


Essential Drawing Supplies for Precision Work
You need a pencil, an eraser, and paper. A standard HB pencil works for light guide lines. A ruler helps with straight lines. A black pen or fine-tip marker is optional for inking final lines. Colored pencils or markers can add color later. None of these supplies need to be expensive. Before diving into how to draw an hourglass, make sure you have these basics at hand.
Establishing Your Drawing Foundation for Symmetrical Objects
Drawing symmetrical objects like an hourglass requires a simple foundation. Start with a light vertical center‑line on your page. This line is your guide for perfect symmetry. All other shapes will mirror themselves on either side of this line. Keep your initial marks faint so they are easy to adjust or erase later. This foundational step makes the entire process of how to draw an hourglass smoother and more accurate, capturing the essence of telling time.
1. Draw the Vertical Center Guide Line for Symmetry
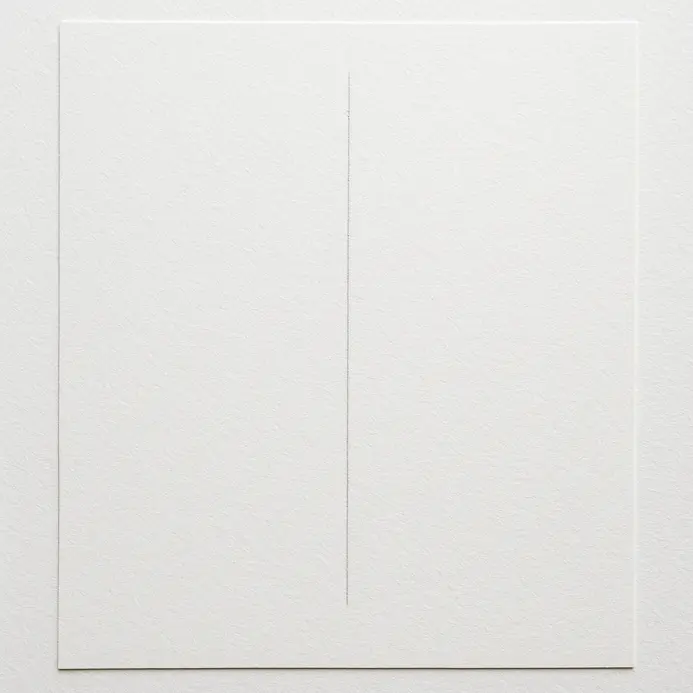
Let’s establish our anchor for perfect symmetry. This single line down the middle will be the backbone of our hourglass, ensuring both halves are balanced and aligned. It’s the most important guide in how to draw an hourglass, so let’s get it right. First, measure the width of your drawing area. Find the exact midpoint and make a tiny, light mark at the top and bottom of your space. Grab your ruler and align it with these two points. Using a hard 2H pencil, draw a straight line from the top mark to the bottom mark with very light, consistent pressure. The goal is a faint reference you can easily erase later. Pro tip: If your arm can’t comfortably reach the full length, draw the top half, then slide your ruler down to connect the line in two smooth segments. This prevents a wobbly hand from ruining your perfect symmetry. simple drawings to practice.
2. Top and Bottom Ovals That Establish Your Frame
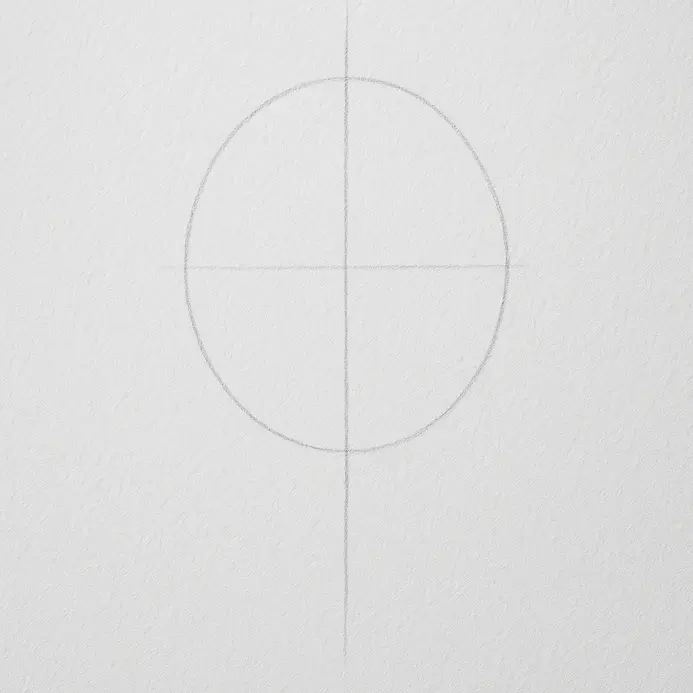
Now we lock in the proportions for our hourglass, allowing us to learn to draw it accurately. how to draw an hourglass shape with its most basic structure. Grab your light pencil and draw two loose ovals. Place the top oval where you want the upper bulb to begin and the bottom oval where the lower bulb will end. Make sure they sit directly above and below each other on your page, aligned to that center line we established earlier. Sketch these ovals with a feather‑light touch, using smooth, sweeping motions from your wrist. They’re just ghostly guides, not final outlines. The width of each oval sets the maximum width for the corresponding bulb of the hourglass. The vertical space between them determines the overall height of your drawing, so adjust this gap until the proportion feels right. Here’s a pro tip: beginners often press too hard, making these guide lines impossible to erase cleanly. If your ovals look identical, try drawing the bottom one slightly flatter to create a subtle sense of perspective. these simple drawings to practice.
3. Connect the Glass Bulbs Through a Narrow Central Neck
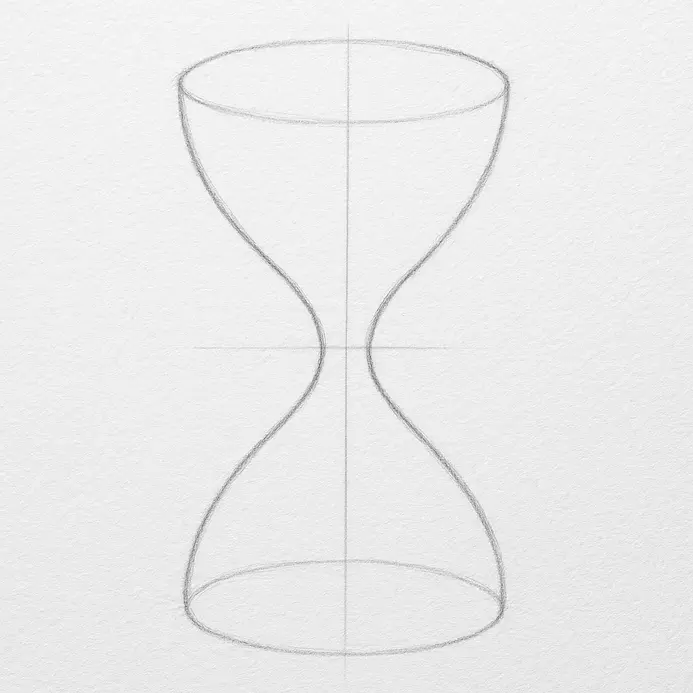
Now we’ll link the two bulbs you’ve drawn with the iconic, pinched waist that gives the hourglass its shape. This step defines the entire structure, so getting the curves and symmetry right is key to how to draw an hourglass realistically. Find the vertical midpoint between your upper and lower bulb. From the inner edge of the top bulb, draw a smooth, inward‑curving line down toward the center. Mirror this action from the bottom bulb, drawing another concave curve that meets the first line to form a narrow neck. Use a light construction pressure with your HB pencil and let your wrist guide the motion for control, making the process feel like a game. Pro Tip: To avoid a lopsided look, try the double‑S method. Visualize each side of the neck as a mirrored ‘S’ curve, which helps you create balanced, organic lines instead of stiff angles, enhancing your drawing style. Explore things to continue learning.
4. Wooden Frames That Secure the Glass Structure Perfectly
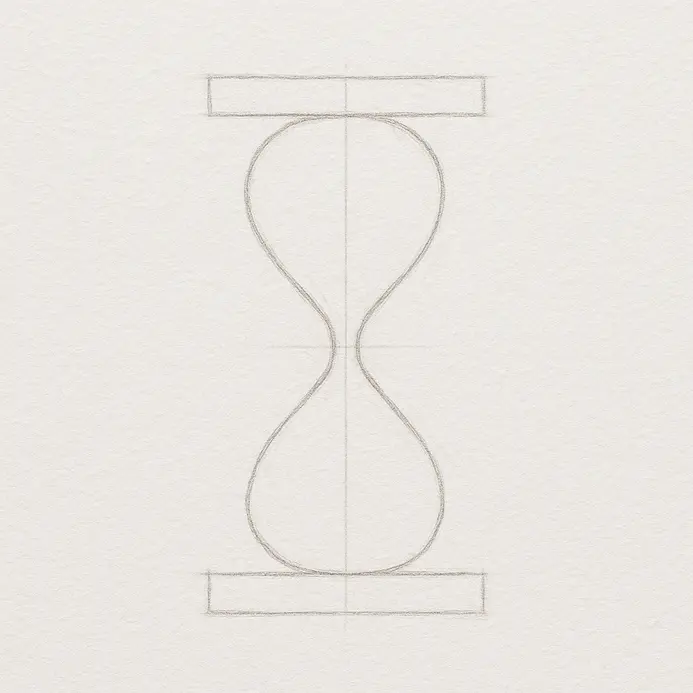
Now, let’s give our hourglass the sturdy wooden frames that hold it together. This is an essential part of how to draw an hourglass that looks solid and believable. We’ll build the rectangular frames at the top and bottom of the hourglass you’ve already drawn. Use your HB pencil with a light touch to sketch two thin rectangles. Place one around the top bulb’s neck and the other around the base. Keep these lines perfectly parallel to your drawing’s central vertical axis to ensure symmetry. Next, draw a second set of lines just inside the first ones to show the wood’s thickness. Connect these inner and outer lines at the corners with short diagonal lines to complete the frame’s 3D form. To make the wood look real, add texture with long, flowing hatching lines along the length of each frame piece. For the corners, use denser, darker marks to show where the pieces join. Apply light cross‑hatching where the frame meets the glass to create a subtle shadow, which makes the frame look heavy and secure. If you want to practice more foundational shapes, check out our guide on how to draw a 3D cube for similar geometric principles. Here’s a pro tip to avoid a common pitfall: always draw both the inner and outer edges of your frame. A single line makes the wood look like a flimsy sticker instead of a solid, structural block that’s actually holding the glass.
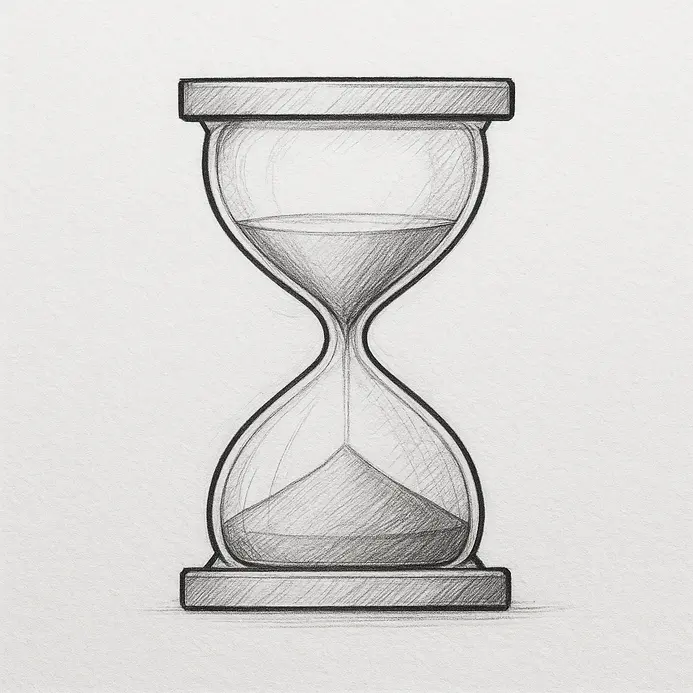
5. Add Sand Levels Within the Top and Bottom Bulbs
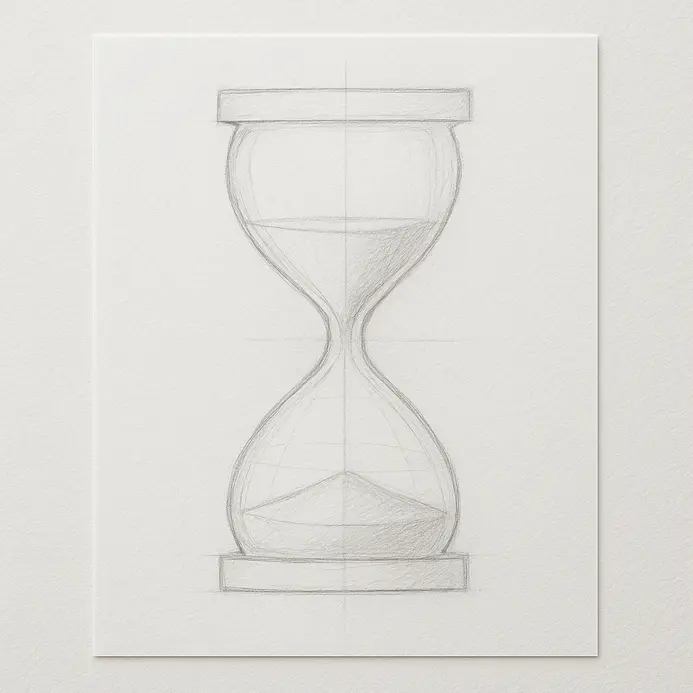
Now we bring our hourglass to life by adding the sand. This step is where your drawing transforms from a simple glass shape into a working timer, and it’s a vital phase in how to draw an hourglass that feels realistic and fun to create. We need to show the sand resting inside each bulb. Inside the top bulb, draw a horizontal line for the sand’s surface. Curve it up slightly at the edges where it touches the glass wall. Inside the bottom bulb, draw a similar line, but make it curve downward in the center to form a small mound. Remember, the top sand level should be lower than the bottom one to show the sand is falling. Use very light pencil pressure for these lines. Fill the area below each line with light, diagonal hatching. Press a bit harder near the bottom of each sand mass to create a sense of weight. Then, use a loose flicking motion with your pencil to add tiny, irregular dots within the shaded areas. Concentrate more dots near the base of the sand and fewer near the surface, creating a fun gradient effect. For a great exercise in building form with texture, check out our guide on realistic animal pencil drawings. The pro tip here is to avoid a perfectly flat sand surface. That soft curve at the edges makes all the difference for a natural, settled look.
6. Erasure Phase: Clearing Guidelines to Reveal the Final Shape
Now we transition from our construction sketch to the clean final shape. This erasure step is essential in how to draw an hourglass with crisp, confident lines. It lifts away the scaffolding to reveal the smooth silhouette you built. Pick up your kneaded eraser. Gently roll or blot it over the internal ovals and grid lines, lifting the graphite without scrubbing. Keep a light touch to avoid damaging the paper. Leave the outermost contour lines in place. Once the guidelines are faint, take a sharp HB pencil and carefully trace over those final contours, defining the elegant curves of the top, waist, and base. Here is a great pro tip. Keep your non drawing hand flat on the paper for stability, but place it well away from your graphite work to prevent smudging your clean lines. If you want to practice more clean line work, check out these simple drawings to practice.
7. Ink the Structural Outlines for Crisp Permanent Glass Edges
Now we move from our light construction sketch to the permanent, clean lines that define our hourglass shape. This inking phase is key to how to draw an hourglass that pops with sharp, glass‑like edges. Grab your fine‑liner pen with a 0.1mm to 0.3mm nib, step by step. Following your graphite guide, draw a single, continuous line to trace the outer curve of the top glass bulb. Use your whole arm for this long sweep, not just your wrist. Pull the pen toward you for the smoothest curve, and rotate your paper as needed to keep your hand comfortable. Repeat this process for the bottom bulb, ensuring both sides are symmetrical before you ink them. Vary your line weight to suggest the glass’s form. Apply slightly more pressure to create a thicker line along the very bottom edge of the base and the top rim. Use a lighter, finer touch for the narrow waist in the center. Remember, a single, confident stroke is always better than going over the line multiple times, which can make it look messy. If you want to practice your line control on other subjects, our guide on easy things to draw for beginners has great exercises that help you learn to draw effectively.
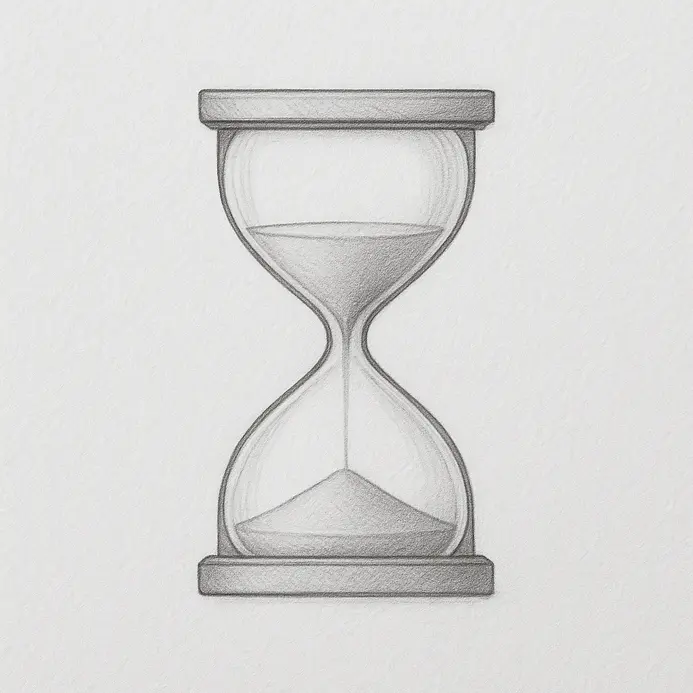
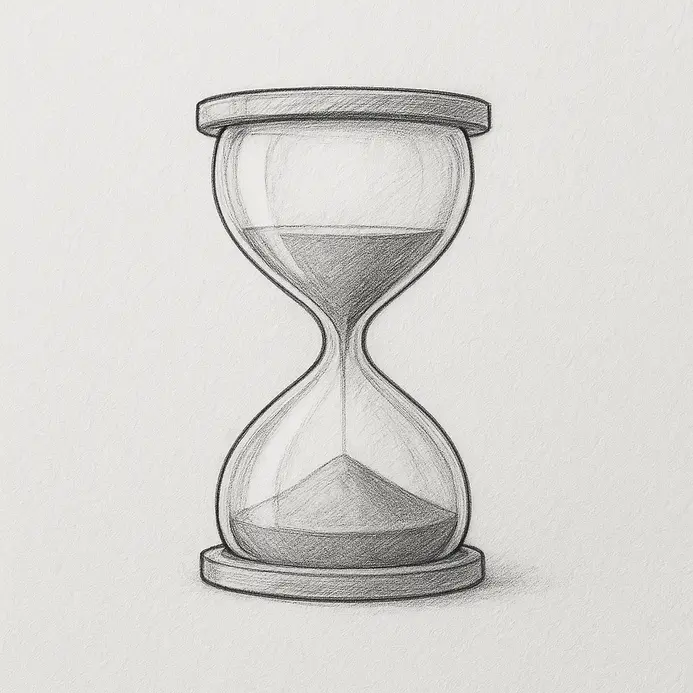
8. Soft Shading: Creating Sand Volume Through Gentle Gradient Tones

Now let’s give the sand in your hourglass its soft, realistic volume. Mastering shading is central to how to draw an hourglass that looks three‑dimensional. We’ll use gentle shading to make the sand feel heavy and granular as it piles in the glass. Hold your HB pencil lightly and apply a faint, even mid‑tone over the entire sand area you sketched. Then, switch to a softer 2B pencil. Focus your darker strokes at the very bottom of the sand pile and along the inner curve where it touches the glass. Use loose, circular motions and let your arm move from the shoulder for smooth, sweeping curves that follow the shape. Build the darkness slowly with multiple light layers instead of pressing hard, a technique every artist should master. To create the top highlight, carefully erase or leave the paper bare along the crest of the sand’s curve. The magic is in the transition. Use your blending stump with a gentle, circular touch to softly merge the dark shadows into the mid‑tone, and finally into that bright highlight. Avoid over‑blending, or you’ll lose the sandy texture and make it look like plastic. Explore things to continue learning.
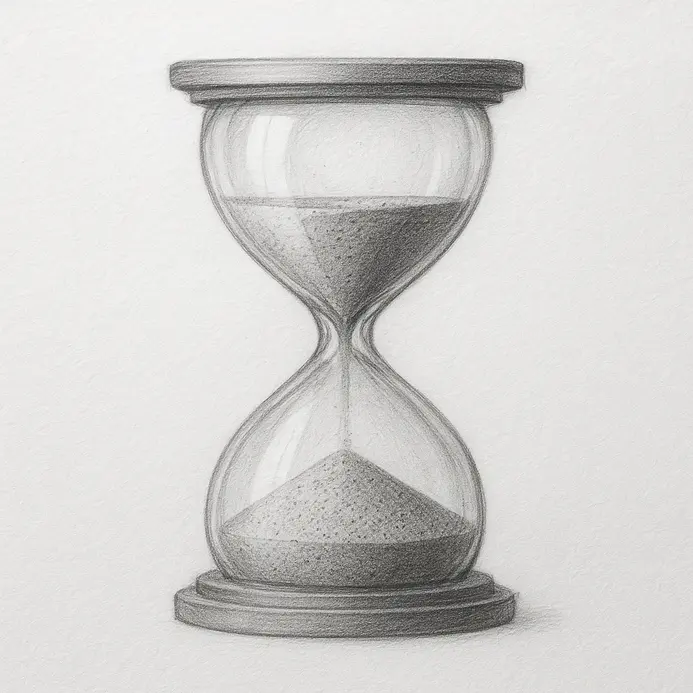
9. Add Bright Highlights Along the Curving Glass Exterior Walls
This is where your hourglass really starts to shine. Adding highlights is the finishing touch in how to draw an hourglass that glistens. Think of this as the final polish that brings your form to life. Find the side of each bulb where your light source would hit most directly. Use a kneaded eraser to lift graphite and create a soft, vertical crescent shape that follows the curve of the glass. Drag the eraser along the contour, using a fluid wrist motion to mimic the arc of the form. Avoid sharp edges by gently blending the highlight’s perimeter into your mid‑tones. For an extra brilliant sparkle, you can add a tiny bit of white gel pen at the very center of your lifted highlight. Remember, the highlight should wrap around the volume of the glass, not sit on it like a flat sticker. This technique adds crucial depth to your drawing. soda can drawing techniques. Here’s a pro tip: never leave a highlight as pure white paper. Add a whisper of light gray tone around its edges to suggest the glass has thickness. Build the intensity slowly with light layers instead of one heavy application.
10. Finished Texture That Brings Life to the Flowing Sand
In this step, we’ll focus on adding the final texture to the flowing sand you’ve sketched, transforming it from a smooth shape into a dynamic, granular stream. Texturing the sand flow is the final detail that brings how to draw an hourglass convincingly to a finish. Start by using a light pencil for stippling – make small, dense clusters of dots along the edges of the sand flow where it’s thinnest. For the main body, switch to broken hatching with short, quick strokes that follow the curve of the flow. Keep your wrist loose and use a feathered touch, pressing lightly at the start of each stroke and lifting quickly to create wispy ends. Gradually increase the density of your marks in the center to show mass, and leave thin white spaces between clusters for highlights, following a step-by-step approach. Remember to vary the size of your dots and strokes to avoid uniformity. To avoid the ‘solid ribbon’ look, ensure the edges of your sand flow are jagged and irregular, not smooth. If you over‑darken, use a kneaded eraser to lift out some graphite and restore the shimmer. Practicing textures like this can enhance your skills for other projects, like drawing cartoon characters with big eyes.
Best Practices for Polishing and Finalizing Your Drawing
To finish, erase all your light construction lines carefully. Go over the final outline of the glass and frame with firmer pencil pressure or ink. Apply shading to show the glass’s roundness and the sand’s weight. Remember to leave white areas for highlights to suggest shine. Following these best practices ensures success when you learn how to draw an hourglass. Practice this drawing again to see your confidence and skill grow with each attempt.
Conclusion
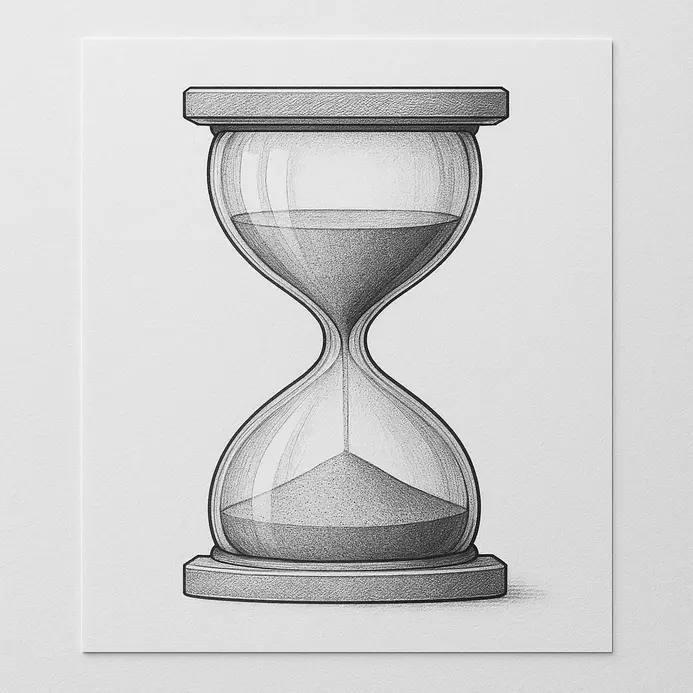
Completing this timer sketch is a satisfying accomplishment worth celebrating. You successfully navigated the sequence of drawing an accurate guide line, framing the top and bottom structures, defining the glass bulbs, and applying final details. Understanding how to draw an hourglass‘s proportions correctly sets a strong foundation for sketching other symmetrical objects like vases or bottles, making it a great exercise for any artist. Learning how to draw an hourglass gives you a repeatable method of moving from light scaffolding to dark permanent lines—a technique you will apply to future subjects. To improve your skills further, try repeating these steps from memory or varying the dimensions of the middle neck. Your next artistic challenge should involve drawing an antique clock to complement this aesthetic theme. Frame your finished artwork or post it in your home studio to show off your growing artistic abilities.
FAQs
Q: What is the easiest way to start an hourglass drawing for a kid?
A: The easiest way is to follow an easy-to-follow, step-by-step tutorial that begins with a horizontal oval for the top and bottom chambers, then connect them with two curved lines to form the silhouette; this simple design keeps the shapes familiar and makes the hourglass drawing a fun drawing activity for a kid.
Q: How can I draw the sand so it looks like it’s flowing between the hourglasses?
A: Draw a small horizontal oval where the sand accumulates in the bottom chamber and sketch overlapping curved line strokes inside the narrow middle; add a few grains drawn as tiny dots or short strokes to show the amount of time moving from the upside chamber to the lower chamber.
Q: Are there any easy-to-follow tips to make the top and bottom look balanced?
A: Yes—start with two equal-sized horizontal ovals, place them opposite each other, and then join them with two curved lines that meet at the narrow waist; ensuring the ovals overlap slightly with the connecting lines creates a popular, balanced hourglass design.
Q: Can I use this hourglass drawing as a fun way to tell time or for games?
A: Absolutely—while a drawn hourglass is symbolic, you can label it with an amount of time like one minute and use it as a visual timer for board games or classroom activities, turning the hourglass drawing into a practical and fun way to tell time during play.
Q: Where can I find a step-by-step tutorial or video to improve my hourglass drawing?
A: Look for a drawing tutorial or video that offers a step-by-step tutorial; many artists provide clear, easy-to-follow videos that show how to create the base horizontal ovals, add the two curved lines for the sides, and illustrate sand flow and shading.


