


Essential Materials for Capturing Sunset Light
Understanding how to draw a sunset starts with assembling the proper tools. You require a graphite pencil for light guide lines, a reliable eraser, and smooth white paper. A metal ruler assists with drawing a perfectly straight horizon. Later stages call for a black pen to ink outlines and colored pencils for the sky. This simple set provides everything required to begin your composition.
Foundation Concepts for Sunset Color Theory
Sunset colors transition smoothly from light to dark across the page. Treat the sky as a continuous gradient when planning your composition. Start with the lightest yellows near the sun, then blend outward toward oranges and deeper reds. Artists learning how to draw a sunset keep foreground shapes simple and dark to establish a clear silhouette against the bright sky. This contrast ensures the background elements remain the focal point.
1. The Horizon Line: Your Foundation for the Scene

This initial stage creates the single straight line that holds your entire composition together, guiding your sunset drawing. Place your paper horizontally and select a hard-lead pencil like an H or 2H. Hold the pencil further back from the tip to maintain light pressure. Draw one thin guideline straight across the paper when practicing how to draw a sunset accurately. Use the straight edge of a ruler to guide your pencil precisely. Place this line approximately one-third of the way up from the bottom to reserve ample space for the sky. Verify that the line sits perfectly level by comparing it to the top and bottom edges of your paper, since a tilted horizon distorts the entire landscape.
2. Sketch the Semi-Circle Outline for Your Setting Sun

This stage establishes the basic sun shape that supports the rest of your composition. Maintain a light touch with your graphite tool throughout this phase. Draw a straight horizontal guideline across the page to represent the horizon. Visualize the sun resting directly on this line when figuring out how to draw a sunset effectively. Place your pencil at the intended center point and move your entire arm from the elbow to sweep a smooth, wide arc. This curve forms the visible top half of the sun. Lightly sketch a few guiding dots to mark the peak of your arc first if drawing a continuous curve feels difficult, then connect them with a gentle stroke.
3. Soft Cloud Shapes That Add Depth to Your Sky

This phase introduces soft cloud formations that give your sky realistic depth. Apply minimal pressure with your HB pencil to sketch large, rounded shapes near the lower sky region, possibly including a palm. Build these forms using small, circular strokes rather than harsh outlines, step by step. Artists mastering how to draw a sunset add smaller, fainter shapes higher up to simulate atmospheric perspective, often using shades of pink and blue. Leave generous open spaces between each cloud formation to preserve the sky structure. For additional practice with atmospheric elements, review this guide on how to draw clouds. Vary the size and spacing of each shape to prevent a flat, repetitive appearance across the upper composition.
4. Draw the Jagged Mountain Range Above the Horizon

This stage constructs the jagged mountain range that anchors the middle ground of your scene. Press your graphite tool firmly against the paper at a chosen point along the horizon line. Draw a short, sharp upward stroke to form the first peak. Understanding how to draw a sunset requires varying each mountain height and width to mimic natural geology. Lift your tool and press down again slightly to the right to begin the next formation. Connect the peaks with slanted lines that descend back to the horizon. Rely on a light-grade pencil during this phase so corrections remain simple. For additional practice with similar terrestrial shapes, explore this guide on easy landscape drawing ideas for beginners.
5. Want Extra Detail? Sketch Foreground Tree Branch Silhouettes

Adding dark tree silhouettes in front of your background elements creates immediate visual depth. Select a palm tree to include in your sunset drawing. soft 6B pencil and begin near the bottom edge of your paper. Press firmly to draw one thick, textured line that curves upward, establishing the main trunk. Learning how to draw a sunset effectively involves extending several long, sweeping lines outward from that central trunk to form branches. Allow your arm to move loosely from the elbow to generate natural, organic curves. Begin each branch with firm pressure and gradually lift the pencil at the tip to create thin, sharp endpoints. Maintain irregular spacing between the branches so the tree reads as a delicate silhouette rather than a solid black mass.
6. Clean Lines: The Crucial Step Before Final Inking

This phase refines your rough sketch into a clean outline ready for permanent ink. Take your light pencil and draw one smooth, continuous stroke where the land meets the sky. Trace over your preliminary ocean guideline with a steady, confident motion. Outline the outer edge of each cloud formation using soft, deliberate curves when practicing how to draw a sunset methodically. Ensure each mark remains a single, fluid stroke rather than a series of choppy segments. Maintain minimal hand pressure so the guidelines stay faint and erasable. Move your entire arm instead of isolating your wrist to eliminate shaky lines. For additional exercises focused on steady hand control, review this guide on simple drawings to practice.
7. Trace Final Silhouettes Using Your Black Fineliner Pen

This stage permanently defines the dark shapes along the lower portion of your composition. Position your preliminary sketch beneath a clean sheet of paper and secure both layers with masking tape to prevent shifting. Grip your black fineliner and carefully trace the outlines of your hills, tree formations, and any animals in the foreground. Artists focused on how to draw a sunset apply long, steady strokes for straight edges and short, controlled marks for curved sections. Rotate the paper frequently so your hand maintains a comfortable drawing angle. Fill the solid black silhouette areas using parallel lines spaced closely together. Complete the inking process in small sections to allow the pigment to dry completely between passes. Reference this guide on simple drawings to practice for additional line-control exercises.
8. The Permanent Horizon That Separates Sky and Water

This phase establishes the definitive boundary line between your sky and water sections, creating a beautiful beach scene. Grip your graphite tool near the eraser end to naturally reduce downward pressure. Locate a position approximately one-third up from the bottom edge of your page. Apply a metal ruler to draw a long, straight guideline across the paper when refining how to draw a sunset professionally. Apply minimal pressure so the mark remains soft and readily erasable during later stages. Verify that the line sits completely flat without tilting upward or downward at the edges. Practice the drawing motion in the air above the paper several times before making contact, as this rehearsal produces a smoother final mark.
9. Fill the Distant Mountains and Branches with Dark Shading
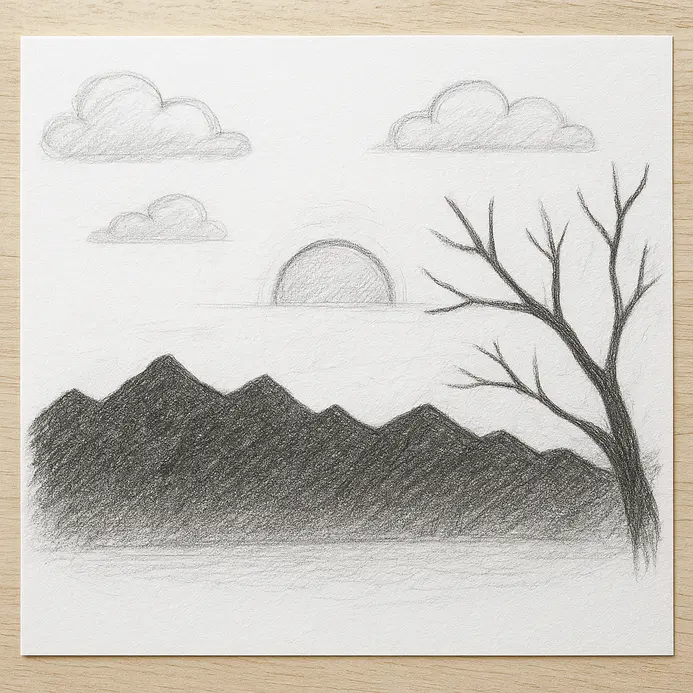
This stage develops the dark tonal values that make your sky and sun appear brilliantly luminous. Select a soft 4B pencil and apply gentle pressure to fill the mountain forms you previously outlined. Begin shading at the base of each peak and stroke upward, gradually lifting the tool to create a soft, diffused top edge. Mastering how to draw a sunset requires keeping background shading light to preserve atmospheric distance. Switch to a sharply pointed graphite tool to render thin, textured lines for the foreground tree branches. Increase pressure slightly where two limbs intersect to simulate natural thickness. Consult this resource on easy landscape drawing ideas for beginners for further natural shading techniques.
10. Water Ripples: The Texture That Brings Oceans to Life

This phase introduces gentle surface textures that give your water section realistic movement. Grip your graphite pencil and sketch a long, slightly undulating line from left to right near the bottom edge. Draw a second wavy line directly above the first, ensuring the two marks do not run perfectly parallel. Artists studying how to draw a sunset keep these strokes broken and choppy to mimic natural water behavior. Continue adding horizontal lines as you move upward, gradually narrowing the gaps between them as they approach the horizon. Apply heavier pressure to the ripples near the bottom edge to establish darker, more prominent reflections. Review this tutorial on easy landscape drawing ideas for beginners for additional water-texture exercises.
11. Sketch the Warm Colors Radiating from the Setting Sun

This stage introduces the soft, glowing tones that spread outward from the central light source. Locate the middle of your page and render a small, diffused circle to represent the sun. Use the flat side of your pencil lead to apply firm pressure near the center, then pull outward in long, curving strokes. Learning how to draw a sunset involves gradually lifting the tool as you stroke outward so the pigment fades naturally. Fill the surrounding sky area with these light, feathery marks to establish a radiant glow. Maintain a relaxed grip and engage your entire arm to produce wide, sweeping motions. Build the color intensity through multiple light layers rather than applying heavy pressure in a single pass.
12. Deep Sky Gradients That Complete the Colorful Evening Composition

This final coloring phase builds the sky from the bottom upward, establishing a smooth tonal blend that defines the evening mood. Select your lightest yellow pencil and apply gentle pressure to lay down a wide band of color across the lower third of the page. Execute long, horizontal strokes to maintain an even pigment distribution, especially when working on your sunset with markers. Transition to a soft orange pencil and draw a second band directly above the yellow, allowing the stroke ends to overlap seamlessly. Continue using broad, sweeping arm motions to maintain consistency across the gradient. Introduce a light purple pencil at the top edge of the paper, then drag those strokes downward into the orange section to create a soft color fusion. Artists perfecting how to draw a sunset lift the pencil near the end of each stroke to create feathered edges that blend effortlessly. Consult this guide on simple colored pencil drawing ideas for additional blending techniques.
Refining Your Sunset Through Post-Drawing Adjustments
Step back from your workspace to evaluate the completed composition with fresh eyes. Verify that the sky gradient transitions smoothly and the horizon line remains perfectly straight. Darken specific silhouette areas to increase contrast, or softly blend any harsh color edges that disrupt the gradient. Applying these minor final adjustments significantly elevates the overall quality when mastering how to draw a sunset. A quick review ensures all elements work together harmoniously before you consider the piece complete.
Conclusion
Completing a vivid evening landscape represents a significant artistic achievement that deserves recognition. You have successfully learned how to draw a sunset using a logical, layered construction method. Beginning with simple geometric guidelines, establishing strong silhouettes, refining structural details, and applying deliberate color strokes allows your artwork to develop systematically. Practice the sequence from memory to reinforce your technical understanding and build muscle memory. Experiment with different compositional variations, such as adjusting the sun diameter or substituting pine trees for bare branches. Continue expanding your artistic practice by attempting a matching sunrise composition or a star-filled night sky. Your improved grasp of horizon placement and atmospheric depth will benefit all future landscape projects. Display your finished piece proudly or share it with fellow creators seeking reliable how to draw a sunset techniques.
FAQs
Q: How do I draw a sunset step to step as a beginner?
A: Start by sketching a horizon line and basic shapes for the sun and any large elements like a plant or simple waves. Use drawing guides to block in proportions. Then add layers of color from light to dark—warm yellows and oranges near the sun, blending into reds and a dark violet at the top. Finish with a finished sunset pass: refine edges, add shadows and highlights, and include small details like silhouettes or ripple lines on waves.
Q: What are drawing guides I can use to make my sunset look realistic?
A: Use horizontal rule lines to keep the horizon level and concentric guides around the sun to maintain even gradation. A photo reference is an excellent guide for color placement and cloud shapes. For composition, apply the rule of thirds so the sun or focal plant aligns with intersecting lines. Also use tonal value sketches to map where shadows and reflections will fall before adding color.
Q: Which colors work best to create a rich sunset, and when should I use dark violet or brown?
A: Start with warm hues—yellows, oranges, and reds—and transition into purples and dark violet toward the top of the sky. Use brown subtly in the foreground for dunes, rocks, or tree trunks to avoid muddying the sky. Dark violet is best for the upper atmosphere or deepening cloud shadows to give the sky depth while keeping the horizon warm.
Q: How do I paint reflections and wave highlights in a sunset over water?
A: Block in the main color band of the sky on the water using horizontal strokes, then add brighter streaks directly under the sun to simulate reflection. Use thin, quick strokes for small waves and add highlights with a lighter warm color to catch the crest. Add some shadow under larger wave forms with muted dark violet or brown to anchor them visually.
Q: Can I use alcohol-based markers or solvents for a sunset illustration, and how does alcohol affect blending?
A: Alcohol-based markers can produce smooth gradients for sunset skies. Use them lightest-to-darkest and work quickly while the ink is wet to blend. You can layer and use a colorless blender to soften transitions. Be careful on thin paper—alcohol can saturate sheets and cause warping or bleed-through; heavier paper or mixed-media paper is recommended.


