


What You Will Need
You only require a pencil with a light touch, an eraser, drawing paper, and a ruler for straight guides. A fine-tip marker helps ink final edges, while colored pencils add optional shading. This guide explains how to draw a 3d cube without expensive tools or complicated setups. Keep your workspace organized and ready for quick sketching.
How to Use This Step-by-Step Tutorial
Follow the sequence carefully, because each stage builds the next part of the structure. Light guide shapes appear early and erase easily later. Understanding this method shows you exactly how to draw a 3d cube without feeling overwhelmed. Take your time and relax your grip on the pencil.
1. Sketch The Front Square To Start

This front square forms the entire foundation of your sketch. The flat face sits parallel to the viewer and creates a distortion-free starting shape, crucial for understanding vertical lines in drawing 3d. Placing your pencil lightly makes adjustments simple, allowing you to refine your cube drawing technique. Mastering this base is the first rule for how to draw cubes with confidence in your cube drawing skills. Check your side lengths for balance before proceeding forward.
2. Add Equal Depth Lines From Each Corner

Creating consistent angles transforms a flat shape into a three-dimensional form. This stage builds the back face by establishing uniform perspective lines. Sketch diagonals from all four corners at identical angles and equal lengths. This skeleton approach teaches you how to draw a 3d cube with reliable spatial depth. Maintain light pressure to correct angles easily during practice.
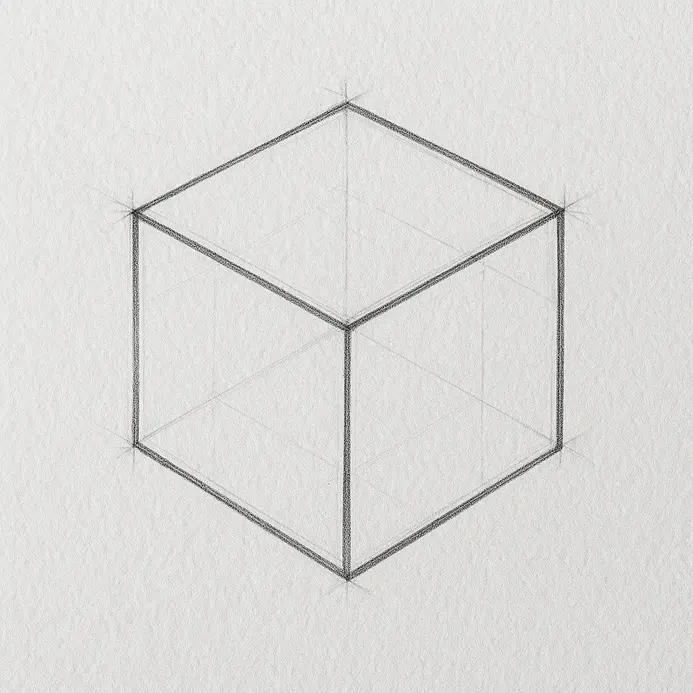
3. Connect The Back Corner To Form Space

Linking these corners shifts your flat sketch into complete volume. You will connect the back points to the existing front structure to define depth entirely, enhancing your understanding of point perspective. This geometric connection is the exact method professionals use to learn how to draw a 3d cube correctly. Keeping every line parallel prevents warped results. Practice reinforces steady hand control for future projects, especially when freehand drawing.
4. Extend The Top Face With Parallel Edges

Extending the upper section gives the structure dynamic length and solid presence. Draw two new straight lines starting at the front and back top corners. Extend them outward following your original side angles precisely. This extension step proves how to draw a 3d cube that occupies realistic space on the page. Verify distances between lines multiple times before darkening strokes to maintain accuracy in your cube drawing.
5. Close The Far Side With Matching Lines

Finishing the rear face locks the entire form into a cohesive object, solidifying your skills in drawing 3d. Connect the three extended corners using vertical and horizontal strokes. Following these alignment rules guarantees you know how to draw a 3d cube without distorted proportions. Squint at your work to spot uneven gaps instantly and adjust quickly.
6. Erase Hidden Guide Lines Inside The Form

The cleanup stage transforms your rough framework into a polished final sketch. Remove every light construction mark sitting inside the solid faces to ensure a clean finish in your drawing tutorial. Work from the outer boundaries inward to protect your clean outlines. This careful removal shows you how to draw a 3d cube with crisp, professional lines. A kneaded eraser works perfectly for lifting graphite without damaging paper, making it an essential tool for your drawing tutorial. Always move your eraser toward your solid boundaries.
7. Ink The Outer Edges For A Clean Finish
Reinforcing the silhouette gives your artwork sharp definition and visual weight. Trace only the visible boundaries that form the complete outer shape. Use smooth, confident strokes and meet corners precisely. Applying dark contrast to the edges completes the process and ensures you succeed when you learn how to draw a 3d cube. Rotate your paper to maintain optimal pen control during inking for your drawing 3d projects.
8. Shade One Face Darker For Real Depth

Adding tonal contrast brings flat geometry to life through simulated lighting. Choose a consistent light source direction before applying graphite. Mastering this shading layer explains how to draw a 3d cube that reads as a solid object. Blend gently within each face to avoid muddy edges. Building value gradually creates convincing volume without harsh strokes.
Tips to Improve Your Drawing
Recreating the form from memory strengthens spatial recall and builds consistent results. Isolating difficult sections allows for dedicated practice before attempting full versions. Altering the scale reveals how perspective shifts at different sizes. Regularly applying this advice guarantees you master how to draw a 3d cube faster. Reviewing value placement supports strong overall composition. Experimenting with background tones adds professional polish to your final piece. Understanding these principles ensures you know exactly how to draw a 3d cube with advanced techniques. Keep practicing daily for rapid skill improvement. Tracking your progress over weeks reveals steady visual growth.
Conclusion
Nice work finishing your sketch from start to finish. You built a simple front square, added depth lines, connected the back edges, and finished with clean outer boundaries and optional shading. That systematic process prepares you for many complex geometric studies. Practice the sequence repeatedly until the angles feel automatic. Trying different scales or lighting directions expands your technical range. Share your recent artwork and apply this exact framework to your next project. Continuing to practice ensures you permanently remember how to draw a 3d cube with precision.
FAQs
Q: How do I draw a cube in an easy way for beginners?
A: To draw a cube in a simple way, start by drawing a square to be the front face square, then draw a second identical square offset behind it to create a cube in space. Connect corresponding corners with straight lines to form the edges of the cube; drawing straight lines helps keep your cube dimensional and proportional. This step by step method is a fun to draw, easy steps approach to making 3d cube drawing accessible.
Q: What is the role of a vanishing point when you draw a cube using perspective?
A: A vanishing point is where parallel lines appear to vanish on the horizon in perspective drawings. In one-point perspective, all diagonal lines leading away from the front face square converge to one vanishing point. In two-point perspective, two vanishing points control how the left side and right side of the cube recede, so you draw the lines from the top and bottom corners toward each vanishing point to create a realistic cube in two-point perspective.
Q: How do I draw a 3d cube using two-point perspective step by step?
A: Begin by drawing a horizontal horizon line and place two vanishing points on it. Draw a vertical line to be the front edge of the cube (draw a straight vertical line). From the top and bottom of that vertical line, draw lines toward each vanishing point — these are diagonal lines that define the top and bottom lines of the receding faces. Decide the depth and place two lines parallel to the original vertical to form the top and bottom of each side, then connect the back corners to finish the cube. This two point perspective method yields realistic three dimensional cubes.
Q: How can I make my cube look three dimensional with shading, highlights, and light source?
A: First determine the location of the light source. Shade the faces according to how much light they receive: the face closest to the light gets the most highlight, the opposite face is the darkest, and the top or side is mid-tone. Use softer edges for gradual shading and keep a small bright highlight on the edge of the cube where light hits directly. This technique turns a flat 3d cube drawing into a convincing three-dimensional object.
Q: What are common mistakes when drawing cubes and how do I fix them?
A: Common mistakes include non-parallel receding lines that don’t meet at a vanishing point, uneven front face square, and inconsistent line weight. Fix them by lightly sketching guidelines toward the vanishing point, ensuring the side of the front face stays square, and drawing three lines for depth with a ruler to draw straight lines. Use dotted lines for hidden edges if needed, then darken the final step edges for a clean model cube.


