


What You Will Need
For this cherry drawing, start with a pencil that makes light guide lines, an eraser, and white drawing paper or a sketchbook. An optional ruler helps with the first straight guide lines, and an optional black pen or fine-tip marker is useful for inking the finished outline. If you want color at the end, keep colored pencils or markers nearby. None of these supplies need to be expensive. You have everything you need to begin.
How to Use This Step-by-Step Tutorial
Follow the steps in order, since each one builds on the last and makes the cherry easier to recognize. Sketch the guide shapes lightly at first because those lines are meant to be erased after the final outline is clean. Small uneven marks in the beginning are normal and part of the process. With the construction method, the drawing becomes clearer one step at a time, so stay patient and keep moving forward.
1. Sketch The Two Overlapping Cherry Circles
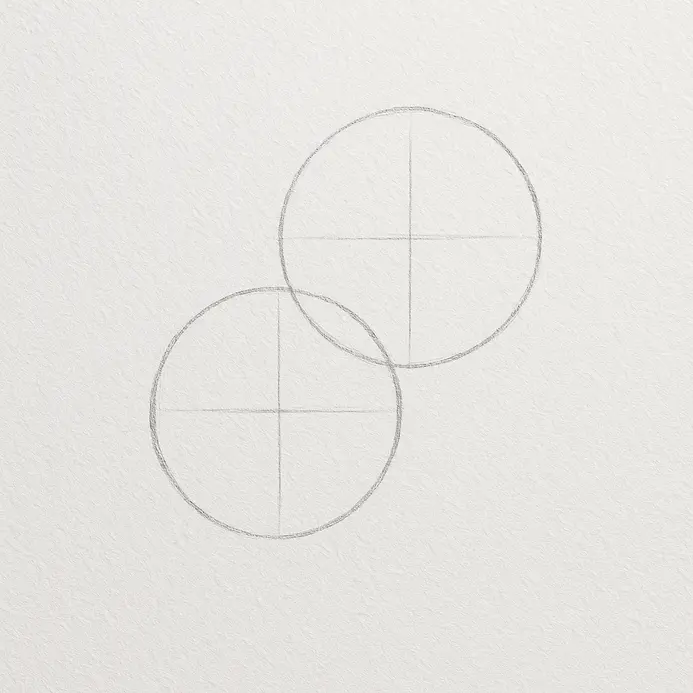
Let’s start by laying down the simple, foundational shapes that will become our two cherries. This first step is all about getting their basic form and relationship on the page so we have a solid structure to build on.
Lightly sketch two circles that are roughly the same size and place them so they overlap by about a quarter to a third of their width. This overlap is key—it makes them look like a natural pair of fruit instead of two separate circles floating in space. Use a very light touch with your pencil here; these are just construction lines we’ll refine later. Draw the full circle for the cherry you want to appear in front first, then sketch the second circle behind it, letting the lines cross for now.
Once you’re happy with the placement, it’s time to clean up. Erase the interior lines where the cherries overlap, so you’re left with one clean, continuous outer silhouette. This immediately makes the shape read as two connected fruits. A great pro tip is to add a tiny, soft curve in the overlap area to suggest where the cherries press together, which adds a nice touch of depth. If you’re looking for more fundamental practice with shapes, check out our guide on easy things to draw for beginners.
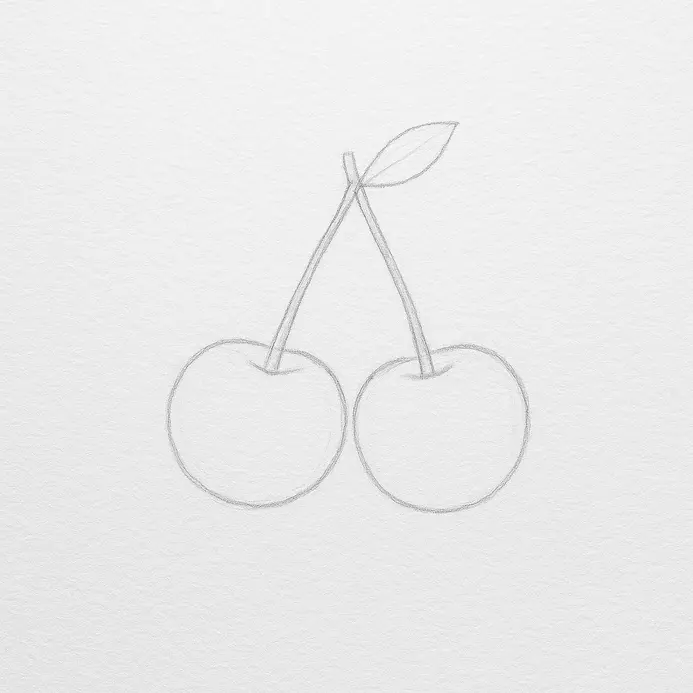
2. Curve The Stems Into A Shallow V
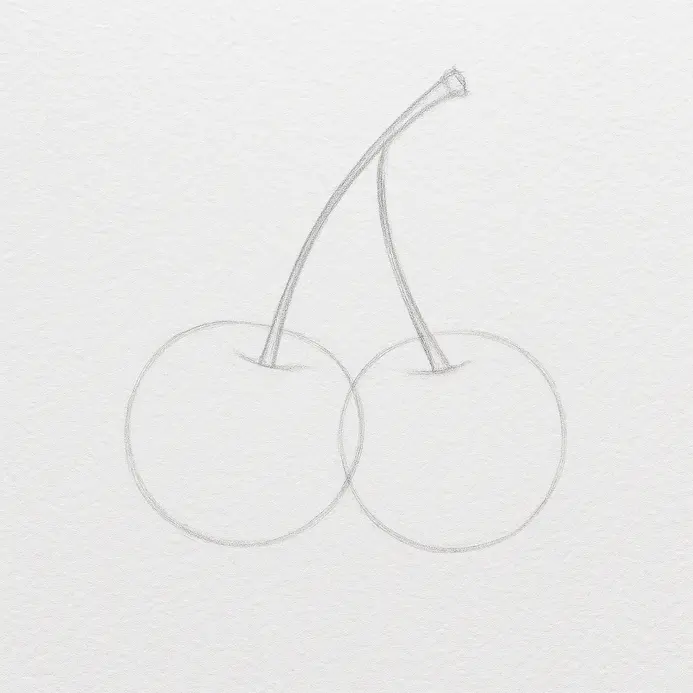
Now we’re going to give our cherry drawing a natural, open look by curving the stems. This step creates a gentle framework that makes the whole piece feel more organic and less stiff. It’s all about drawing width and flow into your composition.
Take the two main stem lines you drew coming from the top of the cherry. Using a light touch, gently curve each one outward. Don’t make a sharp point. Instead, let them diverge into a wide, shallow V shape. Think of it as opening a book slightly. This shape acts as a guide for your eye and gives the fruit a place to hang from naturally.
Work with a light hand here. A common mistake is pressing too hard and making the V too narrow or sharp, which looks forced. Let your pencil glide to keep the lines soft. If you want more practice with gentle, flowing lines, check out our guide on easy landscape drawing ideas for beginners.
Pro tip: Use the natural arc of your wrist to help draw this curve. It’s more about a smooth, confident motion than a rigid, straight line.
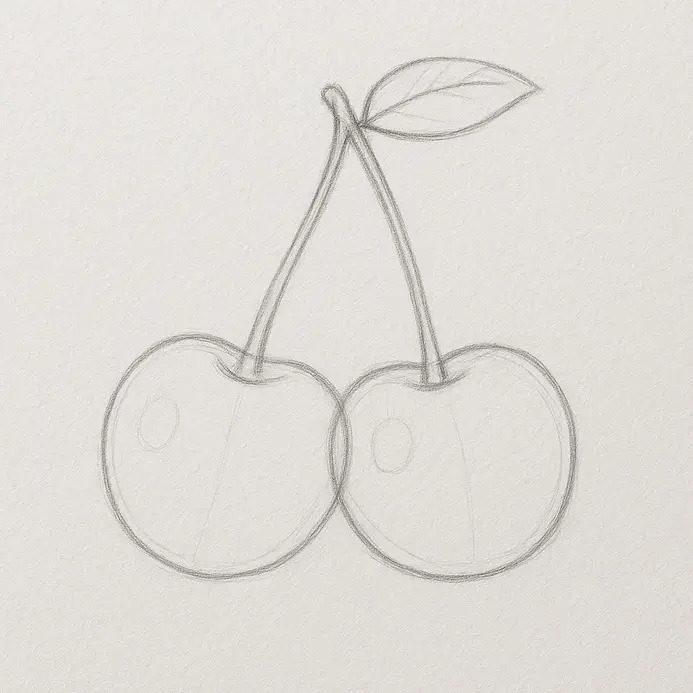
3. Add The Leaf At The Stem Junction
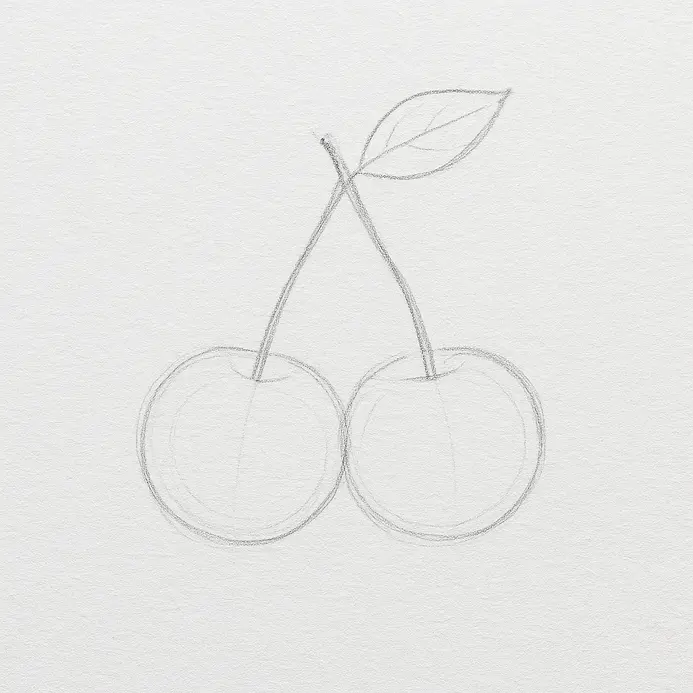
Now we connect our cherry to a bit of nature by adding its leaf. This step moves us from a simple fruit shape to a more complete botanical sketch, showing you How To Draw A Cherry with a realistic touch.
Find the point where the stem meets the top of your cherry. This is the node. From this point, draw a short, thin line for the petiole, angling it upward at about 45 degrees. It should overlap the main stem slightly so the connection looks solid. At the end of this small stem, sketch the leaf blade. Start with a simple curved line for the center midrib, then add the two sides of the leaf, making sure the midrib aligns directly with the petiole you just drew.
Here is a great tip for this step. Avoid drawing the leaf sticking straight out at a perfect right angle. A natural, upward angle makes it look like it is growing, not glued on. You can even add a tiny dark point where the petiole meets the stem to suggest an axillary bud for extra realism. If you are looking for more simple subjects to practice your line work, check out our guide on easy things to draw for beginners.
4. Refine The Cherry Outline And Dimple
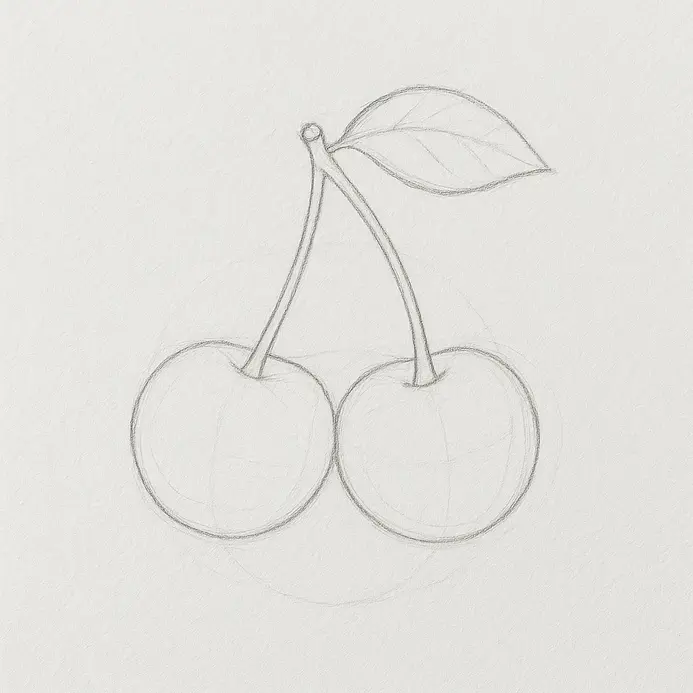
Now we move from a simple sketch to a polished, dimensional cherry. This step is where your drawing gains weight and realism, transforming that basic circle into something that looks like it could roll off the page. We’ll focus on the line quality and that little dimple at the top. These refinements are crucial when learning How To Draw A Cherry to achieve a natural look.
Look at the light circle you drew in the previous step. Your job now is to trace over it, but with intention. Start by making the outline slightly asymmetrical—maybe a little wider at the bottom or gently flattened on one side. This instantly kills that artificial, perfect-circle look. As you draw this new, cleaner outline, vary your pencil pressure. Press harder on the lower curves and lighter as you move toward the top where the highlight will be. This thicker line at the bottom acts like a subtle shadow, making the cherry feel grounded.
Next, let’s place the dimple. Find the topmost curve of your cherry. The dimple isn’t dead center; place it slightly off to one side, leaning toward where your stem will attach. Don’t just draw a dot. Sketch a small, shallow crescent or curved dash to suggest a real indentation. If you’re looking for more practice with clean, confident lines on simple subjects, check out our guide on easy things to draw for beginners.
Here’s a pro tip to remember: a cherry has a smooth, waxy skin. Keep your outline firm and clean, not fuzzy or sketchy. Let the line almost disappear at the very brightest spot to show how light hits the rounded form.
5. Erase The Hidden Overlap Lines
Now we get to the satisfying part where our cherries really start to look clean and separate. We’ve got our two plump circles and our stems in place, but those construction lines where the fruit overlaps can make the drawing look a bit messy. This quick cleanup step is what takes your sketch from a rough draft to a polished piece.
Look at the area where your two cherry circles meet. See the line that shows the back edge of the cherry sitting behind the front one? That’s the hidden overlap line we need to remove. Take your eraser and carefully lift that line away, leaving only the visible outer contour of the front cherry. Do the same for any interior lines you used to place the stems or guide the shapes. The goal is to keep the strong, clean silhouette of each fruit. If you’re working digitally, you can simply lower the opacity of your sketch layer or erase on that layer directly.
Use a kneaded eraser for this if you’re drawing with pencil. It lets you gently lift graphite without scrubbing and damaging your paper. For more foundational practice on building forms lightly, check out our guide on easy things to draw for beginners.
The magic here is in the negative space. By erasing the hidden lines, you create a clear pocket of empty space between the two cherries. This makes them look like three-dimensional objects sitting next to each other, not flat shapes drawn on top of one another. It’s a small action with a huge impact on the realism and readability of your drawing.
6. Draw The Small Highlight Ovals
Now we add the final touch of realism. Those tiny highlight ovals make your cherry look juicy and three dimensional, as if light is glistening off its shiny surface.
Look at the top curve of each cherry you’ve drawn. This is where light hits most directly. With a very sharp pencil or a click eraser, draw two or three small, thin ovals here. Keep them small and subtle. If you’re working digitally, switch to a white brush with a low opacity and gently tap these shapes onto that same top curve. Remember, the shape can be more circular on a very rounded surface. Don’t press too hard or make them too big. Their job is to suggest light, not to become the main focus. For more on foundational techniques, check out our guide on easy things to draw for beginners.
Pro tip: The biggest mistake is placing these highlights randomly. Always check that they sit on the side of the cherry facing your imaginary light source, which should be consistent with the shading you already did.
7. Shade The Lower Side For Gloss
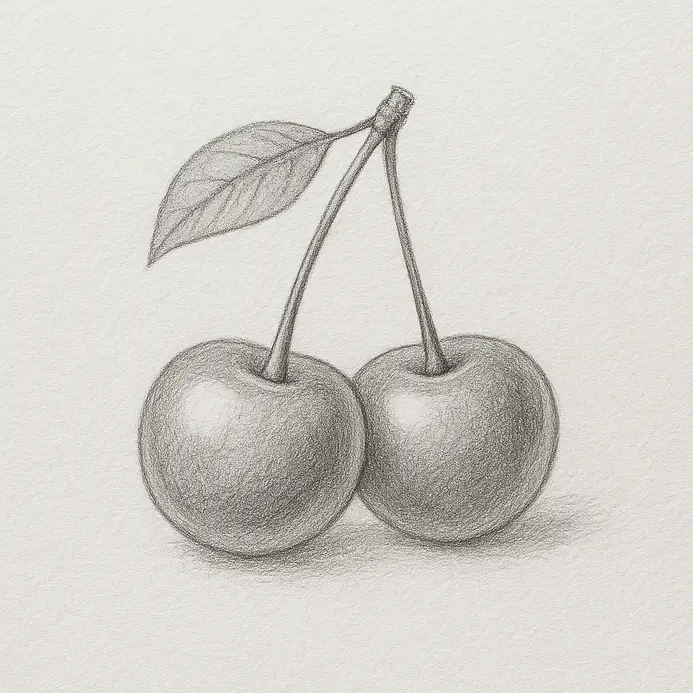
We’re now at the step where our cherry gets its glossy, reflective finish! After sketching the shape and adding the base red with a bright highlight, shading the lower side is what makes it pop off the page. Shading the lower side is a key technique in How To Draw A Cherry for creating that glossy, reflective finish.
Focus on the bottom curve of your cherry drawing. Using your pencil, add a darker shade along this area, starting from the very base and curving up about one-third of the way. Apply gentle pressure to create a smooth gradient that’s darkest at the bottom and lightens as it blends into the mid-tone. Think about the surface beneath the cherry, if it’s wood, mix in a warm brown, or for a cooler look, add a touch of gray-blue. Keep this shading separate from any core shadow, as it’s a reflection band that suggests the environment. Blend the edges with a blending stump or your finger to avoid harsh lines and maintain that rounded, glossy feel. Once you’re comfortable, try this technique on other easy things to draw for beginners to practice on different objects.
Here’s a pro tip: The magic of gloss comes from contrast, so keep that highlight bright and the lower shade soft and subtle. Over-shading tends to make it look dirty instead of shiny!
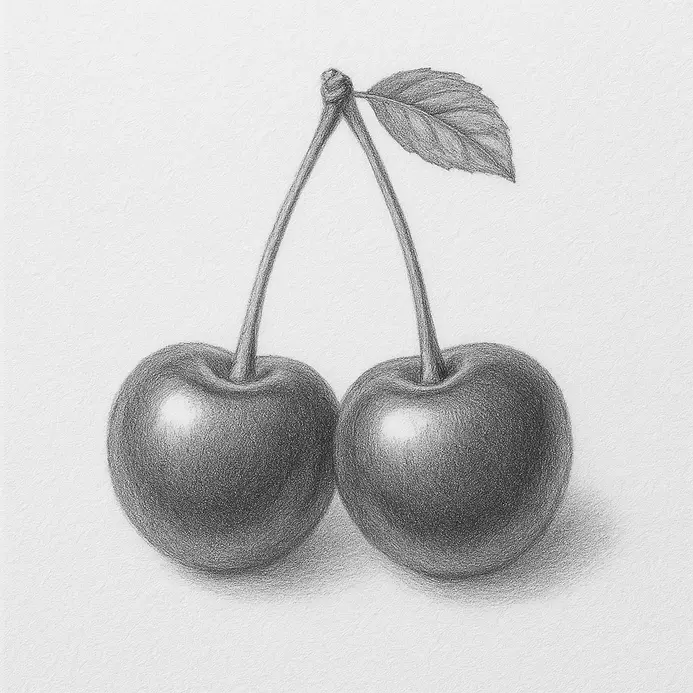
8. Ink The Clean Cherry Outline
Now we take our light sketch and turn it into a polished, final line. This step locks in your cherry’s shape and gives you a crisp guide for any coloring or shading you’ll add later. We’re moving from a loose guide to a confident, finished outline.
Grab your pen and trace directly over the rounded contour of the cherry body you sketched earlier. Use smooth, steady strokes and commit to your line. Follow the curve of the fruit, keeping it plump and organic. Then, ink the small stem line extending from the top. Let your hand move with purpose to avoid wobbly or sketchy lines. If you’re drawing two cherries, connect their stems with a single, clean line.
Pro Tip: Try to ink each major curve in one continuous motion. If you need to practice smooth lines first, check out our guide on easy things to draw for beginners. Starting and stopping often creates bumps, but a fluid stroke keeps your outline looking professional and clean.
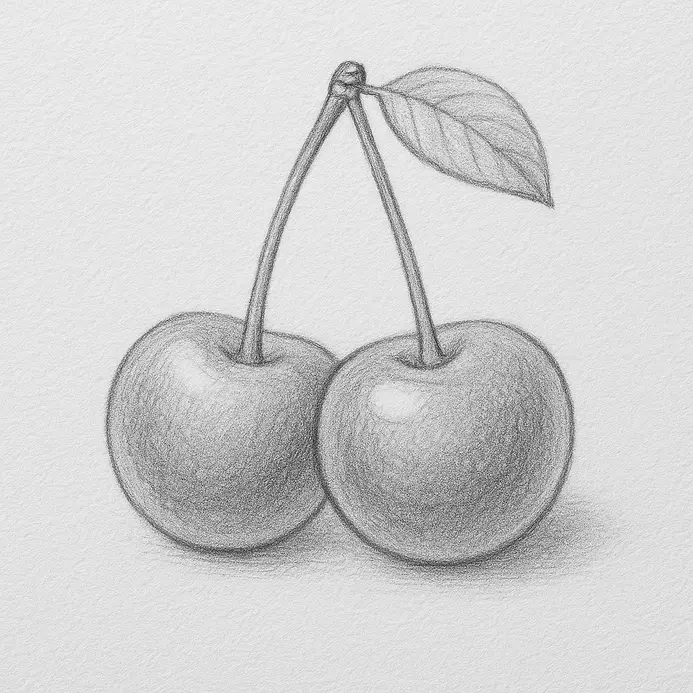
9. Color The Cherries Red And Green
Let’s bring our cherries to life with vibrant color. This final step is where your drawing pops off the page, transforming your sketch into a juicy, realistic piece of fruit. We’ll use red for the cherry bodies and a fresh green for the stems and leaves to create that classic, appetizing look.
Start by filling in the round shapes of your cherries with a solid base of bright red. Keep your strokes smooth and even. Next, to make them look glossy and three-dimensional, leave a tiny white spot or use a lighter red on the top-left side of each cherry to act as a highlight. Then, add some darker red shading, like a crimson or maroon, along the bottom-right side to create a soft shadow. This simple highlight and shadow combo is the secret to making them look plump and shiny.
Now, grab your green pencil or marker for the stems and any leaves. Color the thin stems carefully, staying within your lines. If your drawing includes leaves, fill them in with the same green. For a more natural touch, you can add a slightly darker green along the center vein or leaf edges. A great tip is to keep your greens bright and your reds vivid—this contrast makes the whole image feel fresh and lively. If you enjoy working with colored pencils and want more ideas for simple projects, check out our guide on simple colored pencil drawing ideas.
The most common mistake here is coloring the cherries completely flat. Remember that little white highlight spot. It’s a small detail, but it makes a huge difference, instantly giving your fruit that wet, glossy look. Use your darker tones sparingly so your cherries stay a beautiful, bright red.
Common Mistakes to Avoid in How To Draw A Cherry
When practicing How To Draw A Cherry, beginners often run into a few common pitfalls that can be easily fixed. Understanding these will help your How To Draw A Cherry look more professional right away.
One frequent issue is drawing the stems too straight or rigid instead of using the gentle shallow V curve we covered earlier. Another is placing the leaf at a perfect right angle rather than a natural upward tilt from the stem junction. Over-shading the entire cherry body is also common and can destroy the glossy highlight effect that makes the fruit look juicy.
By being aware of these in your How To Draw A Cherry process, you’ll avoid frustration and see faster improvement. Practice each part separately if needed, and refer back to the steps above for quick fixes. If you want to build stronger foundational skills to prevent these issues, revisit our guide on easy things to draw for beginners.
Tips to Improve Your Drawing
After you finish, try drawing the cherry a second time from memory. That helps you remember the shape and line flow. If one part feels harder, practice that section on its own first, especially the decorative details. Try drawing a larger version and a smaller version to see how proportion changes the look. You can also add a simple background or light shading to give the finished drawing more depth.
Conclusion
You finished your cherry drawing by successfully completing How To Draw A Cherry, and now you have a clean fruit sketch built from simple guide shapes, structure, detail, and final lines. That process is the key skill behind drawing almost anything, so use it again on other fruits or small objects. Try the same lesson from memory next time, change the cherry sizes, or place them in a bowl or on a branch for a new scene. If you want a next step, draw a strawberry, apple, or a small fruit cluster so you can practice the same construction method with a slightly different shape. Share your finished drawing proudly and keep going with the next tutorial.
FAQs
Q: What supplies do I need for this cherry drawing tutorial?
A: Use a pencil, eraser, white paper or a sketchbook, and optional pen or colored pencils for the final step.
Q: How long does it take to draw a cherry?
A: Most beginners finish this tutorial in about 10 to 20 minutes.
Q: How do I keep the cherries from looking too perfect?
A: Make one cherry slightly higher or smaller, and keep the stems curving inward instead of placing everything in a strict symmetry.
Q: How do I draw the highlight on each cherry?
A: Leave a small white oval or crescent near the upper area of each fruit before adding color.
Q: What is the best way to shade the cherries?
A: Shade the lower side opposite the highlight and keep the top area lighter for a glossy look.


