


Essential Geometry Tools for Shape Drawing
You require minimal equipment to construct precise geometric figures. A standard graphite pencil creates reversible guide marks, while a soft eraser removes unwanted construction lines. Heavy white paper or a technical sketchbook supplies an optimal drafting surface. Studying how to draw an octagon demands reliable foundational supplies that support consistent line weight. Optional transparent metal rulers and black fineliners accelerate the layout and final outlining phases.
Understanding Regular vs Irregular Octagons
This instructional guide concentrates exclusively on regular polygonal forms. The eight outer boundaries maintain identical lengths, and every interior angle measures exactly one hundred thirty-five degrees. Irregular variations possess unequal sides and varying angles, which demand advanced measurement techniques. Students searching how to draw an octagon often skip this critical distinction, causing severe proportion errors during drafting. Master the standardized version first to build a reliable framework for spatial calculations.
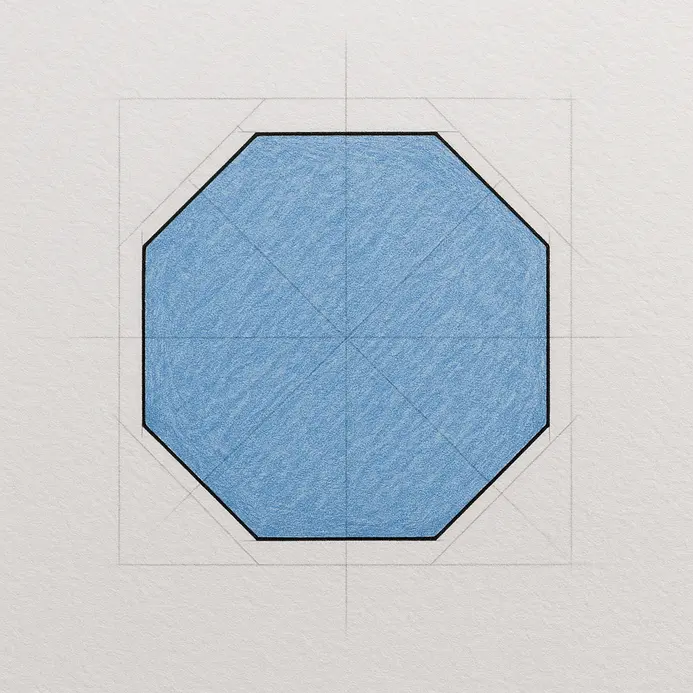
1. Sketch a Large Square as Your Initial Bounding Guide

Establish a faint, proportional container before constructing the final boundaries of your regular octagon. This initial rectangle defines the overall scale and guarantees balanced symmetry during the drafting phase. Position an HB pencil comfortably in a tripod grip, holding the barrel away from the tip to maintain light pressure. A properly scaled bounding box eliminates guesswork when measuring subsequent corner placements. Pivot from your shoulder to draw smooth, controlled strokes that form a centered square on the paper. Execute quick, repetitive flicks to locate the correct angular alignment before committing to full edge lengths. A rigid metal straightedge becomes mandatory if your hand lacks stability during the initial layout phase. Practice this preliminary square placement until your strokes maintain consistent length without conscious adjustment.
2. Cross Hairs: The Intersecting Lines That Find the Center
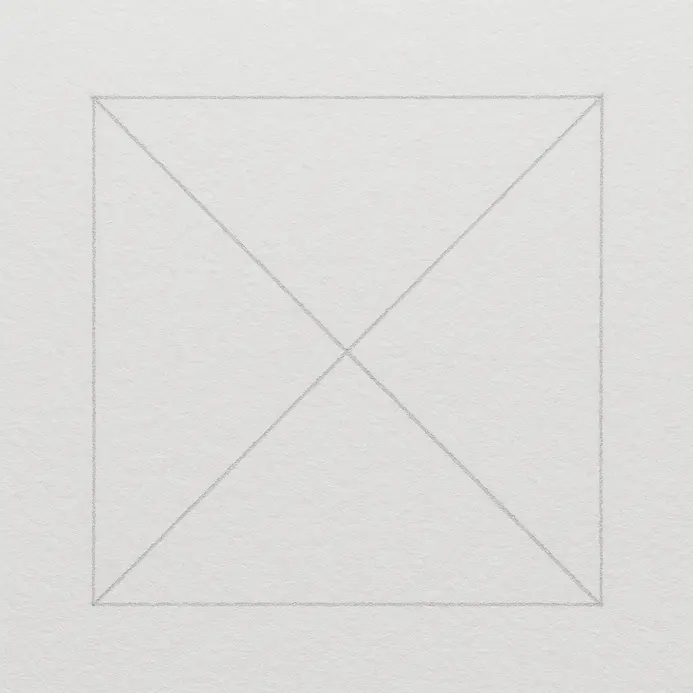
Locating the exact midpoint establishes the radial anchor required for accurate geometric construction. Align your ruler horizontally across the middle of the bounding square and draw a faint, continuous mark from one edge to the opposite boundary. Rotate your drafting surface ninety degrees to place a perpendicular vertical line crossing the initial mark. This intersection generates a precise grid origin for all subsequent calculations. Executing how to draw an octagon successfully demands consistent elbow-driven arm movements instead of restrictive wrist pivots. Verify that your horizontal and vertical lines meet at an exact ninety-degree angle using a standard drafting triangle. Keep these structural marks lighter than your final perimeter strokes to ensure easy removal when refining your regular octagon. Review foundational techniques like how to draw a 3d cube to strengthen spatial alignment.
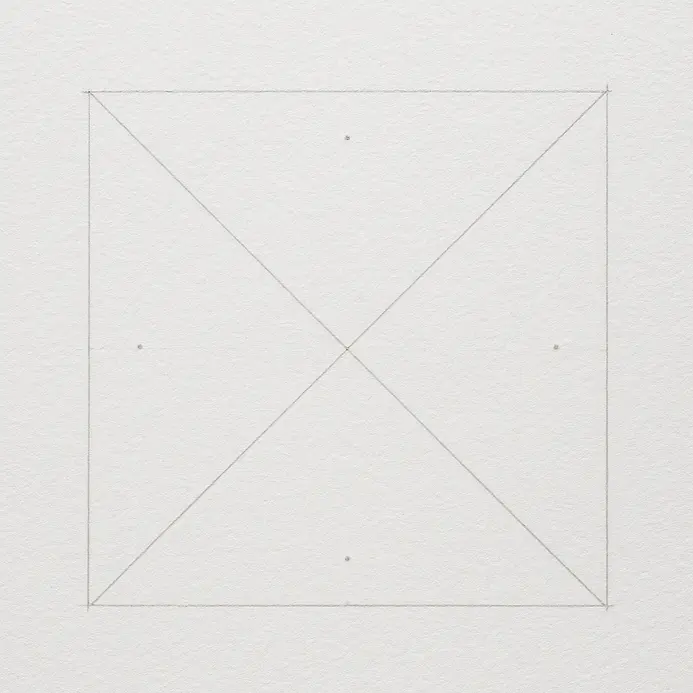
3. Mark the Midpoint Along Each Outer Edge With Pencil
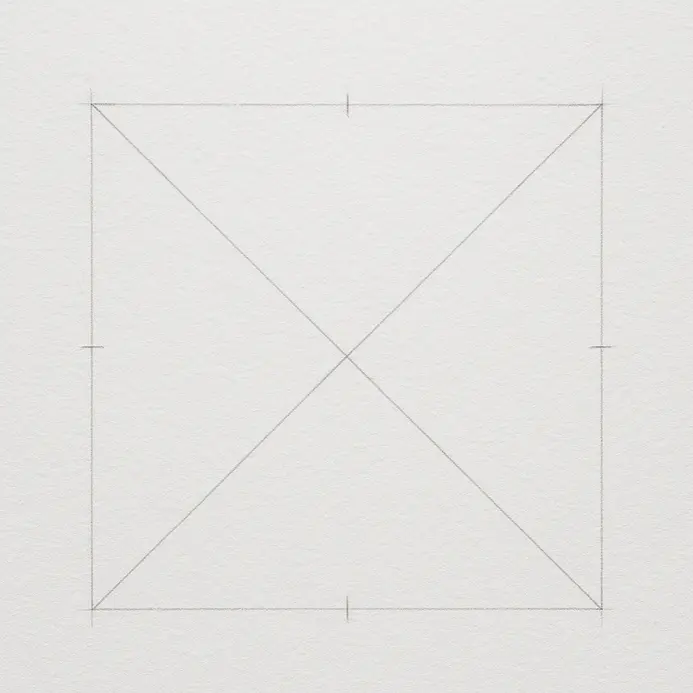
Identify the exact halfway position along all four exterior boundaries of your preliminary square. These precise registration points dictate where the corner cuts will terminate, directly influencing the final polygon symmetry. Tilt your graphite tool slightly away from your body and place a microscopic dash exactly at the visual center of each side. Repeat this measurement process consistently across the top, bottom, left, and right boundaries. Use a calibrated steel ruler to divide each side mathematically when visual estimation produces uneven results. Learning how to draw an octagon requires verifying these midpoint coordinates before committing to permanent connecting lines. Double-check each registration dash to confirm equal spacing on both sides of every vertical and horizontal axis. Consistent midpoint alignment guarantees mathematically perfect edge ratios during the final outlining stage.
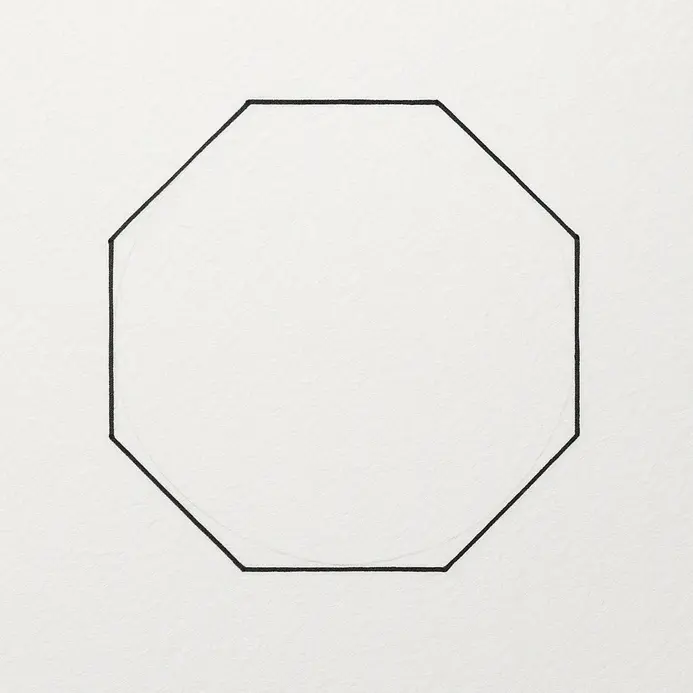
4. Crisp Geometry Achieved: Connect Your Measured Dots With Straight Lines
Transform your registration marks into the definitive outer boundaries of your regular octagon. Align a transparent straightedge between adjacent midpoint dashes and pull a single, confident pencil line using your shoulder joint as the primary pivot point to create the sides of the regular octagon. Replicate this connection sequence continuously until all exterior edges link in a clockwise or counter-clockwise progression. Maintain uniform pencil pressure to establish a clean, uninterrupted visual path around the shape. Execute how to draw an octagon with consistent edge lengths by resting your drawing hand firmly against the ruler to eliminate lateral drift. Apply even, light pressure for each stroke to guarantee precise line registration without tearing the paper surface. If your ruler placement feels unstable, study simple drawings to practice for steady hand conditioning drills while practicing how to draw a regular octagon. Focus on placing the graphite tip directly inside the measurement marks rather than hovering above them.
5. Ready for Clear Edges? Erase All the Square Guide Lines

Remove the preliminary construction grid to isolate your final geometric figure. Select a high-quality kneaded rubber and gently dab it against each unwanted baseline until the graphite dissipates without smudging nearby boundaries. Work from the interior intersection outward, lifting stray marks incrementally while avoiding contact with the established perimeter strokes. Controlled eraser friction preserves the sharp vertex corners essential for technical illustrations. Mastering how to draw an octagon involves careful cleanup that leaves only the eight finalized edges visible. Shield your permanent perimeter lines with a clean index card while scrubbing adjacent guide marks to prevent accidental removal. Refrain from pressing too aggressively, which often creates unwanted paper texture that traps graphite dust. Complete this cleaning phase only after verifying all primary connections remain fully intact.
6. Trace the Final Perimeter Lines With a Dark Ink Pen

Establish permanent boundaries over your light graphite layout using a consistent liquid medium to enhance the visibility of your regular octagon. Select a technical drawing pen with a medium nib and position the ferrule firmly against your existing pencil lines. Pull the ink cartridge steadily along each edge using long, continuous arm sweeps instead of short wrist tremors. Keep the nib perfectly vertical to ensure uniform ink flow across all eight directional changes. Understanding how to draw an octagon at a professional level demands proper sequencing to prevent wet ink from bleeding into your resting hand. Begin at the upper left boundary for right-handed drafters and progress clockwise around the figure. Allow the liquid pigment to cure completely before attempting any final pencil removal. Wait at least sixty seconds before erasing the underlying graphite grid to guarantee complete drying.
7. Interior Gradients: The Shading Technique That Adds Visual Depth
Transform the flat two-dimensional outline of your circle into a volumetric form through strategic value placement. Designate a single outer boundary as the primary shadow edge and apply a series of closely spaced parallel strokes originating from that side. Press firmly at the outer registration point, then gradually release tension as your stroke migrates toward the central axis of the figure. Layer subsequent passes using the same directional flow until you achieve a smooth tonal transition. Applying this volumetric technique remains crucial when discovering how to enhance the depth of your circle. how to draw an octagon with realistic spatial weight. Maintain strict separation between adjacent face planes to preserve geometric clarity. Avoid blending adjacent shaded zones, which immediately flattens the perceived form and destroys edge contrast. Apply a soft graphite stick to unify harsh hatch marks without compromising boundary sharpness.
8. Apply an Even Layer of Color Over the Entire Surface
Establish a uniform base tone across the interior region of your regular octagon to unify your completed geometric construct. Employ a circular burnishing motion with a high-pigment colored pencil to distribute even saturation across the enclosed boundaries. Maintain consistent downward pressure to prevent streaking or uneven pigment distribution near the perimeter lines. Uniform base layering eliminates distracting white specks and enhances overall visual cohesion. Executing how to draw an octagon with polished aesthetics requires repetitive, overlapping strokes that stay strictly within the defined perimeter. Switch to shorter directional passes when approaching acute vertex angles to prevent color overrun. Reapply a second thin coat if initial coverage appears fragmented or translucent. Practice this fill technique across simple drawings to practice to build muscle memory for flawless saturation.
Refining Your Drawing with Precision Corrections
Evaluate your finished construction against strict geometric standards to identify angular mismatches. Verify that opposing boundaries maintain parallel alignment and that each interior angle matches the expected symmetry ratio. Gently reinforce any uneven strokes using a sharp graphite point, then erase residual layout marks completely. Finalizing how to draw an octagon demands patience when correcting minor deviations without compromising established edge lengths. Trace over perfected lines with an archival quality pen to secure your adjustments permanently. This quality control phase transforms preliminary sketches into technically accurate reference materials for architectural applications. Store your finalized work in a protected portfolio to prevent graphite smearing during transport, especially after drawing a regular octagon.
Conclusion
Completing this structural construction sequence produces a mathematically balanced polygon suitable for advanced technical drafting. The methodology prioritizes a bounding square foundation, precise axis cross-hairs, verified midpoint registration, and systematic forty-five-degree edge connections. Mastering how to draw an octagon eliminates reliance on complex measuring instruments while building advanced spatial intuition. Executing these steps sequentially guarantees structural symmetry without requiring protractor calculations. Apply these geometric principles to adjacent polygonal forms, including hexagonal layouts and proportional pentagons. Preserve your finalized reference in a dedicated sketchbook for future mathematical modeling and planning applications, including how to draw a regular octagon. Execute the complete workflow freehand to reinforce muscle memory and proportional accuracy across multiple drafting scenarios.
FAQs
Q: How to draw an octagon using a compass — is there an easy method?
A: Yes, using a compass is a common method: draw a circle with the compass, mark one point on the circle, then step the compass around the circle to mark eight equal arcs and connect the points to form a regular octagon. This geometric how-to is precise and works well when you need a construct a regular octagon with equal sides and angles.
Q: What are two methods to draw an octagon: compass vs start with a square?
A: A common pair of two methods is the compass/circle technique and the square-based method. The compass method places eight points on a circle. The alternative is to start with a square: draw a square, draw diagonal lines from the corners to find edge midpoints, then draw a line to cut the corners (or mark intersection points) so that trimming the square corners yields a regular octagon inside a square.
Q: How do I start with a square to construct a regular octagon inside a square?
A: To construct a regular octagon inside a square, start with a square and draw the two diagonals and the two bisecting midlines; use these to locate the points where you should draw lines that cut off the corners. By drawing straight lines between these intersection points you create one side lengths equal around the octagon. This geometric how-to is often taught in high school geometry classes.
Q: Can I draw an octagon by draw a line steps only, without a compass?
A: Yes. One line-based method starts with a square: draw the square, mark and draw a line to bisect sides, then connect those midpoints and intersection points to cut corners. Another approach is using a ruler and protractor to measure each central angle (45°) and draw lines from a center point, then mark one side at each angle and connect them. Both avoid a compass but may require a protractor.
Q: Is there an online video or online how-to that shows how to draw an octagon for beginners?
A: There are many online resources and video tutorials that demonstrate how to draw an octagon step-by-step, including both compass-based and square-based methods. Search for “how to draw an octagon” plus terms like “compass” or “start with a square” to find high-quality how-to videos that walk you through one side placement, drawing lines, and finishing the shape.


