


If you have a black pen and some colored pencils, you can grab those too, but they’re optional for now. This is a beginner-friendly tutorial that should take you about 20 to 30 minutes.
We’ll start with light guide shapes you can erase later, building your drawing step-by-step. Don’t worry about perfection because every line you draw is progress. Ready to create something lovely? Let’s pick up that pencil and begin.
Essential Drawing Supplies for Floral Sketches
Let’s keep your supplies nice and simple before you learn how to draw a tulip. You’ll need a pencil, an eraser, and a piece of plain paper. A standard HB pencil is perfect for light guide lines.
You might also want a black pen for inking your final lines and colored pencils for a splash of color later. That’s it. You don’t need anything fancy to create something beautiful, so grab what you have and let’s get started.
Understanding the Fundamentals of Botanical Flow
The secret to mastering how to draw a tulip is simply letting the shapes flow naturally. Forget stiff, perfect lines.
Instead, think of the stem as a gentle curve, the leaves as long, graceful ribbons, and the petals as soft, overlapping shapes. We’ll build your tulip from simple forms, so you can see the whole structure before adding any detail. This makes it less intimidating and way more fun.
1. The Central Guide: Your First Light Line

This initial mark creates a central axis that anchors the entire process of how to draw a tulip on your page. It’s the most important line to get right!
Pick up your H or 2H pencil. Hold it loosely and tilt it a little. Press so lightly that you barely touch the paper. Draw one smooth line from the top of your paper down toward the bottom.
This is your tulip’s center line. Don’t worry if it’s not perfectly straight when learning how to draw a tulip, you are doing great!
Pro tip: If you press too hard, the line will be hard to erase later. For more practice with simple shapes, try this guide on easy flower drawings for beginners.
2. Sketch the Main Oval for the Flower Head

Now that you have a blank page ready, this step builds the soft oval shape that guides your path when learning how to draw a tulip. Think of it as a gentle boundary for the petals.
Pick up your pencil and hold it lightly. Draw a few curved lines that overlap to make an oval shape. Don’t try to draw one single dark line. Let your hand move smoothly from your wrist.
Make the oval a nice size in the middle of your paper. You are doing great, and understanding how to draw a tulip comes down to trusting these basic forms.
Pro tip: Don’t worry if your oval is not perfect. A slightly wobbly shape looks more natural than a stiff, geometric one. For more practice with flower shapes, try this guide on how to draw a flower.
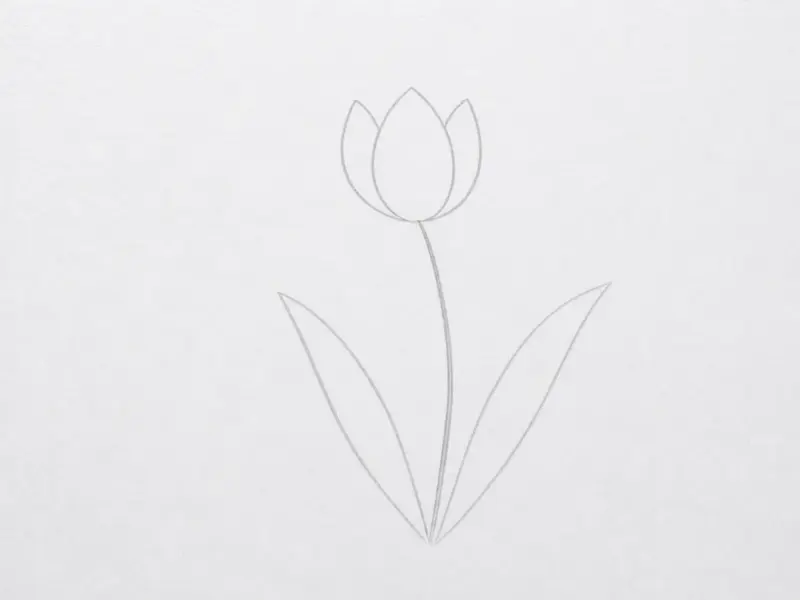
3. Add the Curving Stem and Leaf Shapes

Now that you have the first step’s basic shapes, it’s time to give your tulip a stem and some leaves. This structural phase is a vital part of figuring out how to draw a tulip that looks grounded.
First, find the center bottom of your tulip shape. Draw one long, curving line straight down from there. Don’t make it a perfect straight line. Let it bend a little like a soft noodle.
This is the main stem. Now, add a second line right next to the first one to make the stem thick. Connect them at the bottom. Next, draw a leaf starting about halfway down the stem.
Use your pencil lightly to create a long, skinny oval shape that curves away from the center. You can add a second leaf on the other side if you want. Nice work getting this far, and mastering how to draw a tulip means giving each leaf its own graceful sweep. For more practice on a different flower, try this guide on draw a rose step by step.
Pro tip: If your stem looks too wobbly, try drawing it in one smooth motion from your shoulder instead of your wrist.
4. Define the Main Petal Contours and Tips

You’ve got your basic tulip shape! Now, let’s give each petal its own soft, curvy edge, which reveals exactly how to draw a tulip with realistic outlines.
Look at your three big petal shapes. On each one, draw a curving line from the top tip down to the side. Make this line wavy, not straight. Do this on both sides of each petal.
Don’t press too hard with your pencil. These are just guide lines. You’ll be smoothing them out next. It’s okay if the curves look a little bumpy. That’s part of the fun, especially when you’re exploring how to draw a tulip for the first time. tutorial for drawing a sunflower.
Pro tip: Try drawing these curvy lines in one smooth motion. Lift your pencil and start a new line if you need to. It’s easier than trying to fix a shaky line.
5. A Clean Slate: Erase Your Guide Marks
You’ve got your tulip shape all mapped out with light lines. Now let’s clean it up so the final drawing can shine, which completes a major milestone in learning how to draw a tulip.
Take your eraser. Carefully erase all the light guide lines you drew in the earlier steps. Erase the circle for the bulb and the lines for the petals. Press gently so you don’t tear the paper, a simple habit that keeps your practice looking neat.
You’ll be left with just the clean, darker outline of your tulip. Nice work getting this far! A clean page shows exactly how to draw a tulip without distracting marks.
Pro tip: A clean eraser works best. Rub off any graphite crumbs from the tip on a scrap paper first for a neater clean-up. For more practice, try this guide on easy lotus flower drawing ideas.
6. Ink Your Final Lines for a Crisp Outline

You’ve got your tulip sketch all done. Now you’ll go over your pencil lines with ink to make them bold and clean, a permanent step in mastering how to draw a tulip.
Pick up a fine-liner pen. Start at the top of a petal. Trace right over your pencil line. Go slowly and press firmly. Follow the curve of each petal and leaf.
Connect your lines where the pencil sketch shows you to. Don’t worry about the pencil marks underneath. You can erase those later. This part is easier than it looks, and committing your lines with ink completes your routine for how to draw a tulip.
Pro tip: If your hand gets shaky, rest your pinky on the paper for extra stability. It makes drawing smooth lines much simpler. For more practice, try this guide on easy things to draw for beginners.
7. Add Soft Shading for Gentle Depth

Now that your tulip’s outlines are drawn, this step adds soft shading to make it look rounded and real. Many artists discover that adding shadow truly clarifies how to draw a tulip with three-dimensional depth.
Hold your pencil on its side. Press lightly and move it in tiny circles on the curved underside of each petal. Add a little more shading where petals overlap. Keep your hand light and build up the gray slowly.
This technique reinforces exactly how to draw a tulip with gentle shadows. Check out this tutorial on simple drawings to practice to see the same blending method in action.
Pro tip: If your shading gets too dark too fast, you pressed too hard. Start again with a touch so light you can barely see it.
8. Bring Your Tulip to Life with Color

Now that your tulip outline is complete, this step is all about adding beautiful, bright colors to make it pop. You’re doing great! Picking the right palette shows you how to draw a tulip that feels incredibly vibrant.
Grab your colored pencils or markers. Choose a main color for the petals. Color inside the petal outlines you drew. Press lightly for a soft look or press firmly for a bold color.
Use a green pencil for the stem and leaves. Color those in too. Don’t worry about staying perfectly inside the lines. That’s totally normal for a first try. You can even add a little yellow or orange to the center of the flower.
Pro tip: Start with light layers of color. You can always add more to make it darker, but it’s hard to take color away. Once you’re happy with your tulip, you might want to try more nature drawing, like these easy landscape drawing ideas.
Techniques for Refining and Polishing Your Floral Artistry
Great work. Now, look at your drawing with fresh eyes. Try a second tulip right away, this time from memory. You’ll be surprised how much easier it feels when reviewing how to draw a tulip.
Practice drawing just the curved stem or the petal shapes on a separate page. Try making a bigger tulip or adding a friend. Each drawing teaches you something new, so enjoy the process and watch your confidence bloom.
Conclusion
You did it! Look at your beautiful tulip. You started with just a line and a simple shape and built it into a complete drawing. That’s the magic of using guide shapes first, which gives you a confident path to follow.
If you want to practice, try drawing a whole bouquet with tulips facing different directions. You could also try a daisy or a rose next, using the same step-by-step approach that showed you how to draw a tulip.
I’m so proud of the progress you’ve made today. Every drawing makes you a better artist. Find a nice spot to display your work and enjoy what you’ve created!
FAQs
Q: What pencil should I use for this tutorial?
A: A standard HB pencil is perfect. It’s dark enough to see but light enough to erase easily for your guide lines.
Q: Can I skip the inking step?
A: Absolutely! Your drawing is complete after the clean pencil outline. Inking just makes the lines permanent and crisp.
Q: How do I draw the leaves so they look natural?
A: Make them long and curved, like a ribbon. Start them at the base of the stem and let them sweep outwards. Avoid making them perfectly straight.
Q: How long does it take to draw a tulip?
A: This tutorial is designed to take about 20 to 30 minutes. Take your time and don’t rush—enjoy each step.
Q: How do I add shading to my tulip drawing?
A: Imagine a light source from one side. Use light pencil strokes to shade the opposite side of the petals, stem, and leaves for simple depth.


