


Essential Drawing Tools for Detail-Oriented Illustration
Let us grab your supplies before you begin to see how to draw a taco properly. You will need a standard pencil, an eraser, a marker, and a smooth surface for your drawing tutorial. A 2H or HB pencil works best for light guide lines. Feel free to use a ruler for your first straight guides to create the base of your taco shell. Later on, you might want a black pen for inking and colored pencils for a tasty finish, especially when coloring in your tacos. Do not worry if your set is not fancy. You already have everything required to start your sketch today.
Establishing a Strong Foundation with Basic Geometric Shapes
Every great drawing starts with simple geometry, which is exactly why how to draw a taco feels so approachable. For your shell, we will begin with a gentle, wide U shape for the base. Think of it like a friendly smile resting on your page. Sketch these first lines lightly to keep your layout flexible. These faint marks act as your framework, like a structural blueprint. This strong foundation makes adding all the yummy details much easier later. Keep your strokes faint so they erase cleanly when you are finished.
1. Sketch the Shell’s Crescent Base Shape

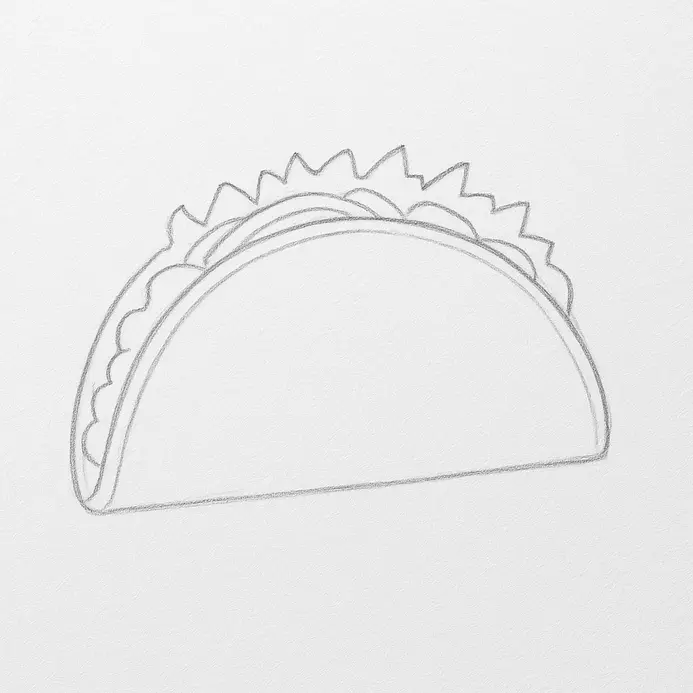
This first phase creates the taco shell’s basic shape. Understanding how to draw a taco means accepting this curve as your foundation. Everything else will rest directly on these initial marks. You are doing great so far. Pick up your pencil and press lightly to sweep across the page. Draw a wide, gentle curve that resembles a shallow smile. When learning how to draw a taco correctly, you will notice this arc dictates your entire layout. Connect the ends of that curve with another soft line. This bottom connector should dip down slightly. Now, return to the top edge and add five to seven soft bumps. These rounded forms give your crust a fan-like appearance. You are doing wonderful work. Pro tip: Do not stress over perfect symmetry when drawing curved lines for your tacos. Natural unevenness makes the shell look more authentic and fun. If you want more practice with fundamental curves, this guide on more easy things to draw is a perfect next step.
2. Add the Inner Curve for Shell Thickness

Now that you have the outer shape ready, this next phase adds structural depth. Mastering how to draw a taco requires showing that realistic inner thickness. This parallel line makes the shell look solid rather than flat. You are building excellent volume. Look closely at the outer arc you already placed. Pick up your tool again and trace a new line inside it. Keep the same curvature while maintaining an even distance across the entire width of your taco shell. This becomes your inner boundary. For more repetition, this tutorial on simple drawings for practice covers the exact same technique. Pro tip: If your line looks wobbly, draw the whole curve in one smooth elbow motion. Keep your wrist relaxed for steady control.
3. Draw the Chunky Meat Filling Base

This phase creates the base mass that all your yummy toppings will rest on. When figuring out how to draw a taco, establishing this lumpy core is essential. You are setting the stage for every tasty layer above it. Grab your HB pencil and start near the center of the opening. Draw a soft, wobbly line that curves upward and around. Making a lumpy hill shape works much better than a perfect circle. Keep your hand loose while maintaining light contact. Connect both ends to form an irregular, rounded footprint. This messy silhouette mimics real chunky meat filling perfectly. If you want to improve your drawing skills, practicing these loose organic forms gives rapid results. Trust the process.
4. Create Clusters of Lettuce and Cheese

Now that your meat base holds firm, this step adds the fresh toppings spilling outward. Demonstrating how to draw a taco means making those greens and dairy look naturally scattered. Let the layers overflow the shell edges for an appetizing effect. For the greens, draw small wavy lines and little C shapes that overlap heavily. Let them crowd near the upper opening while using light pressure at the start. Build the density gradually to avoid flat, uniform areas, particularly when drawing tacos. For the cheese, draft many short thin lines alongside tiny oval shapes. Scatter them randomly among the leafy sections to vary your texture. Keep your grip relaxed. A tutorial on how to draw a lollipop uses similar light strokes to create delicate details. Pro tip: Avoid matching your piece sizes. Real food looks wonderfully chaotic when you sketch it loosely.
5. Erase Your Guide Lines for a Clean Sketch
This cleanup moment removes all temporary marks so your final piece shines bright. Knowing how to draw a taco properly means leaving only the confident outline visible. Your sketch will instantly look polished after this quick process. Grab a kneaded eraser and press it gently onto the faint construction marks. Lift the graphite away without rubbing harshly back and forth. Dab and lift repeatedly until the paper looks fresh again. Patience during this stage pays off, especially when creating intricate details like a taco shell. Switch to a standard plastic eraser for any stubborn dark lines. Move the block in short controlled strokes to prevent accidental smudges. Brush away the debris with your hand or a soft brush. Your main lines should now stand out clearly. For additional shape practice, try this guide on drawing tacos step-by-step. draw a cherry tutorial.
6. Ink Your Final Lines for Crisp Definition

Now that your pencil work is tidy, we will lock everything in with permanent marks. Finalizing how to draw a taco requires giving it professional looking definition. Those crisp boundaries will make the artwork ready for display or coloring. Grab a reliable fine-liner pen and begin with the outer crust edge. Trace smoothly while keeping steady speed. Use slightly thicker strokes for the main shell contour to establish clear visual hierarchy. Next, outline the lettuce clusters and scattered cheese bits inside. Vary your line weight to suggest depth and layering. Rotate the page freely to draw comfortable arcs. Wait for the wet ink to dry completely before touching your eraser again. For another fun food illustration, check out how to draw a soda can.
7. Add Shading for Depth and Dimension

Your outline looks sharp, so let us bring it to life with subtle shadow values. Demonstrating how to draw a taco effectively means showing where the light falls. These gentle dark tones make the illustration pop off the flat surface. Assume your lamp shines from the upper left corner. Keep the left side nearly white. Use a pencil lightly to hatch short strokes along the right inner wall. Build the darkness gradually rather than pressing hard immediately, following a step-by-step drawing tutorial. Fill the gaps between greens with soft crosshatching. Layer multiple gentle passes to create smooth gradients. Pro tip: Start extremely light and darken slowly. Rushing with heavy pressure makes transitions look muddy and ruins the clean effect. Explore additional easy projects to extend your sketching practice.
8. Apply Vibrant Colors to Bring It to Life

The monochrome version looks complete, but adding pigment makes everything delicious. Finishing your guide on how to draw a taco involves choosing bright, appetizing hues. You are doing fantastic work so far. Let us make it vibrant. Grab your colored pencils and fill the inner shell wall with bright yellow. Apply firm pressure to saturate that curved area evenly. Switch to a warm light brown for the outer crust ridge to mimic toasted corn. Layer fresh green across the leafy sections. Add red dots for tomatoes and pale orange streaks for melted bits. Do not stress about staying strictly inside the boundaries. Loose coloring feels more natural and playful here. For additional vibrant practice, try draw a colorful rainbow. Pro tip: Layer colors lightly first. Building up gradually prevents muddy textures and keeps brightness high.
Refining Your Style Through Layering and Detailing
You now hold a complete illustration ready for personal tweaks. Repeating how to draw a taco multiple times will sharpen your muscle memory naturally. Try scaling the piece up larger next session to practice bigger curves. Isolate the toppings on a separate sheet to master their texture. Add a simple ground shadow underneath to anchor the food visually on the page, enhancing the appearance of your tacos. Each attempt reveals more of your individual artistic voice. Keep sketching freely.
Conclusion
Awesome job finishing your project! You successfully followed how to draw a taco from start to finish today. You began with simple guide shapes and stacked delicious layers step by step. That structural approach works beautifully for sketching any object. Want to keep practicing? Try recreating this design from memory or shrink it down next time. Apply that same basic shape breakdown to your favorite meals, like tacos with beef. I would love seeing your results, so feel free to share your finished piece with friends. You should feel proud of this creative effort!
FAQs
Q: How do I start a simple taco drawing as a beginner?
A: Start with an easy-to-follow taco sketch: draw a curved line for the shell, add a slightly folded line to indicate the fold, then block in the taco filling shapes like lettuce, shredded cheese, and ground beef. This step-by-step tutorial approach helps you learn to draw basic forms before adding texture and details.
Q: What is the best order to add details in a step-by-step tutorial for a taco?
A: Begin with the overall taco drawing outline, then define the shell fold and major taco filling masses such as ground meat, chicken, or pork. Next add shredded cheese, cream or salsa shapes, and finally include small details and add texture like crisp edges or crunchy ridges. This order keeps the drawing organized and makes drawing and coloring easier.
Q: How can I make a taco look crunchy or soft depending on style?
A: To depict a crunchy shell, emphasize jagged edges, light highlights, and grainy texture. For a soft tortilla, soften the fold lines and add subtle creases and shading. Whether you want a traditional Mexican dish appearance or a cartoon style, altering the shell texture changes the perception of crunchy vs soft.
Q: What tips help when drawing different fillings like ground beef, chicken, or pork?
A: Use distinct shapes and textures for each filling: ground meat or ground beef can be rendered as clustered, irregular masses; shredded chicken or pork should have fibrous lines; shredded cheese is thin strands; cream or salsa can be smooth blobs. Labeling each layer as you sketch helps visualize different fillings and keep the taco balanced.
Q: Can you suggest ideas for turning a taco sketch into a cartoon taco character?
A: Cartoon taco ideas include giving the shell eyes and a smiling mouth, exaggerating the fold and crunchy edges, and stylizing taco filling like oversized shredded cheese or a dramatic swirl of cream. An artist can simplify forms and use bright drawing and coloring choices to make the taco playful and expressive.


