


What You Will Need
Keeping supplies simple ensures a focused artistic process during this foundational exercise. A standard HB or 2H pencil creates faint structural marks, while a standard rubber eraser removes excess graphite during refinement. Select smooth drawing paper or a preferred sketchbook, and place a ruler nearby for horizon alignment. An optional fine-tip marker assists with defining crisp edges later, and colored pencils provide subtle background tints. You do not require professional tools, as basic materials yield strong results. Organizing these items beforehand prevents workflow interruptions.
How to Use This Step-by-Step Tutorial
Following each instruction in sequence guarantees steady progress and reliable structural development. Every phase relies on the previous foundation, establishing proportional boundaries before introducing detailed value shifts. Minor imperfections occur during early stages, so continue forward when outlines appear rough initially. This construction technique reveals recognizable forms at every stage, reducing frustration and clarifying the overall workflow. Understanding how to draw clouds demands patience as you allow shapes to emerge naturally through layered adjustments.
1. Lightly Sketch the Cloud’s Overall Oval Shape

This initial phase establishes structural control and prepares the surface for detailed rendering. Artists practicing this method begin by outlining an imperfect oval to secure the central volume without heavy pressure, ensuring an irregular shape. Maintaining a relaxed grip ensures flexible adjustments throughout the sketch. Extend the horizontal axis to simulate puffy atmospheric masses, or flatten the curve for layered formations. Reject perfect symmetry and allow organic breaks to define the perimeter. This foundational oval represents the three-dimensional framework for subsequent details. Use a kneaded eraser to gently lighten strokes that appear unexpectedly dark. This adjustment preserves flexibility for upcoming phases.
2. Draw the First Puffy Curves Along the Top Edge
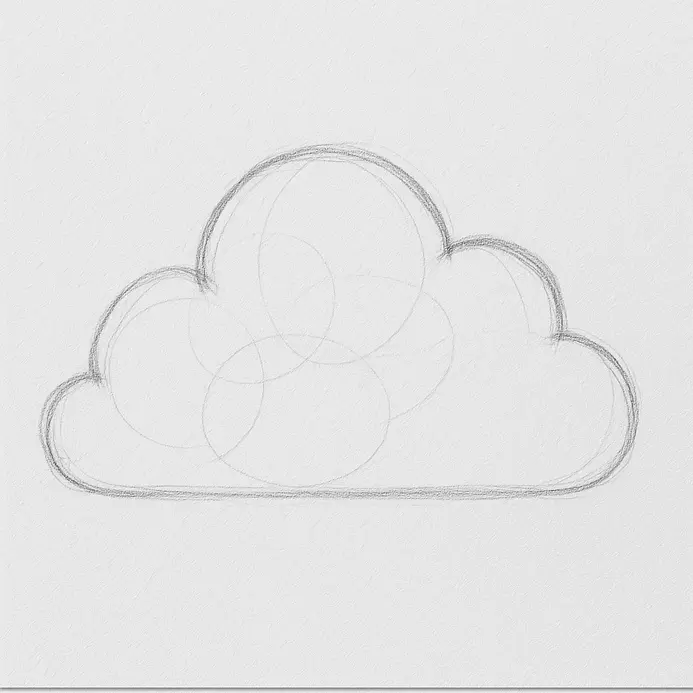
Transforming the foundational oval introduces recognizable atmospheric character. You will extend the soft outline upward by adding billowing forms that mimic the shape of the cloud and natural weather patterns. Begin near the left margin by sketching a wide, gentle arch that pushes outward from the base. Maintain light graphite pressure and use wrist rotations rather than finger movements to achieve a smoother transition of gray. Allow each new curve to overlap the previous one organically to prevent rigid geometry. Create two or three prominent overlapping shapes across the upper boundary. Let one arch dominate in size while keeping adjacent forms slightly smaller to simulate organic growth. These protrusions act as the primary structural shoulders for the entire mass. Practicing how to draw clouds requires mastering these sweeping motions before moving to the next stage.
3. Build the Side Bulges Around the Cloud’s Form
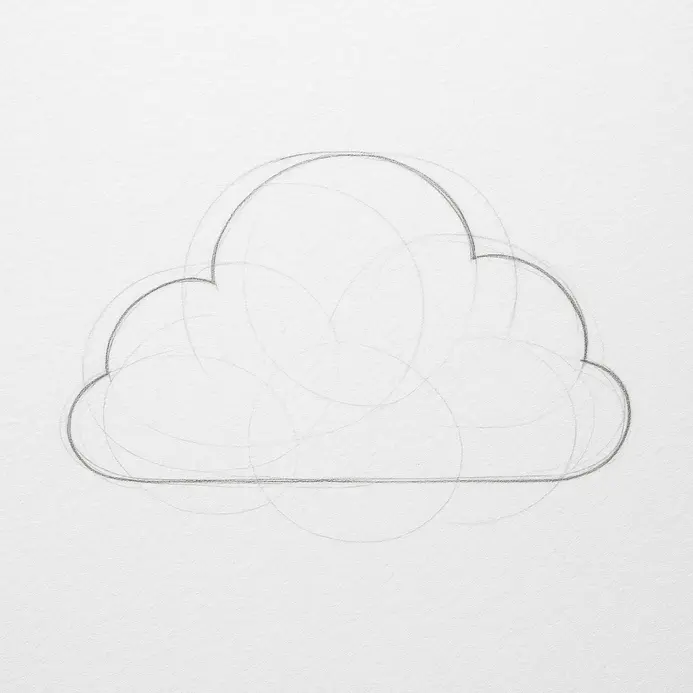
Expanding outward gives the mass volume and a dynamic silhouette. This phase converts a simple geometric guide into a full, rounded weather element. Observe the upper left boundary and sketch a broad curve that overlaps the original line. Keep the pencil light and push the new shape outward from the center. Continue around the perimeter by attaching two or three additional irregular bulges to both flanks. Vary the dimensions significantly, allowing some shapes to stretch while others remain compact. Dramatic variations in extension sizes produce convincing results when learning how to draw clouds accurately. Consult outdoor landscape references to study organic shape relationships and maintain proportional harmony across all sides.
4. Mark the Lowest Shadow Valleys on the Underside

Defining shadow locations establishes three-dimensional weight and depth. Artists mastering how to draw clouds place graphite strategically to transform flat outlines into rounded atmospheric forms. Examine the lower boundary and place short, curved marks within the deepest indentations. Concentrate on recessed areas that would naturally receive minimal illumination from overhead sunlight. A 2B graphite stick works best for establishing this initial shadow map. Keep the strokes light and directional, following the contour of each dip. Mixing deeper depressions with shallower dips creates realistic texture and visual interest. Maintaining this variation prevents an artificial appearance across the final piece.
5. Shade the Underside of the Cloud to Suggest Volume

Applying graduated tones transforms the structural framework into a solid atmospheric mass. You will now build darkness across the lower third to establish weight and perspective, referencing how to draw with darker tones. Press your pencil firmly enough to create consistent graphite layers along the bottom contour. Follow the existing curve directions to reinforce the rounded illusion effectively. Gradually reduce density as you move upward from the darkest edge. This fading effect simulates ambient light scattering through concentrated moisture droplets. A kneaded eraser lifts unwanted streaks and softens harsh transitions when practicing fundamental shading techniques. Blending directly over pencil strokes with a soft brush refines the gradient into a seamless atmospheric effect.
6. Blend the Shadow Into Soft, Gradual Gradients

Smoothing harsh graphite lines produces a convincing airy quality on the paper surface. You will transition sharp shadow borders into gentle mid-tone gradients that mimic reality. Select a blending stump, soft tissue, or clean fingertip to lightly press over the darkened zones. Use circular motions with a brush to distribute graphite evenly toward the lighter upper regions. Avoid back-and-forth scrubbing, as that technique damages paper fibers. Focus instead on pushing the pigment outward from the darkest core to create a more dynamic cloud look. Lifting small sections of graphite with an eraser creates internal highlights frequently appreciated by advanced artists. Maintaining these bright spots increases perceived depth when exploring how to draw clouds with professional techniques.
7. Darken the Core Shadow Areas for More Depth

Intensifying the darkest zones anchors the composition securely to the page, creating a richer hue. You will reinforce the lower foundation marks to strengthen three-dimensional stability. Apply overlapping circular strokes along the bottom third of the shape. Ensure the greatest concentration of graphite rests precisely at the lower edge to enhance the darker areas. Extend the same shading logic to any protruding extensions while studying how to draw clouds systematically. Matching the light source direction across all segments maintains visual harmony. A pinched eraser corner removes excess graphite from upper shadow edges cleanly. This technique produces subtle wisps that break up heavy tones effectively.
8. Refine the Outer Edge for a Softer, Fluffier Silhouette

Revising the perimeter replaces rigid lines with natural softness and atmospheric realism. You will sketch overlapping micro-curves to break uniform boundaries completely, allowing for a more dynamic cloud look. Trace the exterior contour with a light touch and draw short arcing marks that bulge outward slightly. Vary the length and angle of each stroke when practicing organic silhouette construction. Let a few segments swell prominently while others remain subtle. Avoid uniform spacing, as identical bumps create artificial patterns. Embrace irregularity to mimic genuine atmospheric phenomena accurately. Reviewing outdoor formations reinforces these edge variations naturally.
9. Erase the Guide Lines and Clean Up the Highlights

Removing construction marks reveals the final polished composition fully. You will lift all underlying skeleton lines to leave a refined sketch. Press a kneaded eraser gently over the entire surface and target the internal structural lines while preserving outer contours. Lift stubborn graphite carefully without disturbing surrounding shading layers. This careful approach maintains soft texture throughout the piece when learning how to draw clouds efficiently through precise cleanup techniques. Students report greater satisfaction when applying this method consistently. Softening select boundaries with the eraser enhances the overall airy quality significantly. Small highlight lifts brighten specific zones where illumination strikes directly.
10. Add Sky Color Around Your Finished Cloud Drawing

Surrounding the shape with color integrates it into a complete visual scene. You will apply a gentle wash of light gray around the edges to establish spatial depth. Select a blue colored pencil or pastel and stroke outward from the white boundary. Keep pressure even to avoid stark pigment bands across the margin. Allow the pigment to fade gradually into the paper background to simulate natural distance perception. Broadening coverage speeds the application process significantly. Using the pencil side prevents sharp scratch marks when demonstrating background tints properly. This step completes the composition and enhances overall presentation.
Tips to Improve Your Drawing
Repeating the process from memory tests your visual retention and reinforces muscle coordination. Identify difficult sections and practice those isolated phases until they feel comfortable and intuitive. Experiment with scaling exercises to understand proportion shifts across different formats. Drawing the same mass at different dimensions strengthens spatial reasoning when studying atmospheric rendering techniques. Adding secondary elements or additional shading layers increases contextual realism substantially. Try integrating simple hills or distant peaks to ground the overall composition effectively.
Conclusion
You have successfully structured a form from basic guidelines and applied strategic value gradations throughout the surface. Starting lightly and building density remains a reliable method for atmospheric artworks. Practice clustering multiple formations to simulate expansive skies effectively. You now possess the foundational skills required when studying technical rendering methods thoroughly. Display your finished piece to celebrate your progress and share your techniques with fellow creators. Mastering how to draw clouds opens the door to advanced landscape artistry.
FAQs
Q: How do I know how to draw clouds for beginners?
A: Start by learning to draw simple curved lines to outline basic cloud shapes, then build a first layer of soft rounded forms. Use a reference photo to study how clouds in the sky overlap, vary the size, and spread across the sky. Practice draw clouds step by step with a series of drawings, gradually adding light shading to create a smooth, slightly darker underside for depth.
Q: What is the best step by step method to draw clouds in the sky?
A: Begin with a light sketch of loose, curved lines to map the overall silhouette. Add a second, slightly darker first layer to indicate volume, then place a few wispy clouds and streaky highlights on top. Use blending to create a smooth transition between values and vary the size of cloud puffs to avoid uniformity. Finish by adjusting edges—soften most, keep a few sharper areas for contrast.
Q: How can I use a reference photo when drawing the sky and clouds?
A: Choose a clear reference photo that shows the cloud formation you want, noting faraway shapes and near spheres of cloud. Trace the main masses lightly or grid the photo to copy proportions. Observe details like water vapor streaks, streaky cirrus, or wispy clouds and replicate those with lighter, feathery strokes. A reference photo helps you learn to draw realistic overlap, two layers of clouds, and where to add depth.
Q: What tools and colors should I use to draw clouds and add depth?
A: Use pencils for initial sketches and blending tools for a smooth finish; Prismacolor pencils or soft graphite and white charcoal are great for highlights. Use colors—pale blues, warm grays, and very light yellows—to suggest light and atmosphere. Apply slightly darker tones to undersides and faraway tints to indicate distance, then lift highlights to create water droplets or sunlit edges that add depth.
Q: How do you draw wispy clouds versus really dark storm clouds?
A: For wispy clouds, use light, streaky strokes and feathered blending to create thin, elongated forms that spread across the sky. For really dark storm clouds, build up a heavier first layer with darker values, compress forms into larger masses, and add sharper contrasts in places to show density. Vary the size of puffs and include two layers—lighter upper forms and darker lower masses—to increase drama.


