


Essential Drawing Supplies for Architectural Sketching
You need a reliable graphite instrument, a precision eraser, and quality drafting paper to execute any structural illustration. Understanding how to draw a house begins with selecting the correct materials for your specific paper weight and texture. A standard HB pencil remains the ideal starting point because it deposits visible marks while retaining excellent erasure capabilities. You will build your complete toolkit around these foundational tools. A heavy white sketchbook page handles repeated erasing without tearing the surface fiber. A metal edge ruler proves highly useful for establishing perfectly perpendicular boundaries, though freehand practice strengthens long-term muscle memory. Later stages involve transitioning from graphite outlines to black ink for permanent definition, followed by layered pigment application for atmospheric rendering. You possess all necessary equipment to begin executing residential drafts immediately.
Understanding the Geometric Foundations of Buildings
Every residential framework originates from straightforward geometric configurations rather than complex organic curves. Visualize the primary wall structure as a solid vertical rectangle anchored directly to the earth. The upper covering extends upward as a sharp triangular plane that channels precipitation downward efficiently. Entry portals and glass surfaces function as smaller embedded rectangles within the larger facade matrix. Mastering how to draw a house requires recognizing this fundamental shape vocabulary before attempting detailed ornamentation or textural rendering. You will construct every subsequent architectural component directly from these foundational block measurements.
1. Sketch the Ground Line to Anchor Your Drawing

We will establish a light horizontal baseline across the drafting surface to indicate precisely where the terrain terminates. This foundational reference prevents the upcoming structural elements from appearing suspended in empty space without environmental context. Grab a standard box to help visualize the three-dimensional aspects of your drawing. H pencil Apply minimal contact pressure while barely grazing the paper fiber to preserve the quality of your art. Draw one continuous stroke from the left margin to the right edge, positioning the mark near the lower third to reserve ample sky area above. Keep your wrist completely locked to maintain a steady drafting rhythm throughout the pass, which is crucial for detailed art. If you require absolute horizontal accuracy, position a straight edge ruler firmly against the lower boundary. Keep this initial reference line extremely faint, serving strictly as a spatial anchor when learning how to draw a house correctly. Explore additional alignment techniques using this guide on Practice simple drawings to improve your skills in creating shapes like triangles and squares.. Drive the entire stroke using shoulder rotation rather than isolating your wrist joint. This kinetic approach generates smoother, perfectly linear trajectories across wide drafting surfaces. You will observe immediate improvements in boundary control after implementing this kinetic habit.
2. The Main Rectangle: Your Core Structural Building Block
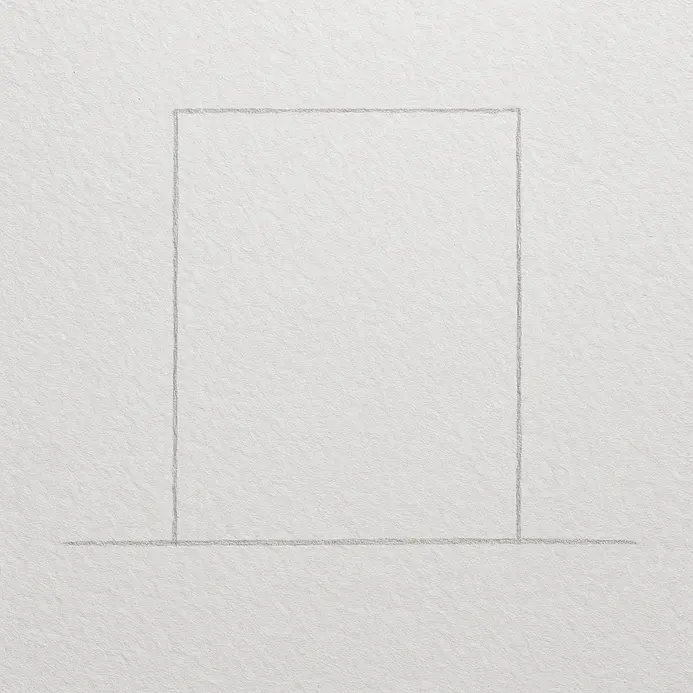
This initial blocking stage establishes the central volume that supports all subsequent architectural details. Position your drafting surface perfectly flat and select a standard graphite instrument for construction. Apply feather-light contact pressure while tracing a tall vertical rectangle near the exact center of your working area. Ensure the lateral boundaries travel completely parallel from the ground baseline upward without tapering inward or bowing outward. Execute elongated, unified passes originating from your elbow joint to eliminate shaky, fragmented graphite trails. Leave generous negative spacing around all four boundaries to accommodate roof overhangs and adjacent landscape features. Recognizing how to draw a house successfully depends entirely on keeping these preliminary construction marks nearly invisible to the eye. You will adjust proportional scaling later without obscuring your working surface.
3. Draw the Triangular Roof Over the Main Body

Locate the precise midpoint along the upper boundary of your primary wall rectangle using visual estimation. Place a distinct dot directly above this center location to establish the highest vertical elevation point. This singular marker dictates the peak positioning for your entire upper shelter system. Connect that apex to the left corner, then extend another diagonal mark to the opposite right corner to complete the triangular framework. Guide your metal ruler along both angled paths to enforce strict geometric accuracy. Apply minimal graphite deposition during this initial layout phase, then reinforce both diagonal edges with darker contact once you approve the pitch angle. Studying how to draw a house properly demands verifying bilateral symmetry before committing to permanent linework in your house drawing. Measure the gap between each lateral wall edge and the newly drawn diagonal slope to guarantee perfectly mirrored angles. Reference the training guide on how to draw a chimney for additional details and structure. simple drawings to practice for additional spatial conditioning exercises.
4. Symmetrical Window Placement That Balances the Entire House

We will position the glass openings with precise mathematical spacing across the front wall to achieve visual harmony. Align your box with the reference points to ensure accurate proportions in your drawing. straight edge tool and trace a faint vertical centerline running directly down the facade midpoint. Establish your first rectangular aperture frame on the left zone, positioning it halfway between the central divider and the exterior boundary. Measure the exact distance separating the central axis from the left edge of that first opening. Transfer that identical measurement to the right side of the vertical guide to lock perfect bilateral balance. Confirm that the bottom horizontal edges of both apertures share the same elevation line without deviation to maintain the integrity of the front of the house. Mastering how to draw a house requires mirroring structural components accurately across the central divider. Elevate your completed draft toward a bright window to inspect the negative space reflection. Consult the alignment tutorial on simple drawings to practice for further precision training.
5. Attach a Rectangular Chimney to the Roof Edge

You will add a vertical exhaust column along the roof pitch to introduce realistic residential character. Locate the right-hand diagonal edge where your shelter plane rests above the main wall to accurately depict the house drawing. Hold your drafting pencil with controlled pressure and trace a short segment that aligns perfectly with that existing incline. This angled baseline serves as the foundational support for your vertical exhaust column. Extend two straight downward trajectories from the segment endpoints to establish the chimney side walls. Connect those vertical terminators with a short horizontal pass to complete the four-sided ventilation stack. Reinforce the final perimeter strokes with moderately increased pressure to separate the new element from the roofline, ensuring the art reflects a well-defined structure. Observing how to draw a house accurately means recognizing that exhaust vents typically extend several inches past the upper ridge. Ensure both lateral boundaries maintain strict perpendicular alignment relative to the ground baseline. Continue studying residential architecture to expand your structural vocabulary.
6. Small Door Details: The Key to Authentic Architecture

This integration phase establishes the primary entry portal into your drafted facade. Sketch a tall, narrow vertical rectangle at the exact center of the lower wall section to mark the doorway. Insert a smaller internal rectangle to define the panel boundary, then draw a compact circular shape near the vertical midpoint to represent the handle hardware. Add a brief horizontal pass above the outer frame to establish the header lintel. Learning how to draw a house authentically requires maintaining strict proportional scaling across all entrance measurements. Maintain minimal graphite contact pressure on your sharpened tip to allow easy proportional adjustments during review. Restrict the door height to approximately one-fifth of the total building elevation to maintain architectural realism. Visit the geometry tutorial on easy things to draw for beginners to reinforce your scaling accuracy.
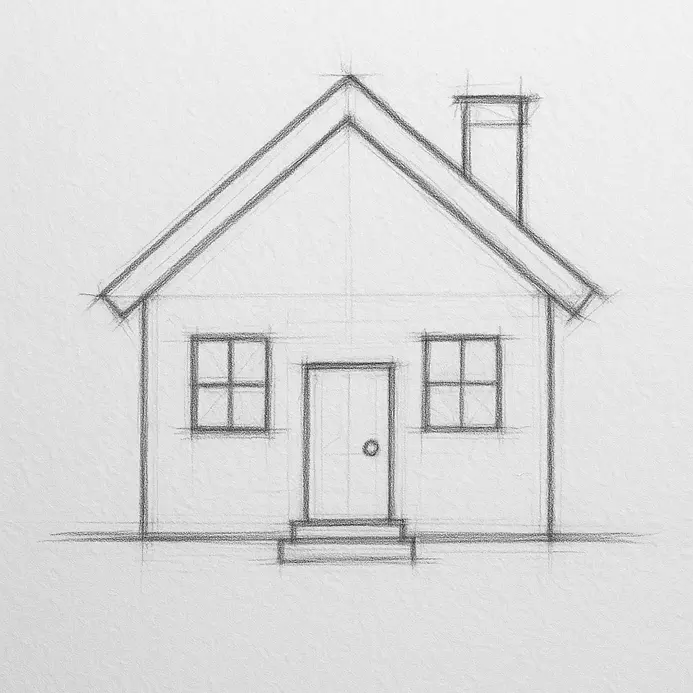
7. Erase Your Guide Lines to Reveal Clean Outlines

You have successfully blocked the primary residential framework using light preliminary construction strokes. You will now remove those temporary geometric markers to produce a polished, professional illustration. Select your plastic eraser and execute gentle sweeping passes across the underlying graphite traces. Apply a soft, unidirectional brushing motion to lift excess particles from the page without abrading the surface texture, as suggested in the drawing tutorial. Avoid aggressive downward pressure to prevent fiber damage or unwanted paper thinning. Your objective focuses strictly on eliminating the faint layout marks while keeping the primary structural boundaries completely intact. Refining how to draw a house frequently demands careful patience during this cleanup phase to avoid accidental surface smudging. Allow any permanent ink outlines to dry thoroughly before applying friction to prevent graphite migration. Discover additional compositional inspiration within this collection of easy landscape drawing ideas for beginners.
8. Crisp Ink Lines That Secure Your Final Shape
This transitional phase locks your graphite draft onto permanent media for final definition. Choose a fine-liner pen equipped with a medium nib and maintain a relaxed grip to promote free wrist articulation. Practice tracing your existing graphite trajectories in empty air several times before allowing the tip to touch the drafting surface. Initiate your stroke at the upper left vertex and pull the instrument downward along the exterior wall boundary. Sustain consistent travel distance powered entirely by elbow rotation to guarantee uniform line thickness across long vertical planes. Slide a straight edge along critical wall paths whenever you demand absolute mathematical alignment. Form angled roof connectors using firm, uninterrupted downward force. Apply lighter downward pressure when tracing interior details like window casings and portal panels. Progress systematically from elevated sections to ground-level elements to maintain an unblemished working zone. Understanding how to draw a house through permanent media builds confidence in trusting your initial geometric layout. Remove the writing implement completely only after completing each distinct trajectory, and brace your pinky digit against the paper to maximize stroke control. Continue analyzing structural rendering workflows to refine your technical execution.
9. Want More Depth? Add Directional Shading for Dimension

Your defined structural outline now demands calculated value distribution to achieve realistic three-dimensional form. Select a single building face to receive complete shadow coverage, establishing a clear directional light source originating from the opposite corner. Transition to a softer graphite lead and deposit light, parallel passes strictly along that shaded exterior wall. Increase downward force near the intersection point where the roof plane meets the vertical facade to generate concentrated contrast. Preserve the sun-facing exterior predominantly white to simulate intense illumination exposure. Extend a diffuse grey tonal field alongside the building footprint to anchor the structure within its environment. Grasping how to draw a house correctly means enforcing uniform lighting logic across every exterior component. Maintain parallel hatching orientation throughout the entire shadowed region to eliminate visual confusion. Expand your environmental rendering capabilities by reviewing the tutorial on easy landscape drawing ideas for beginners. Avoid implementing circular scrubbing motions that disrupt surface cleanliness during value application. Execute elongated directional strokes exclusively to produce seamless tonal gradients throughout shaded zones.
10. Color the Roof to Define the Upper Structure

We will deposit pigment across the upper triangular plane to establish visual hierarchy and complete material simulation. Select a Use your colored pencil to add depth and texture to the elements of the house drawing. that aligns with your chosen roofing material and rest the flat lead edge against the paper surface. Execute expansive, continuous strokes that travel parallel to the existing roof inclination to create a cohesive picture of the house. Identify one slope to receive shadow treatment and apply layered passes over that specific region to intensify color saturation. Keep the opposing slope comparatively pale to simulate direct light reflection. Utilize a freshly sharpened instrument to maintain sharp intersections where the roofline meets the vertical walls. Recognizing how to draw a house accurately depends on synchronizing your coloring direction with physical structural angles. Align each pigment application with the established roof slope to simulate seamless material coverage. Study advanced residential rendering methods to expand your technical proficiency.
11. Warm Wall Tones: Finishing the Central House Body

You will introduce warm value gradients across the central exterior facade to simulate natural daylight exposure. Grip your B-range graphite tool near the shaft midpoint to promote relaxed joint movement and steady pressure regulation. Apply the broad lead tip against the paper surface using gentle, diagonal trajectories across the entire front wall. Increase downward intensity near the vertical corners and beneath the eaves where ambient shadows naturally accumulate. Maintain lighter pigment distribution across the central zone to mimic direct sun reflection. Keep every coloring pass traveling along a uniform axis to prevent muddy texture interference. Understanding how to draw a house effectively requires varying pressure intensity across flat surfaces to suggest dimensional curvature. Modify your contact force continuously to produce organic architectural shading rather than rigidly uniform color blocks. Continue practicing structural rendering to develop faster execution habits.
12. Add Final Colors to Your Windows and Surroundings

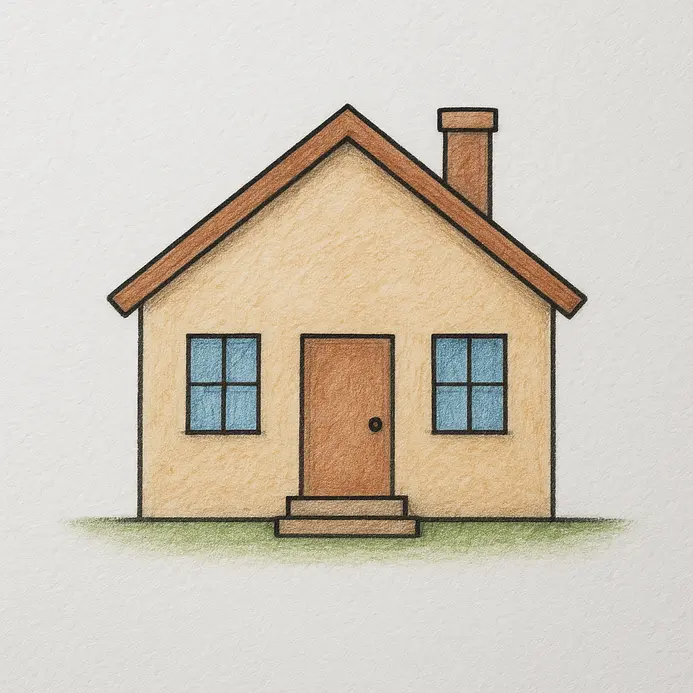
We will apply the remaining color layers to the glass surfaces and adjacent landscape to finalize the complete illustration. Gather several pigment sticks and tint each window panel using pale blue passes executed in uniform directions. Leave microscopic white voids intact across the glass region to mimic intense daylight reflections on a reflective surface. Apply a deeper blue gradient along the lower glass boundary to indicate internal depth and recessed shadowing. Switch to a brown coloring instrument to establish the window frame boundaries, pressing firmly to create strong structural definition before darkening the lower edge. Fill the surrounding ground area using broad shoulder movements with light green and pale sky blue to establish outdoor environmental context. Mastering how to draw a house demands balancing interior glass transparency against exterior landscape massing. Reference the tutorial on black anime characters drawings to cultivate advanced layering control. Combine two distinct blue layers across each glass section rather than applying a single opaque coat to achieve authentic reflective qualities.
Techniques for Refining Your Drawing Workflow
Attempt a complete structural draft entirely from visual memory to strengthen internal spatial retention. Practice complex components like multi-pane framing independently before integrating them into full facade layouts. Experiment with varying scale dimensions to develop an intuitive understanding of architectural proportion. Integrate a simple environmental backdrop featuring a curving pathway or grouped foliage. Each repetition fortifies your spatial reasoning and mechanical precision when designing new residential structures. Recognizing how to draw a house consistently builds the visual reference library required for tackling complex building designs.
Conclusion
Completing a full architectural illustration stands as a deeply rewarding milestone for emerging visual artists. You successfully explored how to draw a house by transitioning from elementary geometric planning into advanced textural rendering techniques. The progressive construction methodology guarantees structural balance and accurate proportional relationships throughout your entire drafting workflow. Drafting oversized foundational outlines establishes mechanical stability before introducing permanent media or vibrant color pigments. Continue advancing your technical execution skills by reconstructing the identical residential blueprint entirely from memory. Modify foundational measurements to generate wider wall sections or steeper roof angles to test your proportional adaptability. Apply this identical sequential process when illustrating a rustic cabin or a contemporary metropolitan dwelling. Display your completed artwork prominently to celebrate the measurable progress achieved through disciplined geometric practice. Anyone can master the process of learning how to draw a house by maintaining steady focus and respecting construction fundamentals.
FAQs
Q: How do I draw a basic home for beginners?
A: Start step by step by sketching a rectangle for the main house and a triangle for the roof. Use a light pencil and draw lightly so you can erase mistakes. Add a square for the door or windows, then refine with darker lines and straight line strokes when you’re happy with the shape.
Q: What is the easiest way to add a roof — do I put a rectangle on top?
A: A common simple approach is to draw a rectangle on top of the main rectangle to suggest a second floor or dormer, or draw a triangle roof sitting on top of the rectangle. Carefully align edges so the roof looks even and the top of the rectangle meets the base of the roof evenly to avoid a lopsided look.
Q: How can I draw windows and doors so they look balanced?
A: Measure spacing lightly and mark points to place a square window or a circular window (a circle can be a decorative attic window). Draw straight lines for window frames and keep the height of doors and windows consistent so elements sit evenly across the façade.
Q: I want your house to look more detailed — how do I add a yard and tree?
A: After the house is established, sketch a simple yard by drawing a horizontal line across the bottom and add grass texture. Place a tree beside the house using overlapping circles for foliage and a rectangle or tapered trunk. You can also draw bushes and a path leading from the door to the yard to create a full scene.
Q: What should I do if I make a mistake while sketching?
A: If you make a mistake, erase the error lightly and redraw carefully. Working lightly at first helps minimize smudging and lets you correct proportions easily. If the mistake is persistent, incorporate it into the design or use it as an opportunity to get creative with style or extra details.


