


1. Understanding Basic Facial Proportions and Measurements
Okay, let’s get our pencils ready. We’re not diving into shading or perfect noses yet. We’re doing something way more foundational. Think of this as learning the map before we start the road trip. When you set out to draw a face for beginners, understanding basic proportions is the most crucial step. The biggest secret to drawing faces isn’t some magical talent. It’s knowing where to put things. Did you ever draw a person and think the eyes looked a little strange? It’s almost always because the proportion and spacing were off.
The Golden Rule: Dividing the Face
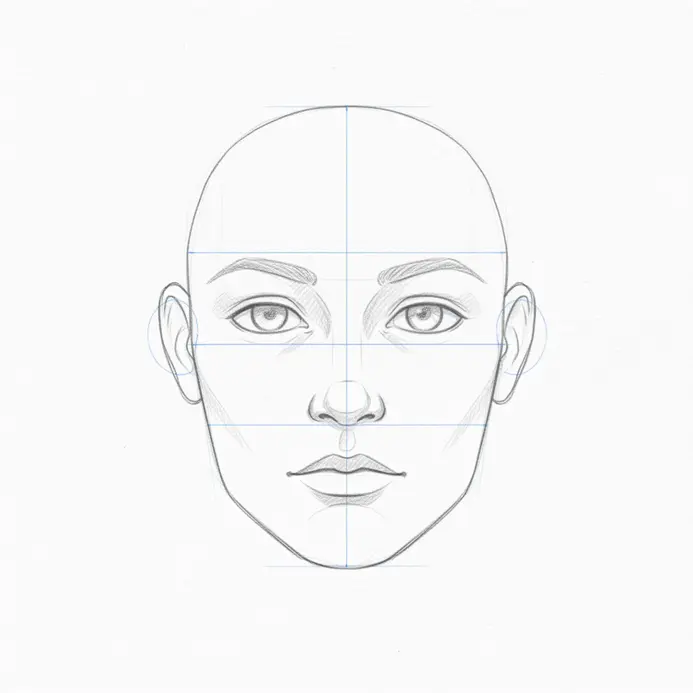
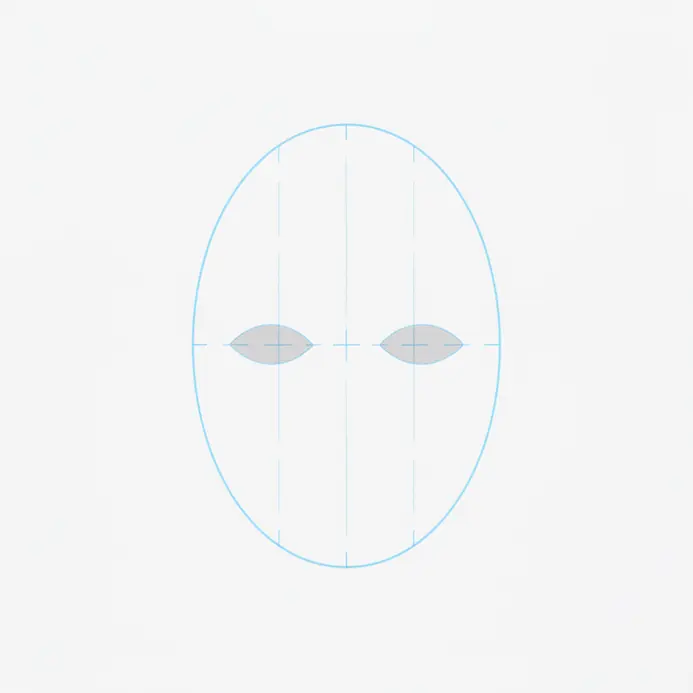
Forget trying to draw a perfect, finished portrait right now. Instead, let’s map out the proportions around the eyes for better accuracy. The classic method artists use is to divide the head into equal sections. Start by sketching a simple oval. Now, draw a line lightly down the vertical center. This is your guide for symmetry. Next, draw a horizontal line across the middle of the head. That’s not where the eyes go. The eyes actually sit on a line exactly halfway between the top of the head and the bottom of the chin.
Here’s your real-world example. Look at your own face in a mirror. Place your finger at the very bottom of your chin. Now move it up to the bottom of the nose. See that distance? That’s about the same as the distance from your nose’s bottom to your eyebrows, and again from your eyebrows to your hairline. The face is roughly divided into equal thirds. This is why practicing with basic shapes first, like in our guide on easy things to draw for beginners, builds such strong drawing skills.
Once you have those guide lines, you can lightly sketch where the other features land. The bottom of the nose is about halfway between the eye line and the chin. The mouth sits about one-third of the way from the nose to the chin. See how we’re breaking the face down into simple, manageable chunks? This approach takes all the guesswork out. You’re building features on a solid, measured structure of the head.
2. Creating the Initial Oval Face Shape Guide
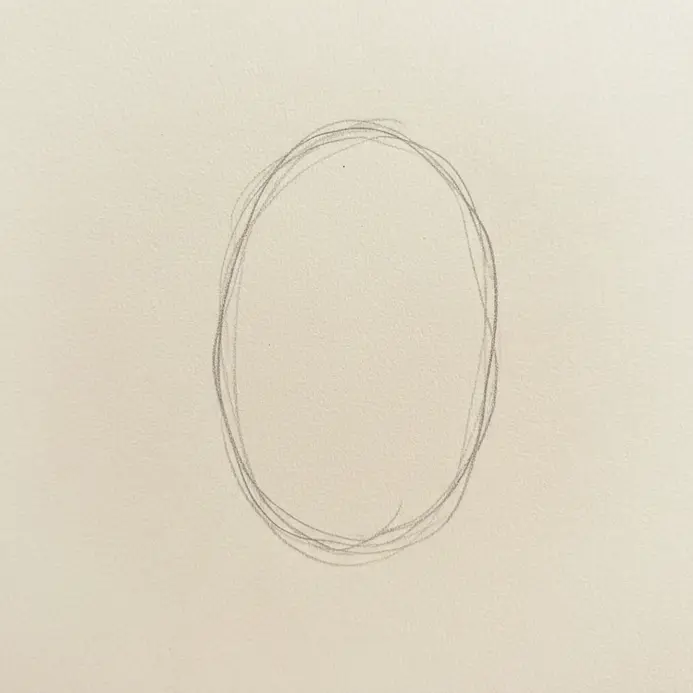
Start With the Universal Blueprint
For anyone learning how to draw a face for beginners, the absolute first thing we grab is that trusty oval. Think of it as our construction blueprint, our friendly guide that stops everything from going lopsided later. The oval isn’t the final face shape—it’s the space where all the magic happens. We lightly sketch this shape, keeping our pencil marks soft and erasable.
Here’s a real-world example to lock this in. Look at a classic egg. See how it’s wider at the top and tapers gently toward the bottom? That’s the exact energy we’re going for with our foundational oval. This simple shape automatically gives us the graceful taper for the jawline. We place our middle line vertically down the center of this oval. This line in the center ensures everything we add later stays symmetrical. It breaks the complex structure of the head into a simple step-by-step process.
Now, let’s add our first big divisions to help us draw a face step by step. About halfway down the oval, draw another horizontal line softly. This marks where the eyes will eventually sit as part of the face step by step. In standard proportion, the eyes in the middle of the head are crucial. This one guideline prevents the ‘forehead of doom’ and makes your drawing of a face look believable instantly. Remember, we’re not drawing features yet—we’re building the map. A light touch is key here so we can adjust as we go.
3. Drawing Accurate Centerlines for Symmetry

Okay, let’s get down to the magic trick that makes a face look real instead of lopsided. We’re talking about centerlines. Think of them as the invisible spine of your drawing. Without a good centerline, your eyes will wander off in different directions. Ever notice how a face feels “off” but you can’t pinpoint why? It’s almost always a symmetry problem in the center of the face.
The Simple Method You Already Know
Forget the fancy tools for a minute. The best tool you have is your own eye and a pencil. Here’s a concrete, observational example you can try right now while drawing a portrait. Grab a photo of a face. Now, take a ruler or even the edge of a piece of paper and visually bisect the face. Find the midpoint between the pupils. Is it perfectly centered over the tip of the nose and the middle of the mouth? Probably not. That slight, natural imperfection is what we’re trying to map, not erase.
Your Action Plan for the Sketch
So, how do we translate this observation to our blank page? Start by drawing your basic oval shape for the head. Lightly draw a single, soft vertical line right down the middle to divide the face in half. This is your guide for everything. Now, here’s the pro move: look at where you’ve placed the outer edges of the eyes. Mentally find the halfway point between them and make a tiny mark. Does your vertical line pass through it? If not, nudge your features. Doing this simple check prevents you from drawing one eye up by the eyebrow and the other down by the cheekbone.
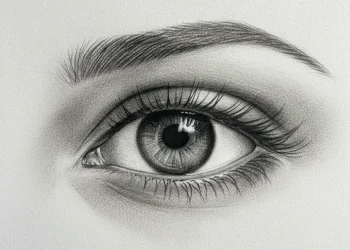
4. Positioning Eyes Using the Five-Eyes Width Rule
Okay, let’s get those eyes in the right spot! Eye placement is a common stumbling block when you draw a face for beginners. Often, the issue is spacing. It’s called the Five-Eyes Width Rule, and it makes positioning eyes so much easier when drawing human faces.
Here’s the core idea: when you look at a face from the front, the total width from the outer corner of one eye to the outer corner of the other is about five eye widths. That means if you imagine or lightly draw five equal spaces across the face, the eyes sit in the second and fourth spaces. The space between the eyes is exactly one eye width. This rule gives you a solid foundation.
Let’s make it real. Next time you’re with a friend, casually observe their face to understand how to draw in the eyebrows correctly. See how the gap between their eyes is roughly the same as the width of one of their eyes? That’s the Five-Eyes Width Rule in living color! It’s a perfect observational trick for a realistic face.
To apply this, start by sketching the basic oval for the head. Then, divide the horizontal center line into five equal parts. Mark the second and fourth segments for the eyes’ outer corners. Remember, keep your lines light so you can adjust as needed. This method for drawing helps map out the proportions before adding details like the nose or mouth.
5. Mapping Nose Placement Relative to Eye Position
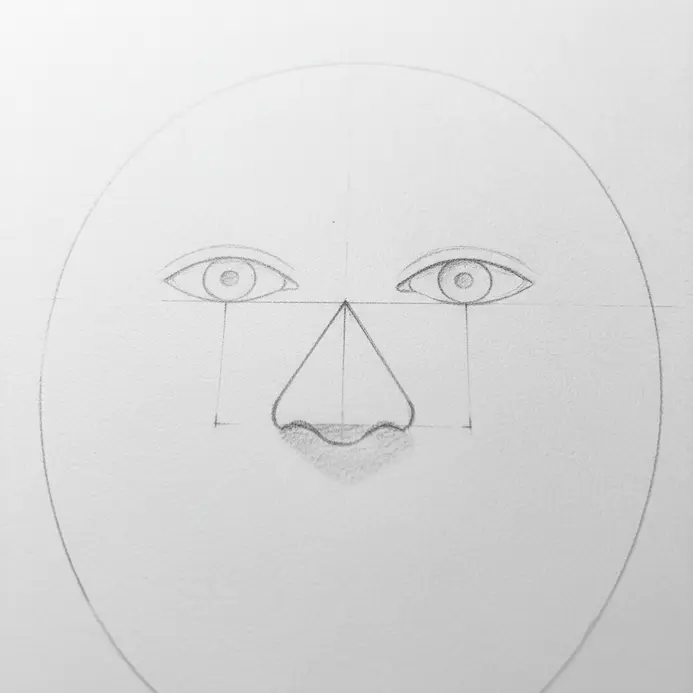
Alright, let’s get our noses in the right spot. This is where so many of us trip up. We get the eyes looking great, but then we plop the nose somewhere random and the whole portrait feels off. The secret is simple: the bottom of the nose is directly related to the position of the eyes.
The One-Third Rule You Will Actually Use
Imagine drawing a light vertical line down the center of the face. Now, picture the distance from the horizontal line where the eyes sit down to the chin. The bottom of the nose typically lands about one-third of the way down that space. We’re not doing math. We’re training our eyes. A fantastic observational trick is to look at a friend’s profile. See how the space from their eye corner to the bottom of their nose forms a rough triangle? That’s the visual anchor you’re looking for when mapping the human face.
Here’s your concrete, real-world example. Grab a photo of a person looking straight ahead. Use your pencil to lightly mark the inner corners of the eyes. Now, draw two lines softly straight down from each of those points. Where do those lines point? They’ll frame the outer edges of the nostrils almost perfectly. Getting this mapping right instantly makes your drawing feel solid. Want to practice this on something simpler first? Try applying this eye-to-nose check when you work on some of our famous female cartoon characters to draw.
6. Drawing Lips Based on Chin Section Divisions

Okay, so we’ve mapped out the chin section. Now for the fun part: placing the lips perfectly using that grid we made. This is the secret sauce that makes a drawing of a face look “right” instead of just “off.” We’re going to use those four horizontal bands. The key is remembering that the lower lip sits right at the midpoint of the entire chin-to-nose-base section.
Let’s Break Down Those Bands
Here’s your cheat sheet. The first band up from the chin is for the shadow under your bottom lip. The second band is the body of the lower lip itself. The third band holds the peaks of the upper lip. Finally, the fourth band is where the lips meet the philtrum, those vertical grooves under the nose. This system takes the guesswork out of portrait drawing.
Want a real-world example? Next time you’re sketching, try this. Lightly draw your chin-to-nose section and divide it into four equal bands. Now, look at a photo. You’ll see the lower lip’s top edge consistently hits that 50% line. The cupid’s bow peaks land in the third band. It’s consistent across different faces.
Now, about width and angles. A good rule is that the lip width relates to the jaw’s width. And the little upward tilt at the corners of the mouth? That’s your lip commissure angle. Keep it subtle. Getting these proportions right is a huge step in learning how to draw a face, especially when you start drawing. It’s less about drawing a perfect mouth and more about placing it correctly on the head’s structure.
7. Placing Ears Using the Nose-to-Eyebrow Alignment
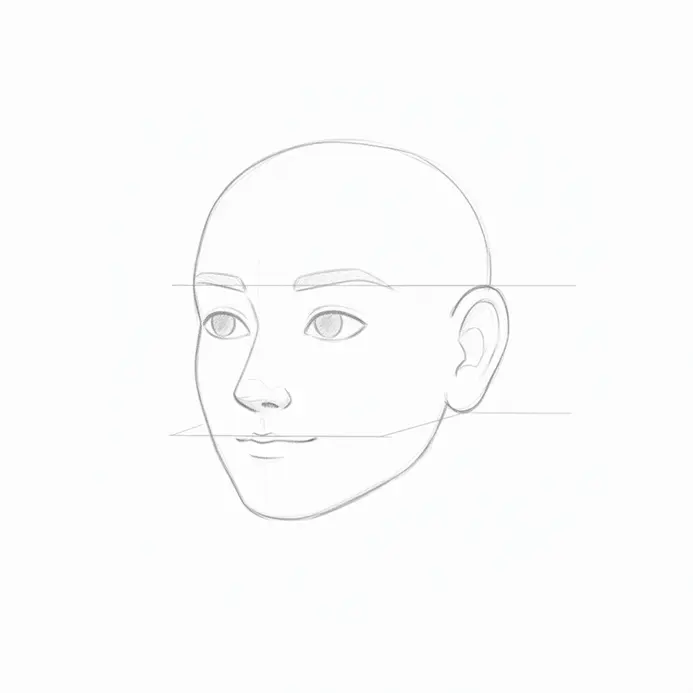
Your Nose is the Secret Map to Perfect Ears
Alright, let’s talk ears. They’re not just random shapes stuck to the side of the head. Placing ears correctly is a common struggle when you draw a face for beginners, but using the nose as a guide makes it simple. Here’s the rule: the tops of the ears line up with the eyebrow, and the bottom of the ear lines up with the bottom of the nose. You don’t need to guess. You’ve already mapped these points on the face.
Think about a real-world example. Look at a friend in profile or check out a photo. You’ll see that line from the eyebrow travels right back to where the ear starts. The line and the bottom angle of the nose goes straight back to the earlobe, which is crucial when drawing a portrait. This alignment keeps the ears from looking like they’re floating too high or sagging too low.
So, when you’re sketching, lightly draw those two horizontal lines from the eyebrow and nose out toward the side of the head. Where they end is where you’ll block in the ear shape as you draw a face step by step. This method takes the mystery out of drawing portraits and makes the whole process feel more manageable. Give it a try on your next sketch.
8. Adding Hairline and Forehead Proportions
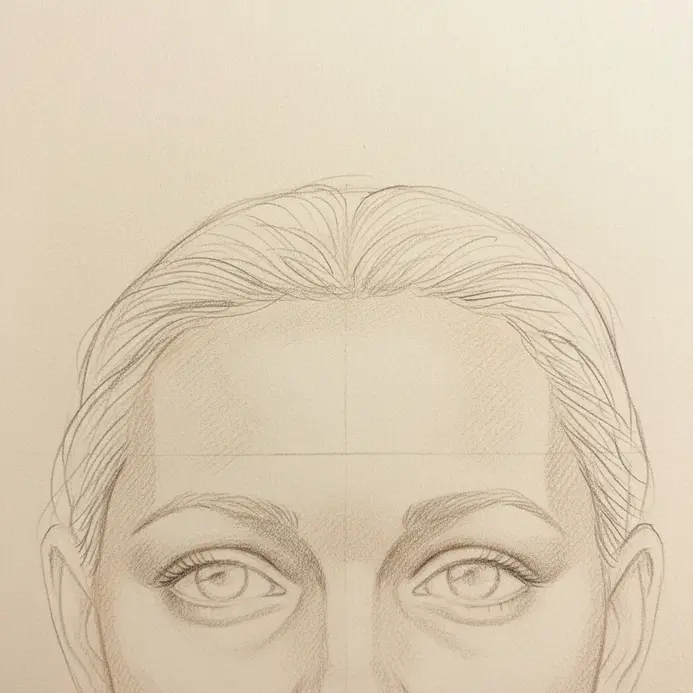
Where Does the Hair Actually Start?
Okay, let’s get this sorted because it’s a classic beginner trap. We’ve got our face oval mapped out. The hairline is not the top line of your oval. It sits lower. Getting its position wrong makes a forehead look impossibly tall or squished. Think of the forehead as a distinct, separate plane from the hair-covered scalp. A solid observational example? Look at a friend’s profile. See how the forehead slopes back from the eyebrows before the hair starts growing? That’s the top portion of the head we are defining.
So, how do we find it on our drawing? Remember those horizontal lines we used to place the eyes and nose? Let’s add one more. Measure about one-third of the way down from your top guideline to your eyebrow line. Lightly sketch a new horizontal guide here. This is your general hairline starting point for a standard adult face. It creates a balanced forehead area that feels natural. Want to learn more about mapping out proportions from the very start? Our guide on easy things to draw for beginners breaks down this foundational step by step thinking.
Now, the shape of the hair line itself is never a perfect, hard curved line. Is it a widow’s peak? Is it rounded or more straight across? This is where you add personality. Use light, sketchy strokes to suggest individual hairs coming forward, not a solid, helmet-like line. Getting this right instantly makes your portrait look less like a diagram and more like a person, which is essential when you want to draw a face.
9. Shading Techniques for Facial Contours

Okay, let’s get into the fun part where your flat sketch starts to look like a real person! When you draw a face for beginners, shading is all about tricking the eye into seeing depth where there’s only paper. We’re showing where the light isn’t hitting, which is crucial when you want to draw a face realistically. Think about holding an egg under a lamp. The curve closest to the light is bright, and as the surface turns away, it gets gradually darker. Your face has those same gentle curves.
Find Your Light Source First
Before your pencil even touches the paper, decide where your light is coming from. Is it above and to the left? Directly in front? This one decision controls everything in your drawing a portrait. The side opposite your light source gets the core shadows. For a beginner, I always recommend a simple top-left light. Now, where do we put those shadows? The biggest areas are usually under the brow ridge, the side of the nose, under the bottom lip, and under the chin. See how those are all places that would naturally block light?
Here’s a real-world observational tip for you. Go look at a friend’s face in a room with one main light. See that soft, grayish area under their cheekbone? That’s not a harsh line, it’s a transition. Your goal is to build that up with layers of your pencil, instead of drawing one heavy scribble. Start with a light touch and slowly add a bit of shading where you need deeper shadows. This layered approach is perfect for beginners.
10. Avoiding Common Beginner Mistakes in Facial Symmetry
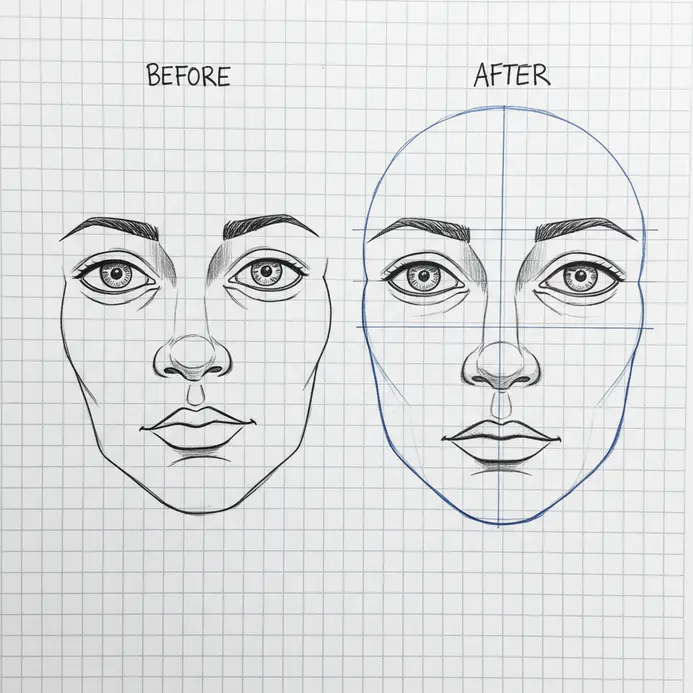
Let’s get real for a second. When we first learn to draw a face for beginners, we obsess over making everything perfectly even. But here’s the secret our brains already know: no face is perfectly symmetrical. The trick is knowing which asymmetries are totally normal and which ones throw the whole drawing off. So, what’s the biggest trap when it comes to drawing? It’s overcorrecting those tiny, natural differences until our portrait looks like a weird, stiff mask.
What’s Normal vs. What Needs Fixing
Think about a photo of a friend smiling. Is one eye a smidge higher? Does their nose curve ever so slightly? In real life, a small nasal deviation is completely acceptable when it comes to drawing. If you try to “fix” these in your sketch, you’ll erase the character and life from the person you’re drawing, which is something you want to avoid when you want to draw a face. Your goal isn’t a robot. It’s a believable, lively face.
How do you avoid this? You need a solid plan before your pencil hits the paper. I always start by lightly sketching my central guideline and a few basic horizontal lines for the eyes, nose, and mouth. This map keeps the big pieces in the right neighborhoods so the small, natural quirks can live happily within them. If you’re looking for a great exercise to practice drawing this mapping without pressure, our guide on easy things to draw for beginners has some perfect starting points.
Your One Concrete Thing to Watch For
Here’s your real-world example to take away. Grab a selfie. Now, flip it horizontally. Looks weird, right? That’s because you’re used to your own subtle asymmetries! When you’re drawing heads, constantly flip your canvas or hold your sketch up to a mirror. This instantly shows you if you’ve accidentally made one eye way bigger or shifted the entire mouth off-center. It’s the fastest way to learn and catch symmetry mistakes.
Conclusion
Look at that. You have built a face from the ground up. We started with a simple oval and ended with a portrait that has structure and life. The magic is not in one perfect stroke, but in following these reliable steps every single time. Remember, every artist uses these proportion rules as their secret weapon. Did you see how the pieces fit together? Now your drawing has a solid foundation. The next time you sit down to draw a face for beginners, you will know exactly where to place each feature. Keep this tutorial handy for your next sketch session. Your next step is to grab a photo of a friend and try applying these steps to a real reference to get better at drawing.
FAQs
Q: What is the simplest way to start to draw a face for beginners?
A: Start by drawing a circle to establish the cranium, then draw an oval that extends down for the jaw. Put a line down the middle to indicate the center plane of the face and a horizontal line halfway down the circle to mark the brow line. This basic approach helps you understand facial proportions before you start adding features.
Q: What is the Loomis method and how can it help me draw a face?
A: The Loomis method, developed by Andrew Loomis, is an approach to drawing the head that begins with a sphere and a flattened side of the face to establish planes. It teaches you to place the bottom of the circle, jawline, and the center line so portrait artists and beginners can consistently understand facial proportions and construct a face from any angle.
Q: How do I draw a face for beginners from the side (profile)?
A: To draw a face for beginners from the side, start with a circle, mark the side of the face and the edge of the face, then add a line from the bottom of the circle forward to form the forehead, nose, and chin. Pay special attention to the placement of the ear, which usually sits between the brow line and the bottom of the nose line.
Q: Where should I place the eyes, nose and mouth when drawing the face?
A: Use proportional guidelines: the eyes sit on the horizontal line across the middle of the head, the nose base generally falls halfway between the eyebrows and the chin, and the mouth falls about a third of the way down from the nose to the chin. To understand facial proportions, measure distances rather than relying on guesswork.
Q: How can I draw a female face differently from a male face?
A: When you draw a female face, soften the jaw and make the cheekbones slightly higher; draw the eyebrows with gentler, more curved strokes and position the eyes slightly larger. The overall approach to drawing facial features remains similar, but subtle changes to the edges and proportions create a convincingly female structure.


