

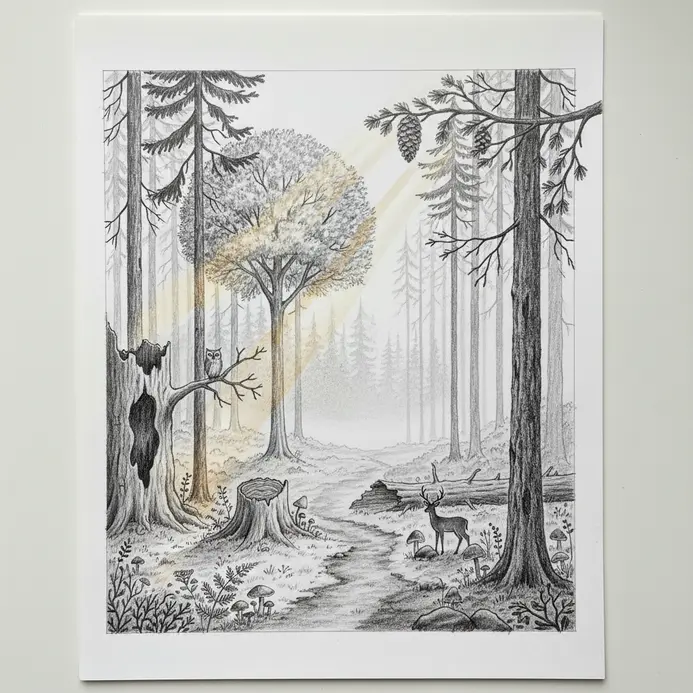


What You Need for Easy Drawing Forest Ideas
Prepare a standard graphite pencil for light initial guidelines, alongside a clean eraser and white paper. An optional straightedge assists with foundational perspective lines, while a black fine-liner secures crisp final outlines. Keep colored mediums on hand if you prefer adding tonal depth later. Gathering affordable, basic materials ensures you maintain steady focus on the drawing process without clutter.
Before You Start: Easy Forest Drawing Basics
Complete each phase sequentially, since earlier forms establish the foundation for later details. Apply light pressure during initial layout strokes, knowing those marks will disappear after cleanup. Minor irregularities during early construction remain normal and support organic growth. This systematic approach transforms rough geometry into recognizable woodland scenery with consistent practice. Patience during early stages accelerates your overall progress. Following structured steps reduces guesswork and strengthens observational skills. The framework remains flexible enough for personal adjustments while maintaining structural integrity. Mastering these fundamentals prepares you for Easy drawing forest ideas throughout the entire session.
1. Sketch Triangle Pine Trees In Clean Rows
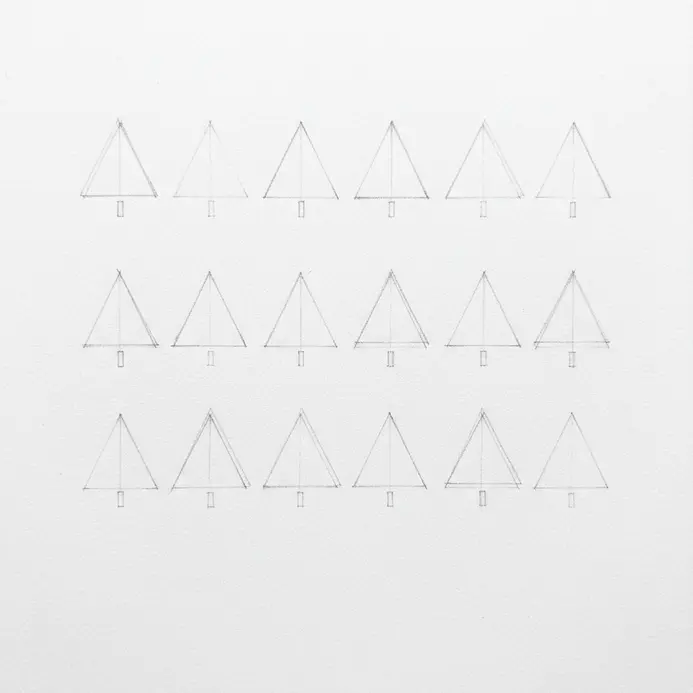
This initial phase establishes the overall woodland structure, delivering a neat graphic layout immediately. You will construct a perspective grid using triangular forms that diminish in size across the page. Maintaining a controlled framework ranks among the finest Easy drawing forest ideas for newcomers seeking instant spatial depth. Draw a faint horizon line across the sheet, then mark a single vanishing point along it. Extend two long diagonal angles downward from that dot to outline the boundaries of your foremost layer. Populate that space with evenly spaced, upright triangles. Shift to subsequent background rows, drawing narrower guidelines and filling them with smaller shapes. Continue shrinking the triangular forms until they reach the distant horizon markers. A straightedge guarantees sharp perspective lines, though light pencil pressure remains essential for later cleanup. This repetitive scaling exercise builds reliable spatial reasoning skills.
2. Shape A Cloud Canopy Tree With Rounded Edges
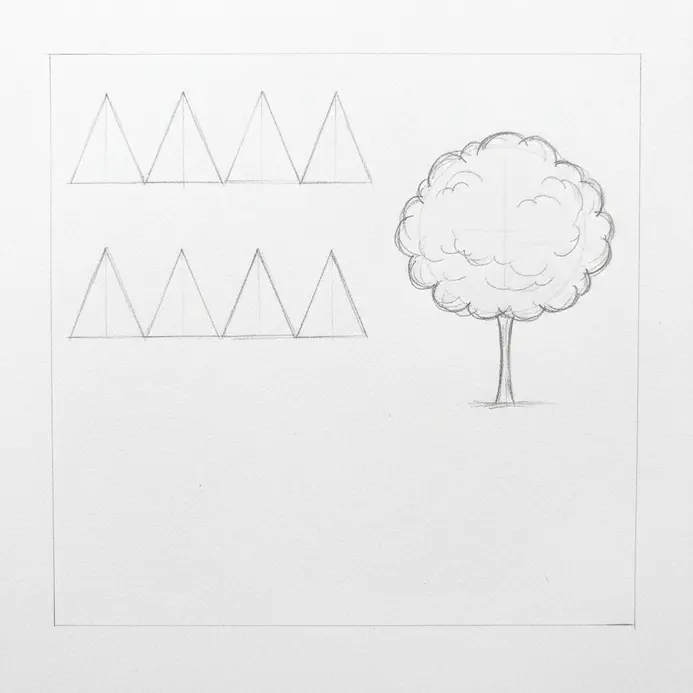
Transform rigid linear forms into soft, overlapping foliage clusters using this technique. Instead of rendering one massive leaf mass, separate the canopy into distinct floating pads that resemble weather formations. This structural shift introduces volume and light play into the composition. Begin with the leftmost branch and sketch a loose oval hovering above its tip. Maintain light pressure to allow adjustments without damaging the paper surface. Repeat this process along adjacent branches, varying each oval width and curvature. Connect floating shapes to wooden stems with gentle connecting strokes. Leave deliberate gaps between adjacent leaf pads to enhance depth perception. These intentional voids create a layered canopy that reads as intentional rather than chaotic. Practice shaping lower edges before building upper domes for consistent rounding effects.
3. Build A Layered Forest Silhouette Behind The Trees

Generate convincing spatial distance by stacking receding horizontal bands across the background plane. Drawing multiple fading layers transforms flat compositions into expansive landscapes. Each subsequent row sits closer to the viewer, creating atmospheric density. Mark a gentle wavy line above the established horizon to separate the furthest row from the sky. Fill the space beneath with your lightest pressure application, keeping edges soft and undefined. Add a second overlapping band directly behind the main subjects, increasing line weight slightly. Introduce irregular peaks and valleys along each new upper boundary to suggest individual crowns. Repeat until five distinct rows appear on your sheet, each progressively darker and more detailed. Allow narrow sky gaps to bleed through overlapping masses for realistic lighting.
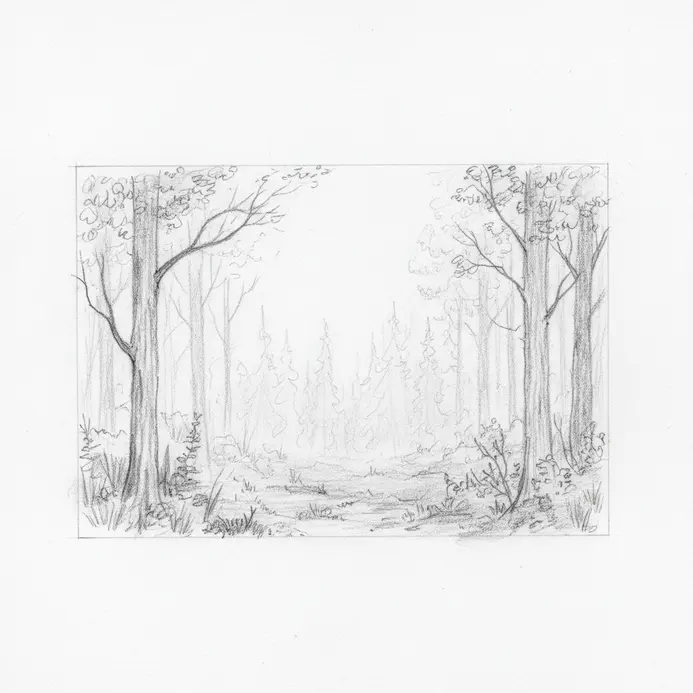
4. Draw A Winding Woodland Path Through The Center
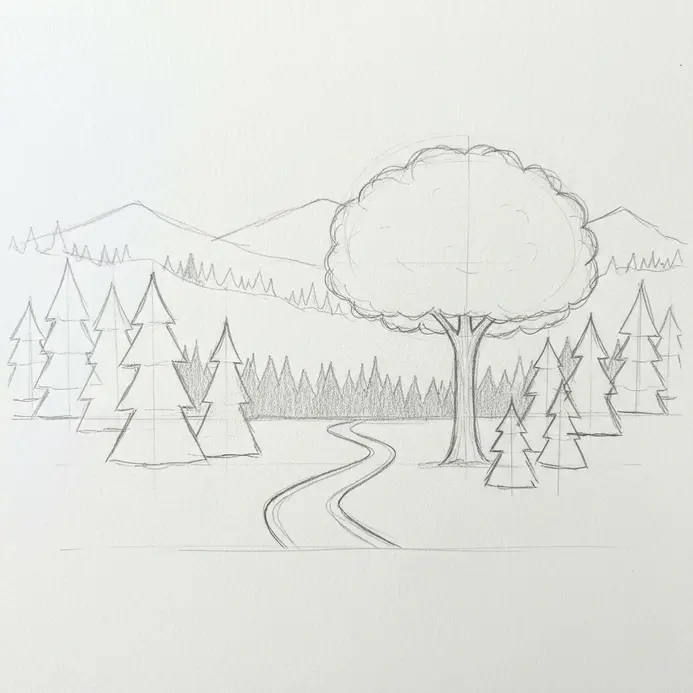
Direct viewer attention toward the central clearing with a gentle curving walkway. Adding an organic route converts isolated botanical elements into an immersive environment. A single sweeping line establishes entry points and exit trajectories simultaneously. Place your starting mark near the bottom center edge and curve upward through existing trunk placements. Let the line drift naturally rather than following rigid mathematical arcs. Thinner strokes near the upper boundary suggest distance, while thicker strokes anchor the foreground. Trace a parallel boundary alongside the initial stroke, maintaining uneven spacing throughout the route. Wider mid-sections contrast with tighter curves to simulate natural dirt trails, expanding your portfolio of practical Easy drawing forest ideas. Merge both edges near the distant horizon to imply vanishing trails among distant foliage.
5. Add A Mossy Tree Stump Near The Foreground

Ground the entire composition by positioning a weathered wooden base in the immediate foreground. Placing heavy anchor objects near the front pushes background elements further into space. Offset the placement from dead center for balanced visual flow. Construct an uneven cylinder shape with jagged upper edges and wider side profiles. Extend wavy ground roots from the base to connect the object to the surrounding terrain. Add short curved marks to indicate grain direction and natural fractures. Pile soft, clustered vegetation along the top rim and shaded crevices to establish moss coverage. Layering organic textures over structural foundations yields convincing realism without overwhelming the composition. This technique proves essential among advanced Easy drawing forest ideas for adding environmental storytelling.
6. Sketch Fern Fronds Around The Forest Floor
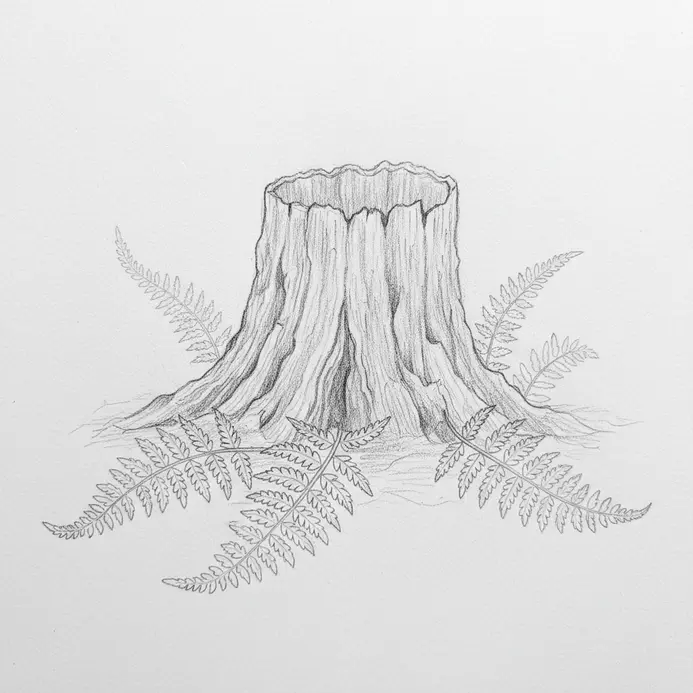
Brighten the lower terrain by adding delicate leaf clusters along dirt paths and root systems, a foundational exercise for mastering Easy drawing forest ideas. Introducing fine details enhances textural variety and reinforces natural ground coverage. This layering technique grounds the entire composition. Draw gently curving rachis lines extending outward from established tree bases in multiple directions. Attach paired leaflets along each stem, shrinking individual shapes toward the upper tips. Use brief feathered strokes along outer edges to maintain organic irregularity. Apply heavier pencil pressure to foreground specimens while fading background leaves into the mid-section. Varying leaflet spacing and orientation prevents repetitive mechanical appearances. Consistent practice with botanical variations builds steady hand control.
7. Place A Mushroom Patch Along The Ground Line

Anchor your lower boundary with clustered organic caps following the soil contour. Grouping multiple specimens along existing curves establishes grounded life and visual rhythm. Varying stem height prevents uniform mechanical spacing across the foreground. Arrange primary caps taller than secondary forms to establish natural growth hierarchy. Integrate overlapping shapes to create instant spatial depth without additional shading. Consistent practice with grouped arrangements strengthens your foundational Easy drawing forest ideas portfolio. Allow partial overlaps between adjacent caps to reinforce organic density. This layering approach eliminates flat sticker appearances. Maintaining irregular spacing guarantees realistic results.
8. Draw A Fallen Log Stretching Across The Scene
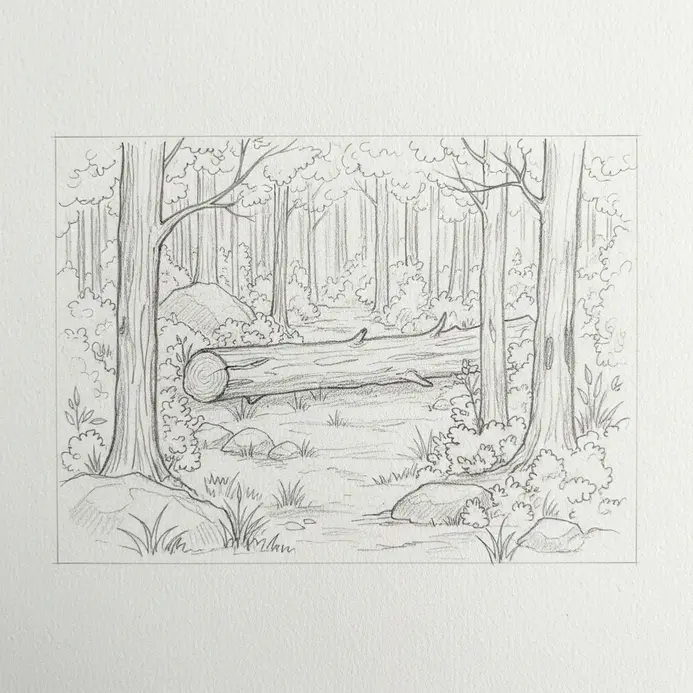
Extend a horizontal timber across the lower quadrant to establish additional foreground structure. Positioning heavy elements diagonally creates immediate spatial flow. Angled placement guides the viewer gaze toward central focal points. Sketch a long cylinder shape starting near the front corner and tapering toward mid-distance. Apply gentle pressure during initial layout to allow smooth curve adjustments. Avoid perfectly straight edges, as nature favors subtle bends and uneven surfaces. Render bark texture using short jagged marks alongside the trunk boundary. Carve occasional deep cracks and knot shapes to simulate natural aging processes. Darkening interior knots establishes reliable shadow placement for Easy drawing forest ideas that require advanced material rendering. Soften outer edges to imply weathering and environmental exposure. Adding scattered moss patches along upper surfaces reinforces time progression. Irregular line quality ensures authentic wood representation. Final polishing enhances overall realism.
9. Shape A Hollow Oak Trunk With A Dark Opening
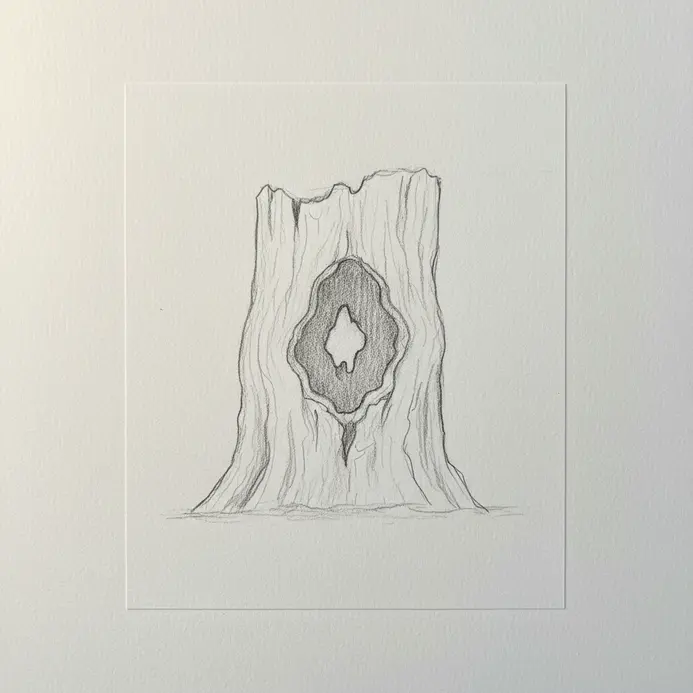
Transform standard trunk forms into ancient structures by carving out deep interior cavities. Adding shadowed voids introduces narrative intrigue and visual weight to your layout. Off-center placement maintains balanced composition flow. Locate a suitable zone below the canopy line and sketch a jagged vertical slit. Fill the interior space with uniform heavy pressure to establish complete depth contrast. Allow rough bark fragments to protrude slightly over the entrance boundary. Keep cavity edges uneven to simulate fractured wood over time. Maintaining solid black interiors prevents shallow stain appearances. This high-contrast method remains essential for advanced Easy drawing forest ideas focusing on dramatic lighting. The final result anchors the viewer attention.
10. Add A Foggy Tree Line In The Distance
Establish extreme spatial recession by rendering faint background tree bands above the established horizon. Atmospheric layering reduces distant object saturation and detail density. Soft fading edges blend seamlessly into the open sky above. Mark a gentle undulating boundary line at the ground-sky intersection point. Fill the area beneath with feather-light side shading to create a uniform grey gradient. Maintain extreme lightness to ensure foreground elements remain dominant. Blur lower transitions using soft paper blending or eraser strokes for natural diffusion. Avoid adding individual trunk details within this distant band. Simplifying far background forms proves essential for mastering Easy drawing forest ideas with professional depth control.
11. Sketch Sunbeams Cutting Through The Pines
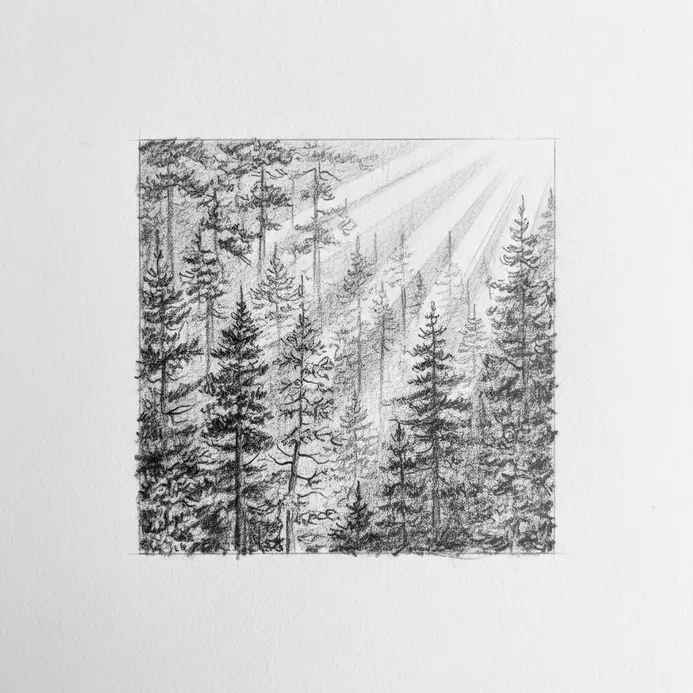
Illuminate your woodland scene with diagonal light shafts breaking through dense overhead foliage. Introducing directional radiance transforms static layouts into dynamic environmental studies. Highlighting specific pathways directs viewer focus immediately. Locate natural canopy gaps and extend faint angled lines downward from those openings. Keep initial construction pressure minimal for straightforward adjustment or complete removal. Darken adjacent areas to define beam boundaries and enhance contrast ratios. Add subtle floating particles inside light columns to simulate suspended atmospheric dust. Ensuring beams intersect visible trunks creates interrupted vertical rhythm. Practicing these illumination techniques expands your Easy drawing forest ideas repertoire significantly.
12. Add A Pinecone Branch Above The Forest Floor

Elevate mid-level details by suspending dropped branches above accumulated leaf litter. Positioning secondary foreground objects bridges empty gaps between soil and canopy. Resting timber on established rock formations anchors the visual weight. Sketch a gently curving limb resting against a nearby moss-covered stone foundation. Taper terminal ends and introduce natural twisting angles along the central axis. Extend minor twig offshoots to support clustered seed pods and organic debris. Darken underside shadows to reinforce physical separation from supporting surfaces. Scattered bark lichen and weathered grain marks enhance environmental authenticity. Executing these layered arrangements strengthens your foundational Easy drawing forest ideas collection.
13. Place A Deer Silhouette Between The Tree Trunks
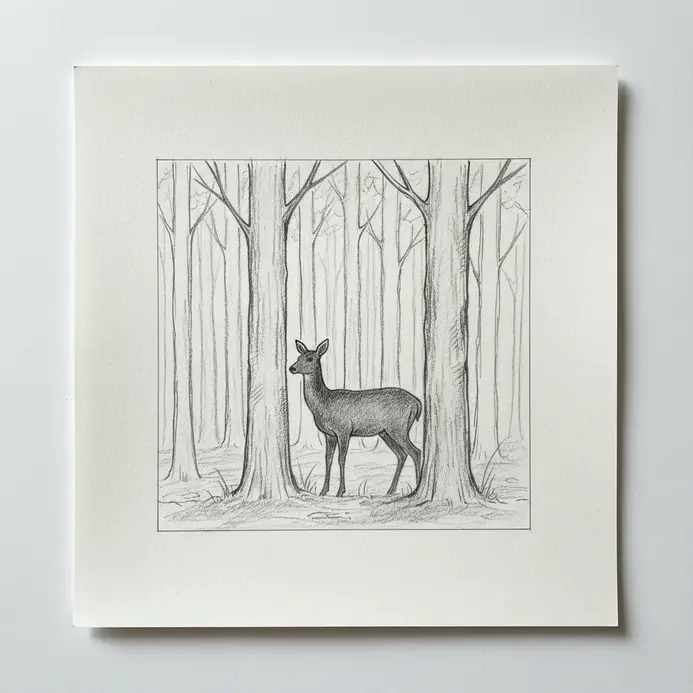
Inject narrative life into your environment by inserting a single animal outline between foreground pillars. Creating focal characters transforms abstract layouts into recognizable ecological snapshots. Proper scale relationships maintain realistic spatial integrity. Locate open space between two primary vertical supports and sketch a simplified side profile. Maintain basic curvature along the spine and slender neck proportions. Apply uniform dark pressure across the entire shape to produce a clean silhouette. Offset placement slightly from central alignment to generate candid movement cues. Preserving negative space around the subject enhances framing quality. Incorporating wildlife elements completes your comprehensive Easy drawing forest ideas workflow.
14. Draw An Owl Perched On A Branch Above
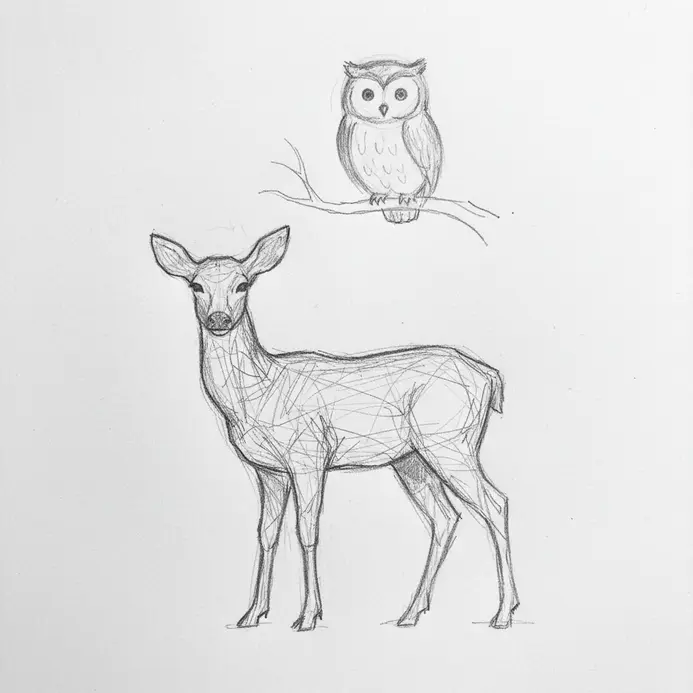
Construct upper canopy details by assembling basic geometric shapes into recognizable avian forms. Establishing correct proportions early prevents structural distortion during later detailing phases. Overlapping circles and ovals simplify complex anatomy. Center a vertical oval for the main body directly above existing timber supports. Attach a smaller circular head overlapping the upper third section. Extend horizontal guide lines across the facial zone to align beak placement and eye positioning accurately. Add gripping talons curling over the wooden perch to establish physical contact. Erasing initial construction marks leaves a clean, polished final outline. Mastering these structural breakdowns expands your Easy drawing forest ideas skill set substantially.
15. Finish With Forest Floor Rocks And Final Shading
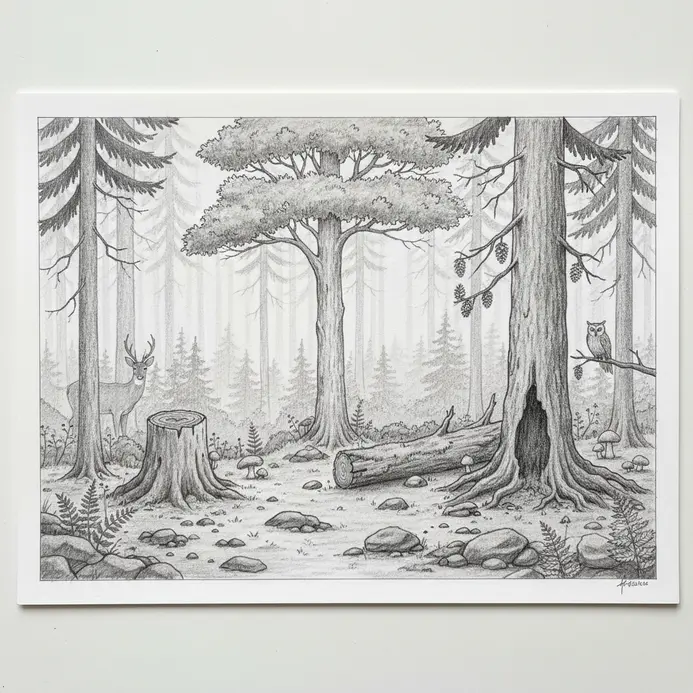
Complete the composition by scattering angular stone formations across the established soil plane. Consistent shading unifies disparate elements into a cohesive environmental study. Varying pebble sizes prevents mechanical floor textures. Cluster three to five jagged rock shapes near exposed root systems and pathway edges. Apply short directional strokes to simulate granite grain patterns on shadowed surfaces. Review overall illumination sources to guarantee uniform shadow alignment throughout the layout. Darken existing crevices along bark, trunks, and foliage to amplify contrast ratios. Filling residual gaps with fine gravel and scattered debris enhances natural density. Finalizing these grounding details ensures your Easy drawing forest ideas achieve professional presentation standards.
How to Choose the Right Easy Forest Drawing Idea for You
Select the simplest starting structure that matches your current comfort level and time availability. Focus on isolated components like single pines, isolated stumps, or solitary fungal clusters if larger scenes feel overwhelming. Repeating identical forms at varying scales builds proportional accuracy and hand memory. Attempt each completed composition again from memory after initial practice sessions. Isolating challenging components for repeated drills accelerates technical improvement. Introducing atmospheric backgrounds or consistent light sources serves as a logical progression step. Tracking personal milestones within a dedicated sketchbook reveals consistent growth patterns.
Conclusion
You have completed a comprehensive woodland study session, which demonstrates consistent habit formation and shape translation skills. Moving from structural frameworks to refined details establishes a reliable workflow for future botanical studies. Revisiting earlier compositions with altered scales or modified lighting conditions reinforces long-term retention. Transition toward denser woodland arrangements once comfortable with foundational spacing and shading techniques. Sharing finished pieces with fellow nature artists or storing completed pages creates valuable reference libraries for future projects. Incorporating these methods ensures your final Easy drawing forest ideas remain consistently polished and visually engaging.
FAQs
Q: What supplies do I need for these forest sketches?
A: Use a graphite pencil, a standard eraser, and plain paper for initial layouts. Adding coloring tools or fine liners remains optional after completing the main structure.
Q: Are these forest drawing ideas good for beginners?
A: Yes. The foundational forms rely on simple geometry, including basic triangles, smooth circles, sweeping lines, and gentle curves.
Q: How long does each forest idea take to draw?
A: Most exercises require five to twenty minutes, depending on individual detail preferences and pacing.
Q: Do I need to ink the drawing?
A: Leaving the piece as a graphite study works perfectly, though adding ink liners enhances final contrast.
Q: How do I make the forest look deeper?
A: Place larger elements in the front, reduce scale toward the back, and apply softer pressure for distant background layers.


