


Mathematical Foundations For Creating Precise Visual Illusions
The vibration effect that defines this work falls apart if your line width varies by a single millimeter. We all know the temptation to freehand a quick sketch, but trust me on this, Op Art leaves zero room for organic error. Your grid lines and contour lines must be mathematically precise because the illusion relies on the exact physical interaction between your stark patterns and the viewer retina. This is why artists study optical illusion art by building their iconic works on rigid geometric systems. Think of your initial sketch not as a drawing but as a precise architectural plan for perception. Every curve in a forced perspective piece must be calculated, not guessed. The good news is that this foundation, once solid, makes the actual inking process feel almost automatic.
Drafting Instruments And Surface Requirements For Sharp Lines
A single bleed of ink into soft paper fibers will flatten your entire illusion of movement. You need a surface that fights back against your pen, which is why smooth architectural drafting paper or high-quality bristol board are non-negotiable. They provide the hard, non-porous tooth that keeps your black and white boundaries brutally sharp. For your tools, reach for pigment liners or technical drawing pens with a consistent tip size. The rigid edge of a metal ruler is your best friend for those initial construction lines. Avoid any paper labeled for sketching or mixed media, as the texture will blur the crisp edges that make your pattern pop.
This combination of tool and surface is fundamental when learning to create compelling optical illusion art. It separates a dynamic, confusing image from a flat, static design.
1. Create a Monochromatic Wavy Parallel Line Grid
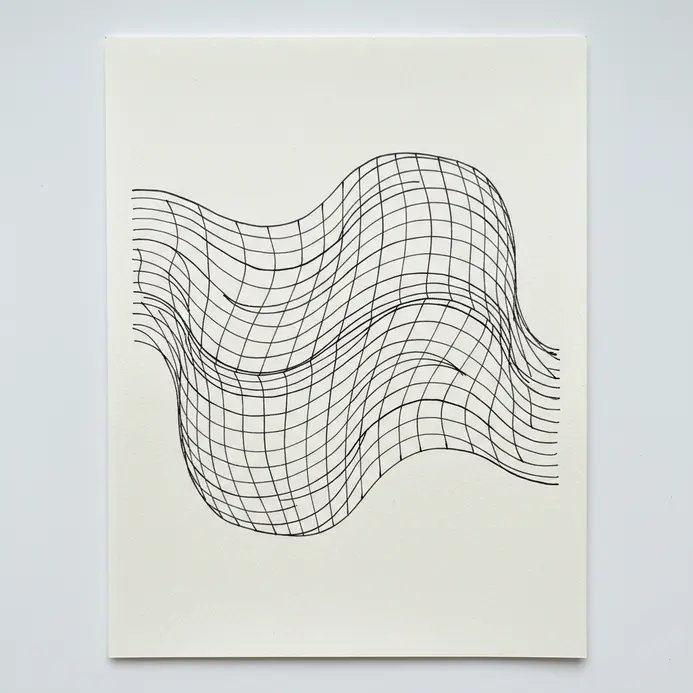
This one surprised me because it looks complex but takes under ten minutes to complete. You will create a series of wavy lines, all the same color, running perfectly parallel across the canvas. The key is drawing your consistent wavy line with a steady hand. Then you simply duplicate it, keeping the spacing perfectly even to build the grid.
Why does this approach define classic optical illusion art so effectively? It is all about how your brain perceives that repetitive, uniform pattern. The monochrome palette forces your eyes to focus solely on the subtle curves. For more inspiration on related techniques, explore modern pop art.
My go-to tip is to use a light pencil grid first if you are drawing by hand. This keeps your final inked lines uniform. Feel the satisfaction when that flat page starts to ripple.
2. Build an Interlocking Black White Escher Tessellation

This one looks intricate, but the process is surprisingly straightforward and deeply satisfying. You start with a perfect square on graph paper. The magic happens when you draw a unique curve along one side, then meticulously translate that exact shape onto the opposite side. I love how this turns a simple square into a template for interlocking birds, fish, or any figure you choose.
Why does it work so well? The precise translation ensures your shapes fit together without any gaps, creating a mesmerizing, continuous pattern. The high contrast of black and white then makes the interlocking figures pop, which is a hallmark of great optical illusion art.
My go-to tip is to keep your initial curves simple and flowing. Trust me, this makes the tessellation process much smoother. Feel the pride when your first row of shapes locks perfectly into place.
3. Draw an Impossible Three Dimensional Penrose Triangle

This one looks tricky, but trust me, it starts with a simple shape anyone can draw. Your first step is to lightly sketch a large equilateral triangle as your foundation. I love how this basic outline creates the perfect frame for the mind-bending effect to unfold. Keep your pencil pressure light so you erase these guide lines later.
Focus on making all three sides exactly the same length, using a ruler for precision. A common beginner mistake is rushing this step and ending up with a lopsided triangle, which ruins the whole effect. Your wrist movement should be smooth and steady, avoiding a tight grip that makes dark, hard-to-remove lines.
Once your perfect triangle is down, you have set the stage for a classic piece of optical illusion art. The satisfaction comes from seeing this clean, precise shape transform into something that defies logic. For more inspiration on using stark contrast in your work, you can discover black and white techniques that play with perception.
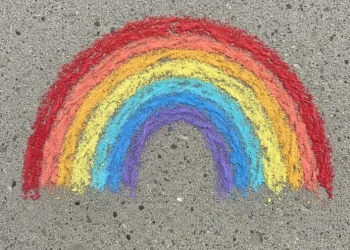
4. Sketch a Gradient Concentric Circle Ripple Pattern

This is where the magic of movement really starts to come alive. You will use your software’s Ellipse Tool to draw perfect circles from a single, precise center point. The key is applying a smooth radial gradient to each one, creating that beautiful, flowing color ripple effect that seems to pulse outward. Trust me, when you get those colors to transition seamlessly from one ring to the next, it feels incredibly satisfying.
A common hiccup? Off-center circles that break the visual flow. Always use guides to lock in that central origin. For a fantastic foundation in working with these core abstract shapes, you can begin abstract painting concepts with some simple exercises.
Isn’t it amazing how a few concentric rings build a strong foundation for optical illusion art? That simple layering creates a convincing sense of depth.
5. Achieve a High Contrast Moire Interference Texture

Ever wondered how those mesmerizing, wavy patterns seem to float between two layers? It is all about a fantastic visual phenomenon called moiré. To make it pop, you need to overlay two simple, regular patterns like grids or parallel lines with a tiny misalignment. That slight rotation or frequency difference creates those stark, pulsing bands of light and dark.
For maximum impact, print your patterns in pure black on a transparent film. This ensures the lines are completely opaque, blocking light where they overlap to create deep shadows. The real magic happens when you view them together because the high contrast makes the texture look alive. It is a brilliant way to add dynamic energy when developing your own optical illusion art.
My go-to tip? Start with thin, dense lines and a subtle angle shift of a degree or two. This simple setup guarantees a clean effect that feels active. Seeing that perfect, sharp pattern emerge is incredibly satisfying.
6. Form a Floating Geometric Cube Illusion
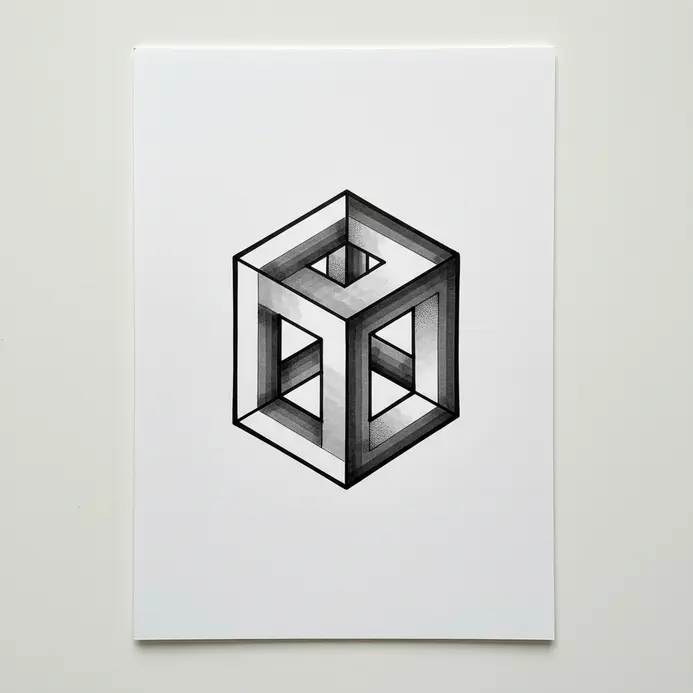
This one is a classic mind-bender. It looks complex, but with a ruler and patience, you build it in under ten minutes. Start by drawing two overlapping squares on your page, then connect their corners to form a simple wireframe cube. The real trick is introducing the impossible line that makes your brain stutter.
From a front corner, draw a line aiming for a back corner, but connect it in a way that defies normal perspective. This creates the famous Penrose Cube illusion, an object that cannot exist in three-dimensional space. Your mind tries to resolve the contradictory depth cues, and that is where the effect shines.
For an extra layer of depth, try adding some simple shading. Imagine a single light source and darken the sides facing away from it. This solidifies the form and makes the optical illusion art pop right off the page. It is incredible to watch a flat drawing gain impossible dimension. If you enjoy playing with perception and abstract form, you might also like to learn abstract dot art for another way to create captivating visual effects.
7. Capture a Distorted Radial Line Starburst Design

Ever tried a sunburst pattern only to find it felt too perfect and static? This design fixes that immediately. You start by creating a clean radial base, like spokes from a hub, and then you introduce controlled chaos. I love the Warp effects in Illustrator for this, letting you bend and twist those straight lines into something dynamic.
You achieve a similar warping effect in Photoshop using its Liquify filter. The key is to distort with purpose, not at random, to maintain a sense of the original structure. This technique shows how modern optical illusion art plays directly with your visual system. For a look at how artists historically manipulated visual perception in other ways, explore famous art history incidents.
Does that not look stunning when it all comes together? The intentional imperfection creates a true visual pulse.
8. Outline a Hidden Figure Ground Reversal Illustration

Ever looked at a drawing and watched it flip between two different pictures? That is the magic of a hidden figure ground reversal. You start by sketching two ideas that share the same outline, like a vase and two faces. The trick is making that shared contour line work perfectly for both images, so neither one dominates the other.
Keep your design simple with strong value contrast, often using just black and white. Avoid adding too much detail or color, as it can lock the viewer to a single reading. Isn’t it satisfying when someone finally sees the second image you cleverly hid? I love how this technique makes the audience an active participant in your optical illusion art.
Feel that little thrill of visual discovery.
9. Apply a Hyperbolic Curved Surface Checkerboard Grid
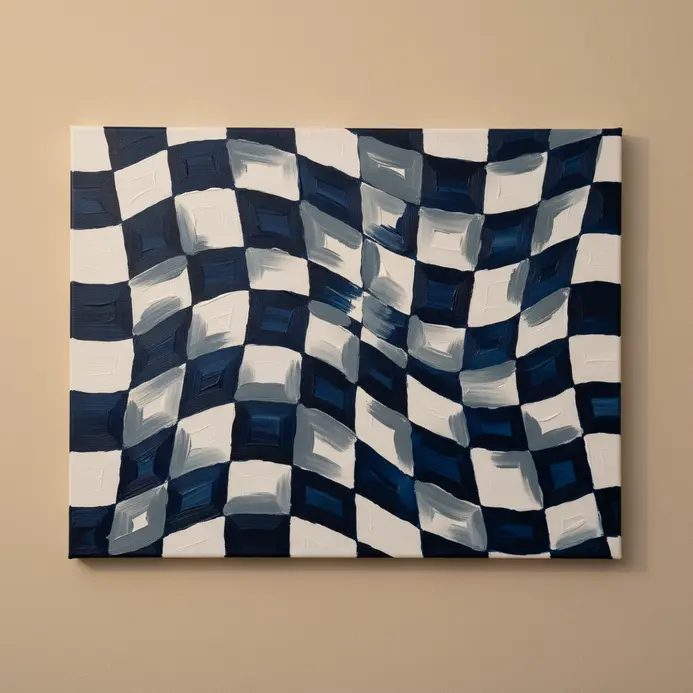
Ever looked at a piece and felt like the floor was dropping away? That is the unsettling magic of a hyperbolic checkerboard grid. This technique projects a standard checkerboard pattern onto a surface that bends inward like a saddle, creating a powerful illusion of impossible depth. You are not drawing on a flat plane, but mapping onto a shape with negative curvature that warps spatial reading.
In practice, artists often use a hyperboloid model as their reference surface. The real trick is texture mapping the squares so they follow the geometry correctly instead of just stretching. A common mistake is treating it like a simple warp, which loses that mind-bending quality.
When done right, the grid cells create dynamic movement that defines advanced optical illusion art. This approach is a fantastic way to push your abstract work into visually arresting territory. For a different approach to clean composition, you might enjoy exploring minimalist painting styles. I love how this method turns pure mathematics into a visceral experience.
10. Paint a Perspective Warped Corridor Floor Effect
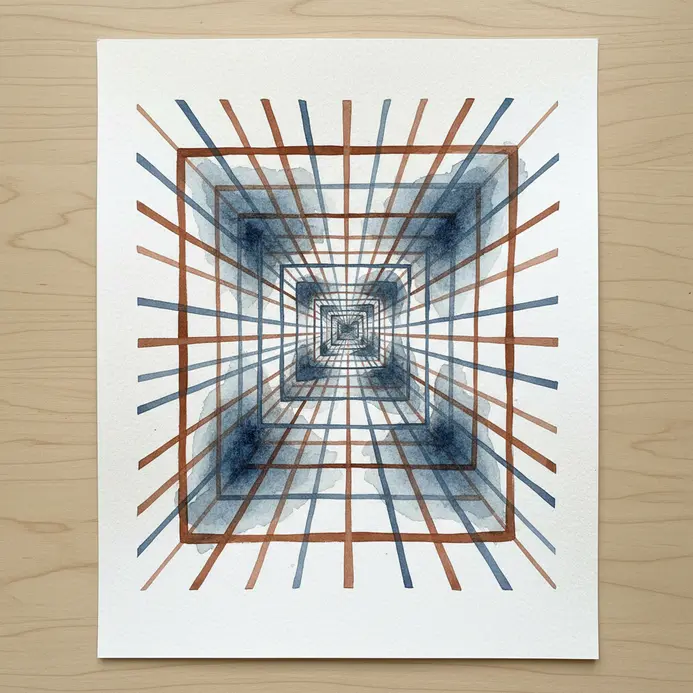
Ever feel like your art sits too flat on the page? This technique gives it a mind-bending twist. You start by drawing a simple corridor using linear perspective lines that meet at a vanishing point. Then you take the floor tiles and curve their lines, making the surface appear to sink or bulge.
It looks complex, but trust me, it relies on that smooth, controlled warp. You use a flexi-curve tool to guide your pencil for consistent bends across the drawing.
The key is keeping the underlying perspective accurate so this optical illusion art holds together. When you get it right, the sense of depth is incredible and feels alive. For more inspiration on adding layers of visual intrigue, discover paintings with hidden meanings.
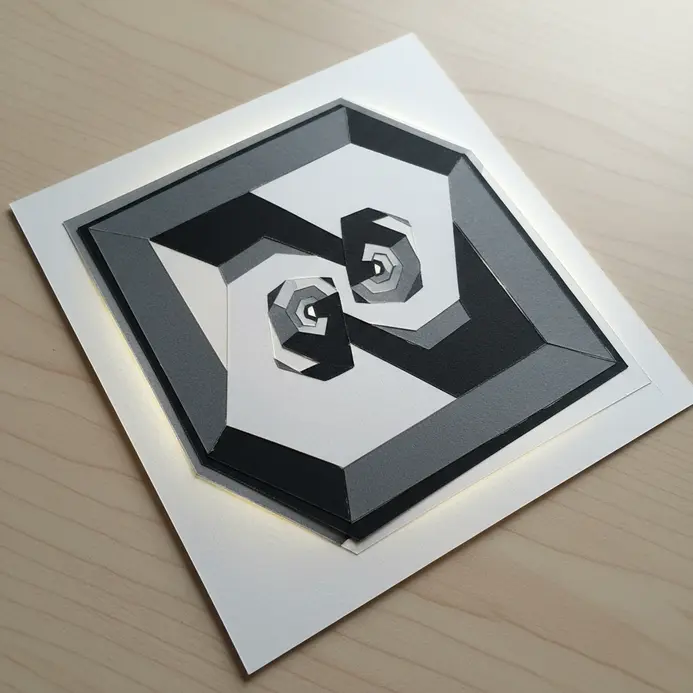
11. Layer a Nested Spiraling Octagonal Pattern Design

Have you ever wondered how those spiraling op art patterns come together? This nested octagon design is a fantastic example and much easier than it looks. By layering and transforming simple shapes, you produce a stunning movement that draws the eye inward.
Begin with a regular octagon positioned at the center of your work area. Then make a copy, increase its size by a consistent factor like 1.1, and rotate it by a fixed angle of ten to fifteen degrees. Repeat this duplicate, scale, and rotate sequence multiple times. A nested spiral emerges, with each octagon slightly larger and turned from the last.
This method works because our brains interpret gradual size changes as continuous motion, a known hallmark of optical illusion art. It shows how controlled repetition yields dramatic results. I love how basic geometry becomes captivating here.
For best results, maintain the same scaling and rotation values throughout the entire layout. Double-check your settings to ensure strict consistency. When you are done, step back and admire the dynamic depth you created.
12. Create a Refractive Glass Shard Overlay Effect

This effect looks like pure digital magic, but the core procedure is surprisingly straightforward. You will create sharp, irregular glass shard shapes over your background layer. Then the real trick begins as you make the area behind each shard bend as if light passes through actual glass.
You achieve this using a special displacement map, which acts as a blurred grayscale version of your shards. When you apply the Displace filter to your background and feed it this map, it shifts pixels to create subtle refractive warping. I love how this step transforms flat graphics into something with genuine material weight.
Remember to keep your displacement scale moderate and add transparency to the layers for realism. The final look adds dramatic fragmentation perfectly suited for optical illusion art projects. For more digital creation methods, you explore digital painting techniques here.
13. Build an Alternating Geometric Silhouette Shape Shift
Ever watched a shape seem to breathe and transform before your eyes? This effect builds easily once you understand the flow. You start with a simple geometric silhouette like a square, then define a second form like a triangle or star. The magic lives in the interpolation of vertices.
By matching the number of points between the two forms, you animate a smooth shift from one shape to the other. I set the animation to cycle back and forth to create a hypnotic rhythm. The clean lines and solid fills make the optical illusion art incredibly sharp and clear. For related motion concepts, you can explore modern pop art for extra ideas.
Try it yourself and feel the satisfaction of building a working visual engine.
14. Use Vibrating Horizontal Stripe Intensity Patterns

Ever noticed how certain patterns shimmer and pulse right before your eyes? This approach relies on parallel horizontal lines that shift in brightness and placement. By arranging these stripes with rhythmic variations, you trick a static picture into feeling active and alive.
It remains a classic approach when building effective optical illusion art. Your visual system tracks those rapid contrast shifts and sums them into a strong sense of motion. This is exactly why the work of pioneers like Bridget Riley feels so kinetic and alive.
I use this method to add breathing room and energy to dense layouts. The key sits in the subtle adjustments that trigger the whole effect.
15. Draw a Depth Defying Infinite Staircase Illustration

This one looks incredibly dense, but trust me, it remains a brilliant exercise in spatial logic. You sketch a simple staircase using linear perspective lines, but then deliberately connect them in a closed loop. I love how careful shading makes those contradictory angles feel completely solid.
The real technique hides in the visual cues. You draw steps that climb and descend at the same junction, bending reality for the observer. This demonstrates how traditional graphic work successfully manipulates spatial understanding. For a solid foundation in high-contrast rendering, I recommend you discover black and white techniques first.
Draw your own pathless staircase and watch that satisfying, confusing reaction unfold.
Digitizing And Animating Static Geometric Hand Drawings
Scanning your finished piece at a high resolution is the first step to making it pulse with new life. Once digitized, software like Adobe Illustrator lets you isolate individual lines or shapes from your pattern. You can then subtly shift these elements in a looping sequence to create a hypnotic sense of depth and motion that a static page simply cannot hold. This process transforms your hand-drawn artwork into a living, responsive eye experiment. It is a fantastic way to explore contemporary applications of the Op Art movement. You take the precise, calculated foundation from your physical drawing and grant it a new layer of perceptual magic. This digital step invites endless experimentation with rhythm and pace in your visual trick.
Conclusion
Working with optical illusion art reminds us that seeing is a creative act, not a passive one. Your brain remains an active participant in these visual conversations, and each piece you create serves as a small experiment in perception. The real joy comes from sharing your work and watching someone else’s eyes light up with that same moment of delightful confusion you felt while making it. For your next project, pick one technique that intrigued you and push it further by changing the scale, inverting the colors, or combining it with another pattern from this list. The world of geometric design is vast, and your unique perspective is the perfect tool to explore it.
FAQs
Q: What are the best tools for beginners to start creating optical illusion art?
A: Start with a fine-tip black drafting pen, a ruler, and smooth white paper as your primary reference surface. These supplies give a painter the control needed for clean layouts. A compass and fine-line markers help greatly when working on a stretched canvas or preparing your first piece.
Q: How do I make my lines perfectly straight and even?
A: Always use a ruler for any long straight strokes. Apply steady, even pressure and pull the pen toward your body for maximum control. Practicing how to space grid lines and align contour lines using this simple technique builds muscle memory for flawless execution.
Q: Why does my optical illusion art look flat instead of dynamic?
A: This usually happens when value shifts lack strength or the rhythm breaks down. Ensure your darks hit solid black and your highlights stay completely clear. Focusing on consistent repetition activates the visual trick that fuels the entire op art movement.
Q: Can I create optical illusions with colour instead of black and white?
A: Absolutely. Masters like Bridget Riley and Victor Vasarely use vibrant palettes to generate intense vibrations. Start with a basic layout and apply bold blocks of colour to see how complementary tones interact. Learning to layer hues helps you create optical illusions that pulse with life.
Q: How do I plan a complex design before I start drawing?
A: Begin with light pencil strokes to map out your core layout and establish structure. Using grid paper helps you track the process accurately when building geometric forms. Testing your idea in digital software allows you to experiment with a strong sense of depth before final inking.


