


Selecting Weather Resistant Softwood Lumber Grades
The fastest way to guarantee a planter that lasts for years is to start with Western Red Cedar. This lumber has natural oils that fight rot and insects, so you can build without a liner for ornamentals. The good news is, you can find it in standard dimensional sizes at most lumberyards. When exploring various diy wood planter box designs, selecting weather-resistant lumber from the beginning guarantees longevity.
Establishing Proper Interior Drainage Systems
Your plants will drown if you build a solid, watertight bottom on your planter box. Here is the thing, you need to leave deliberate gaps between the slats on the base. A quarter-inch space between each board lets excess water escape freely. Before finalizing your favorite diy wood planter box designs, planning the base gaps prevents root rot entirely.
1. Build a Rustic Reclaimed Pallet Wood Box

Ever wondered how to get that gorgeous weathered look for your garden? It is easier than you think, and it starts with a free pallet. I love how this project turns discarded wood into something beautiful when browsing simple diy wood planter box designs. The key is finding pallets stamped with HT for Heat Treated, which means they are safe to use. Trust me, avoiding the chemically treated ones is non-negotiable.
Once you have your pallet, carefully pry it apart with a pry bar. It feels a bit like a treasure hunt, finding those perfect, rustic boards. After removing all the nails, you are left with unique wood full of character. Pair your new planter with a DIY plant stand designs for a complete outdoor look. Does that not feel satisfying?
2. Modern Cedar Horizontal Slat Planter: Clean Lines for Outdoor Style

Have you ever wanted a planter that looks as stylish as your patio furniture? This design uses horizontal cedar slats to create a crisp, modern look. You assemble the slats into a clean box, often with mitered corners for seamless joints. I love how this simple linear pattern ranks among popular diy wood planter box designs.
It works because cedar is naturally rot-resistant, so it holds up beautifully outdoors. The best part is that you get fantastic drainage for your plants right from the start.
3. Assemble a Tiered Vertical Garden Wooden Stand

This one looks intimidating, but trust me, putting it together feels like solving a fun puzzle. You will start by building the side frames. Lay your side supports flat, position the horizontal shelf supports at your marked heights, and drill pilot holes before driving in the screws. Mastering tiered diy wood planter box designs becomes much easier once you assemble the frames correctly.
Why does this method work so well? Drilling those pilot holes is the secret that prevents the wood from splitting, giving you a sturdy, professional-looking result every single time. Give it a try and feel that awesome sense of accomplishment when your stand is ready for plants.
4. Build a Classic Square Cedar Garden Box
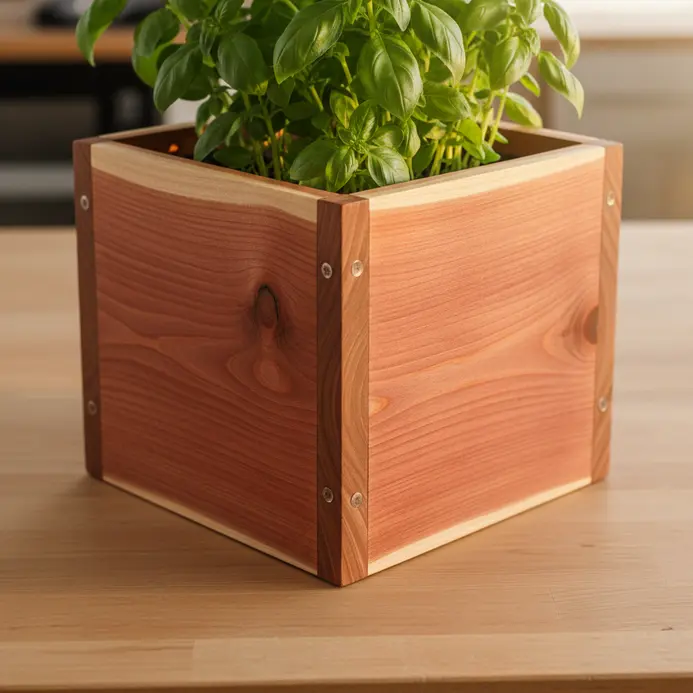
Who knew a simple square could be so satisfying? This classic design gives you a durable, long-lasting home for your plants. Start by cutting your cedar boards to your chosen size. I love stacking two boards high for a perfect 12-inch depth, which proves why square diy wood planter box designs remain timeless. Drill pilot holes to prevent splitting, then screw the corners together for a rock-solid frame.
It is so rewarding to see it all come together. Once built, you can fill it with soil and get planting, or even add a personal touch with some flower pot painting ideas.
5. Industrial Pipe Leg Raised Planter: Elevated Urban Charm

This one looks intimidating, but trust me, it’s surprisingly straightforward to assemble. You’ll build a simple wooden box for the planter and then create its rugged legs using black iron pipe and fittings. The magic is in the contrast between the warm, natural wood and the cool, industrial metal. This combination perfectly represents modern diy wood planter box designs.
I love how this design brings a touch of urban greening to patios and balconies. The raised height makes tending to your herbs or flowers so much easier on your back. Feel that modern, functional charm come together as you add your plants.
6. Create a Mid-Century Tapered Leg Planter Box

This design looks complex, but the process is quite straightforward once you break it down. You will start by cutting your planter box sides with mitered corners for a seamless look, then shape the signature tapered legs. I love how the legs lift the whole piece, giving it that classic mid-century silhouette among retro diy wood planter box designs. The real payoff is in the finishing: sealing it properly makes your planter look professional and last for years. creative craft ideas.
7. Build a Farmhouse X-Brace Wooden Planter Box

Ever thought those beautiful X-braces were too complex? Trust me, they are simpler than they look. You will cut side panels and a sturdy frame, then assemble it all with exterior-grade wood screws. The magic happens when you fit those two diagonal pieces into an ‘X’ on each side. This technique instantly elevates classic diy wood planter box designs. It is so satisfying to see that rustic farmhouse character come together instantly.
My go-to tip? Do not skip the heavy-duty landscape fabric liner. It protects your wood from soil moisture, making your planter last for years. You will love the final look.
8. Construct a Large Rectangular Porch Entry Planter

Ever wanted a big, welcoming statement piece for your front door? This large planter is easier than it looks, I promise. You will start by cutting your wood for the long sides, short ends, and a sturdy base. Secure it all with exterior wood screws and do not forget to drill plenty of drainage holes in the bottom. Mastering oversized diy wood planter box designs just requires steady measuring.
Trust me, elevating it on small feet makes a huge difference for plant health and your porch. Using rot-resistant cedar is my go-to for a project that lasts. The payoff is a gorgeous, custom home for your favorite flowers that you built yourself. Feel proud every time you walk up the steps.
9. Make a Narrow Balcony Railing Hanging Box

Ever feel like your balcony railing is just wasted space? This project turns it into a perfect home for herbs or flowers. The key is keeping the box shallow, so I aim for a depth of 4-6 inches. You will assemble it with exterior screws, then drill those all-important drainage holes in the bottom. Understanding compact diy wood planter box designs saves precious floor space while adding greenery. It is satisfying because you get greenery without sacrificing precious floor space.
Securing it with a sturdy bracket is a must, and if you enjoy making things, you might love these easy craft ideas for kids for another fun weekend project.
10. Hexagonal Geometric Cedar Planter Design: A Unique Focal Point

Ever feel like your garden planters all look the same? This six-sided cedar design is my favorite way to break the mold. It looks complex, but the secret is a precise 30-degree bevel cut on each board end. You will join six identical pieces with waterproof glue and screws, then attach a matching base. I love this because the sharp angles create a stunning modern look that naturally draws the eye among angular diy wood planter box designs. Trust me, the crisp geometry feels incredibly satisfying when it all clicks together.
11. Build a Weathered Driftwood Style Rectangular Box

Who would have thought you could get that gorgeous, sun-bleached driftwood look from a simple box? The secret is all in the finish. After assembling your box with wood glue and nails, grab some #0000 steel wool to lightly distress the surface and mimic natural wear. Then, apply a gray wood stain and let it soak in for that perfect coastal hue. Weathered finishes top the list of favorite diy wood planter box designs.
I love this step because it transforms plain wood into something with so much character. A final coat of matte polyurethane seals the deal, making your new planter or storage box durable enough for everyday use. simple DIY keychain projects.
12. Paint a Minimalist White Wooden Planter

Ever feel like a planter is distracting from your beautiful plant? A clean coat of white paint is the perfect fix. The secret is in the prep. You must start with a stain-blocking primer on any raw or knotty wood to keep the white pure. Sand thoroughly between coats for that flawless, smooth finish. Many minimalist diy wood planter box designs rely heavily on flawless prep work. I love how this simple step transforms a basic box into a modern statement piece that lets your greenery shine. Feel that fresh, serene vibe.
13. Chevron Patterned Stained Wood Box: Add Detailed Texture

Ever wondered how to make your chevron box look like it was crafted by hand? Adding detailed texture is the key. Begin by staining the wood with a dry brush technique to allow for uneven absorption and highlight the natural grain. Once dry, lightly sand the surface with fine-grit paper to create a soft, satin sheen and gently round the edges for a worn look. Textured finishes elevate any of these diy wood planter box designs to artisan levels. I always recommend observing real wood pieces to guide where to add subtle imperfections like slight scratches or stain variations.
This method works because it introduces shadows and highlights that give the box depth and a unique, artisan feel. Try it, and you’ll be thrilled with how realistic and textured your finished piece appears!
14. Assemble a Trellis Backed Vertical Climbing Planter

This one looks complex, but trust me, the assembly is quite straightforward. You will start by building the planter box itself, connecting the sides and ends, and then attaching the bottom panel. I always drill pilot holes first to prevent any splitting. Next, you will install the liner to protect the wood.
Then, you will construct the trellis and secure it to the planter. Isn’t it satisfying to create a structure that maximizes your planting area? Integrating vertical supports makes supported diy wood planter box designs perfect for small spaces. It is perfect for small spaces and gives your climbing plants a beautiful home. For another fun project to do with the family, check out these kid-friendly clothespin crafts.
15. Create a Cascading Staircase Triple Planter Box

Ever wanted to pack a ton of greenery into a small patio corner? This cascading staircase planter is your perfect solution. You will build three separate boxes and stack them in a staggered, stepped formation. I love how this design creates a lush vertical garden effect with minimal footprint. Cascading layouts dominate modern diy wood planter box designs for maximizing small footprints. It is surprisingly simple once you break it down into building one box at a time.
Start by cutting your pieces for the three boxes from a rot-resistant wood like cedar. Assemble each box with deck screws, pre-drilling to avoid splits. Then, secure them in their cascading layout, ensuring each smaller box sits stable on the one below. The finished look is a dynamic, tiered display that makes any space feel like a garden oasis.
Trust me on this one: always drill plenty of drainage holes in every box bottom. Line them with landscape fabric to keep soil in and let water out. Your plants will thrive in their new elevated homes, and you will feel so proud of your handiwork.
16. Build an Elevated V-Shaped Herb Garden Trough

This design looks complex, but trust me, it’s a straightforward weekend build. You’ll construct a sturdy base frame from pressure-treated 2x4s for the legs and supports. The magic is in the trough: you attach angled bottom slats to create that V-shape, which provides varied soil depths for different herbs and excellent drainage. Elevated herb troughs top any list of practical diy wood planter box designs.
Why does it work so well? The elevated height makes tending your plants a breeze, and the V-shape prevents soggy roots. I love how functional and stylish it turns out. For another great project to pair with it, check out these DIY plant stand designs.
17. Make a Natural Bamboo Slatted Long Planter

Who would have thought bamboo could create such a stunning planter? You will cut smaller poles into slats and attach them to a sturdy frame made from larger corner posts. The slatted design is not just pretty. It lets your plant roots breathe and drain perfectly. Natural bamboo features heavily in eco-friendly diy wood planter box designs. I love how this build feels so organic once it is done. Trust me, sealing it with an exterior-grade finish makes all the difference for its outdoor life.
18. Add Decorative Lattice Side Garden Box Details

Ever wondered how to give your planter a custom look while also adding function? Attaching a decorative lattice panel to one or more sides is a fantastic trick. Lattice integration defines functional diy wood planter box designs for climbing varieties. It instantly creates a trellis for climbing plants like peas or clematis, turning your box into a vertical garden feature.
I love this because it feels like you are building a tiny, private garden wall. For a sturdy build, consider adding a simple wood frame around the lattice for support. Choose a material that fits your style, whether that is classic cedar or low-maintenance vinyl.
Doesn’t that sound like a beautiful way to maximize your growing space?
19. Form a Curved Front Modern Teak Planter

This one looks so elegant, doesn’t it? The secret is cutting that smooth, gentle arc for the front panel. You’ll need to create a precise template first, then use a bandsaw for the cleanest cut. Refine it with a router and a flush trim bit to get a perfect, consistent curve across all your pieces. Curved fronts distinguish luxury diy wood planter box designs from standard rectangular options.
Teak is a joy to work with for this because its natural oils make it incredibly durable outdoors. I love that it requires so little upkeep, letting you focus on the beautiful form. Pair your finished planter with a complementary DIY plant stand designs for a complete modern look.
20. Charred Shou Sugi Ban Box: A Durable and Striking Finish

Ever wanted a planter that looks like a piece of modern art and lasts forever? This ancient Japanese technique is your answer. You carefully char the surface of cedar wood with a controlled flame, then brush it to reveal a stunning, deep texture. The process naturally preserves the wood, making it incredibly resistant to rot and bugs. Fire-charred techniques elevate unique diy wood planter box designs.
I love how this method turns a simple box into a conversation piece. That rugged, charred finish highlights the wood’s unique grain in a way paint never could. Trust me, the payoff is a planter that feels both timeless and totally unique.
21. Install a Floating Wall Mounted Wooden Box

Ever wondered how those sleek floating shelves are mounted? It looks complex, but the process is straightforward with the right prep. First, use a stud finder to locate the most secure points on your wall. Then, depending on your box’s design, you will either use a French cleat for heavy loads or simply drill through the back. Your level is your best friend here to keep everything perfectly straight.
This method works so well because it distributes weight cleanly against the wall, creating that modern, seamless look. I love how it instantly organizes a space and adds character. Floating installations maximize compact wall space in space-saving diy wood planter box designs. Once your box is secure, it is the perfect spot for plants or decor. For a pop of color, check out these flower pot painting ideas to style your new display. Feel proud of your handiwork.
22. Build a Caster Wheeled Mobile Patio Planter

Ever get frustrated trying to move a heavy, soil-filled planter on your patio? This design solves that with a simple frame on swivel caster wheels. You build a sturdy box from pressure-treated lumber, attach legs, and then fix the casters to the bottom. The beauty is in the mobility, letting you chase the sun or rearrange your space with a gentle push. I love how practical this feels, and trust me, choosing outdoor-rated casters with brakes makes all the difference for stability.
23. Assemble a Staggered Height Quadruple Planter Set

This one looks intimidating with all the parts, but trust me, it’s easier than you think. Start by laying out all the panels and hardware on a clean, flat workspace. I love the moment when you first slot the side panels together, feeling that satisfying click as the box takes shape. Isn’t it amazing how a few simple pieces transform into a gorgeous tiered display? Just remember to go slow and avoid overtightening the screws, and you’ll end up with a stunning, functional set for your plants.
24. Create a Corner Fitting L-Shaped Garden Box

Ever find yourself staring at that empty, sunny corner of your patio, wishing it was a garden? This L-shaped planter is your perfect solution. You essentially build two connected boxes that snugly fit into a corner, maximizing your planting space. I love how it turns an awkward spot into a lush, productive area. The key is planning your arm dimensions and ensuring each gets enough sun.
Start by selecting naturally rot-resistant wood like cedar for longevity. Construct each arm separately, then join them at the corner with exterior screws. Lining the bottom with landscape fabric helps with drainage and keeps soil in. DIY plant stand designs. Feel the satisfaction of creating a custom garden nook.
25. Build a Rustic Barrel Style Wood Planter

Have you ever seen a barrel planter and wished you could make one? This rustic project lets you create a charming piece using simple curved techniques. It starts with cutting wood staves and assembling them with basic tools. Barrel shapes remain timeless among rustic diy wood planter box designs.
First, cut your lumber to height and angle for the staves. Use a jigsaw to make a circular base from exterior plywood. Then, arrange the staves around it, securing with exterior screws and clamps for a tight fit. Add bands for that authentic barrel look.
The rustic aesthetic adds warmth to any outdoor space. I always finish mine with a deck stain to protect against weather. Don’t forget to drill drainage holes for healthy plants. You’ll love the result!
26. Herringbone Panel Cedar Planter Design: An Elegant Pattern

This design looks intimidating, but trust me, the elegant result is worth the careful cuts. You will create a stunning V-shaped pattern by fitting two rectangular cedar slats together at a perfect 90-degree angle for each piece of the herringbone. I love how the diagonal flow adds so much texture and turns a simple box into a true garden feature. Intricate patterns distinguish artisan diy wood planter box designs.
Your key to success is precise measuring and using a miter saw for those critical angled cuts. Isn’t it satisfying when a complex pattern comes together so cleanly? For a fun and different kind of project, check out these easy craft ideas for kids.
27. Construct a Wide Rim Bench Planter Combo

Who says you have to choose between a bench and a planter? This wide rim design lets you enjoy both in one stylish piece. You will build a solid wooden frame and attach boards for the planter and seat. Critical step: add drainage holes and a gravel layer to prevent waterlogging. Multi-purpose furniture inspires innovative diy wood planter box designs. I love using cedar for its durability—it ensures your combo lasts seasons. Give it a go and feel the satisfaction of creating your own outdoor oasis!
28. Build a Deep Root Growth Tall Planter

Ever struggled with vegetables that wilt too fast or seem stunted? This design solves that by giving roots the vertical space they crave. Construct your box with a minimum height of 24 inches and ensure you drill plenty of drainage holes. The extra depth lets taproots stretch down for better water and nutrient access, leading to incredibly robust plants. Deep-root configurations optimize specialized diy wood planter box designs. I love how this simple change makes such a dramatic difference in your garden’s health.
29. Make a Scandinavian Light Pine Succulent Box

Who would have thought a few pieces of pale wood could look so serene? You will cut your light pine boards to size, then assemble the simple box with wood glue and a few nails. I love how the clean, minimalist lines let the natural wood grain shine through, creating a perfect backdrop for your succulents. Scandinavian aesthetics influence many contemporary diy wood planter box designs. The trick is to drill several drainage holes in the bottom before you add soil. When you are done, it feels like you have brought a little piece of calm, organized nature indoors. If you enjoy this kind of simple project, you might also like some simple DIY keychain projects for a quick creative win.
30. Add Detailed Trimmed Border Wooden Planter Accents

Does your wooden planter look a bit too basic? Let’s fix that! I love adding detailed trimmed borders to elevate the look. Use a router with a cove bit to create elegant edges, or attach pre-made molding for a classic touch. It’s all about selecting the right wood and cutting precise angles. Decorative accents transform standard builds into refined diy wood planter box designs. Pro tip: always seal the trim with an exterior-grade polyurethane for outdoor durability. Feel the pride when it all comes together!
Applying Exterior Grade Sealants And Stains
One coat of penetrating oil stain applied before assembly protects your wood from the inside out. This finish soaks deep into the fibers, shielding against UV rays and moisture far better than a surface paint. You want to focus on the end grain of every cut piece, as that is where water wicks in fastest. For a clear finish that shows off the natural wood grain, use a sealant labeled for decks or outdoor furniture. Apply it with a brush to all surfaces, especially the interior where damp soil presses against the wood. Let it dry completely before adding your potting mix, and reapply a fresh coat each spring to maintain that protection.
Conclusion
Your garden is an extension of your home and your creativity, a place where you get to shape the beauty around you. Choosing the right diy wood planter box designs is the first step in making that space truly yours. My best advice is to pick one plan that speaks to you, gather your materials, and just start. The first cut into the wood is always the hardest, but it is also the most rewarding. Remember, these designs are a starting point—feel free to adjust the size, the finish, or the details to match your vision. The real magic happens when you step back and see something you built with your own hands, filled with life and color, adding that perfect personal touch to your outdoor sanctuary.
FAQs
Q: What type of wood is best for outdoor planter boxes?
A: Cedar and redwood are top choices for outdoor planters because they naturally resist rot and insects. Pressure-treated pine is another durable option, but use a liner if planting edibles. For a budget-friendly project, reclaimed wood adds character but may have a shorter lifespan.
Q: How do I prevent my wooden planter from rotting?
A: Proper drainage is essential. Always drill holes in the bottom of your planter. You can also line the interior with landscape fabric or a plastic sheet to separate the soil from the wood. Applying a wood preservative or sealant designed for outdoor use will significantly extend its life.
Q: Do I need special tools to build these planters?
A: Most of these designs require only basic tools. A cordless drill, a circular saw or handsaw, a square, and a tape measure will handle the majority of projects. A Kreg jig is helpful for strong, hidden joints but is not required for simpler box construction.
Q: How much will it cost to build a wooden planter?
A: Cost varies widely based on size, design, and materials. A simple small box from pine boards might cost under twenty dollars. Larger planters using cedar or featuring complex joinery and hardware will cost more. Reclaiming wood from pallets or old furniture can reduce costs to nearly zero.
Q: Can I adjust these plans to fit my specific space?
A: Absolutely. These plans are templates for inspiration. You can easily modify the length, width, or height to suit your balcony, porch, or garden bed. The key is maintaining structural integrity, so ensure your corner joints are solid and you account for the weight of wet soil when scaling up.


