


Essential Clay Preparation and Tool Selection
Choosing a self-hardening air-dry clay is your fastest path to a finished piece without needing a kiln, perfect for that immediate sculptural satisfaction. The good news is you need almost no tools beyond your hands, but a small container of water and a wooden rib help smooth surfaces. Exploring new diy pinch pots ideas always starts with proper wedging to remove air bubbles that cause cracks during the drying process. Trust me, the single most important step is kneading your material thoroughly before shaping begins. You want to start with a smooth, well-worked ball about the size of your fist, which gives you enough material to practice consistent wall thickness. This initial prep work makes the actual pinching so much easier and prevents frustration later.
Mastering Finger Pressure for Uniform Walls
The secret to a strong vessel is applying steady, even pressure with your thumb on the inside and your fingers on the outside as you rotate the ball of clay. Beginners often make the mistake of pinching only one spot, which creates a lopsided bowl shape with a dangerously thin base. When you focus on moving your pressure point upward in a slow spiral from the bottom centre, your walls start to rise beautifully. This consistent technique prevents structural cracking and gives your piece that lovely, deliberate feel in the hand. Keep a mental image of your desired final thickness, about that of a heavy coin, and stop working when you feel it. Mastering this balance opens up countless diy pinch pots ideas for everyday tableware or decorative shelves. You will notice how much smoother the surface becomes when you support the exterior gently while pressing from within.
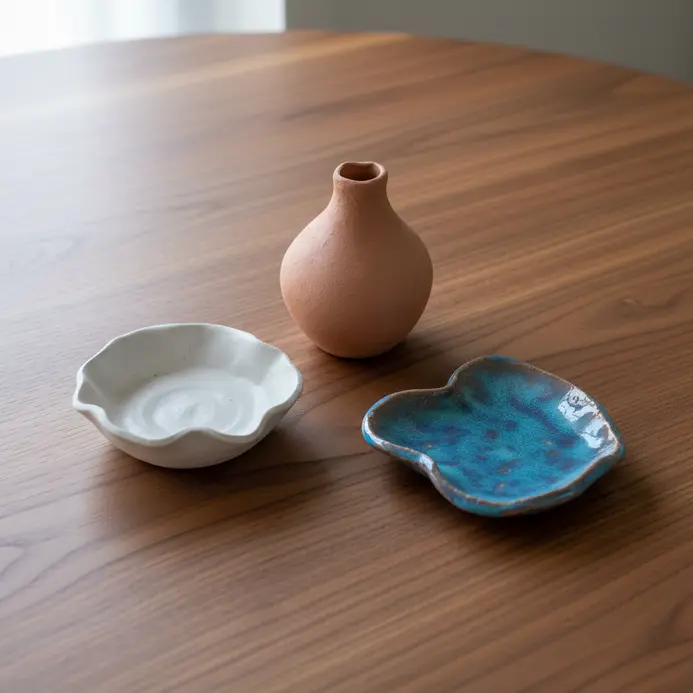
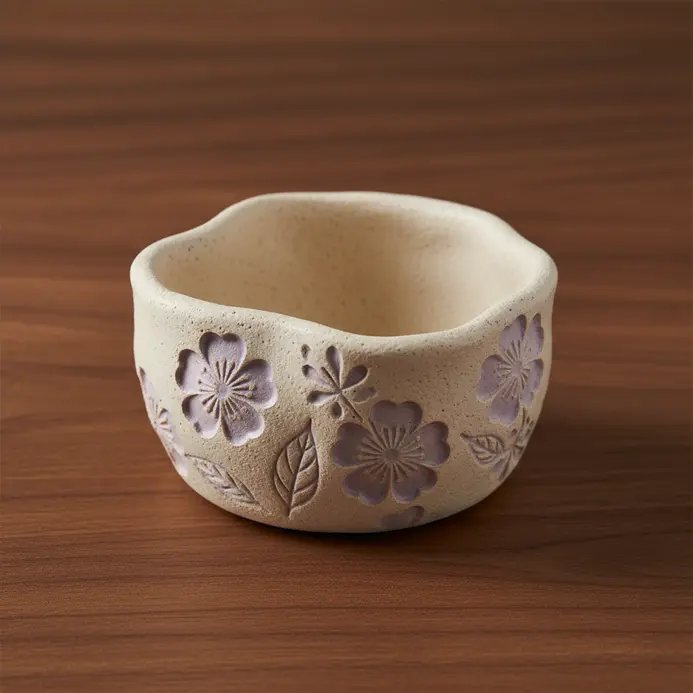
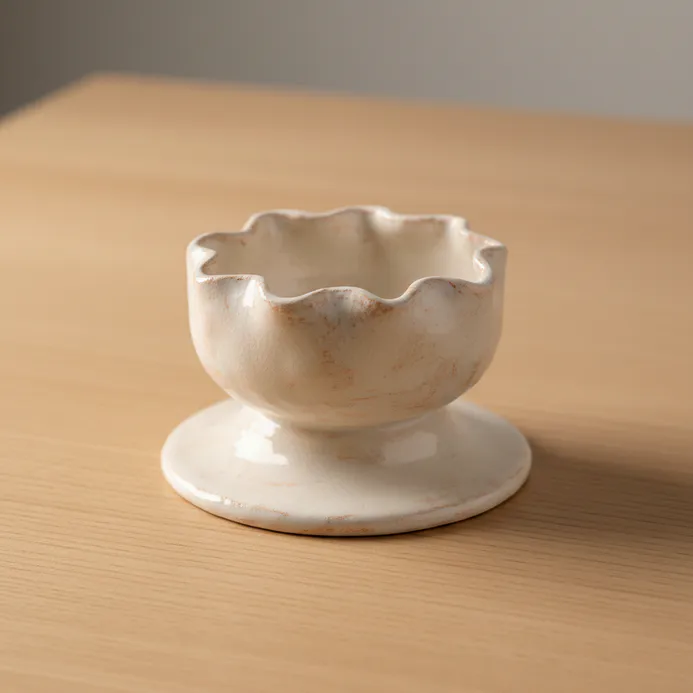
1. Build a Minimalist White Ring Dish Tray
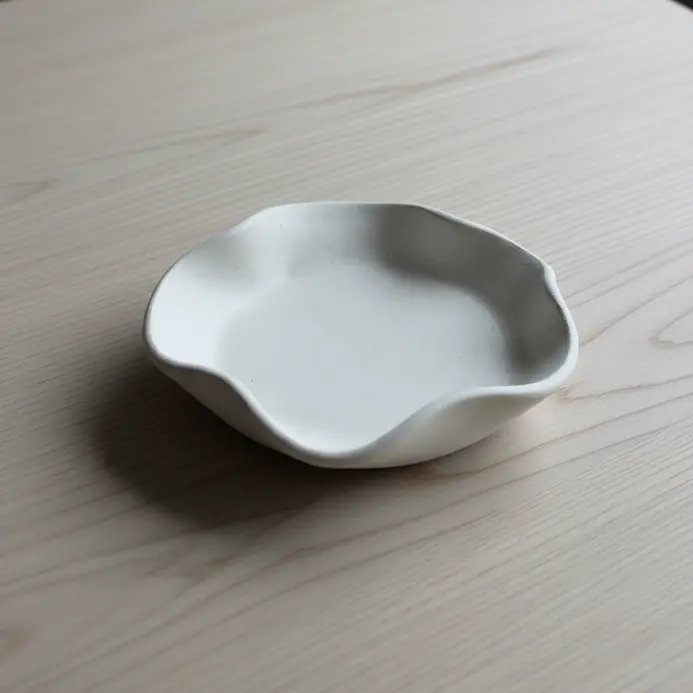
Ever wondered how something so elegant could start as a simple hand-scooped shape? This project transforms that basic air dry clay bowl into a sleek jewelry catch-all. You start by pinching a shallow, smooth dish from a ball of white material, then let it dry completely before adding finishes. The real magic happens with a coat of bright white acrylic paint and a protective sealer, giving it that crisp, clean finish. I love how this simple form solves the daily ‘where did I put my ring?’ problem with such style, proving why elegant diy pinch pots ideas always deserve attention. Why does it work so well? Its minimalist design means it fits anywhere, from a bathroom vanity to a bedside table, without shouting for attention. The smooth white surface feels calm and modern. For a fun next step, you can explore pottery painting ideas for beginners Consider to add a subtle pattern to your succulent container. Try it and feel the satisfaction of making something both useful and beautiful.
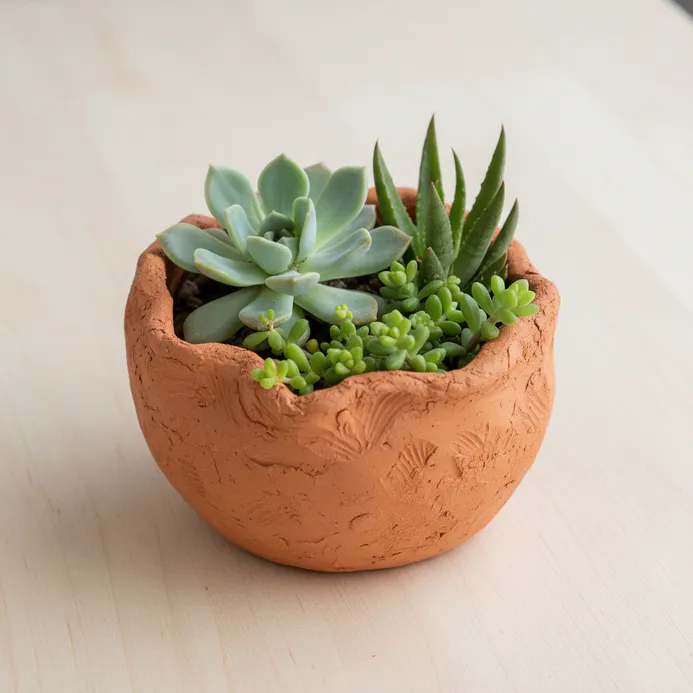
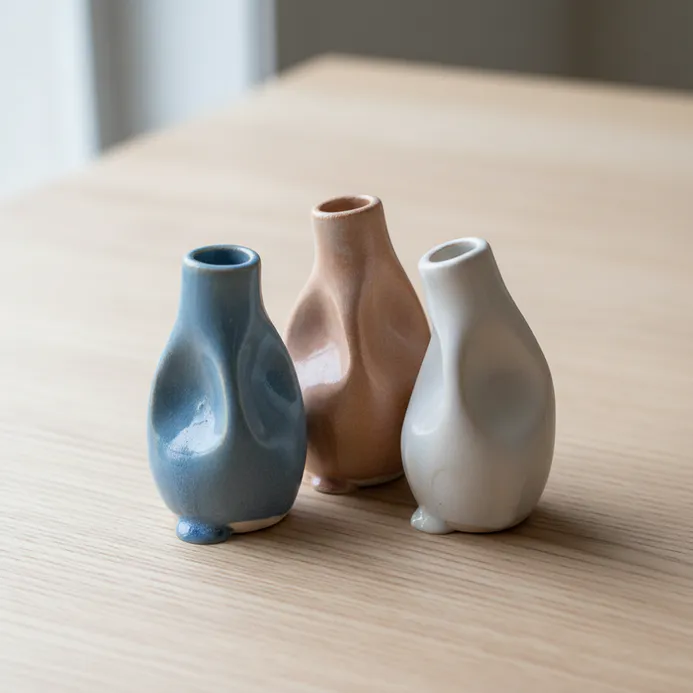
2. Form a Natural Terracotta Bud Vase
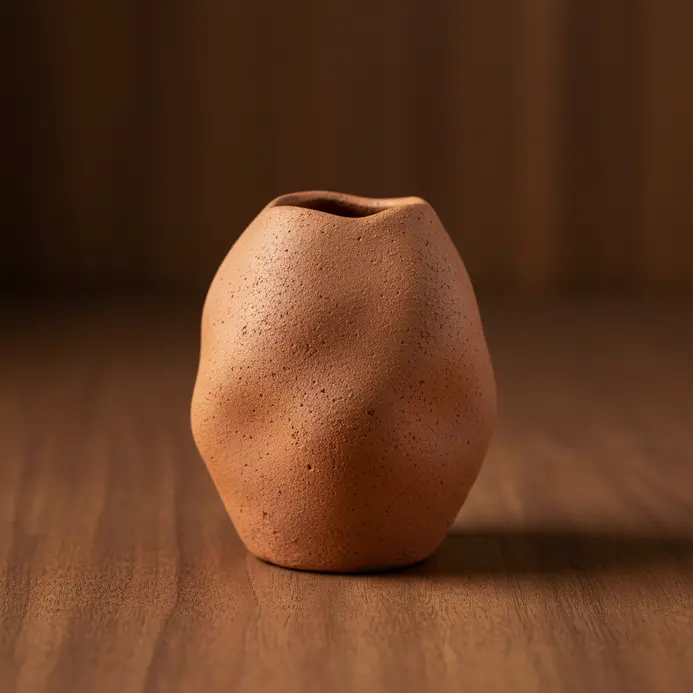
Ever wanted a simple, beautiful vessel for a single flower from your garden? This project delivers exactly that, showing how versatile diy pinch pots ideas become when you play with height. Start by wedging your terracotta clay to remove air pockets, then form a solid ball. Press your thumb into the center and gently pinch and rotate to create a small bowl, gradually thinning the walls toward the opening. To build up the slender neck of your hedgehog pinch pot, roll a thin piece of clay. coil of clay, score the rim of your existing piece, and blend it on securely, smoothing everything inside and out with a damp sponge. I love how the raw, unglazed finish of terracotta gives this bud vase its warm, rustic character. The key to avoiding cracks is a slow drying process. Let it sit under loose plastic for a couple of days before letting it air dry completely. Once bisque fired, it is ready to hold a delicate bloom. Feel the satisfaction of creating a minimalist piece that highlights nature’s beauty.
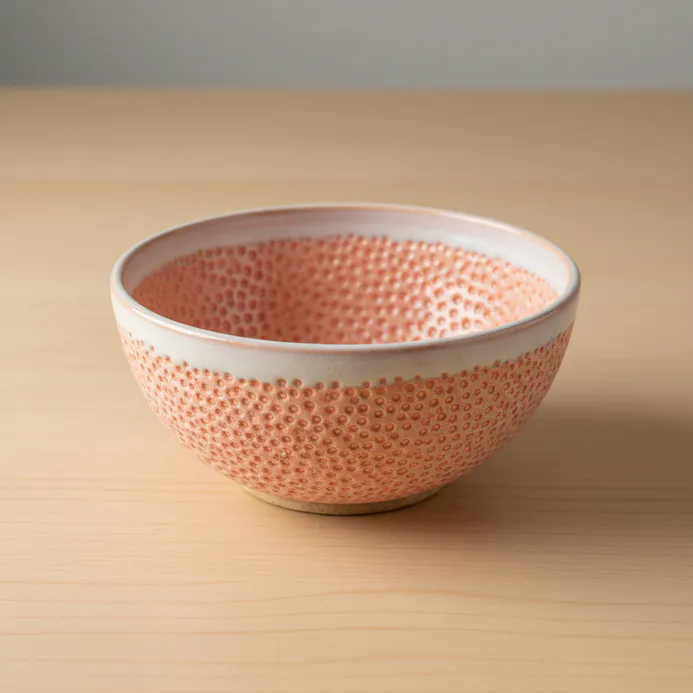
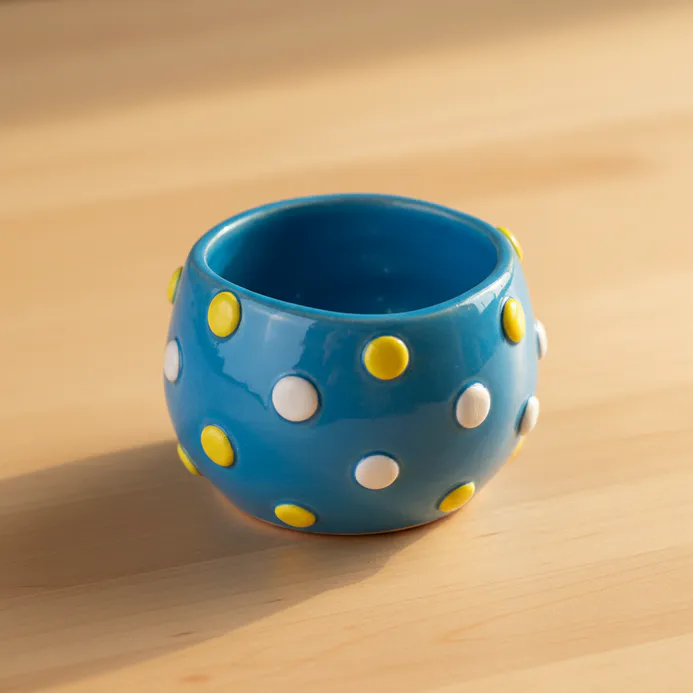
3. Create a Polka Dot Snack Bowl
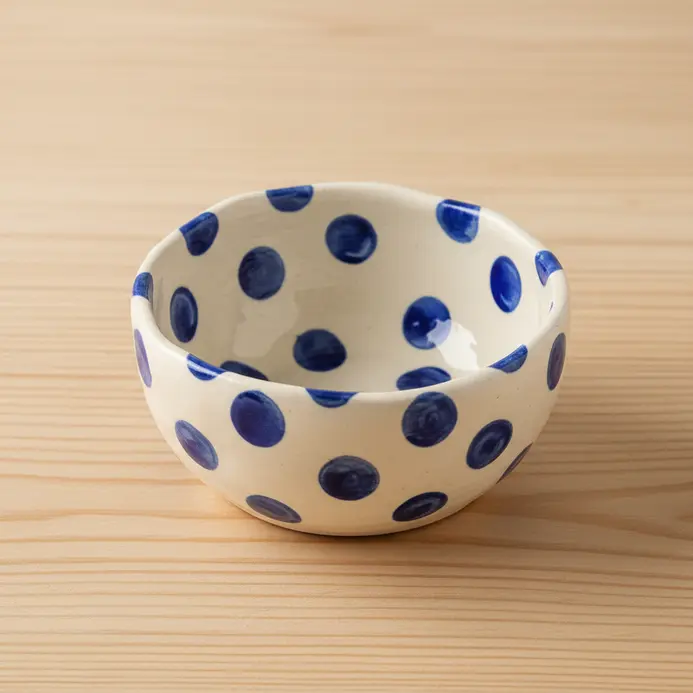
Who doesn’t love a playful polka dot pattern on the dinner table? This snack bowl project is surprisingly simple and adds a pop of fun to your gatherings, which is why playful diy pinch pots ideas A succulent always wins me over. To make it, paint dots with a round sponge dauber or apply vinyl decals after shaping. Clean your ceramic or glass bowl first, then dip the applicator in acrylic paint and press to create each circle. Allow it to dry fully, and if using paint, consider baking it for durability. For a textured look, polymer clay dots are a great option. It works because you get a custom, cheerful dish that makes everyday snacks feel special. I always recommend sealing painted bowls with a food-safe top coat. Explore here are some easy crafts to do at home, including clay pinch pots perfect for kids crafts. for more inspiration.
4. Stamp a Textured Lace Impression Planter
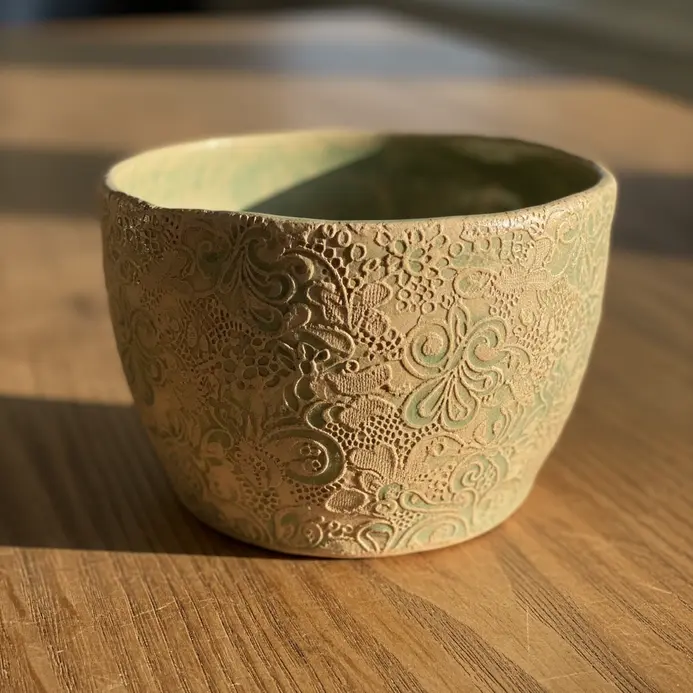
Who would have thought something as delicate as lace could create such a bold surface texture? This technique is my favorite for adding instant vintage charm, proving that intricate diy pinch pots ideas often rely on simple tools. You simply roll out a slab of air-dry clay, lay a piece of lace on top, and press it in with your rolling pin. When you peel the fabric away, the detailed pattern is left behind, ready to be shaped into your planter. It works because the lace acts like a natural stamp, giving you a professional-looking result with almost no effort, similar to the simplicity of making a pinch pot. For a fun finishing touch, this textured surface is perfect for an easy craft for painting objects after it dries completely.
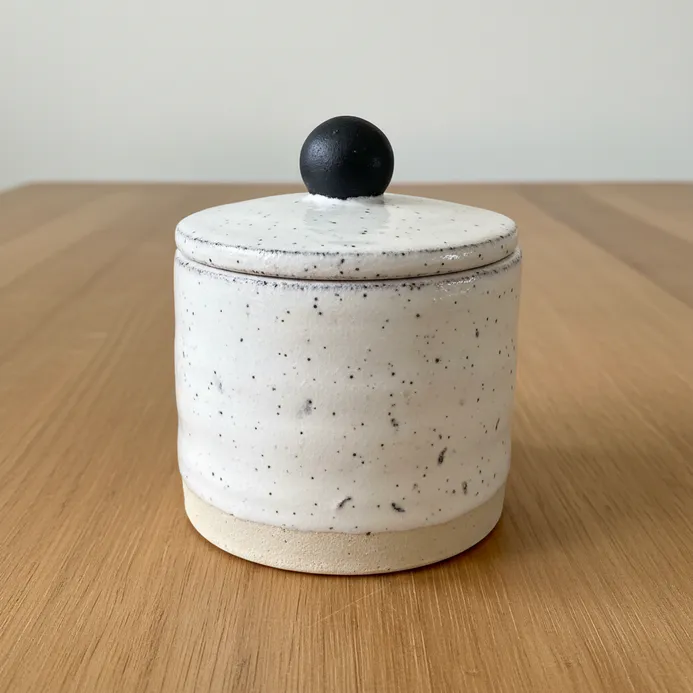
5. Add a Golden Rimmed Jewelry Trinket Pot
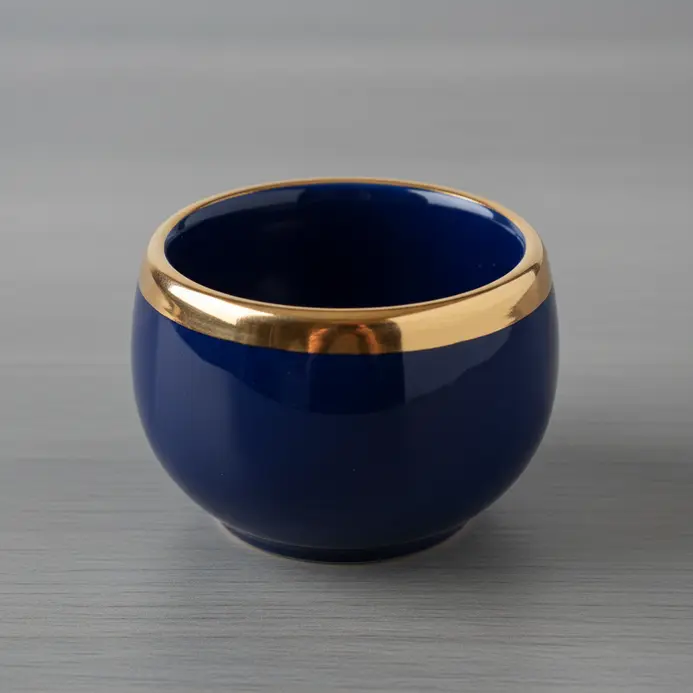
Ever find yourself losing small earrings or rings in the bottom of a drawer? This project is the perfect, pretty solution, standing out beautifully among classic diy pinch pots ideas. Start by forming your base from a ball of cold-earthenware material, making sure the walls stay completely even, especially when creating clay pinch pots. After it is fired and glazed, the magic happens with a gold overglaze carefully applied just to the top edge. I love how this tiny detail instantly makes a simple pot feel luxurious and special. Try it and feel that little spark of joy every time you open it.
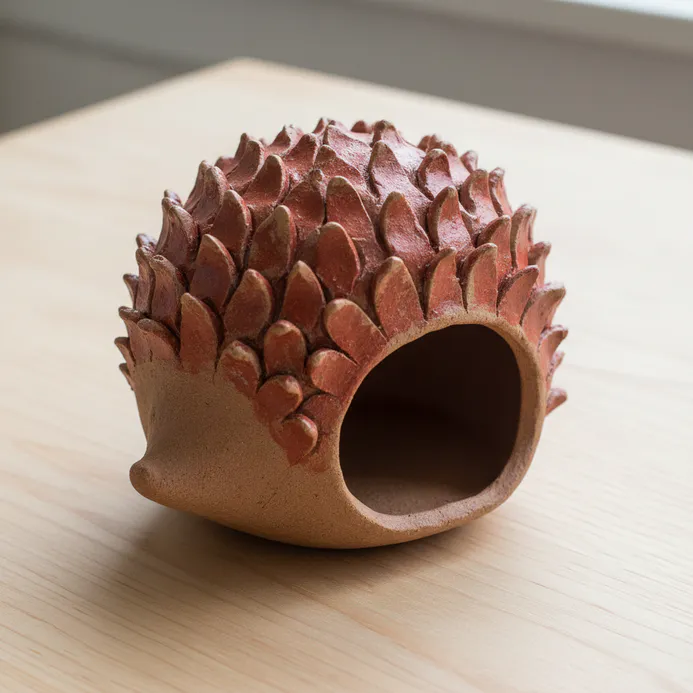
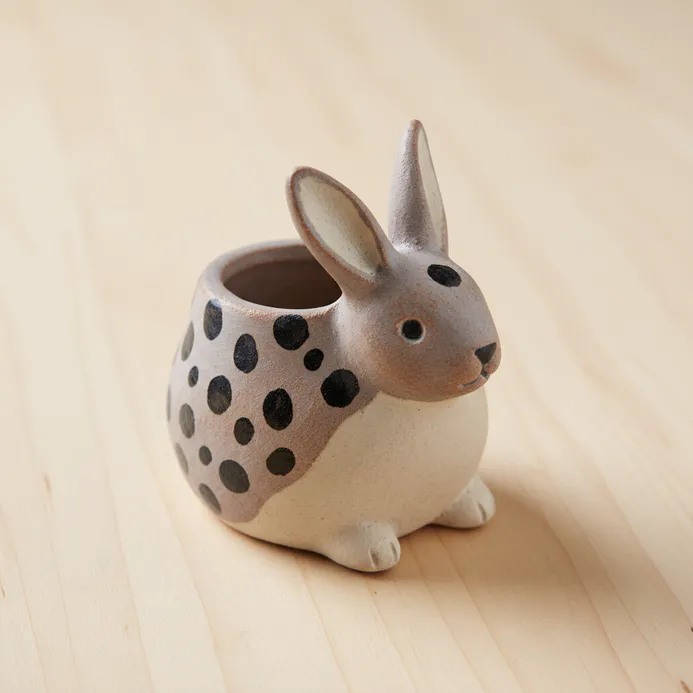
6. Sculpt a Small Hedgehog Shaped Pot
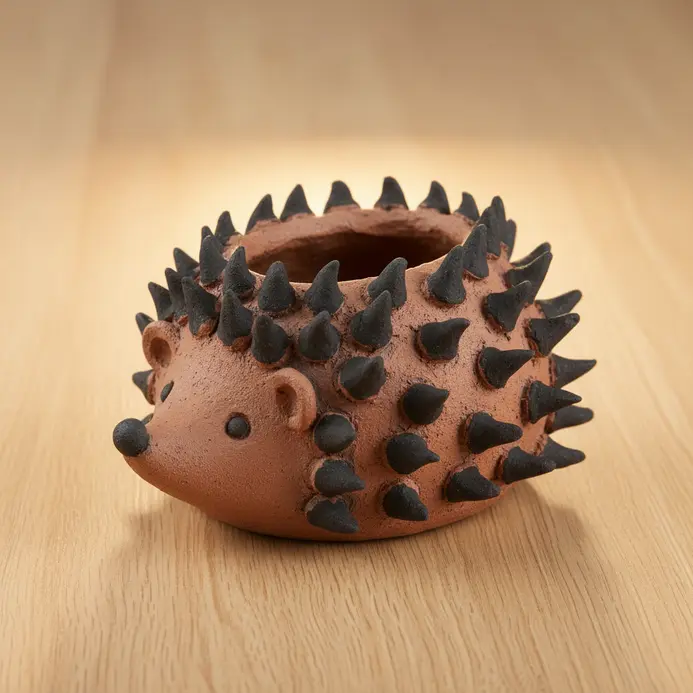
Ever wanted to make something both adorable and incredibly useful? This hedgehog design is perfect for beginners exploring animal-themed diy pinch pots ideas. Begin with a basic bowl shape, forming an oval body and a cute pointed snout. Use air dry material for a friendly, forgiving option, then smooth the surface with a damp sponge to prevent any early cracking in your craft for kids. Next, create the spines along the back of your clay pot. I use a This garlic press can be a fun tool to use when crafting unique shapes in your clay pinch pots. for this—it makes uniform spikes in no time. It works because the simple silhouette is easy to hollow out, and the added spines provide charming surface texture. My tip: always include a small drainage hole if you plan to keep it outdoors. Once it hardens, have fun personalizing it with colors, similar to learning about painting flowers on crafts.
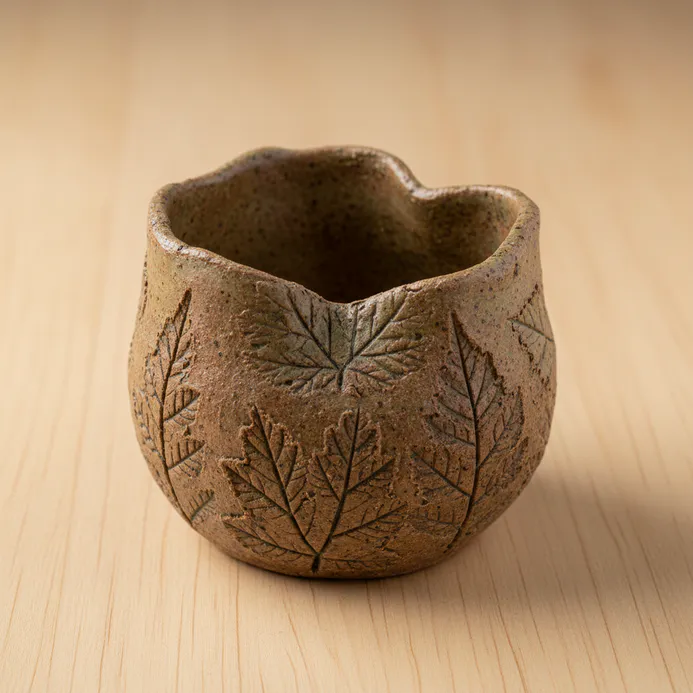
7. Press a Leaf Motif Bowl
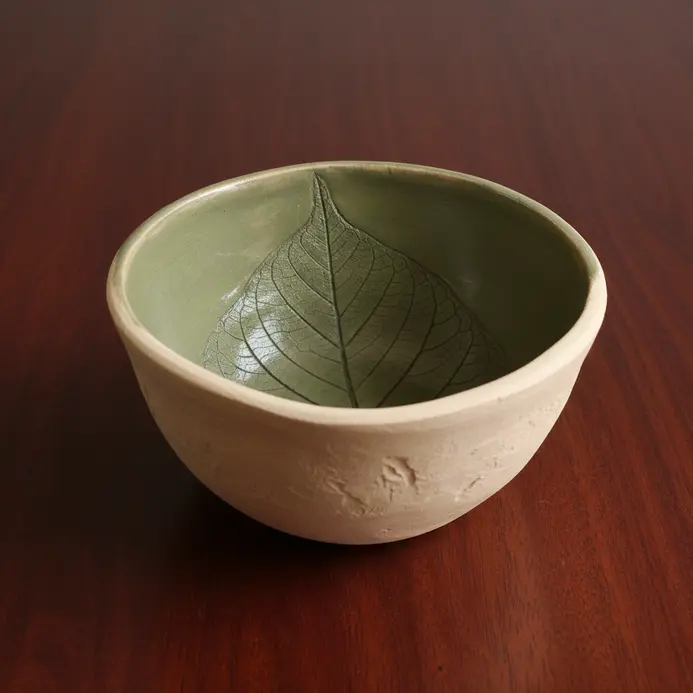
Ever wondered how ceramicists capture such incredibly detailed natural textures? This technique is wonderfully direct, making it one of my most recommended nature-inspired diy pinch pots ideas. You start by rolling a smooth material into a flat circle, then press a fresh botanical sample with prominent veins right into the surface. After carefully peeling the leaf away, you gently drape the textured piece over an inverted bowl to form its final curve. The magic is in that perfect impression, which gives your final piece a one-of-a-kind, organic design that glazes will later highlight beautifully. For a great next step after your bowl is fired, check out this tutorial on how to make a pinch pot. flower pot painting inspiration. Trust me, the final reveal when you pull it from the kiln feels absolutely stunning.
8. Assemble a Nested Trio of Storage Pots
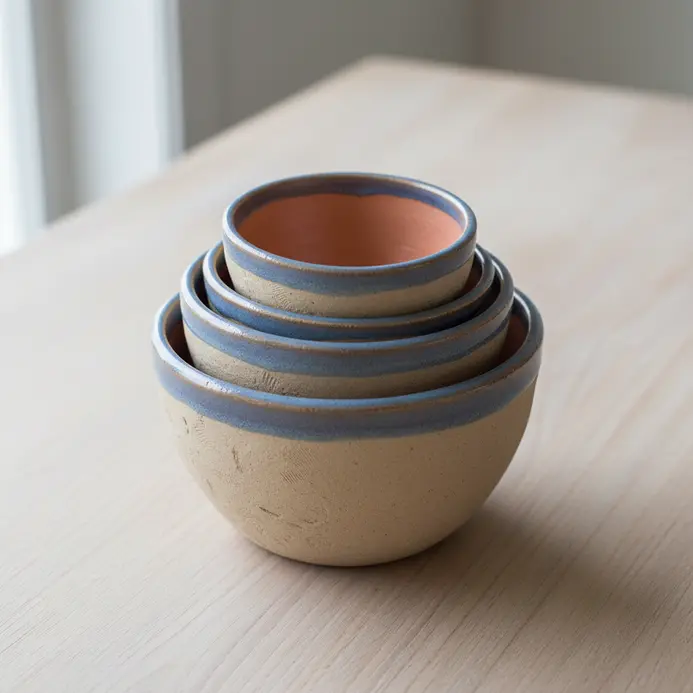
This project is a total win for clever, space-saving organization on crowded shelves. The real magic happens when you carefully form three pieces where each one fits perfectly inside the next. You will want to measure the top and bottom diameters carefully, since tapered shapes are your absolute best friends here. I love hunting for the right proportions at thrift stores or mixing different finishes for a custom, curated look. Once you have your matching set, the fun part is making them uniquely yours. Give them a good clean, then personalize with acrylic paint or decoupage. Sealing your finished piece ensures it lasts through seasons of use. Arrange them nested for storage, side-by-side as a display, or fill them with little treasures. Does that not look completely stunning and tidy?
9. Build a Rustic Pebble Texture Salt Cellar
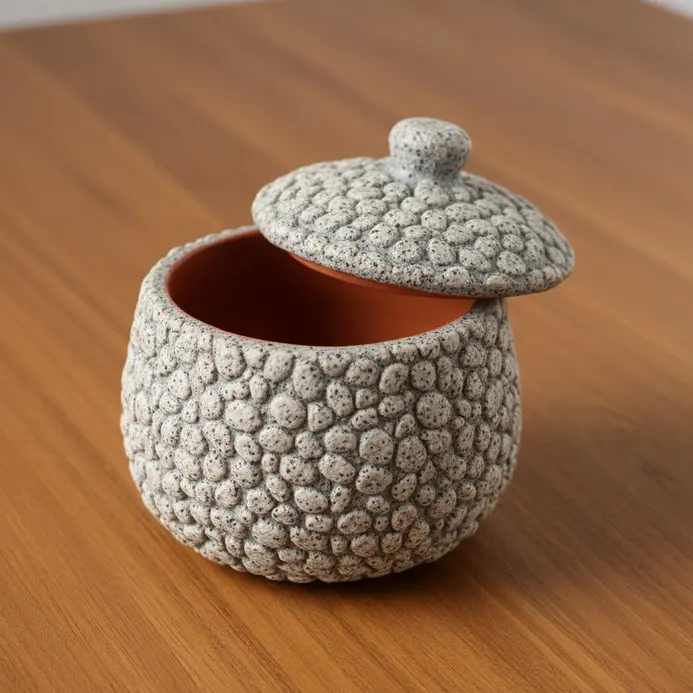
Who would have thought a humble table accessory could become a stunning natural art piece? This one is a textural delight that stands apart from smoother diy pinch pots ideas. You start with a small wooden bowl or pre-shaped dish as your sturdy base. Then, plan a deliberate pattern with clean, completely dry river stones before applying a reliable adhesive in tiny sections. I love how this project turns ordinary garden finds into something truly unique. It works so well because that rough, natural surface adds a wonderful, tactile element to your dining setup, especially when using apple pinch pots. The result is a functional item full of personal charm that invites conversation. Look into easy things to paint and get inspired for your next kitchen project.
10. Form a Geometric Triangle Desk Organizer
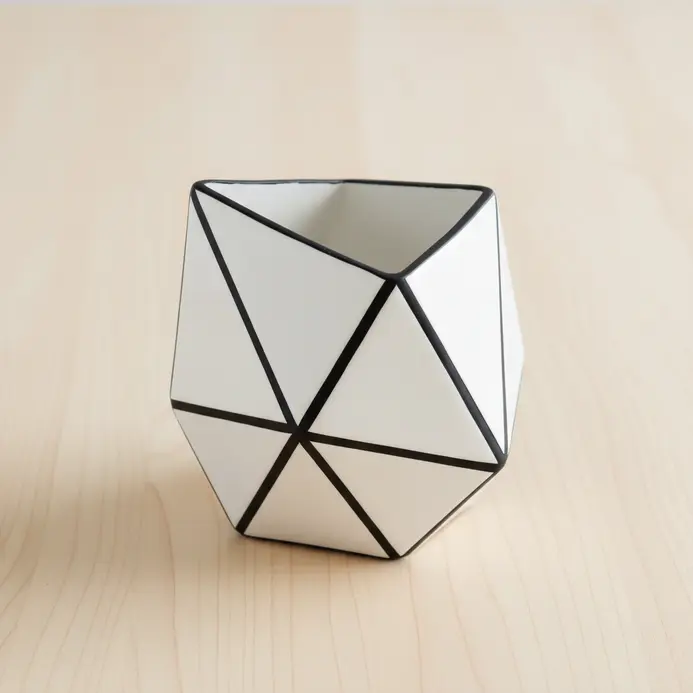
Who says a desk organizer has to be a boring rectangular box? This project brings a modern, sharply faceted look directly to your workspace, expanding traditional clay projects for kids. diy pinch pots ideas into functional geometry. I love how you can draft the concept and build sharp compartments for all your writing tools. It looks complicated at first glance, but a little careful measuring goes a long way toward success. The key is to stay precise with your calculations and cuts to get those crisp angles perfectly aligned. Trust me, the moment you drop your first pen into a monster pinch pot is incredibly rewarding. Start with a quick pencil sketch to map out your exact layout before assembling. Isn’t it great to make something highly functional that also looks like a modern art piece? Feel proud of your clever, well-organized creation, especially if it includes a monster pinch pot.
11. Create a Scalloped Edge Candy Dish
This one looks highly elegant on the counter, but trust me, it is surprisingly simple to carve by hand. Start by forming your basic dish from a fresh ball of clay, keeping the base sturdy. Once it firms up to a leather-hard state, use a small round cutter or even the rounded tip of a teaspoon to press gentle curves into the outer rim. Go slowly and try to space each wave evenly for a completely uniform appearance. The scalloped edge instantly adds a timeless charm that makes this dish feel ready for entertaining. I love how this simple shaping trick turns an ordinary bowl into a gorgeous decorative centerpiece. It works perfectly for holding wrapped sweets or even loose coins on an entryway console. You can discover even more decorative ideas for small vases that rely on similar edge-cutting techniques. Feel the deep satisfaction of crafting something both incredibly pretty and deeply practical.
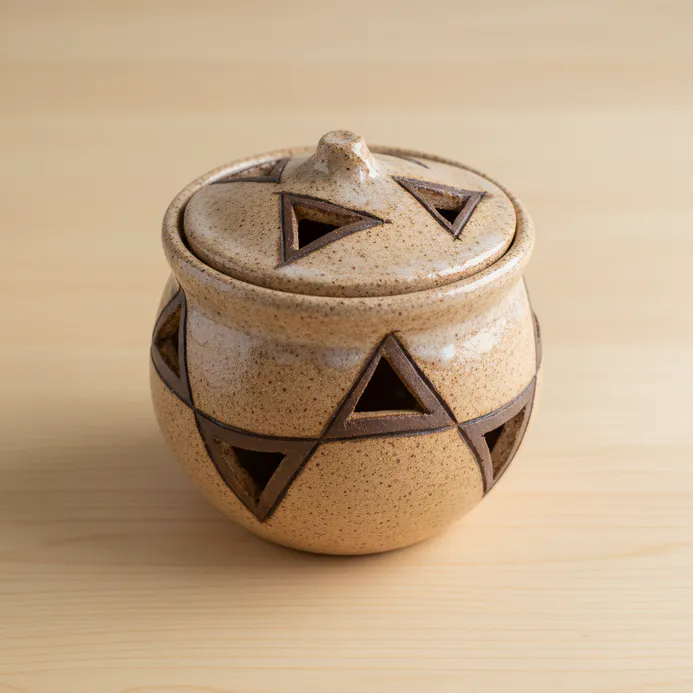
12. Make a Lidded Marble Pattern Stash Jar
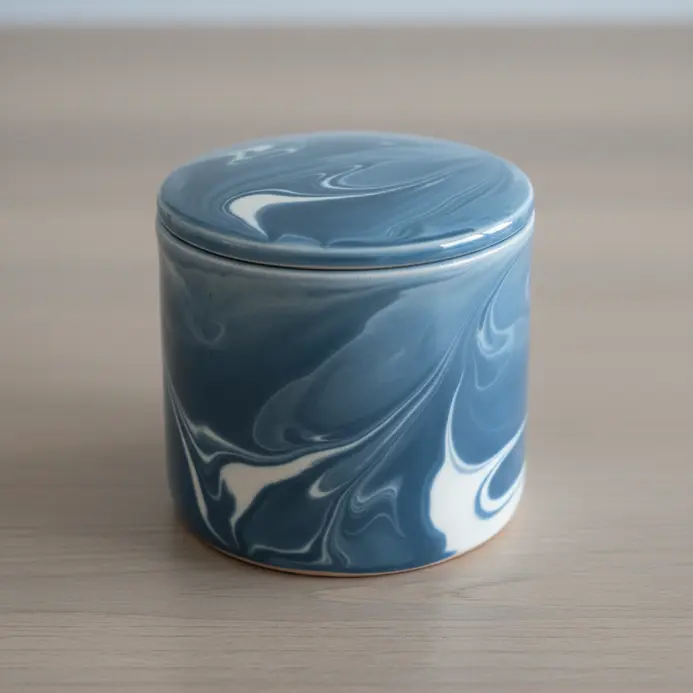
Who would have guessed you could achieve such a sophisticated-looking jar so quickly? The real secret lies in a careful swirling technique, which creates those gorgeous, flowing visual lines. I absolutely love this method because you can blend simple polymer clay sheets or even use fluid acrylic paints to get the exact marbled effect you want. Press your blended sheet onto a clean storage jar and matching lid, then bake or cure completely. The result is a highly unique, functional piece that feels like a miniature gallery piece for your bathroom shelf. My top tip is to avoid over-mixing your chosen colors, or you will end up with a muddy gray instead of crisp, bright veins. Once your container is sealed with a clay pot, it will be ready for use. clear varnishUsing air dry clay, it remains highly durable for daily handling. This project pairs wonderfully with other easy to make crafts, especially clay pinch pots. abstract painting for beginner crafters. Does that not look absolutely stunning when the lid closes?
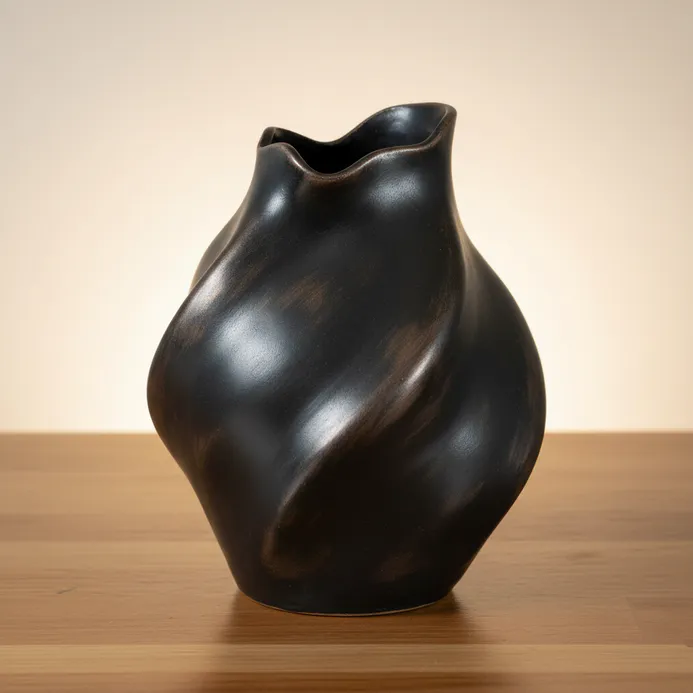
13. Build an Abstract Asymmetrical Vase Form
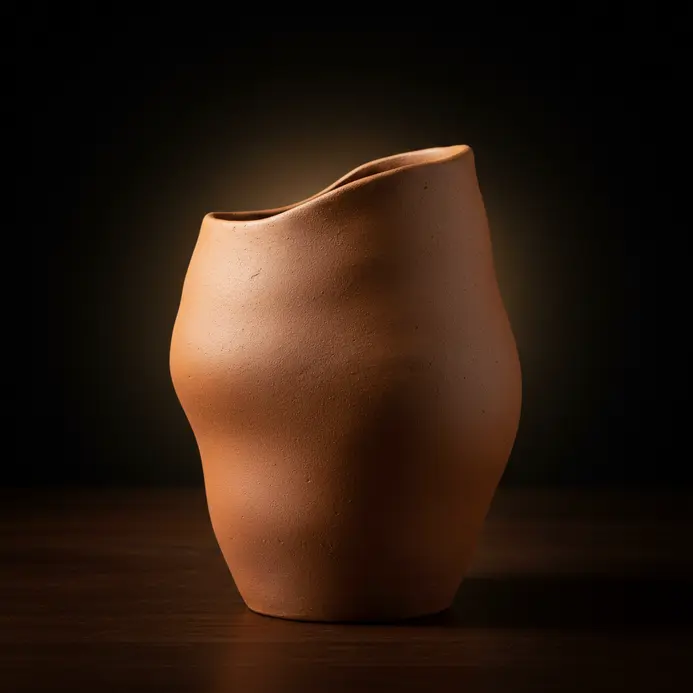
Ever look at a traditional symmetrical vase and wonder what happens when you break all the standard symmetry rules? This project gives you the freedom to explore that exact question, making it ideal for experimental diy pinch pots ideas. You will start with a stable rounded base, then intentionally push, pull, and stretch the sides to create a completely dynamic, off-balance silhouette. I love letting my pure intuition guide the shaping process here, often adding an unexpected bulge on one side or pinching a dramatic curve near the neck of my clay pot. Remember, even unconventional silhouettes still require a sense of visual weight to avoid falling over. Rotate your piece continuously as you build, and consider adding surface texture or a bold splash of colour to direct the viewer’s eye smoothly across the form. Trust me, the real satisfaction comes from stepping back and seeing your uniquely sculptural creation standing tall and proud.
14. Paint a Blue Glazed Spoon Rest
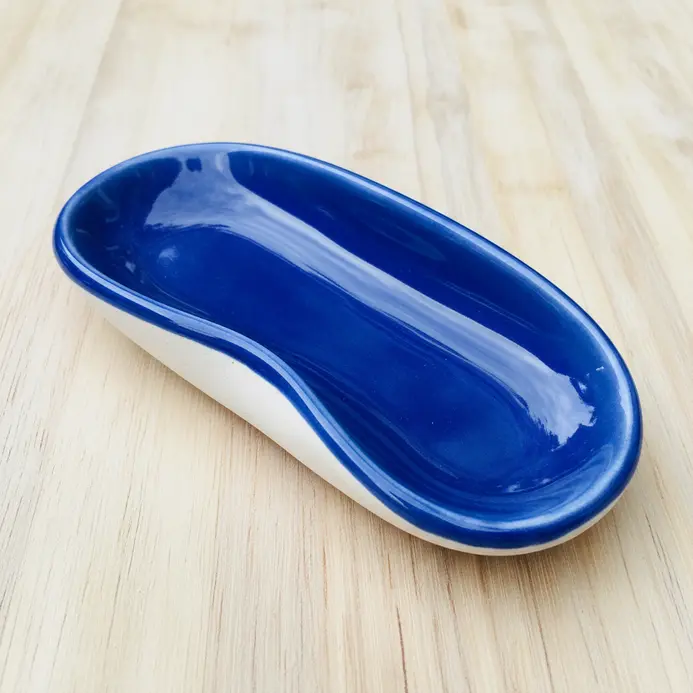
This kitchen accessory project is a fantastic way to add a deeply personal, fully functional splash of colour near your stove. You start with a plain bisque spoon rest and carefully layer several thin coats of a vibrant blue finishing liquid. I absolutely love watching the shade transform during the firing cycle, turning into a brilliantly glossy, highly durable surface perfect for messy cooking days. Always remember to wipe the bottom rim completely clean so it never sticks to your kiln shelf during the high-heat cycle. Apply exactly three smooth, even passes for a rich, deep blue tone, letting each layer dry completely in between coats. This straightforward routine consistently yields a beautiful, heat-safe piece you will use every single day. Discover more pottery painting ideas for beginners to expand your color palette. Does that sound completely satisfying?
15. Craft a Boho Style Hanging Planter
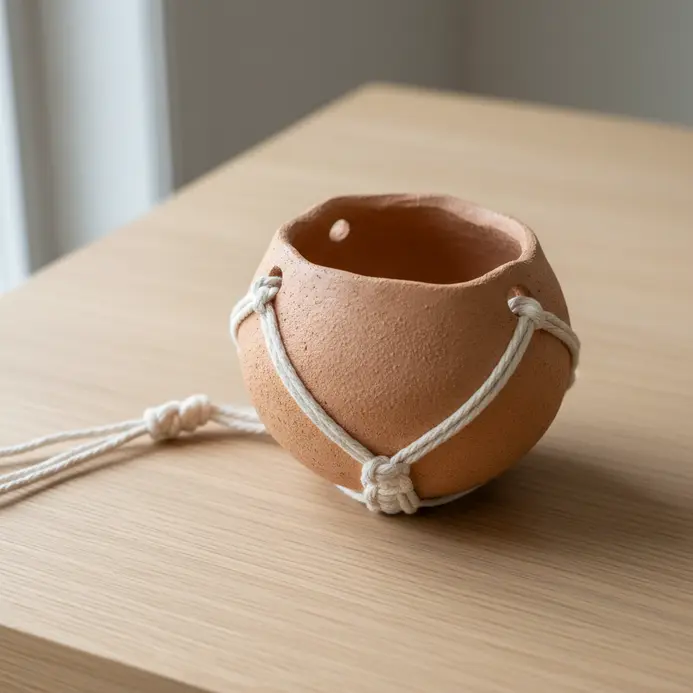
Who would have thought you could safely suspend a hand-sculpted vessel right from your ceiling? Start by forming a few sturdy pots in varying diameters, keeping the base walls slightly thicker to prevent stress tears. Then, use a precise needle tool to pierce one central drainage hole in the bottom and exactly three or four evenly spaced holes near the top rim for suspending cords. This technique opens up countless vertical diy pinch pots ideas for bright, sunlit corners. I strongly recommend letting these pieces dry completely and reach a solid greenware stage before adding any heavy natural twine or jute rope. Carefully thread the suspension line through each rim opening, knotting the ends securely underneath each individual vessel to hold them in a beautiful cascading line. Isn’t it deeply satisfying to build such a personal, earthy home accent that actually supports living foliage?
16. Stamp a Floral Embossed Tea Bag Holder
This tiny accessory looks incredibly refined, but the actual construction process is quite forgiving for new makers. You begin by pressing your favorite botanical design onto sturdy cardstock using a specially formulated sticky ink. Immediately sprinkle fine shimmering powder onto the wet areas, gently tap off the loose grains, and carefully melt the remainder with a hot air tool to create those raised, glossy flowers. I love how this quick trick transforms a flat folded card into a memorable keepsake. Trust me, the absolute key to success is using an anti-static powder tool first to eliminate stray particles and keep your outlines razor sharp. Once that raised panel cools completely, you just align the fold lines, crease sharply, and secure the edges with clear adhesive. It remains a fantastic weekend activity for beginners and makes a deeply personal desk companion. Pair it alongside other easy crafts to do at home for a beautifully coordinated handmade gift box.
17. Sculpt a Whimsical Owl Totem Pot
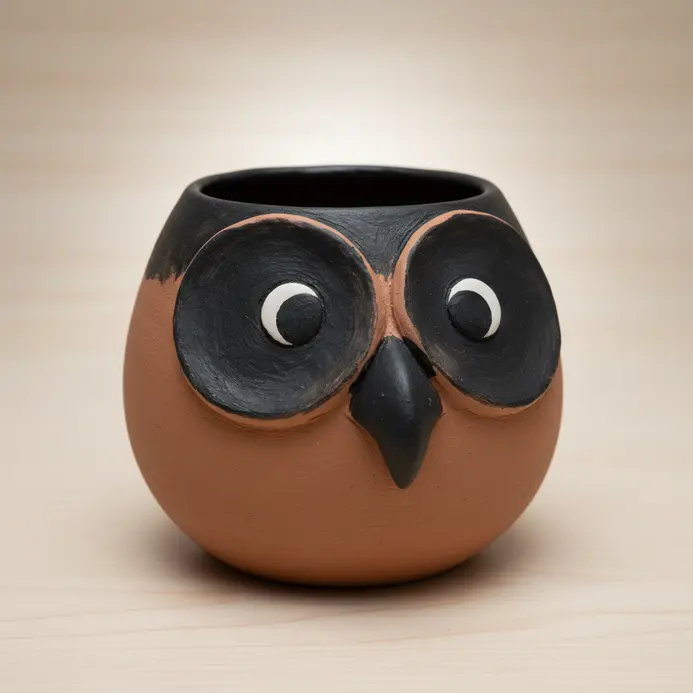
Does a fully functional garden sculpture really have to be difficult to assemble? It absolutely does not, especially when you explore whimsical character-based projects. Start by building a solid, rounded base that sits flat and stable on any garden ledge. Then, gently roll and attach more pliable material to build out a chunky body and a large, expressive head. I absolutely love stuffing a lightweight aluminum foil bundle directly inside the torso to save material weight while maintaining perfect structural support while shaping. Add highly playful facial features like oversized circular eyes and deeply grooved feather patterns using your basic modeling tools. Always remember to drill a generous opening straight through the bottom for proper water drainage. Once the piece fully seasons overnight, painting it with bright acrylic paints instantly brings all that feathered personality to life. Check out easy craft for painting objects to match your color scheme. Feel the quiet pride of building a completely unique outdoor guardian.
18. Build a Stacked Pebble Sculpture Vase
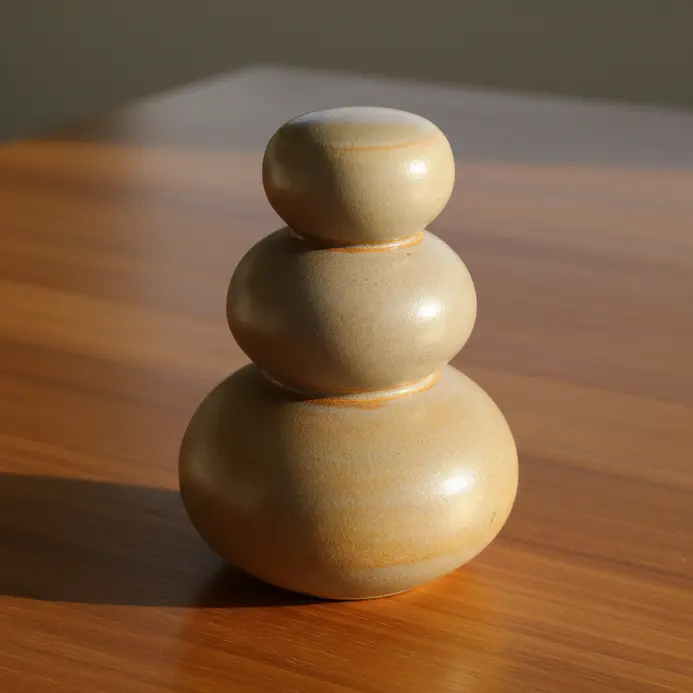
This tower structure looks wildly intricate from a distance, but building it layer by layer feels incredibly meditative. You carefully select rounded stones, arranging and bonding them like tiny building blocks around a solid wooden dowel or heavy ceramic base. I truly appreciate how you can interlock irregular shapes for maximum strength, resulting in a wonderfully rustic, deeply tactile vessel. It remains a fantastic introduction for newcomers since the uneven stone faces beautifully mask any tiny alignment mistakes. Trust me, the absolute non-negotiable rule here is selecting a professional strong waterproof adhesive and patiently waiting for each individual ring to cure completely before stacking the next row. The final result turns out incredibly sturdy, completely unique, and feels like a genuine slice of rugged landscape resting quietly on your bookshelf.
19. Dip Glaze Condiment Bowls
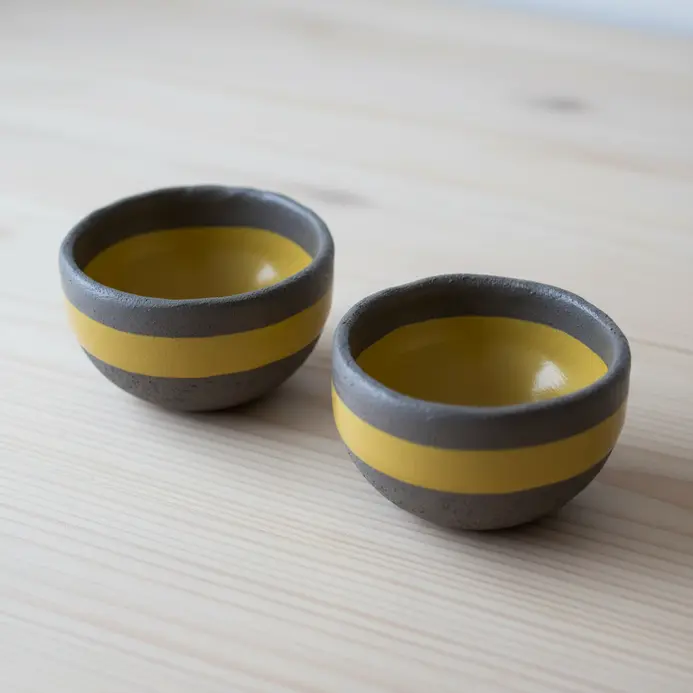
Ever questioned how professional ceramicists achieve that impossibly clean dividing line between glazed and bare earth on their serving ware, similar to techniques used in making a pinch pot? This method looks incredibly advanced, yet the actual dipping process remains wonderfully straightforward. You simply grip your fully bisque-fired bowl by the foot and slowly submerge the upper section directly into your liquid color bath, carefully controlling the exact penetration depth. The outcome delivers a razor-sharp, completely clean boundary between the glossy surface and natural raw clay, gifting each individual piece a highly modern, distinctly handmade character. I genuinely adore how one single, smooth motion creates such a powerful visual contrast. You can experiment by lowering it twice into different batches to layer a gradient, or keep the vision clean with one solid tone. The absolute requirement lies in maintaining a fluid, unwavering hand to achieve that completely even coverage layer. Pulling your creation straight out of the bucket reveals that perfect, sharp transition line instantly. Try pairing it alongside painting flowers on crafts for an extra artistic touch on the lower band before your final kiln trip.
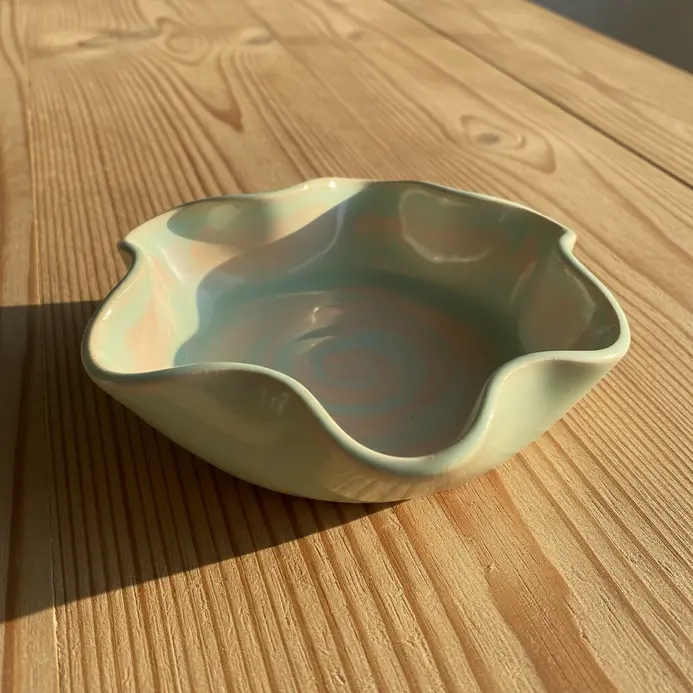
20. Form an Organic Wave Rimmed Planter
Ever wanted to capture the exact fluid motion of the shoreline in a permanent, solid object? Begin shaping a standard rounded vessel, then allow your palms and fingertips to gently coax the outer walls into a soft, highly flowing silhouette. Instead of trimming a perfectly straight upper edge, simply pinch and lift alternating sections into a continuous series of flowing ripples. This remains my absolute favorite approach for injecting instant natural movement into static shapes, much like the organic forms found in turtle pinch pots. The pure freedom of this completely irregular style guarantees there is no incorrect starting point, and your individual hand pressure naturally dictates the final character. Once your planter reaches bone-dry stiffness, consider adding a final decorative layer with flower pot painting inspiration.
21. Paint a Floral Pattern Incense Holder
Does your recently shaped piece feel entirely incomplete without a personalized artistic mark? Adding delicate botanical illustrations onto a dedicated incense platform remains the absolute best way to stamp your creative identity onto a functional object. Start by gently sanding any rough edges with fine paper and brushing on a thin coating of clay to enhance your pinch pots made. gesso primer to guarantee maximum pigment adhesion. Next, faintly map out your chosen design using a soft pencil before laying down foundational colors with high-quality fluid paints. I genuinely enjoy layering translucent washes of overlapping petals and tiny leaf shapes, finishing the composition with extreme precision using a fine liner brush until every bloom appears vibrantly alive. It provides an incredibly calming, focused routine that transforms a basic smoke catcher into a genuine display centerpiece. Feel completely proud when you position your custom-decorated treasure on the main hallway shelf.
Drying and Finishing Your Handbuilt Creations
Place your completed piece onto a perfectly flat, shaded work surface and drape a lightweight plastic sheet over it for exactly two days to moderate the initial moisture loss and prevent sudden structural tears. Once the raw material completely loses that glossy wet appearance, you can safely discard the plastic cover and allow ambient oxygen to finish the curing cycle, which becomes absolutely vital before any decorative steps. If you aim for a highly food-safe ceramic sealant for everyday dining pieces, you must fire stoneware properly first. If you strictly prefer using unfired air dry clay, apply roughly three thin layers of polyurethane varnish to completely safeguard your artistic effort and deeply enhance the painted colour tones. This final protective routine permanently locks in every careful shaping decision and leaves your finished vessel fully ready for long-term daily handling or secure shelf display. Proper moisture control always remains the absolute foundation of crack-free success. Never rush the curing phase, regardless of how eager you might feel to start decorating.
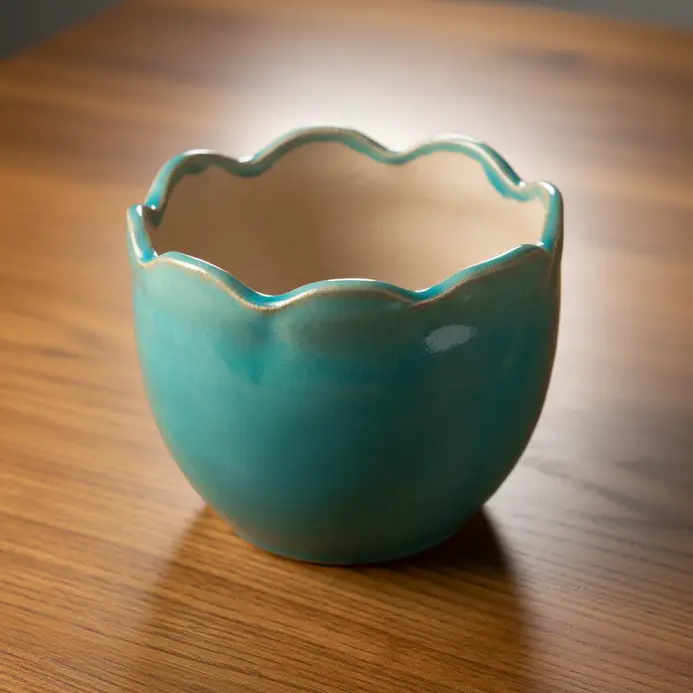
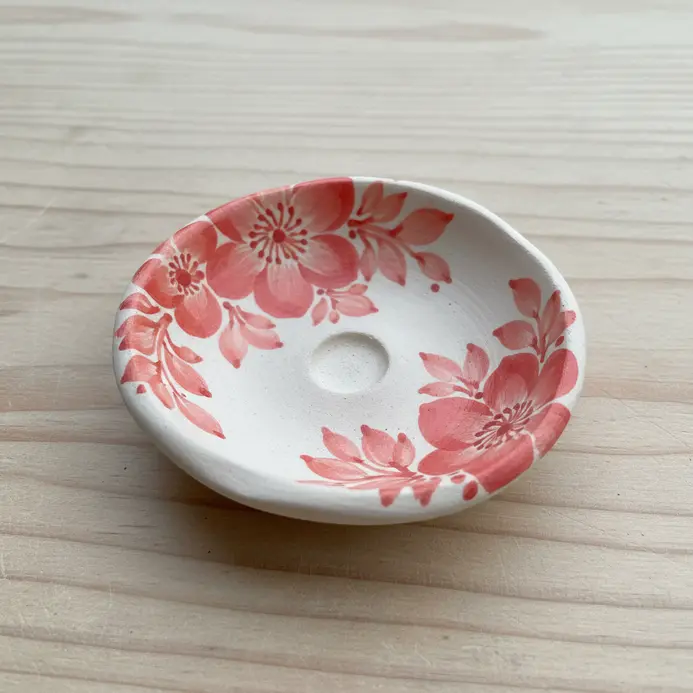
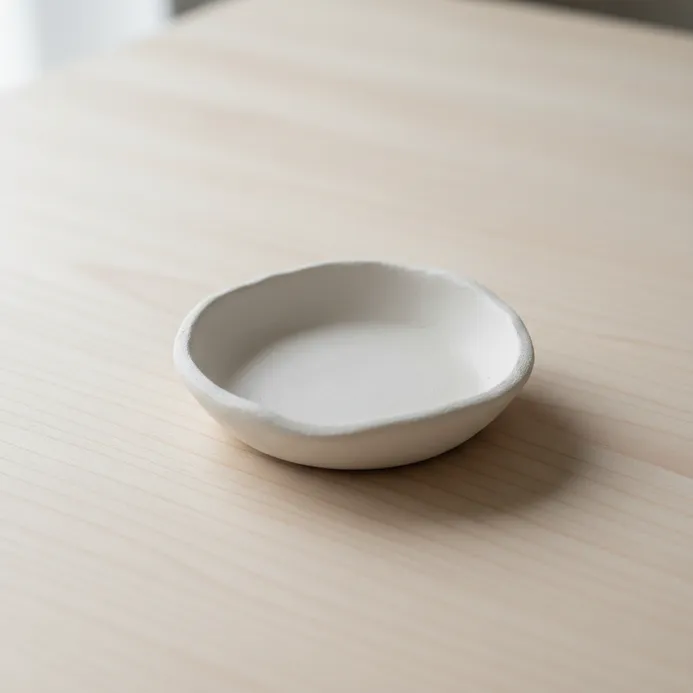
More DIY Pinch Pots Ideas Gallery for Inspiration

Conclusion
Looking back at all these diy pinch pots ideas, I hope your creative spark feels fully ignited for your weekend studio time. Examine the wide variety of pot shapes and practical functions you can easily achieve from that single, familiar starting point. The true beauty of working with pliable earth lies in the undeniable truth that each finished vessel, like an apple pinch pot, permanently carries your unique fingerprint, rendering it entirely unmistakably yours. My strongest recommendation remains picking one concept that genuinely excites you without feeling overwhelming, gathering a lump of raw material and a couple of smoothing tools, and immediately beginning the pressing motion. Never stress about achieving flawless curves during your very first session, since the most deeply loved creations, like clay pinch pots, frequently emerge from accidental bends and experimental shaping. Your absolute favorite display piece hides patiently in your very next handful of earth, waiting for your hands to give it form.
FAQs
Q: What are easy pinch pots ideas for beginners?
A: A great project for beginners is to start with the basic shape: roll a ball of clay, press your thumb into the center, and pinch the sides evenly to form a small bowl. This super easy method works well using air dry clay or regular pottery clay and is perfect for projects for beginners and fun craft sessions with kids.
Q: How can I make pinch pots using air dry clay?
A: Using air dry clay is simple: knead until soft, form your ball, press and pinch into shape, then leave to dry according to the clay instructions. You can add texture with a fork or stamps, paint once dry, and glue on small decorative pieces like beads or shells if desired.
Q: Are pinch pots a great project for kids and classroom activities?
A: Yes—pinch pots together in small groups to make a collection of ornaments, nests for Easter, or autumn-themed dishes. It’s a great activity for kids because it’s tactile, requires no wheel or potter skills, and can be supervised easily for a safe, fun craft.
Q: What simple pinch pot craft ideas can I try for holidays like Easter and Autumn?
A: For Easter, shape tiny egg holders or little bunny mugs; for autumn, make leaf-imprinted bowls or mini pumpkin ornaments. These seasonal craft ideas are super easy and can be painted in festive colors after you leave to dry.
Q: How do I join two pinch pots together?
A: To pinch pots together, score the joining edges, add slip (watered clay) or a strong craft glue for air dry clay, press firmly, and smooth the seam. This technique lets you create stacked pots, a mug with a handle, or a multi-compartment organizer.


