

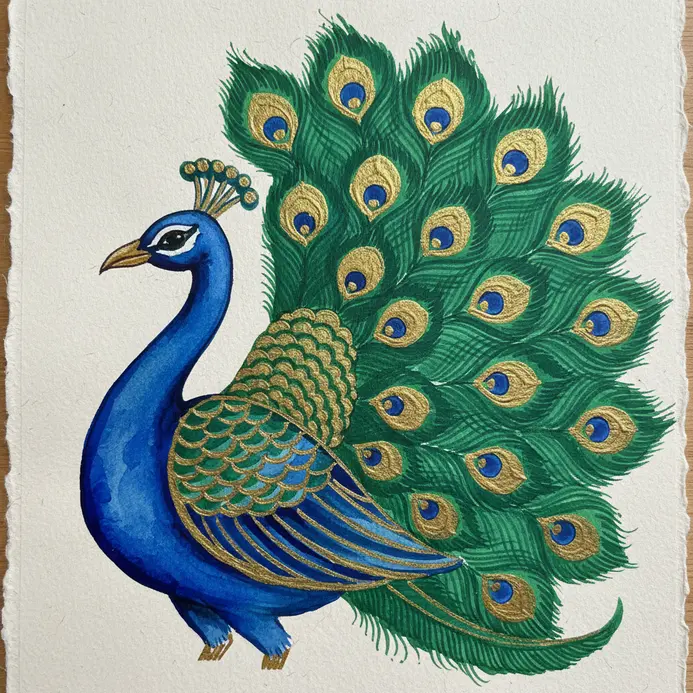


Palette Selection for Traditional Indian Pigment Aesthetics
Your peacock will feel flat without the specific jewel-toned trio of cobalt blue, emerald green, and deep ochre that defines this art form. Think of these as your non-negotiable base colors, with the blue forming the body and neck, the green for the lower plumage, and that rich ochre for the beak and feet. When assembling a collection for an easy peacock painting indian art, you want to avoid modern synthetic hues that look too bright or neon, as the traditional look relies on a more muted, earthy saturation. Use opaque gouache paint on cold-press watercolor paper, as it gives you that bold, flat color block that mimics folk art styles perfectly. The high contrast between these three pigments creates the visual pop we all love, even before you add any intricate details.
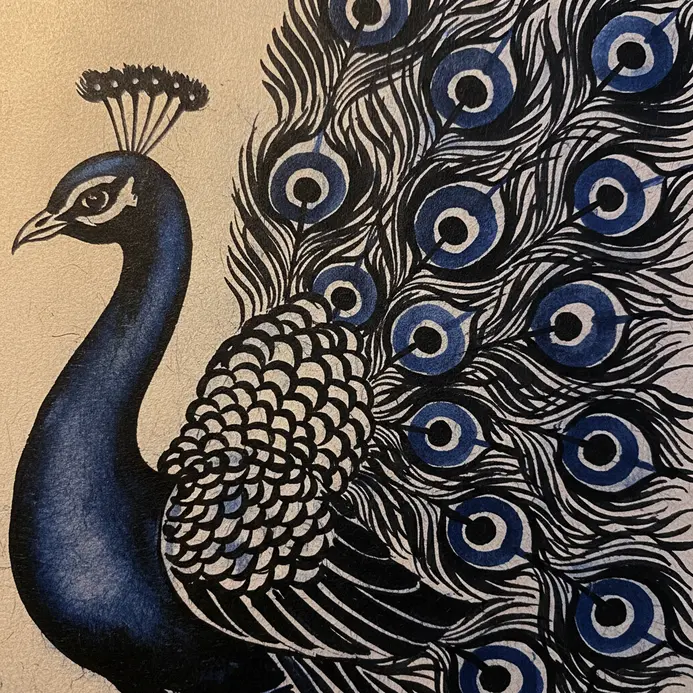
Stylized Anatomy and Curvature for Feather Rhythms
The most common mistake beginners make is trying to draw the peacock’s head plume too small, which throws off the entire bird’s elegant balance. Trust me on this, that teardrop-shaped crest needs to be almost as large as the head itself to achieve the right stylized silhouette. From there, focus on the long, fluid S-curve of the neck and back, letting it guide the placement of your repeating feather shapes. Remember, you are aiming for rhythmic, decorative patterns over strict realism, so feel free to exaggerate the curves. Use a fine-tip archival ink pen to outline your bird first; this gives you a clean guide to fill with those repeating, symmetrical feather textures. This approach keeps the anatomy graceful and grounded in the tradition, even when you simplify the design.
1. Sketch the Initial Teardrop Shape for the Body
 Ever wondered how to start something that looks so graceful? This first step is all about establishing the core form. Begin by lightly sketching a circle or oval for the wider end of the body. From there, draw a light line to mark the taper’s direction, then connect the sides with smooth, flowing curves can enhance the visual appeal of your artwork and make it stand out as a piece of decor.. I love how this simple shape instantly gives your peacock a solid foundation. Trust me on this, using a very light touch for these guide lines is absolutely key. It lets you erase them cleanly later without leaving a messy trace. Feel the deep satisfaction when that elegant teardrop finally takes shape on your page, giving you a clear roadmap for the entire easy peacock painting indian art process.
2. Draw the Small Circle Head Shape
 Ever try to draw a perfect circle in one single stroke? It is perfectly okay if your first attempts look more like a potato; even professional artists have to start somewhere when discovering Pinterest’s best ideas. I love this step because it is entirely about building the shape with patience. The trick is to start with light, overlapping strokes. Use a series of small arcs to feel out the roundness, letting your pencil barely graze the paper, as you create patterns reminiscent of Madhubani painting. Once the general form looks right, go over it with a slightly firmer line to define your final circle. This method works so well because it lets you correct as you go, making the whole process feel incredibly forgiving and fun. Trust me on this one, and feel that deep satisfaction when that perfect little head takes shape. Mastering this simple circle is a crucial foundation when learning the easy peacock painting indian art style.
3. Connect the Head and Body with a Neck Line
 Ever wonder why some drawings look a bit stiff or off balance? Often, it’s because of a rigid neck structure. This connection point is where your peacock posture truly gets its elegance, much like the intricate designs found in Madhubani painting. Start by drawing two slightly curved lines from the bottom of the head down to the body, making sure they taper wider at the shoulders. I love this step because it instantly gives your figure a sense of natural flow and stability. Feel that satisfying mental click when the head and body finally unite into a cohesive silhouette. Connecting these two major shapes smoothly ensures your easy peacock painting Indian art looks polished from the very first glance, making it a perfect decor piece.
4. Sketch the Large Fan Tail Arc
 Ever tried sketching a perfect fan shape without a ruler? You might find and save ideas for improving your technique on Pinterest. It looks quite tricky at first, but trust me, it is all about finding your implied pivot point. Lightly mark a small dot on your paper outside where your tail will eventually spread out; this serves as your visual hinge. From there, draw a short, gentle curve for the inner edge, then a much longer, sweeping curve that fans out dramatically for the outer boundary. Connect them smoothly, and you will instantly have your elegant arc. Why does this specific technique work so well? It gives your peacock that instantly recognizable, graceful silhouette without complicated measuring tools. For a smooth flow, practice your curves freehand and keep your pencil strokes exceptionally light. You will love how this foundational shape brings your painting to life, much like the bold patterns found in Madhubani painting. similar traditional Gond art. This sweeping arc becomes the dramatic canvas for every detail you will add later in your easy peacock painting indian art.
5. Paint the Body with a Solid Jewel Tone
 This specific phase feels less like traditional painting and more like setting a precious gemstone. You are going to apply a rich, vibrant color across the entire body shape of your peacock. Think of a deep sapphire blue or a brilliant emerald green, applied in perfectly smooth, even layers. Always start with a well-prepared surface to ensure clean results. Then, use a good quality brush and build up the color with several thin coats instead of attempting one thick application. Trust me, this patient layering is what gives that luxurious, luminous look. See how the color naturally deepens with each successive pass? It works because a pure, solid jewel tone makes your peacock look instantly regal and highly eye-catching. You will absolutely love how this bold base makes every single detail you add next pop beautifully, elevating your entire easy peacock painting indian art to a professional standard.
6. Paint the Head in a Matching Jewel Tone
 Who would have thought a single thoughtful color choice could make your entire painting look so remarkably cohesive? The core idea here is to paint the peacock’s head using a complementary jewel tone that directly relates to your main body color. You might pick a slightly deeper sapphire blue if your bird leans toward teal, or a rich amethyst purple if you prefer a cooler shade overall. This creates a beautiful, intentional visual link that feels incredibly luxurious. I love how this straightforward step ties the whole composition together with effortless harmony. It is never about finding an exact mathematical match, but rather about choosing a tone that sings beautifully alongside the rest. For a softer visual approach that still embraces vibrant colors, check out these pastel watercolor painting techniques. Feel how that deliberate color choice elevates your entire piece, proving that careful planning is the secret to any successful easy peacock painting indian art.
7. Paint Large Green Blobs for the Tail Feathers
 This particular phase is so wonderfully freeing, because you are absolutely not drawing individual feathers yet. You are simply laying down large green blobs that will rapidly become your foundational structure. Think of them broadly as leaf-like or paddle shapes, naturally wider at the base and fanning out gracefully from the central body. Vary their sizes and tilt angles slightly to create an organic, flowing arrangement for the magnificent tail. Use a medium flat brush loaded with smooth, opaque paint and apply light to medium pressure in confident fluid strokes. Resist the strong urge to perfect each individual shape right now, and definitely let this entire layer dry completely before you proceed. This straightforward step creates the stunning visual volume you routinely see across many classic Indian art pieces. For another beautiful approach to traditional pattern work, you can explore Bhil painting techniques. Laying these broad shapes correctly sets the stage for a vibrant easy peacock painting indian art composition.
8. Apply Blue Centers Inside the Green Blobs
 Ever wondered exactly how professional artists achieve those perfectly placed little blue dots in the middle of their peacock feathers? This specific step is entirely about careful placement and precision. You will take your small round brush, dip the very tip in a vibrant blue, and place a single confident dot right in the heart of each pre-painted green shape. It truly resembles adding the final sparkling accent to a polished jewel. I genuinely love this part of the process because it instantly makes your artwork pop with immediate visual dimension. The sharp contrast between the earthy green background and the bright blue center creates a stunning, eye-catching effect. Try it carefully on a practice scrap first and feel the deep satisfaction when those perfect little centers finally align. Achieving this contrast is a quick way to boost the quality of your easy peacock painting indian art.
9. Add Black Dots Inside the Blue Centers
 Ever questioned how digital artists consistently get those tiny, absolutely perfect details on every single feather? This crucial step is entirely about surgical precision. Carefully identify your painted blue centers, then prepare to work with absolute focus. I love this specific phase because it is exactly where that classic peacock eye pattern finally springs to vivid life. Click carefully to place each minute dot firmly within the blue areas. This deliberate contrast adds incredible perceived depth and makes the entire piece instantly pop with energy. For more visual inspiration on related regional art styles, you can discover Bengali painting styles. Does that not look absolutely stunning? Adding these dark focal points completes the signature motif for any polished easy peacock painting indian art.
10. Paint Thin Stem Lines for the Feathers
 Ever wondered exactly what visual element gives a painted feather its structural backbone? The answer is entirely in the central stem, botanically known as the rachis. I genuinely love this step because it brings instant, necessary structure to your sweeping tail. You will use a fine-tipped brush carefully loaded with properly ink-thinned paint. Paint one single smooth, confident line directly down the exact center of your feather shape, allowing it to taper naturally from thick at the base to incredibly thin at the tip. This solitary stroke adds immense structural dimension, instantly making your flat feather shape look far more alive. Trust me completely on this, as the deep satisfaction of watching a clean, curving stem line form is a fantastic creative payoff for your easy peacock painting indian art.
11. Add Small Green Filler Blobs Between Feathers
 Do you ever look at your work and suddenly feel like your peacock feathers look just a bit too sparse? This clever little visual trick fills them out beautifully. Grab your small round brush and carefully dab tiny, irregular green shapes directly into the visible gaps between the main features. I deeply love using two or three slightly different shades of green here, deliberately layering them to create a genuine sense of depth and rich organic texture. Isn’t it incredibly satisfying to visually watch those feathers suddenly come alive with just a few strategic dabs? This quick technique adds a wonderfully playful, vibrant touch that makes your overall painting instantly pop. For a much more traditional feel, you can certainly explore the meticulous dot work seen in classic styles by visiting this guide to learn Pichwai painting styles. It remains a brilliant method to quickly add visual complexity without overwhelming your composition during your easy peacock painting indian art project.
12. Paint Two Simple Lines for the Legs
 Who would have realistically guessed that the entire final pose of your magnificent peacock actually starts with just two simple lines? This specific phase is entirely about establishing a clean structural blueprint. You will deliberately paint two distinct, parallel lines dropping directly from the bottom edge of the body to properly define the legs. I absolutely love this stage because it firmly sets the entire figure’s posture in one decisive stroke. Focus entirely on the general forward direction and accurate proportional length during your initial pass. Use a fine-tipped round brush specifically chosen for drawing exceptionally clean lines and keep your paint mixed to a very fluid working consistency. Pro tip: always draw directly from your shoulder joint for a significantly steadier, smoother hand. This foundational structural step strictly guarantees that your figure maintains perfect balance and true proportion long before you attempt adding any surface detail, securing a successful easy peacock painting indian art.
13. Outline the Beak with a Fine Brush
 This step often looks like a remarkably small detail, but trust me completely when I say it heavily defines the entire character of your painted bird. After your initial light sketch has dried properly, carefully load your fine liner brush with properly thinned black paint or archival ink. Follow your original pencil sketch with deliberate, slow, and confident strokes, strictly letting the fine brush tip do all the precise work. Deliberately vary your applied hand pressure a little bit to intentionally create slightly thicker lines exactly where shadows naturally fall, while keeping the delicate leading edges incredibly thin. Why does this specific outlining technique work so exceptionally well in Madhubani painting? That crisp, definitive line physically separates the beak from the main head mass and simultaneously gives you a perfect, enclosed guide for adding local color later. Isn’t it deeply satisfying to finally watch that sharp, clear definition suddenly appear? You have absolutely got this specific technique mastered. Your artwork instantly looks far more professional and sharply focused once you complete this essential stage of an easy peacock painting indian art.
14. Add a White Highlight Dot to the Eye
 Ever seriously noticed how a finished painting’s eyes can suddenly feel completely flat or strangely lifeless? A single tiny reflective mark is overwhelmingly the fix for that issue. This remains my absolute favorite finishing touch across every project. You will carefully use a fine detail brush heavily loaded with highly opaque white paint to deliberately add exactly one small dot directly in the upper quadrant of the iris. The absolute key to success here is strategic placement. Position that tiny highlight so it deliberately overlaps the dark pupil slightly, mimicking a single overhead light source. Trust me entirely on this one specific tip. That single micro dot instantly adds a wet, highly reflective sparkle that brings incredible lifelike depth directly into your peacock’s intense gaze. It makes the entire eye mechanism look instantly alive and sharply focused. Does that not feel completely magical? For a wonderful variety of other subjects to thoroughly practice this exact highlighting on, you should certainly explore easy Indian drawing ideas to keep your skills sharp for your next easy peacock painting indian art project.
15. Apply Gold Paint to Outline the Feathers
 This incredibly fun phase is exactly what makes your finished peacock suddenly shimmer with light. I truly love this entire sequence. Carefully load just the very sharp tip of your fine liner brush with a rich, creamy gold paint mixture. Then, deliberately trace the delicate barbs outlining each individual feather using light, incredibly steady lines. Isn’t that process deeply satisfying? It immediately defines those intricate inner details and simultaneously adds a touch of royal visual elegance. Your entire painting transforms in a single afternoon application. Trust me completely, and seriously let each gold stroke dry thoroughly to absolutely avoid smudging that precious metallic shine later on.
16. Add Gold Dots to Decorate the Feathers
 Isn’t it completely amazing how just a few tiny details can totally transform an otherwise simple painted shape? This specific step remains entirely about adding that final necessary touch of visual sparkle. I personally love using a dedicated nail art dotting tool for perfectly uniform, round results. Carefully load the exact metal tip with a tiny bit of metallic gold paint and gently press it completely straight down onto your dried feather surface, then immediately lift it straight back up without dragging. This remarkably simple dotting technique instantly adds a wonderful repeating rhythm and a clear touch of visual luxury directly onto your finished work. For a classic, polished look, deliberately try creating a uniform visual pattern directly along the outer edges of each feather’s vanes. The bright metallic shimmer aggressively catches ambient light beautifully, making your entire painting visually come alive. If you remain completely new to these specific decorative application methods, you can consistently find excellent detailed guidance in this guide on traditional Indian art for beginners. Does that not look completely stunning once finished? Adding this gold pattern elevates the entire composition to a gallery-ready easy peacock painting indian art standard.
17. Paint Intricate Pattern Strokes on the Neck
 Ever deeply wondered exactly how experienced artists consistently get those incredibly stunning, highly detailed neck patterns? It remains entirely about carefully planning your visual flow first. I honestly love gently sketching the full decorative design lightly using a standard makeup pencil specifically to see exactly how it naturally follows the neck’s gentle anatomical curves. Then, carefully using a fine liner brush heavily loaded with highly opaque cake paint, I deliberately trace directly over those temporary guide lines using confident, completely steady strokes. This specific structured method works perfectly because you always build directly upon a stable temporary guide, which actively prevents any accidentally wobbly lines from ruining your progress. For a truly rich visual appearance, deliberately try implementing a strict monochromatic color palette featuring exactly one bright metallic accent. You can consistently find fresh inspiration for your custom decorative borders by deliberately exploring traditional ink painting ideas online. Feel the immense creative satisfaction precisely when your complicated decorative pattern finally comes together perfectly on the canvas, cementing the elegance of your easy peacock painting indian art.
18. Add a Wing Shape with a Color Block
 Does it suddenly feel like your peacock is finally completely ready to leap off the canvas and physically come to life? Deliberately adding the visible wing shape provides exactly that final, incredibly bold visual move. I deeply love this specific step because it instantly grants your painted bird true visual character. Carefully use a light pencil to gently sketch a soft, incredibly flowing geometric shape that naturally starts right at the shoulder joint and gracefully curves outward. Think deliberately of it simply as an elegant, singular leaf gently attached to the main body mass. Once you feel completely happy with your temporary outline, firmly go directly over it using a fine brush mixed with dark archival ink. Now comes the absolutely best part of this sequence, applying the solid color block. Completely fill the entire enclosed wing shape using a smooth, perfectly even wash of a highly vibrant pigment like rich emerald green or deep royal blue. Carefully use a medium-sized flat brush and apply extremely consistent downward pressure to actively avoid creating visible streaks. Isn’t it wonderfully satisfying to finally watch that solid, beautiful geometric form suddenly appear? Your artwork literally receives a major immediate visual boost of pure energy when executed properly in this easy peacock painting indian art.
19. Detail the Wing with Simple Line Work
 Ever seriously wondered exactly how seasoned illustrators perfectly capture a wing’s natural grace without literally drawing every single microscopic feather? This highly effective method intensely focuses on simple linear suggestion to visually imply structural form and natural flight movement. Carefully begin by lightly sketching the exact three primary anatomical segments of the wing’s internal architecture using a standard HB or 2B pencil. Then, deliberately radiate gentle lines outward from the center to visually indicate distinct groups of primary and secondary flight feathers. Once your delicate pencil guide finally feels completely structurally balanced, carefully trace directly over those marks using a reliable fineliner pen. Intentionally use highly confident, solid pressure lines specifically for the leading structural edge, while switching to visibly softer, deliberately broken strokes strictly for the trailing edge to actively suggest overlapping feather texture. This specific visual approach deliberately keeps your final drawing highly dynamic while actively avoiding unnecessary visual clutter. I absolutely love how this highly structured, disciplined method consistently makes such an incredibly complex anatomical form feel wonderfully accessible to beginners practicing realistic watercolor painting methods. Mastering this line work perfectly completes the wing structure in your easy peacock painting indian art.
20. Enhance the Border with More Gold Dots
 This remains my absolute favorite final decorative finishing touch across all canvas sizes. Carefully adding more gold dots deliberately positioned exactly along your outer compositional border instantly transforms it from looking simple to looking utterly splendid. You can actively choose to use an ultra fine-tipped brush or a dedicated rubber dotting tool specifically for maintaining highly consistent circular shapes. I consistently love deliberately varying both the physical dot sizes and the spacing density intentionally for a genuinely richer visual appearance. This specific border trick actively works because the intense metallic shimmer automatically draws the viewer’s eye inward and perfectly frames your central peacock, effectively giving it that highly traditional Indian decorative art aesthetic. For an almost identical framing effect applied to a different cultural style, deliberately check out these specific simple Madhubani drawing tutorials. Trust me fully, watching that extra metallic sparkle suddenly come completely together proves incredibly satisfying. This final decorative frame truly seals the success of your easy peacock painting indian art creation.
21. Clean the Background Edges with Paint
 This absolutely final cleanup step honestly feels exactly like putting on prescription eyeglasses and suddenly seeing your entire room instantly snap into perfect visual focus, does it not? You will deliberately take a freshly cleaned small round brush and carefully paint tightly right along the exact outer contours of the peacock figure, aggressively using the identical solid background pigment color to deliberately cover any stray pencil marks or fuzzy edge bleeds. I deeply love exactly how this sharp cleanup instantly makes your painted bird pop flawlessly against its setting. It truly marks that deeply satisfying psychological moment when your painting finally shifts from looking merely ‘almost completed’ to becoming genuinely, gallery-ready polished.
Preserving Metallic Ink Finishes with Archival Sprays
A single deliberate spray layer of a professional-grade UV fixative applied exactly twelve inches away remains the absolute only reliable method that will successfully keep your precious gold or silver detailing safely from accidentally smudging or rapidly tarnishing over time. The wonderful news is this entire preservation step precisely takes two quiet minutes while actively protecting many weeks of incredibly careful patient work specifically applied to those intricate little eye patterns inside the tail. You strictly need to purchase a specialized aerosol spray specifically explicitly formulated to protect archival ink and pigment, as using a standard generic furniture varnish can dangerously react unpredictably with exposed metallic particles and inevitably cause permanent dulling. Keep your spraying can completely steady while executing a light, perfectly even sweeping motion across the entire canvas surface, carefully ensuring absolute full coverage without letting heavy droplet pools form anywhere. Allow this invisible chemical sealant to cure completely undisturbed for one full twenty-four hour day before you even remotely consider attempting framing or physical handling, as this specific waiting period ensures an absolute permanent chemical bond. This crucial final protection step safely locks in absolutely all that vibrant base color and brilliant metallic shimmer, guaranteeing your finished artwork stays perfectly as vividly bright as the very exact day you placed your last brush down on that easy peacock painting indian art.
Conclusion
You successfully started with incredibly simple geometric shapes and carefully built them into something brilliantly vibrant and completely full of life. That entire artistic process, from a basic floating teardrop outline all the way to a heavily layered jewel-toned decorative fan, exactly explains what makes this specific creative journey so deeply rewarding. The very next moment you feel genuinely inspired again, definitely try applying this exact same layered structural approach with an entirely different bird species or a completely fresh color palette. Always keep your initial graphite sketches intentionally loose and consciously remember that lasting visual depth consistently arrives from patiently building multiple color layers sequentially, never from obsessively trying to perfect exactly one tiny detail right at the absolute start. Your genuine deep appreciation for these truly magnificent birds finally possesses a wonderfully reliable, structured way to fully shine directly through your personal artwork when following an easy peacock painting indian art methodology.
FAQs
Q: What materials do I need for an easy peacock painting Indian art project?
A: For an easy peacock painting in Indian art style you’ll need basic acrylic or poster paints (blues, greens, gold, white, black), a set of brushes (round for details, flat for filling), a canvas or heavy paper, a pencil for sketching, a palette, water jar, and optional gold or metallic pens for embellishments. Using simple materials keeps the painting approachable for beginners.
Q: How can I simplify peacock feathers to make an easy peacock painting?
A: Simplify peacock feathers by breaking them into repeating teardrop or eye-shaped forms radiating from the body. Use layered strokes — base color, a darker inner shape, and a highlight — instead of painting every strand. This stylized approach is common in Indian art and makes creating vibrant paintings peacock motifs much easier.
Q: Are there step-by-step techniques for creating an Indian art inspired peacock painting?
A: Yes. Start with a light pencil sketch of the body and tail outline, block in base colors, add mid-tones and shadows, then paint feather details with simple shapes and highlights. Finish with decorative patterns and dot work often seen in Indian art. Many artists also follow pinterest’s best ideas and inspiration to find step-by-step visual guides and variations.
Q: Can beginners recreate traditional Indian peacock paintings without advanced skills?
A: Absolutely. Beginners can recreate traditional Indian peacock paintings by focusing on stylized forms and bold colors rather than intricate realism. Using templates or tracing a simple outline helps, and incorporating patterns inspired by folk art reduces the need for detailed anatomy while preserving the Indian art aesthetic.
Q: How do I choose colors and patterns for an Indian-style peacock painting?
A: Choose vibrant jewel tones like teal, turquoise, emerald, and cobalt blue, balanced with gold, ochre, and deep greens. Patterns such as paisleys, mandalas, and repetitive dots enhance the Indian art feel. Looking at paintings peacock galleries or pinterest’s best ideas and inspiration boards can help you mix palettes and patterns that work well together.


