


Sizing And Paper Weight Considerations
Your bookmark will warp and buckle the first time you try a wet-on-wet wash if you use anything lighter than 140lb cold press paper. That specific weight is the sweet spot that absorbs water slowly enough to let you move pigment around without the paper turning into a soggy mess. We all know the frustration of a beautiful wash ruined by a puddle, and this weight prevents that. I prefer cold press for its slight texture, which gives you more control over where your colors flow. Trust me, starting with the right paper feels like you have a secret advantage for diy watercolor bookmarks. This single choice sets you up for success with every technique, from simple gradients to adding texture with salt.
Essential Pigment And Brush Selection
The most common mistake that leads to a flat, dull wash is using water straight from the tube without letting it concentrate enough on your palette. You need a puddle of rich, creamy paint to get those luminous layers we love in watercolor. A small round brush with a sharp point, like a size 6, gives you the perfect balance of control for details when designing diy watercolor bookmarks. The good news is you only need three primary colors to mix a whole library of shades. Keep a jar of clean water and a paper towel right next to you to manage the water-to-pigment ratio on the fly. This simple setup makes color mixing intuitive and fun.
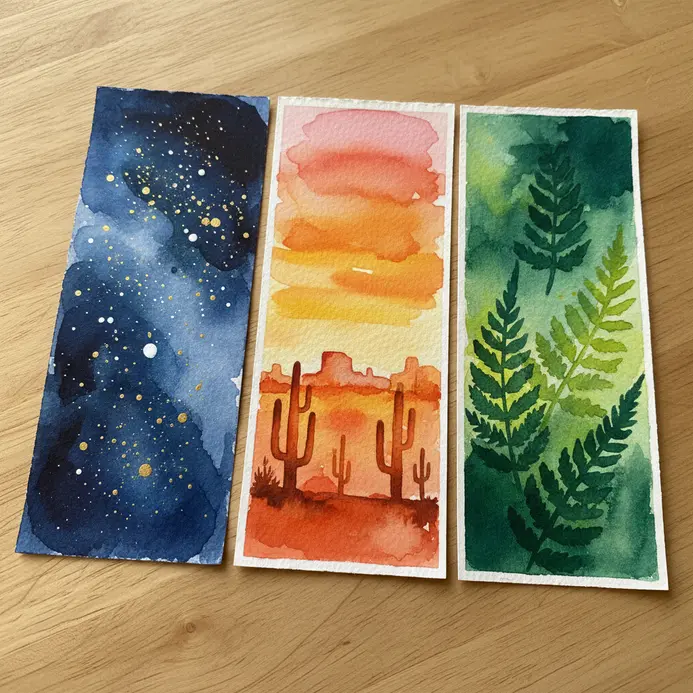
1. Paint a Celestial Gold Splattered Nebula Bookmark

Ever wondered how to make your reading feel more magical? This project creates a stunning, starry sky right on your bookmark. The secret is the wet-on-wet watercolor technique. You wet your paper first, then let blues and purples blend into a soft, dreamy nebula. Once it dries, flick gold paint across it for a perfect starry effect. I love how this combines a relaxing painting process with a gorgeous result for diy watercolor bookmarks. For more ways to practice, try these easy watercolor painting ideas. Feel proud when you see that shimmering galaxy marking your page.
2. Create a Minimalist Forest Silhouette Pine Bookmark

This one is my favorite for its quiet elegance among all diy watercolor bookmarks. You start by cutting a clean rectangle from sturdy cardstock. Then, along one long edge, lightly sketch a row of simple pine trees using a scissor. I love overlapping them a bit to create a sense of depth in your miniature forest. Once you are happy with the shapes, fill them in completely with a fine black marker. Is not that satisfyingly bold? The beauty of this silhouette technique is its simplicity. It feels sophisticated but is so accessible. Your final piece will be a beautiful, functional accessory that feels uniquely yours. Trust me, you will be so proud to tuck this into your current read.
3. Achieve a Soft Lavender Field Impressionist Bookmark

Who would have thought a lavender field could be so beginner friendly? This one is all about loose, blended strokes, not precise details. Start with a soft sky wash on the top third of your bookmark using a flat wash brush. Then, use dabs of various purples and greens to suggest the flowers and foliage while painting diy watercolor bookmarks. The impressionist style forgives any wobbles, focusing on light and color over accuracy. For a lovely, hazy effect, explore various watercolor techniques like wet-on-wet blending. I love how forgiving this approach is. Your goal is to capture the feeling of a sun-drenched field, not every single bloom. Try it and feel that sense of calm when your soft, atmospheric scene comes together.
4. Blend an Ocean Wave Gradient Ombre Bookmark
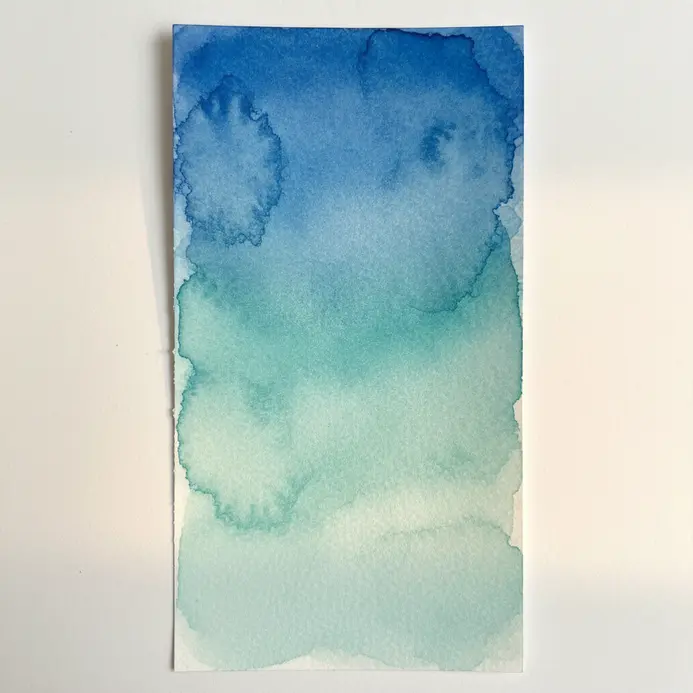
Ever wondered how to get that seamless ocean look? Achieving that smooth finish for diy watercolor bookmarks is all about timing and a clean damp brush. Start with your lightest blue at the top of your bookmark, then quickly add your medium and dark shades below while everything is still wet. Use a gentle touch to feather the edges where the colors meet, letting them flow together. It works because the colors blend on their own when you catch them at the right moment. My favorite tip is to work on a slightly dampened paper strip to help the wet-on-wet technique create that smooth gradient effortlessly. For more whimsical watercolor art inspiration, check out that link. Try it and feel the calming satisfaction of watching your own little ocean wave come to life.
5. Illustrate an Intricate Pressed Floral Botanical Bookmark

Ever wondered how those vintage-looking pressed flower illustrations get their delicate charm? This project looks complex, but it is all about building a thoughtful composition. Start with your cream-colored cardstock Base your design and give it a slightly worn texture for a unique look. Then, paint your focal point, like a small rosebud with crinkled petals, while arranging supporting elements around your diy watercolor bookmarks. I love how the key to realism is using those muted, faded colors for your botanicals. Vary the sizes and layer some translucent grass blades over other flowers to create depth. Your finished piece will have that beautiful, detailed texture of real dried flowers. Feel that sense of vintage charm when your artwork is complete.
6. Add Metallic Details to an Abstract Geometric Bookmark
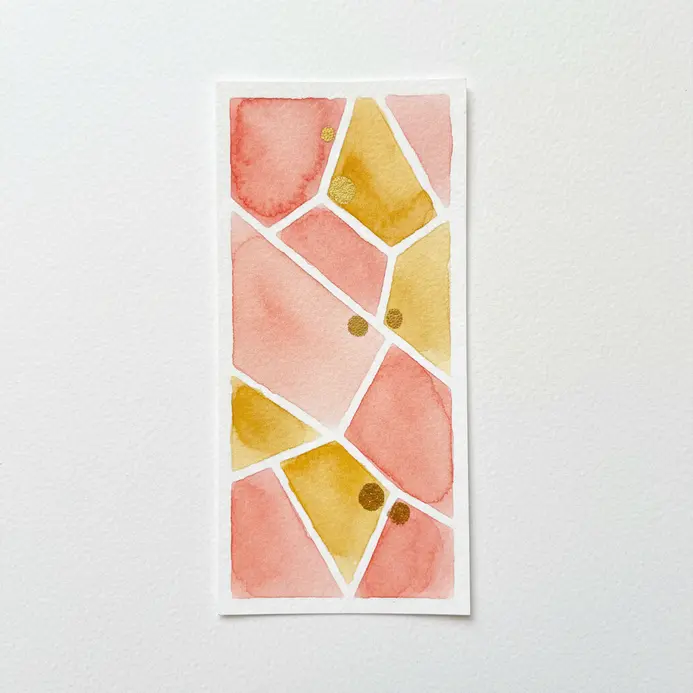
This step feels like adding the final, magical touch to a modern design. You have your geometric shapes laid out on your watercolor paper or cardstock. Now, grab a metallic paint pen and trace a few key lines or fill in one small shape. The contrast between the matte base and that shiny accent is everything. It works because that sudden shimmer draws the eye and adds a sophisticated edge you notice when finishing diy watercolor bookmarks. For a fantastic way to practice your geometric shapes, check out these simple painting projects for beginners. I love using this tool as it gives the most control. You are able to easily add thin stripes inside a triangle or outline just one side of a square. Trust me, a little metallic goes a long way. Does that not look stunning?
7. Apply an Ink Wash for a Vintage Map Bookmark

This step feels like magic, transforming a fresh print into a treasured artifact. You will dilute a brown ink with plenty of water to create a translucent wash. Brush it over your map in light layers, letting each one dry before adding more while designing diy watercolor bookmarks. This gradual build-up creates a beautiful, aged sepia tone without hiding the details. Why does it work so well when you choose the right art supplies? That subtle, weathered glow adds instant character and makes your bookmark feel genuinely old. I love testing the mix on scrap paper first to get the perfect tea-stained look, and you are able to explore Here are some unique miniature canvas painting ideas for kids. Place the tape alongside your project to keep everything in place.
8. Capture a Monochromatic Blue Mountain Range Bookmark

Ever wondered how to create a scene that feels both grand and peaceful? This design uses only shades of blue to build a serene mountain range. You will layer jagged peaks, using the darkest navy blues for the foreground and lighter tones for the distance. A soft gradient sky pulls it all together, creating a wonderful sense of depth when making diy watercolor bookmarks. I love this one for its calming, sophisticated look. The key is to plan your layers so the closest mountains are the darkest and most defined. Trust me, using at least three distinct shades makes all the difference. Feel proud when you see those majestic, layered blues come to life on your page.
9. Build a Whimsical Rainbow Sky Cloud Bookmark

This one looks like it belongs in a storybook, but it is surprisingly simple to put together. You start by cutting two identical fluffy cloud shapes from white felt. Then, you arrange strips of felt in the classic ROYGBIV order into a gentle arc underneath while assembling diy watercolor bookmarks. I love using a tiny dab of fabric glue to hold those rainbow strips perfectly in place before I sew them down. This creates a cheerful, tactile accessory that adds a splash of joy to any reading session. For a lovely way to add more color, you are able to explore soft pastel watercolor painting ideas to inspire your next project. The secret is designing your rainbow arc on paper first to ensure a smooth fit. Feel proud when you stitch the final piece together.
10. Paint a Summer Sunset Cactus Desert Bookmark

Ever wanted to capture a desert sunset’s magic in a tiny, functional piece of art? You start by wetting the paper and letting the hole punch create fun shapes. sunset colors blend on their own, creating that perfect gradient of yellow, orange, and pink. Then, you add the iconic cactus silhouettes against the sky for a striking contrast when painting diy watercolor bookmarks. This works because the wet-on-wet technique makes the colors feel alive and dreamy. I love how this project lets you practice blending, and you are able to find more inspiration for delicate color palettes in these diy bookmarks. soft pastel watercolor painting ideas. Once the sky is dry, paint your cacti and desert floor with earthy tones. Remember, the key to crisp silhouettes is letting each layer dry completely. Trust me, your patience pays off with a stunning, peaceful scene you are able to use in your favorite book.
11. Layer a Dark Moody Storm Cloud Bookmark

This one looks like a complex sky painting but is all about clever paper play. Start by cutting a ribbon to add a decorative touch. dark cardstock base and lightly distressing the edges for a moody frame. The real magic happens in your cloud layers when preparing unique diy watercolor bookmarks. Practice sketching irregular, billowy shapes, then cut them from dark, medium, and light grey papers to build that ominous depth. Why does it work so well? The overlapping layers create a genuine feeling of weight and atmosphere, like a storm is brewing right on your page. I love adding the final touches with a silver gel pen for a flash of lightning. Does that not look stunning and dramatic?
12. Sketch a Delicate Cherry Blossom Branch Bookmark

Who would have thought a simple pencil sketch could feel so elegant? Start with your lightest touch to map out a graceful, flowing main branch. Add a few smaller sub-branches and lightly sketch clusters of oval shapes where your blossoms will go. Trust me on this, using a kneaded eraser is the secret to keeping everything soft and correctable for your diy watercolor bookmarks. Now, define those lovely five-petaled blossoms and a few tiny leaves. Build up subtle shading on the underside of the branches and at the base of petals for gentle form. This design works because its quiet beauty makes a perfect, personal reading companion. It is also a wonderful piece to pair with creative painting projects as gifts.
13. Create a Deep Sea Jellyfish Neon Bookmark

This one is pure magic. I love how a simple dark bookmark transforms into a glowing deep-sea creature. Start by cutting your jellyfish shape from heavyweight black cardstock. Bring it to life with glowing details using neon paints or markers on the bell while assembling diy watercolor bookmarks. The secret to that bioluminescent look is layering. Add a sprinkle of fine glitter or mix glow powder into your sealant before applying a final coat of UV resin for a glossy, durable finish. Are not they satisfying to create? Feel the wonder every time you mark your page. For more creative inspiration, you are able to incorporate doodle art into designs to add even more personality.
14. Paint an Autumn Leaves Fall Foliage Bookmark

Who says you need to be an expert to capture the beauty of fall with a hole punch? This project looks detailed, but trust me, the wet-on-wet technique does most of the work for you. Lightly sketch a few leaf shapes on your bookmark, then wet the whole shape with clean water. Drop in your yellows, oranges, and reds when creating diy watercolor bookmarks, letting them mingle and blend on the paper like real foliage. I love how this technique creates such natural, vibrant color variations without any fuss. Is not that satisfying? Feel that warm, autumnal glow right on your page.
15. Illustrate an Emerald Green Lush Fern Bookmark

Ever wondered how to make a simple leaf look so lush and alive? This one is all about building up your greens in layers. Start with a light wash of emerald green watercolor for the whole frond shape, then let it dry completely. Next, add darker forest greens to the undersides of the leaflets and along the main stem for shadow, and touch the upper edges with a brighter jade. It works because that variation in tone is what gives a fern its vibrant, feathery texture. I love finishing this one with a fine-line pen to trace the delicate veins and serrated edges for that final pop of detail. You are able to find more inspiration for other creative DIY craft projects to try once you have mastered this natural look.
16. Achieve Rustic Texture with an Earth Tone Bookmark

Ever feel like your projects look a bit too new and uniform? The secret to a rustic piece is all in the materials you start with. Grab some cold press watercolor paper or a piece of textured kraft paper for that built-in, organic feel right away. The slight tooth and irregularities are exactly what you want for your diy watercolor bookmarks. I love this one because your base choice does most of the work. Next, embrace the earth tone palette. Think sepia, moss, or rust and let them blend softly for a natural look. A simple tassel made from rough jute twine adds the perfect tactile finish. You might also review easy watercolor painting ideas. The beauty is in the subtle imperfections, so do not stress about making it perfect. It feels wonderfully handmade and grounded, like a piece crafted by a kid.
17. Draw a Cosmic Moon Phase Detail Bookmark

Who would have thought a few circles could create something so magical? This design looks complex, but trust me, it is surprisingly simple to lay out. Start by sketching your rectangle with a ruler. Then, lightly draw three to five circles for your moon phases, using a coin for perfect shapes if you need it. Focus on distinct phases like a full circle, a half, and a crescent. The real fun begins when you fill them in. I love using watercolors for an ethereal, starry background. Paint the sky a deep blue or purple, then let a white gel pen add tiny stars around your moons. Is not it satisfying to see the cosmic scene come together on your own handmade project? Feel proud of your celestial creation.
18. Paint a Bright Citrus Fruit Slice Bookmark

Who would have thought a simple citrus slice could look so juicy and bright on a bookmark? Start with a light pencil sketch of a circle, then draw smaller segments inside like pie slices. I love using a round brush for washes of vibrant yellow and orange, adding a touch of red for depth. This project works because the simple, bold shapes are incredibly forgiving and the colors pop wonderfully. Let each layer dry completely to avoid muddy colors, and for more control, you might explore various watercolor techniques. Feel that fresh, sunny satisfaction when you are done!
19. Use a Zen Japanese Ink Style Bookmark

Ever feel like your reading time needs a bit more calm? A Zen Japanese Ink Style bookmark brings that peaceful, minimalist energy right into your hands. You create it by painting a simple, elegant motif like bamboo or a single cherry blossom onto heavy cardstock with black ink, focusing on the expressive quality of each brushstroke. The magic is in its restraint. It captures the essence of the subject, not every detail, which makes the final piece feel deeply intentional. I love how this transforms a routine page marker into a moment of quiet reflection. Handle it with care to protect the delicate art, and you will have a beautiful companion for your favorite books. You might explore whimsical watercolor art inspiration alongside your project.
20. Create a Sparkling Snowflake Winter Frost Bookmark

Who says winter markers need to be plain? This project brings the magic of a frosty morning right into your book. Start by cutting your bookmark base from light blue or white cardstock. Then, add delicate snowflakes you punch out or cut by hand. Now for the fun part! Coat the entire surface with a thin layer of craft glue and immediately sprinkle on fine, iridescent glitter. This creates that beautiful, shimmery frost effect. I love how the whole piece sparkles when it catches the light. Is not that satisfying? You end up with an elegant, handmade accessory that feels like a little piece of winter magic. Feel proud of your unique frosty creation.
Sealing And Finishing For Longevity
A bookmark is useless if the pigment transfers to your book pages, so you must seal your work with a protective layer after it is completely bone dry. I use two thin coats of a matte acrylic spray varnish, holding the can about ten inches away and using quick, even passes. This creates a durable, waterproof barrier that locks in your art without any sticky residue or yellowing. Let the first coat dry fully before applying the second layer of tape. The final step is trimming your paper with a sharp craft knife and a metal ruler for crisp, clean edges that look professionally made. This finishing process turns your painted paper into a sturdy, functional piece of art you will use for years.
Conclusion
I hope these ideas show you how accessible and enjoyable this hobby is. The best part is that each one becomes a tiny, personal piece of art that reflects your taste and style. When you are ready to start, pick the design that speaks to you most and remember that watercolor is wonderfully forgiving. Happy accidents often lead to the most interesting effects. Whether you gift them or keep them for your own collection, these diy watercolor bookmarks add a lovely, handmade touch to every reading adventure. Your next chapter is waiting for a beautiful new marker.
FAQs
Q: What basic materials do I need for watercolor bookmarks DIY?
A: A basic kit includes watercolor paper (thick is best), paints, brushes, a pencil, scissors or a craft knife, and optionally a stamp or decorative punch; you might also use a strip of plastic or lamination to protect the bookmark after it is completely dry.
Q: How do I make sure paint doesn’t warp thin paper when making bookmarks?
A: To avoid warping, use thick watercolor paper or mount thin paper onto a thicker backing; let the paint layers dry between applications and try to use one or two light washes rather than heavy coats to keep the paper flat and useful as a bookmark.
Q: Can children or a class do watercolor bookmarks DIY as a fun and creative activity?
A: Yes—watercolor bookmarks DIY works well for a class setting; it’s a fun and creative project that a teacher can adapt, using simple techniques and short demonstrations so students can experiment and make personalized pieces.
Q: How long should I let the paint dry before handling or laminating my bookmark?
A: Let the paint completely dry before touching or processing; depending on paper thickness and layers, that can take from 10 minutes to an hour—ensure it is dry to the touch to avoid smudges or sticking when you laminate with plastic.
Q: Where can I learn new techniques for watercolor bookmarks DIY—are there online classes?
A: You can learn techniques from a local art teacher or online platforms like Skillshare, which offer short courses and tutorials demonstrating brushwork, stamping, and layering methods to make your bookmarks look fancy or casually artistic.


