


Establishing Accurate Light Source Direction First
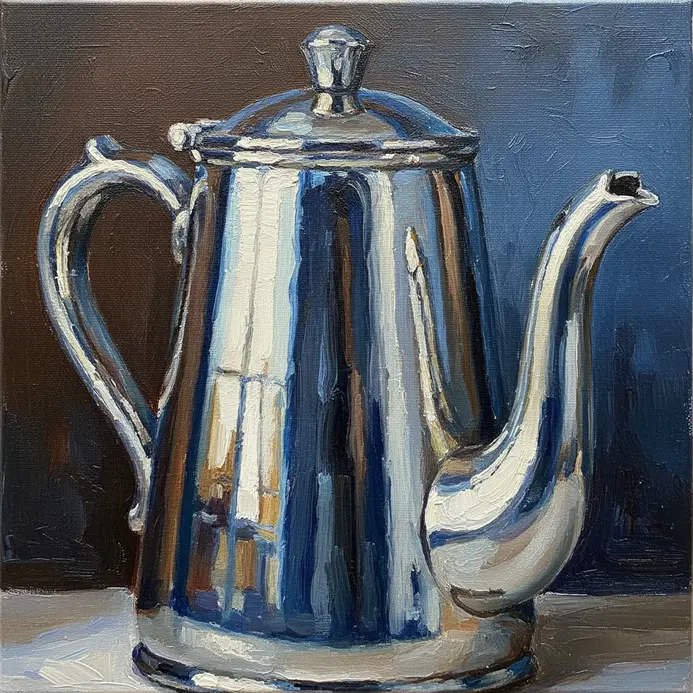
The single most important decision you make before a single brushstroke is nailing down your light source direction on your canvas. Trust me on this, when reviewing tips how to paint reflective surfaces, everything about your reflection depends on it. You must commit to one strong, clear angle for your primary light and mark it lightly with a pencil line. This line becomes your guide for every highlight and cast shadow on that shiny apple or chrome kettle. It forces you to see reflections not as random patterns, but as a direct result of light hitting a curved surface at a specific angle. Your entire painting’s believability hinges on this consistent anchor point, so take your time to get it right.
Selecting Still Life Objects for Practice
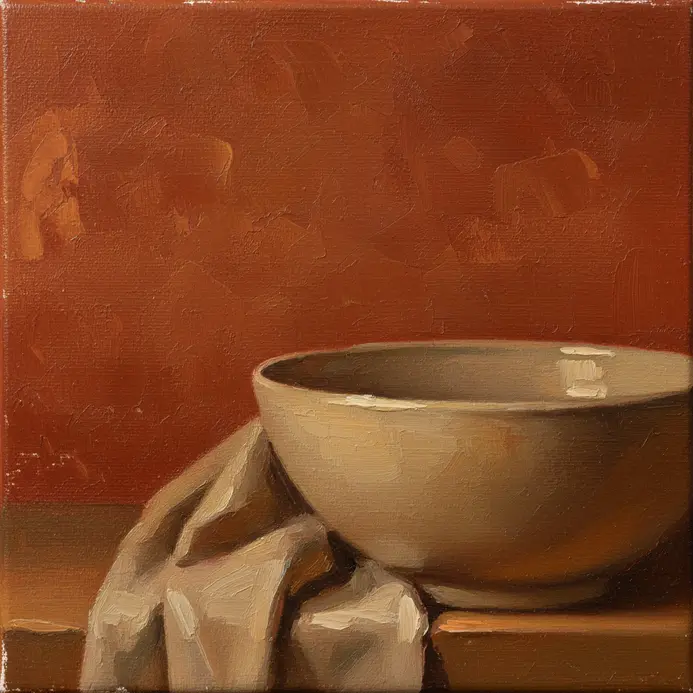
Start with a single spherical object like a polished apple or a Christmas ornament to practice the fundamentals of value control. The good news is its simple curve teaches you how highlights and reflections warp and travel across a surface. Avoid overly complex items like a cut glass vase or a brushed metal thermos at first, a common piece of advice in tips how to paint reflective surfaces, as their faceted surfaces and textured finishes add distracting complications. You want an object with a smooth, uniformly reflective surface where you can clearly see the sharp highlight and the surrounding dark tones. This focused practice on one shape builds the essential skill of simplifying complex visual information into manageable abstract shapes.
1. Analyze Your Light Source and Angles to Understand Reflections
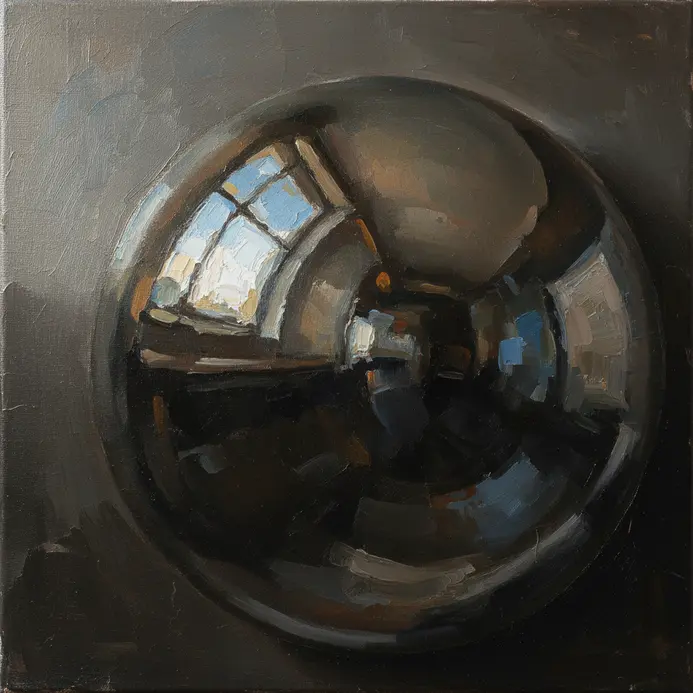
Ever felt overwhelmed trying to paint a shiny object? Trust me, studying tips how to paint reflective surfaces gets you past the intimidation quickly. You do not need to be a scientist, but the Law of Reflection is your best friend here. It means the light bounces off the surface at the same angle it hits, which tells you exactly where that highlight will appear in your tutorial. Next, look at the light source itself. Is it a small, direct point like a lamp, or a large, soft source like a window? A point source creates a sharp, bright highlight, while a soft light gives you a gentle, spread-out glow. That difference in your reference is everything. This is why analyzing your setup first makes painting reflections feel less like guesswork and more like a satisfying puzzle. You can always explore still life painting ideas to practice this with simple, reflective objects.
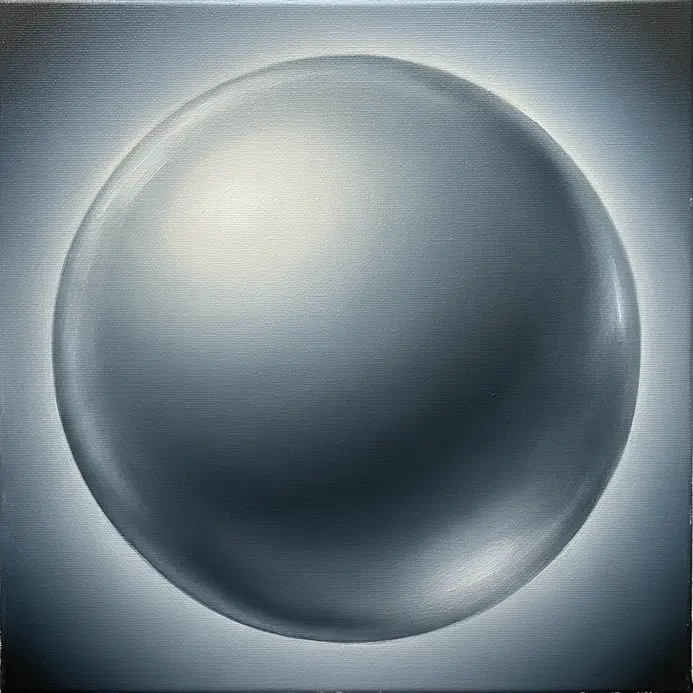
2. Define Core Value Masses: Simplify Light and Shadow First
Ever felt overwhelmed by all the tiny details on a shiny object? Trust me, you are not alone. The secret is to squint your eyes. This simple trick blurs the small stuff, matching tips how to paint reflective surfaces, and lets you see only the biggest shapes of light and dark. I love starting with core value masses to block in the whole scene. Think of it like making a simple map before you paint the landscape. You are not drawing a spoon or a window yet, you are only drawing the shape of the light hitting it and the shape of its shadow. This approach immediately gives your painting depth and a solid three-dimensional feel. It unifies your composition and stops you from getting lost in the weeds. Try this foundational step and feel the relief of having a strong, simple structure to build upon. Your reflective surfaces will look convincing, not chaotic.
3. Block In Local Surface Colors Underneath the Shine
Have you ever tried to paint a shiny object and ended up with highlights that look pasted on? That is a classic sign you skipped the foundation. Following reliable tips how to paint reflective surfaces tells us that before any sparkle, you need to establish the object’s local color. This is its true color in neutral light, like the red of an apple or the gray of a metal spoon. Start by blocking in that color with broad, confident strokes. Fill the entire shape, focusing on solid coverage instead of details. Think of it as laying down the ground floor before you decorate. I love this step because it instantly gives your object solid form and volume. The shine will have something to cling to. Once your base is set, you can lightly sketch in basic light and shadow areas using slightly darker or lighter versions of that same color. This careful application of sienna will add warmth to your reflective areas. value control makes adding reflections later feel intuitive, not like guesswork. For a fantastic way to practice this on a perfect surface, you should follow a demo that focuses on reflective techniques. learn glass painting designs. Feel how satisfying it is to build realism from the ground up.
4. Map Distorted Environmental Shapes Accurately
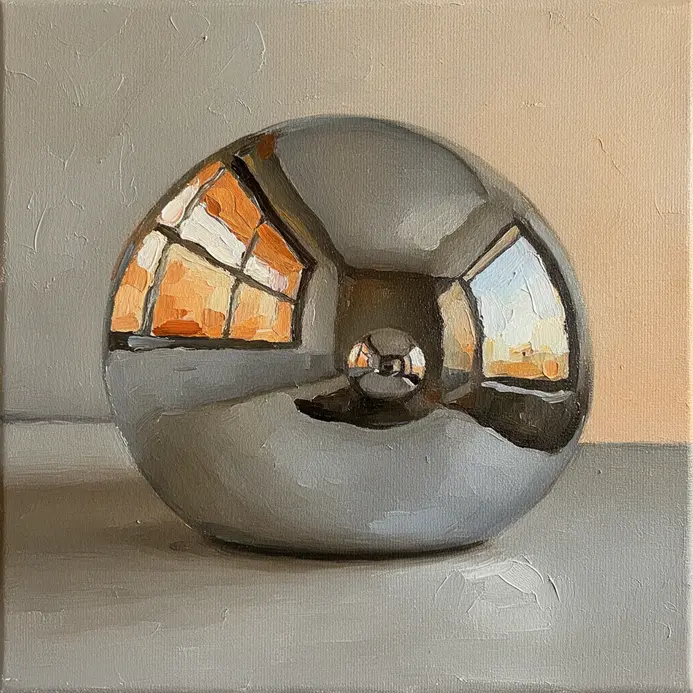
Ever look at a shiny apple and wonder why the window reflection looks so stretched? That is the distortion you need to paint. Applying standard tips how to paint reflective surfaces helps you identify what is being reflected, like a lamp or a wall. Then, simplify those warped shapes into basic color blocks, focusing on their precise edges. Paint these abstract shapes with the correct value and color they appear, not how you think they should look. I love this approach because it forces you to see the light, not the object. The sharp contrast between those distorted shapes is what sells the illusion of a hard, reflective surface. For a deep dive into painting on glossy materials, you can discover glass painting techniques to see these principles in action. Feel the satisfaction when your object suddenly pops with dimension.
5. Establish Your Deepest Shadow Values for Contrast
Ever feel like your reflective objects look a bit flat? Consider adding some ultramarine to bring them to life. This tips how to paint reflective surfaces method works so well because it instantly defines form and creates dramatic contrast. It is all about finding and committing to your absolute darkest darks. First, squint at your subject or reference to simplify the scene. Spot the phthalo blue highlights that enhance the depth of your painting. deepest shadow values, like the tiny crevice where a handle meets a mug or the darkest part of a cast shadow. These are your anchors. Mix a rich, dark pigment like Payne’s Gray or Ivory Black for paint, or use a soft 8B pencil, and apply it with confidence to those specific spots. Why does this work? Your painting gains incredible depth and visual impact. Trust me on this one. Place those few powerful dark notes, step back, and feel the satisfaction as your reflective surface suddenly gains serious weight and dimension, much like a well-executed tutorial.
6. Paint Midtone Reflection Shifts on Curved Surfaces
Ever notice how the light on a curved object doesn’t jump straight from bright to dark? That is the magic of the midtone reflection shift, and mastering it is your secret weapon against flat-looking paintings. Reviewing tips how to paint reflective surfaces reminds you to observe how light softens and changes color as it wraps around a form. The key is to mix and blend those subtle value changes into a smooth, continuous gradient. This works because it defines the form and communicates materiality, making your object look truly three-dimensional. I love how this technique adds so much depth. For a great way to practice these smooth transitions, you should master watercolor painting techniques.
7. Apply Precise Soft Edges for Realistic Transitions
Ever notice how a shadow on a shiny surface seems to fade away instead of stopping hard? That is the magic of a precise soft edge. It is not about blurring everything. Standard tips how to paint reflective surfaces tell you to analyze your light source and the object’s distance. Then, control that blend with intention. I love using a feathered brush with cobalt accents at low opacity to build the transition gradually. This works because it mimics how light naturally scatters and diffuses. Your painting will instantly feel more lifelike and dimensional. Think about the shape of the softness too. Is it softer on one side, perhaps due to the use of alizarin crimson? In digital software, try feathering a selection before you paint into it. A common mistake is overusing the blur tool, which makes things look muddy. Instead, reference a real object and observe those transitions. It is so satisfying when your reflections start to look like they are truly part of the surface.
8. Add Sharpened Specular Highlights for Final Sparkle
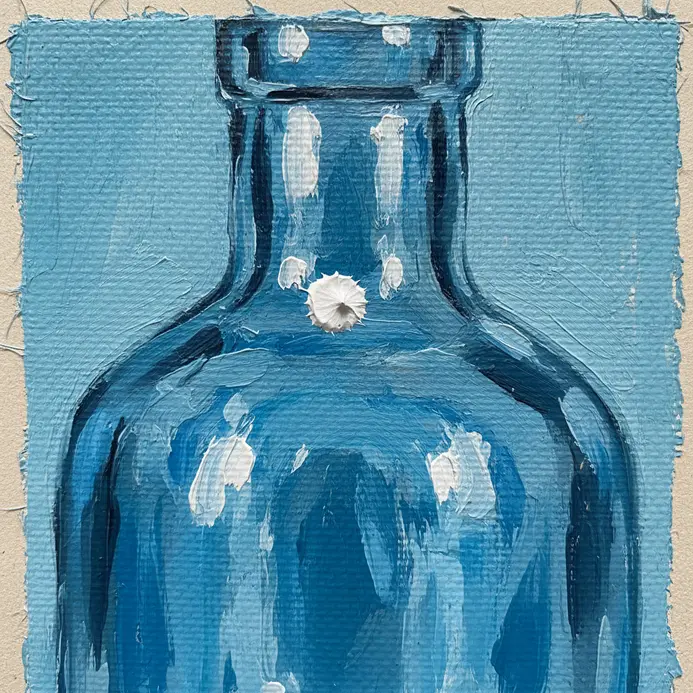
Ever notice how the sparkle in a photo of jewelry or wet glass makes it feel real, almost like a demo of perfect lighting? This final touch is where tips how to paint reflective surfaces finally pay off. I love this step because it brings everything to life. You will isolate the brightest spots on your surface and make them pop even more using alizarin crimson. A great way to do this is with the phthalo blue to create dynamic highlights. Dodge & Burn technique. Create a new layer set to Overlay mode. Use the Dodge tool with a soft brush and target the highlights at a low exposure. Gently paint over the very center of each highlight to build up its brightness. For extra crispness, try sharpening those areas with a High Pass filter on a separate layer. This works because our eyes are drawn to sharp, bright points, making the whole surface appear more dimensional and glossy. It is a perfect finishing move for metal, water, or eyes. If you want to push realism even further, you could consider hyper-realistic oil painting where this technique shines. Feel the satisfaction of that final, convincing sparkle.
9. Adjust Final Color Saturation in Reflected Light
Ever notice how reflections in real life are never as bright as the objects they mirror, similar to how a painter balances colors? That is because reflected light naturally loses some of its punch. To fix this in your work, follow professional tips on how to paint reflective surfaces by first isolating the reflection areas using a turquoise hue. soft brush layer mask or a luminosity selection. Then, add a Hue/Saturation adjustment layer and gently pull that slider down until the colors feel integrated, not artificial; a technique often used by painters. I love this step because it is what makes a shiny surface look believable, not plastic. It also lets you control the mood, making a scene feel calm or vibrant. For a great way to practice this kind of color control, you can try acrylic painting on canvas where you can play with light and reflections. Feel how much more realistic your painting looks.
10. Refine Surface Texture with Transparent Glazes
Ever wondered how those gorgeous ceramic textures get their deep, luminous quality? It is all about the magic of transparent glazes. You apply a thin layer over your textured bisque ware, and during the firing, the glaze flows into the carved or impressed grooves, pooling there to create a richer color and a glossy depth. On the high points, it stays thin, letting the clay or an underglaze peek through. I love this effect because it matches tips how to paint reflective surfaces perfectly, using light and shadow to make every detail pop, turning a simple texture into something truly captivating. For the best results, choose a tinted transparent glaze like a soft celadon. The subtle color wash will gather in the recesses, creating beautiful visual variation without hiding your hard work. Remember, a common mistake is using an opaque glaze that completely covers your texture. With a transparent one, you are enhancing, not obscuring. Try it and feel the satisfaction when your piece comes out of the kiln with that perfect, professional-looking finish.
Varnishing Techniques for Maintaining Surface Luminosity
Consulting advanced tips how to paint reflective surfaces confirms a matte acrylic varnish is your best friend for locking in the delicate value relationships of a reflective painting without adding distracting shine. Apply it only after your painting is completely dry, usually in two thin, even coats with a soft, wide brush to saturate the colors effectively. The first coat might look milky, but it will dry clear, protecting your work from dust and UV light which can dull those careful dark tones over time. This final step ensures the intense highlights you worked hard to place stay crisp and the deep shadows retain their depth, preserving the luminous quality you created. A proper varnish acts as a permanent shield, letting the true interplay of light you captured remain the star.
Conclusion
Painting reflective surfaces teaches us to see light and shape in a new way. The effort you put into observing and layering values builds a skill set that makes every object you paint feel more solid and real. For your next project, choose a simple chrome spoon or a clear glass marble. Applying these tips how to paint reflective surfaces on a smaller scale will reinforce what you have learned. You will be surprised how quickly your ability to portray light grows.
FAQs
Q: What is the best step-by-step approach to painting a reflective surface?
A: Start with an accurate drawing and outline of the object, then establish a white background or midtone ground. Block in the dark and light tonal areas first, working from tones first to the final layer. Use a flat brush for large shapes and switch to smaller brushes for highlights. Build dark values and reflections with thin layers, glazing where needed, and finish by adding paint shiny highlights with titanium white or pure white applied as a dab for the brightest reflections.
Q: How do I mix accurate reflective colors like metal or chrome?
A: Mix reflections by observing dark and light values and using a range of cool and warm pigments. Combine burnt umber and cobalt blue for deep shadow neutrals, add a touch of cadmium yellow or cadmium orange to warm reflections, and use permanent alizarin crimson or violet sparingly for subtle color shifts. For the brightest highlights use titanium white or pure white. Avoid making the whole surface uniformly bright—exaggerate contrasts where the light hits to sell the reflective effect.
Q: Which brushes and brushstrokes work best when painting a reflective surface?
A: Use a flat brush for smooth, broad reflections and slick edges, and a smaller round or filbert for detailed transitions and bright highlights. Long, controlled brushstrokes help maintain the illusion of a sheen; dab on pure white or titanium white for specular highlights. Blend edges softly where reflections blur and keep some crisp lines for sharp reflections to suggest a polished finish.
Q: How can I capture the tonal range on reflective surfaces without overworking the painting?
A: Start by mapping dark values and light values in a tonal underpainting using diluted burnt sienna or burnt umber and a cool blue. Work from tones first, gradually adding color, and preserve the lightest areas with a white background or mask them until the final layer. Avoid heavy reworking—build thin layers to maintain luminosity and only add pure white highlights at the end to keep the surface fresh.
Q: What color combinations create convincing reflections in water or metal?
A: For water reflections use cobalt blue, violet, and touches of cadmium yellow or yellow ochre for environmental color. For metal, mix burnt umber with cobalt blue for deep reflections, add cadmium red or cadmium orange for warm highlights when appropriate, and finish bright mirror spots with titanium white. Use permanent alizarin crimson for cooler red shifts and adjust saturation to match surrounding tones.


