


Preparing Terracotta Surfaces For Optimal Paint Adhesion
The quickest way to drain all the vibrancy from your paint and leave it looking patchy is to skip the priming step on porous terracotta. Trust me on this, exploring easy indian pot painting designs requires understanding that clay loves to suck up your expensive acrylics like a sponge, leaving you with a dull, uneven finish. The fix takes less than ten minutes. You need to apply a good, solid coat of gesso primer before your first drop of color touches the pot. This creates a smooth, sealed layer that lets your pigments sit on top in their full, glorious saturation. The preparation ensures your motif pops with the intensity you planned, and it makes your linework glide on without any frustrating drag. Your finished piece will look professional and last for years because you gave it a proper foundation.
Selecting Traditional Color Palettes For Authentic Effects
You can achieve that unmistakable Indian folk art look by starting with a core palette of vermilion, ochre, cobalt blue, and leaf green. When practicing easy indian pot painting designs, these saturated colors create beautiful contrast against the matte terracotta background and work in perfect harmony. The good news is you do not need a rainbow of tubes to start. With just these four, you can mix a whole range of authentic secondary tones. The secret to making them sing is that high-contrast outlining. Plan to use either a sharp white or a deep black acrylic liner to trace your final shapes. This defining step pulls the entire composition together, giving it that crisp, graphic quality typical of styles like Madhubani or Warli art. Your eye will naturally follow these clean lines, making even a simple arrangement feel intentional and complete.
1. Paint Minimalist White Warli Stick Figures

Ever thought traditional Indian art was too complex? This approach ranks highly among easy indian pot painting designs because it focuses on clean white figures against a dark pot. Use a fine detail brush to draw circles for heads and triangles for bodies. It is all about stark contrast and telling a story with basic shapes. I love this one because the high contrast makes any pot pop instantly. It works so well because you reduce everything to its simplest form. Trust me, embrace the simplicity and your pot will look elegant. Browse easy Indian painting ideas for your clay pots for further guidance.
2. Apply Bold Ochre Yellow Horizontal Stripes

Ever want to add a huge dose of warmth and energy to a piece? Grab your ochre yellow paint and get ready to create serious visual impact with one of the most beginner friendly easy indian pot painting designs. You will measure out and tape off those bold horizontal stripes, then fill them in with those rich, earthy bands. I love this because the horizontal lines make a narrow pot look wider and more balanced. Trust me, pulling that tape off to reveal crisp, perfect stripes feels absolutely amazing.
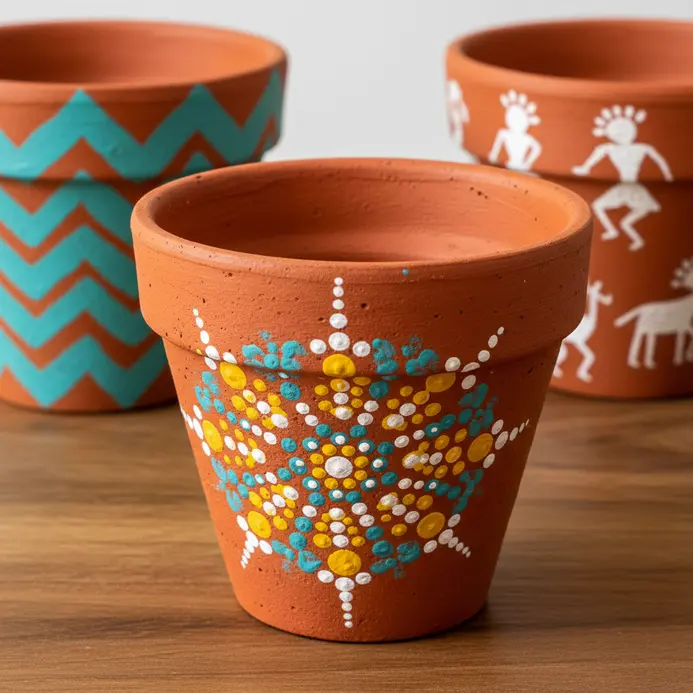
3. Create a Multicolor Dot Mandala Central Burst
This one looks detailed, but the central dot is your only true guide. Start with a single, bold mark right at your marked center. Then, build outward in rings, alternating your colors and letting each layer dry completely. I love the rhythm this creates when testing easy indian pot painting designs on a curved surface. Using a mandala dotting tool set helps keep your marks uniform as you work your way out. This design works because the vibrant, layered colors pull the eye right into the heart of the pattern. For a different take on vibrant traditional patterns, you can also explore Gond painting styles. Trust me, the satisfaction of that final, perfect ring is unbeatable. Stand back and admire your cheerful, energetic result.
4. Outline a Simple Geometric Blue Diamond Lattice

This pattern looks geometrically precise, but trust me, it relies on a simple grid structure. Start by using a light pencil and ruler to map out your lattice on your prepared pot. I love sketching a simple offset grid where the points of each diamond connect, creating that classic interlocking look for your easy indian pot painting designs. Once your guide is set, carefully trace over those lines with a fine brush and your outline color. Let those lines dry completely before you fill each shape with your chosen blues. The crisp, rhythmic structure is so satisfying and brings a calm, elegant vibe to any space. For a different take on structured arrangements, you could explore ideas for Bhil painting which often use similar geometric principles.
5. Draw a Terracotta Red Lotus Petal Outline

Ever wondered how to capture that earthy, natural feel in your floral art? Capturing this botanical look for easy indian pot painting designs starts with a light pencil sketch. Draw a soft, rounded ‘U’ shape for the base, then add graceful lines from each end that curve outward and meet at a soft point. I love using a terracotta colored pencil for the final outline, as it gives that perfect warm, clay-like tone. Focus on making your curves smooth and flowing, not perfectly symmetrical. This step is so satisfying because you are laying the foundation for the entire flower’s elegance. Trust me on this one, a slightly asymmetrical petal looks far more natural and beautiful. Feel the satisfaction of creating a classic, graceful shape.
6. Achieve a Vibrant Teal Chevron Zigzag Pattern

Ever think a geometric pattern sounds too technical for your pot design? You will find this zigzag style incredibly fun when exploring easy indian pot painting designs. You start by planning your V-shapes with a pencil and level to keep everything straight. Then, the magic happens with painter’s tape to mask off your negative space before laying down that gorgeous teal color. The crisp lines you get are incredibly satisfying. I love how the sharp zigzag creates such dynamic energy, while the vibrant teal feels so fresh and modern. It offers a fantastic way to add personality to a surface. For more pattern inspiration that plays with bold shapes and colors, you can learn Bengali painting ideas.
7. Use a White Paint Pen for Paisley Swirls

This technique looks complex, but it proves that easy indian pot painting designs remain incredibly approachable. You simply draw the classic curved teardrop shape and fill it with smaller swirls and dots using a white paint pen. That sharp contrast against a dark pot makes the pattern pop with an elegant, traditional feel. Isn’t that a stunning effect? Try to create Pichwai painting designs next to expand your repertoire. I love how this method gives you precise control for those beautiful, flowing lines.
8. Paint a Pastel Pink Floral Border Design

Ever wondered how to make a border look delicate and intentional, not slapped on? You will master this framing step by lightly sketching a vine or repeating sections with a pencil on your plant pot. Use soft, loose strokes with your pastel pink paints to build the main flowers, adding smaller buds in slightly different shades for variety. Next, bring in soft greens for leaves and stems. The key to making it feel dimensional is adding a tiny bit of darker pink to petal creases and a touch of white for highlights. This simple shading trick is what makes your flowers pop off the surface and feel real. I love finishing with a few delicate touches on my flower pot design. tendrils using a liner brush to tie the whole design together. Isn’t it satisfying when a few simple layers create something so charming? Feel the soft, romantic mood come to life.
9. Add Metallic Gold Leaf Accents

This one looks incredibly fancy but adds luxury to your collection of easy indian pot painting designs surprisingly easily. You will use transfer gold leaf for easiest handling, applying it with a special tacky adhesive called gilding size. Let the size get sticky, then press the leaf onto your pot. The final shimmer is stunning and feels wonderfully luxurious. Trust me, that reflective, brushstroke-free shine is worth the extra step. Always seal your work with a clear protective topcoat. This prevents tarnishing and locks in that brilliant gold finish. For another way to add detailed, handcrafted beauty to your projects, you can browse Madhubani painting ideas. Does that not look stunning?
10. Stencil a Contrasting Black Checkerboard Grid Pattern

This checkerboard looks complex but is surprisingly straightforward with the right prep. The key remains a perfectly planned layout. You start by painting your pot with a light base color and letting it dry completely. Then, you find the exact center and use a chalk line to draw your guide lines for a perfectly symmetrical grid in your pot design. Secure your stencil with repositionable spray adhesive to prevent paint bleed, and apply your black paint with a dabbing motion. Working from the center outwards ensures the pattern stays balanced. I love how this graphic, bold look feels both modern and classic on a simple pot. It is a fantastic way to practice precision, and the crisp final result is so satisfying. For a deeper dive into classic patterns, explore easy traditional Indian art tutorials.
11. Form an Emerald Green Leafy Vine Wrap

Ever wondered how to add that natural, flowing touch to your home decor project? This leafy wrap represents a wonderfully organic approach among easy indian pot painting designs. Your main job is to attach artificial silk leaves to a flexible wire base, overlapping them as you go. Vary their direction to mimic real growth, and you will create a lush, organic vine in no time. I love this one because the vibrant green instantly makes a piece feel fresh and alive. It offers a fantastic way to add texture and a bit of nature to your designs. Try it and feel the satisfaction of wrapping your pot with your own handmade greenery.
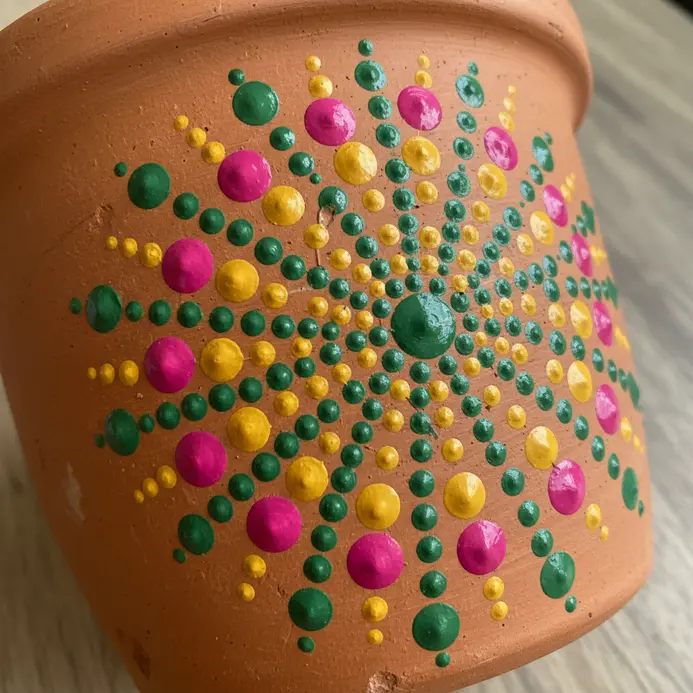
12. Build Symmetry Focused Mandala Dot Rings

Ever wondered how those perfect, hypnotic dot patterns are created? Building symmetry focused rings highlights exactly why easy indian pot painting designs feel so hypnotic. You start by marking your center and drawing concentric circles with a compass, then use a protractor to divide the circle into equal slices. The magic happens when you dot along these lines, repeating the same arrangement in each segment to build outward. It looks detailed, but the precision of the guidelines does the heavy lifting for you. I love how this technique feels both structured and creative. Check out general flower pot painting ideas to get started.
13. Capture a Sun Worshipper Radiant Line Burst

Ever wondered how artists capture dramatic rays of light bursting from a center? This radiant effect shows how directional energy brings life to easy indian pot painting designs. The key is focusing on a small central point while you arrange your subject lines outward. You will need to carefully space your strokes around the center to define those sharp radiating elements. This works because it merges emotional impact with a powerful visual spectacle. Trust me, once you see those radiant lines appear on your canvas, you will feel a genuine sense of awe.
14. Paint a Traditional Orange Mango Motif Repeat

Ever wondered how those gorgeous repeating patterns on fabric or ceramics are made? Creating a seamless mango motif brings cheerful rhythm to your easy indian pot painting designs. You will first sketch a few curved mangoes and wavy leaves, then arrange them so the edges of your design tile perfectly match. I love focusing on the seamless tile repeat first, as it is the trick to a professional look. The vibrant oranges and greens create such a cheerful, handcrafted feel. If you are new to patterns, check out these beginner pottery painting ideas. Feel the satisfaction when your motif flows without a break.
15. Block In Contemporary Neon Abstract Shape Blocks

Who would have thought glowing, futuristic pots could be so beginner friendly? Blocking in contemporary shapes proves that easy indian pot painting designs embrace modern bold energy. You will sketch abstract blocks and fill them with vibrant neon acrylics, watching the pot come alive instantly. It feels fresh, and the high contrast makes a real visual impact. My go-to tip is to start with a white primer coat, which makes the neon colors pop incredibly. Apply your paint in a few thin layers for the most luminous, even finish. Explore easy things to paint for additional practice. You will love how this turns out.
16. Sketch a Rustic Brown Painted Clay Elephant

I love how this one looks like a true folk art find for easy indian pot painting designs. Sound complicated? It is not. You start with light, overlapping ovals for the body and head, adding thick cylinders for the legs. Use a 6B pencil to build up those uneven, bumpy lines that make the elephant look hand-molded from real clay. Your goal is to avoid perfect symmetry. Let your lines wobble a bit to create that rustic texture. The payoff is a charming, earthy elephant sketch that feels handmade and full of character.
17. Add Soft Lavender Polka Dot Clusters

Ever wonder how those lovely, imperfect dot patterns come together? Adding soft clusters is my go-to trick for instant charm in easy indian pot painting designs. You will create whimsical groupings of soft lavender dots using the blunt end of a pencil or a dedicated dotting tool. Press lightly for small dots and reload the tool for larger ones, clustering them organically on your pot’s surface. It works because the muted color feels gentle and the hand-grouped arrangements look intentional, not rigid. I love how this technique adds a sweet, calming touch. For a smooth start, practice your dot pressure on paper first. You can find more pot painting ideas to amp up your creativity. easy acrylic painting ideas for your flower pot design to build your skills further. Does that not sound delightful?
18. Draw a Deep Purple Peacock Feather Eye
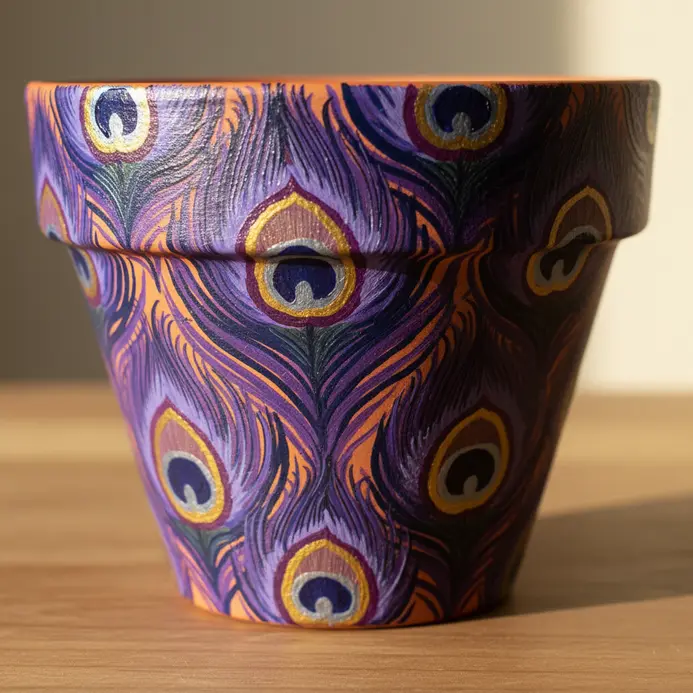
This feather eye stands out because it looks complex but remains forgiving for easy indian pot painting designs. You are not drawing a realistic eye, but rather a fantastical one made entirely from a feather’s shape and colors. Start by sketching an almond eye shape and then extend flowing, wispy lines from the eyelids to become feather barbs. Fill the iris with rings of deep purple, blending into blues and greens, and make the central ‘eye’ a metallic gold. Isn’t that transition stunning in your ceramic pots? The rich jewel tones naturally create a sense of iridescent depth that is so satisfying to see come together. For a softer touch, you could pair this design with some easy flower painting designs for your ceramic pots on the same piece.
19. Layer Shimmering Silver Concentric Circle Sets

Ever thought those perfect, layered circles look too tricky? I love this one because it relies on simple repetition with a gorgeous metallic twist. You will paint multiple sets of rings that share the same center point, then arrange them to overlap and create depth. The key is using a metallic silver acrylic paint for that signature shimmer that catches the light beautifully. Start by lightly marking your center points and sketching the largest circle for each set. Fill them in with your silver paint, working from the outside in for crisp lines. Trust me on this one, letting each layer dry slightly before adding the next prevents smudging and keeps your design sharp. The overlapping layers create such elegant visual movement, making your pot feel dynamic and sophisticated. Try it and feel the satisfaction when that brilliant shine comes together.
20. Form a Bright Magenta Diamond Shape Array

Does a perfect diamond array sound tricky? It is not! The secret is starting with one clean, symmetrical diamond. I love using a bright magenta color for this because it is so vibrant. Once you have your single diamond shape, you simply repeat it in neat rows and columns, keeping the spacing even. This pattern works so well because the repetition creates a dynamic rhythm that is simply eye-catching. Trust me, getting your first row perfectly aligned is the key. The feeling when your grid of sparkling diamonds comes together is pure satisfaction. This geometric approach is a fantastic way to add modern flair to your projects, and the skills you learn here translate perfectly to other designs, like when you try mini canvas painting for beginners.
21. Achieve a Solid Navy Base with White Dots

This one looks sharp and professional, but the secret is its incredible simplicity. Trust me, the most important step is letting your navy blue base coat dry completely before you even think about making dots. Then, use a dotting tool or a toothpick to apply perfectly round white polka dots in a clean pattern. The high contrast creates a classic look that works for so many styles. Isn’t it satisfying when a simple two-color design makes such a big impact? For a similar sense of pattern and rhythm, you might enjoy exploring easy mandala art patterns. Feel how crisp and modern your finished piece looks.
22. Blend a Warm Sunset Gradient Horizontal Bands
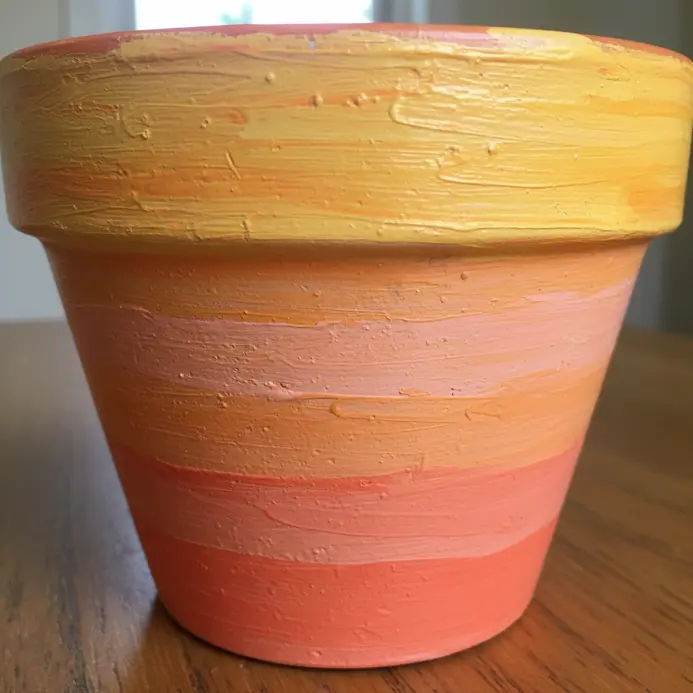
Ever wanted to capture the feeling of a sunset on your pot? This design looks like a soft sky, moving from a bright yellow down through oranges and reds into a deep, peaceful violet. You will paint distinct horizontal color bands first, then blend their edges together while the paint is still wet. I love this technique because it creates a sophisticated, calming look that feels like art. Trust me, keep your blending strokes light and horizontal to avoid muddy colors, and you will be so proud of the result.
23. Use a Fine Line Brush for Floral Doodles

Ever wondered how artists get those impossibly thin, delicate vines and petals? The secret is a fine line brush. Load it with thinned acrylic or ink, hold it like a pen, and let your hand glide. You will draw tiny leaves, detailed stamens, and wispy stems with total control. This works because it adds a layer of professional-looking detail that makes your whole design pop. I love how a single, well-placed line can suggest a whole leaf. For a similar effect with dots, you might enjoy exploring abstract dot art painting. It is incredibly satisfying to see your floral doodles come to life with such crisp precision.
24. Add a Textured Sand Speckled Finish Accent

Ever wondered how to get that lovely, grainy look that feels like a sun-warmed beach? This technique is my secret for adding instant, organic texture. You simply mix fine craft sand directly into your base paint. Start with a tiny amount, stir it thoroughly, and test it on a scrap piece until the texture looks right. I love how this finish breaks up a smooth surface and gives your pot so much more character. Apply your mixture with a stiff brush for a pronounced feel or a sponge for something subtler. The best part? It is incredibly forgiving and adds a handcrafted quality that plain paint simply cannot match. For a whole new world of texture and color, check out these easy Indian painting ideas. Trust me, you will adore the tactile result.
25. Paint Bold Primary Color Triangle Rows

Does geometric art feel too precise to be fun? Trust me, this one is a joy. You will create rows of sharp triangles using only pure red, yellow, and blue. The secret is applying masking tape first to get those crisp edges. Paint inside the taped shapes, let it dry, and peel away the tape to reveal your bold pattern. I love how the clean lines and vibrant primary colors create such a modern, graphic look. It is surprisingly satisfying to see those perfect shapes appear. Try it and feel the instant pop of energy it brings to your space.
Applying Durable Sealers To Preserve Painted Designs
A quick splash of water or a simple touch can chip weeks of detailed work if you forget the final, non-negotiable step. Your beautiful painting needs a shield, so lock in all that hard work with a protective top coat. For terracotta pots, I always recommend an outdoor-grade varnish because it is formulated to handle temperature changes and moisture. Look for a water-based, non-yellowing formula in your preferred finish, whether you love a glossy shine or a soft matte look. Apply at least two even coats, letting each dry completely. This sealer does more than prevent chipping. It also protects the pigments from fading in sunlight, ensuring your vibrant colors stay true. Your pot will be ready for actual use, whether as a planter or a decorative centerpiece, without any worry in your home decor.
Conclusion
The best part about these patterns is how they connect you to a tradition of making ordinary objects extraordinary. Your painted pot is not just a decoration, it represents a small celebration of color and pattern you made yourself. For your next project, pick one color combination you love and use it across two different pot sizes with the same simple motif. The repetition will build your confidence and create a lovely, cohesive set. These easy indian pot painting designs remain a perfect reminder that you do not need complex skills to make something that brings a splash of joy to your space.
FAQs
Q: What are some easy Indian pot painting design ideas for beginners?
A: Easy Indian pot painting design ideas include simple motifs like paisleys, dots, stripes, and floral patterns inspired by traditional Indian art. Use bold colours or a muted hue depending on your aesthetic, apply lines or patterns with a marker for precision, and add a contemporary touch with metallic accents. These designs are stylish and perfect to beautify your home, balcony or garden area.
Q: What types of pot painting and materials should I use for DIY flower pot projects?
A: Types of pot painting range from using acrylic paint, spray paint, latex paint to glaze finishes. For diy flower pot work, acrylic paint is widely used to paint a pot at home because it adheres well and comes in many hues; spray paint is great for base coats; latex paint works outdoors. Seal with a sealer after finishing to protect the painted plant container. Choose brushes, markers, and the best materials for flower pots like outdoor acrylics or a clear coat sealer.
Q: How do I prepare terracotta and clay pots before painting?
A: To prepare clay pots before firing or terracotta pots at home, clean them thoroughly to remove dirt and let the pot dry—some recommend soaking the pot or planter in a bucket of warm water or a tub for about an hour to remove salts and air bubbles. If you’re reusing old pots, scrub and rinse in a bucket of warm water, let the pot moist areas dry completely, then apply a primer or base coat to help the paint adhere.
Q: Can I paint succulent pots and outdoor planters like matka or large pots for balcony use?
A: Yes—succulent pots, matka, and larger pots and planters for balcony or garden use can be painted. Use weather-resistant acrylics or latex paint for outdoor exposure, and finish with a waterproof sealer. For clay or terracotta, remember these pots retain heat, so lighter hues can help keep soil cooler. Choose eye-catching designs or a timeless look depending on your garden space or corner of your living area.
Q: What are some creative pot design ideas to beautify your home and garden?
A: Creative pot design ideas include painting bold colours with geometric lines or patterns, adding painted flowers, emoticons for a whimsical touch, or using glaze for a glossy, aesthetic finish. You can stencil mandalas, create pots with unique mixed-media accents, or make a contemporary touch with metallic spray paint. These approaches enhance the beauty and bring a lively, eye-catching design to your home garden or balcony.


