


Achieving Correct Proportion Through Basic Geometric Shapes
Every single figure in Warli or Madhubani art starts as a circle, triangle, or line. Trust me on this, breaking your subject down into its simplest shapes is the secret to nailing proportion without needing a sketch. You will notice an elephant becomes a large oval body with four cylindrical legs and a triangle for an ear. This geometric foundation gives you the perfect framework for an easy indian folk art drawing to build your intricate patterns onto. The good news is this method keeps your drawing balanced and prevents the common beginner mistake of a wobbly, lopsided figure. Stick to this modular pattern assembly and your final silhouette will feel solid and stylistically correct, which is the heart of folk art.
Selecting Archival Liners and Earth Tone Pigments
A waterproof, pigment-based fine-liner pen with a 0.3mm tip gives you the unbroken, bold outline that defines this entire style. You want that line to be crisp and permanent so your subsequent layers of paint or hatching do not make it bleed. For the color fields on your easy indian folk art drawing, look for opaque paints like gouache or acrylic markers in the traditional earthy palette of terracotta red, mustard yellow, deep green, and chalk white. These saturated, flat colors mimic the natural pigments used for generations and create that beautiful high-contrast look against a dark paper. The right tools do half the work for you, ensuring your motifs have the visual density and authenticity you are aiming for.
1. Draw a Geometric Sun Burst Madhubani Motif

Who would have thought such a detailed sun motif could be so beginner-friendly? It looks complex, but the secret is in the concentric circles. Start by finding your paper’s center with light diagonal lines, then use a compass to draw a small circle and two larger ones around it. That’s your core sun disc. Next, lightly pencil lines radiating outwards to divide the space into equal sections. Fill these rays with simple, repeating patterns like tiny dots or parallel lines. The magic of this easy indian folk art drawing design lies in the repetition. Isn’t it satisfying to watch the geometric burst take shape? For more Indian drawing inspiration, explore these simple ideas.
2. Sketch a Triangular Warli Dancer Silhouette
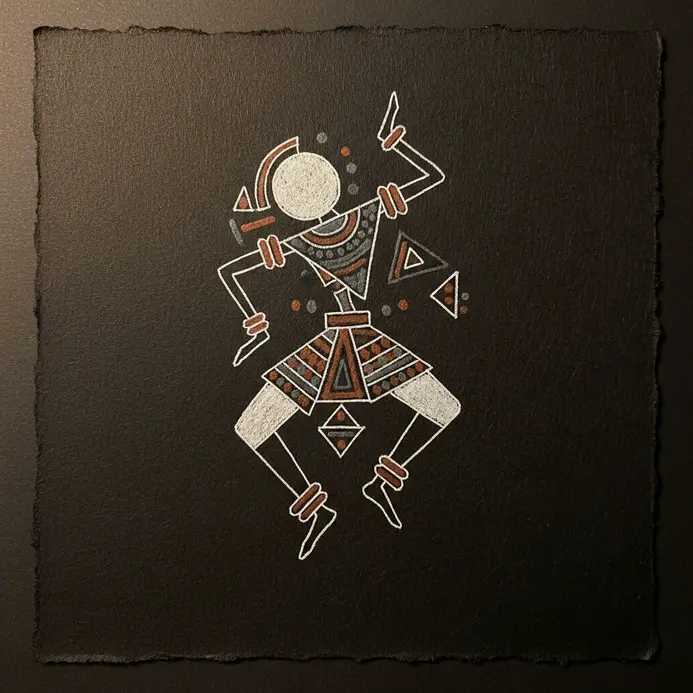
Who would have thought a dancer could be built from such simple shapes? This silhouette is all about using basic geometry to suggest movement. Start with a big, upside-down triangle for the body, then add a small circle for the head right on top. The magic is in the limbs—use thin lines for the arms and legs, positioning them at different angles to feel the rhythm. I love how this works because the inverted triangle torso gives a stable yet dynamic base for the figure. Trust me, keep your pencil light at first when practicing an easy indian folk art drawing like this. You can always darken the lines once your joyful dancer is perfectly posed.
3. Create a Double Lined Floral Vine Pattern: A Classic Border Technique
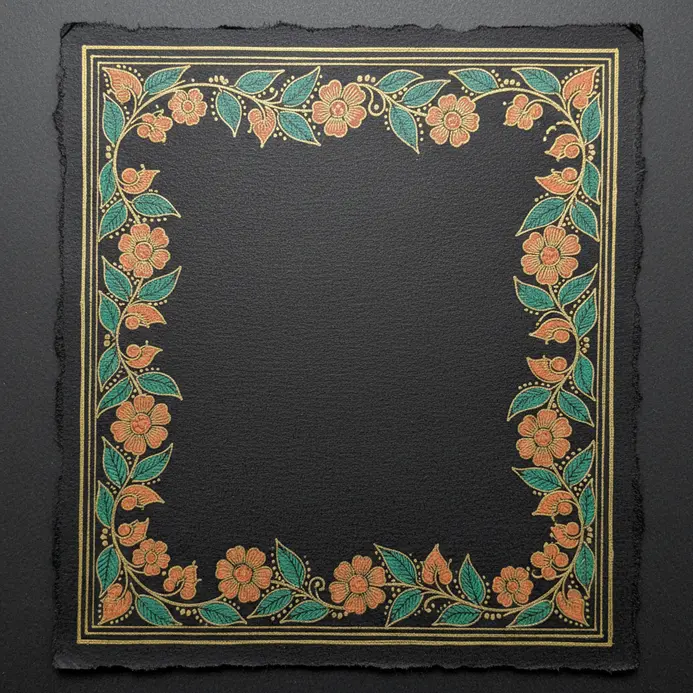
Ever wondered how those elegant borders on invitations or textiles are made? You start with a flowing central line, your vine, and trace two parallel lines on either side. This creates a neat channel where you’ll place your floral motifs. I love sketching in the leaves, blossoms, and buds along this path to bring the pattern to life. Planning your central vine shape first is key, especially in traditional art practices. A wavy line gives a natural feel, while a straight one feels more formal. The real magic happens when you decide on symmetry for balance or asymmetry for a dynamic look. It is satisfying to watch an easy indian folk art drawing transform a simple line into a continuous, beautiful design. For a similar decorative feel, you can try Madhubani folk art drawing.
4. Outline a Stylized Fish With a Striped Body
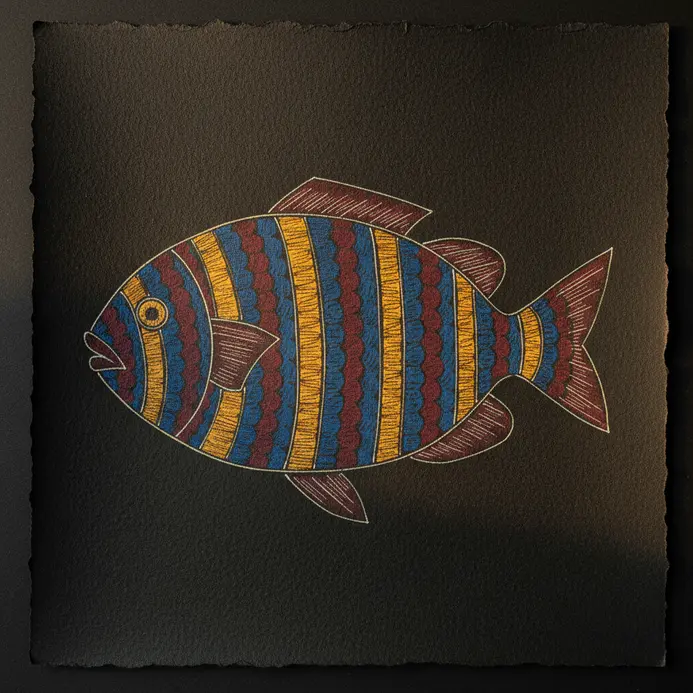
This one surprised me – it looks complex but really takes under 10 minutes. Start with that smooth, elongated oval for the body, then add the flowing head and a classic forked tail. I love how the simple almond shape makes everything else fall into place so easily. Isn’t it satisfying when a few lines create a recognizable creature? Next, draw your fins as gentle arcs and rounded triangles. The real fun begins when you add those bold, vertical stripes across the body. Your drawing will instantly gain that stylized, graphic pop. For more inspiration on related techniques, you can try Madhubani folk art drawing. Feel proud of how this easy indian folk art drawing approach transforms a simple outline into a complete piece of art.
5. Build a Simple Circle Warli House Sketch
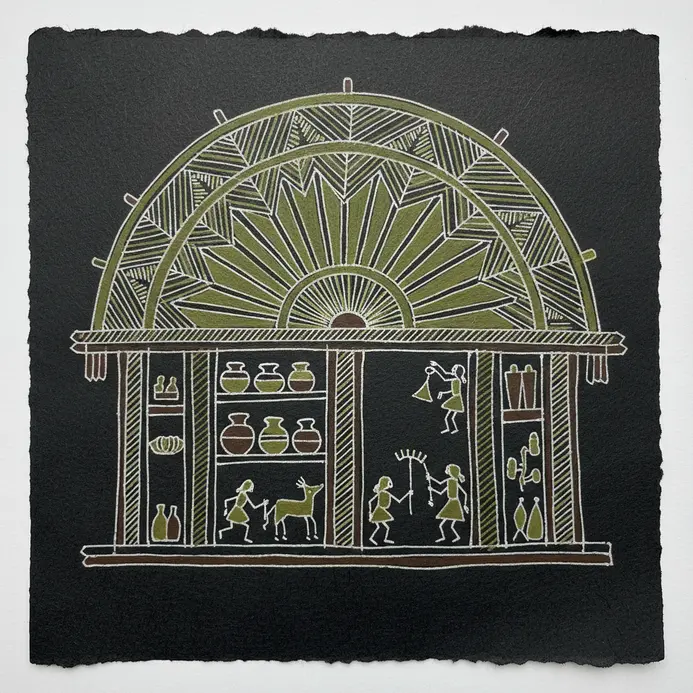
This one surprised me—it looks complex but really takes under ten minutes. You start with a large, slightly imperfect circle for the house body. Then, you place a simple triangle on top for the roof and a small rectangle at the bottom for the door. I love how this basic geometric combination instantly creates a recognizable home, much like a village adorned with warli art. Why does this work so well? The charm is in the rustic simplicity. Your final step is to add a few stick figure people near the house using just circles and lines. Trust me on this one, seeing your finished easy indian folk art drawing feels incredibly satisfying.
6. Draw a Peacock With Patterned Tail Feathers

Does drawing a peacock’s ornate tail feel intimidating? Trust me, it looks more complex than it is. The secret is starting with that huge wall, which can serve as a canvas for warli art. fan-like shape for the base, making it much larger than the body, similar to the bold designs in kalamkari. From there, you can fill it with simple repeating patterns like circles or teardrops. I love how this instantly captures that iconic, eye-catching look. Focus on those proportions first, and the patterns will follow. The payoff is huge when you see that majestic tail come together on the page. It is a fantastic way to practice intricate details, treating each easy indian folk art drawing as a separate study. You can find similar pattern inspiration if you learn easy Pichwai art.
7. Capture a Minimalist Tree Of Life Outline
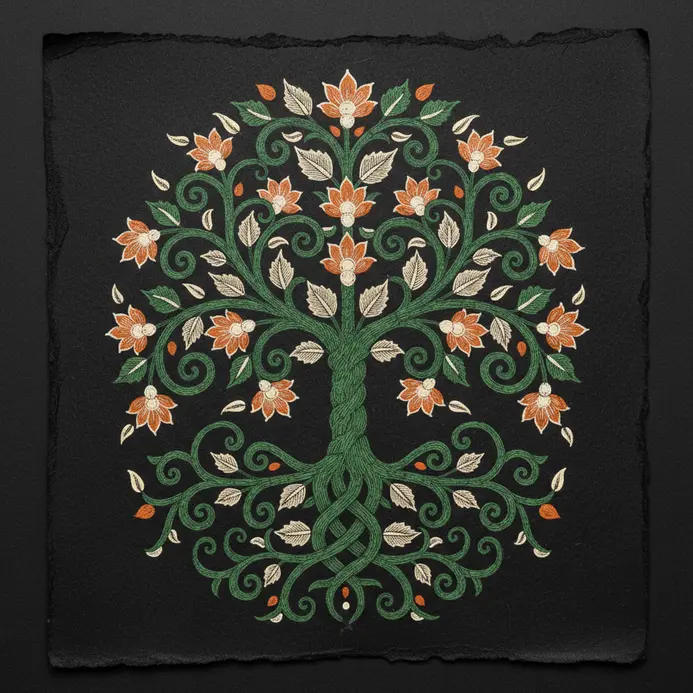
Ever wondered how to draw the story of all living things? This one is just about simple lines and clear ideas. Start with a single point for the common ancestor, then draw three main branches for the three Domains of Life. From one of those, add a few smaller lines for the main kingdoms like plants and animals. I love how this makes a huge concept feel approachable. The satisfaction comes from seeing that clean, branching structure appear on your easy indian folk art drawing page. It is a perfect framework to adapt, and you can find similar symbolic structures if you explore Bengali drawing motifs.
8. Form a Symmetrical Lotus Flower Drawing
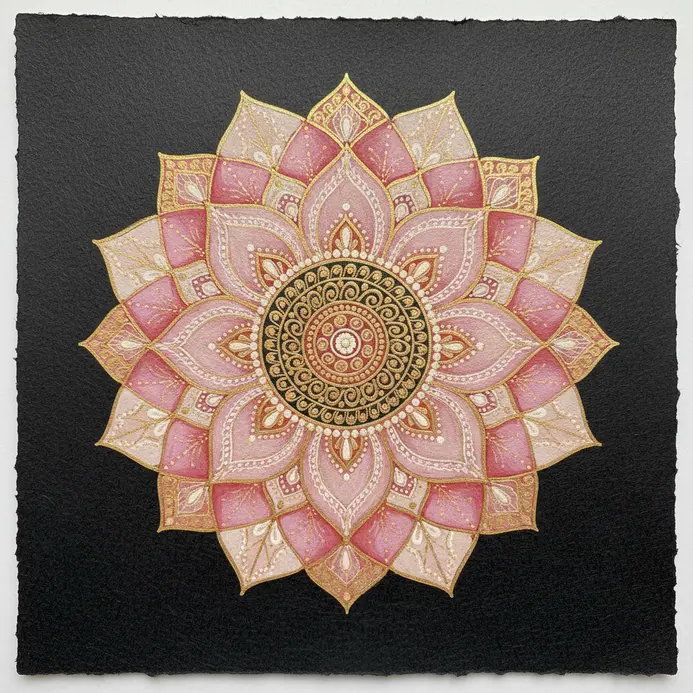
This one surprised me – it looks intricate but that perfect symmetry makes it so much easier. You will start by lightly drawing a central vertical axis with a ruler, ensuring precision like in kalamkari. Then, build your lotus petal by petal, mirroring each shape on the other side of that line. Trust me, this methodical approach gives you a beautifully balanced flower every time. I love how this layered construction creates natural depth, with each petal gracefully overlapping the last. The key is keeping your initial sketch light so you can adjust this easy indian folk art drawing before committing to ink. Does that not look stunning when the final lines come together?
9. Sketch a Pair Of Warli Drummers Figures
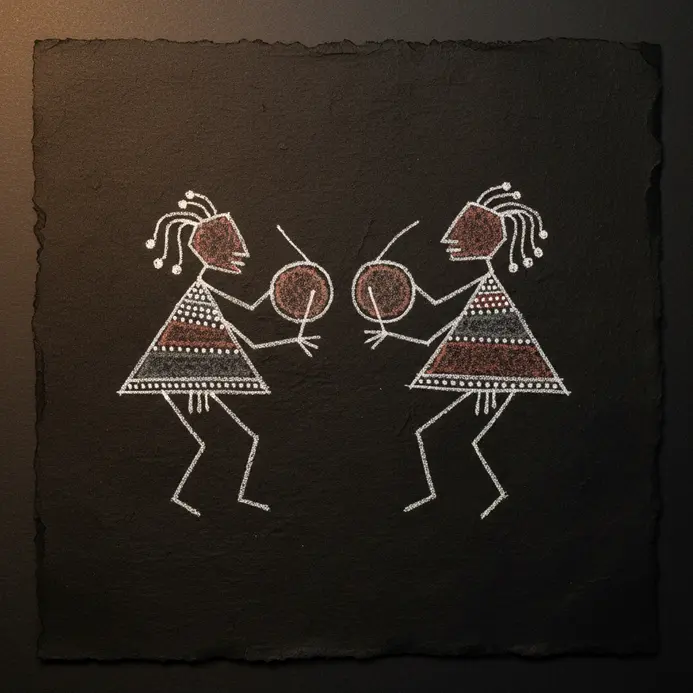
This one is all about capturing movement with the simplest shapes. Ever wondered how to make stick figures look so lively? Start with a circle for each head and then draw the classic diamond-shaped torso using two triangles, reminiscent of phad painting techniques. Your arms and legs are just lines, but bend those elbows and knees to show the drummers in action, with a simple oval for the drum in front of each. I love how this sketch teaches you to express energy without detail. The key is keeping everything geometric and letting those dynamic poses do the work, as seen in various art styles. It is a fantastic way to get comfortable with the core style of this tribal art form while mastering an easy indian folk art drawing technique. For another approach using basic shapes, you might enjoy these simple Bhil art drawings. Feel that rhythm come to life on your page.
10. Draw a Large Eyed Elephant Line Drawing
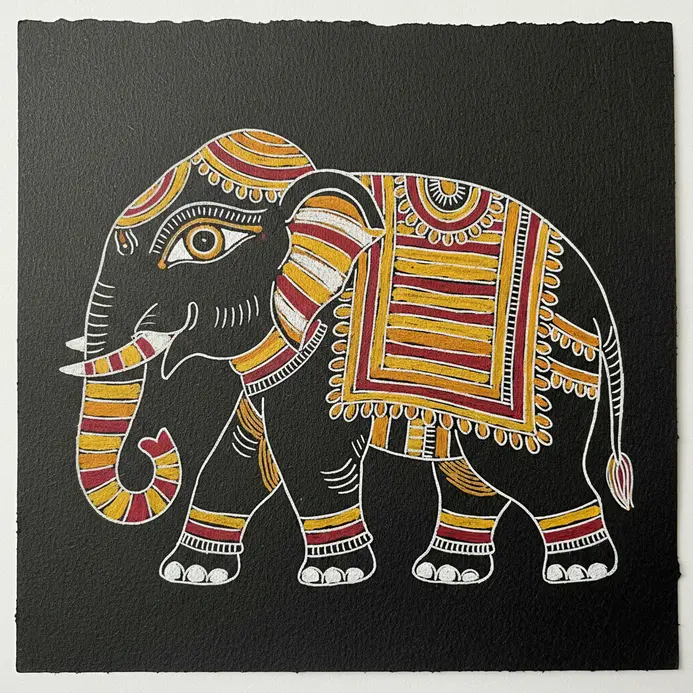
This one is a joy. The charm comes from those huge, expressive eyes and soft, curving lines. Start with a big, slightly squashed oval for the head, then add another for the lower jaw. Place two large circles high up for the eyes, giving them a tiny white highlight dot for life. Use your arm, not your wrist, for the sweeping curves of the large floppy ears and the rounded body. Trust me, those gentle curves make all the difference when you attempt an easy indian folk art drawing like this one. For the trunk, draw two parallel lines that taper and curve. Add a few simple horizontal lines on it for texture. Keep your initial sketch light, then go back with more pressure to darken the main outlines. You will love how this friendly, stylized creature comes together. Feel proud of your simple folk art creation.
11. Create an Intricate Spiral Bound Turtle Motif

Ever find yourself wanting to add more detail but not sure how? I love using interlocking spirals to form the turtle’s shape. Start with a simple turtle outline, then let a series of smaller, flowing spirals build its shell and flippers. The key is letting those spiral lines follow the natural curves, creating texture and movement. It feels so satisfying when the pattern clicks into place, giving your easy indian folk art drawing a beautiful, intricate flow. For a great foundation in these pattern-building skills, I recommend exploring traditional Indian art techniques. Try this motif and feel the joy of watching a simple drawing transform into something wonderfully complex.
12. Sketch a Group Dance Warli Pattern Circle

Who would have thought a circle of dancing stick figures could feel so joyful? You start by lightly sketching a large circle, then marking even spots around its edge for each dancer. For every figure, draw a small circle for the head and two simple triangles joined at their points for the body. Add thin, bent lines for arms and legs to show movement, and connect hands between figures. Isn’t it amazing how this simple geometry captures a whole community celebration? The real key is keeping those elements aligned with the principles of village art. geometric shapes super basic. I love how the circular arrangement naturally suggests endless motion and unity. Your final step is to trace everything with a fine-tipped pen, similar to those used in pattachitra. black pen for that crisp, traditional look. Try it and feel the satisfaction of seeing your easy indian folk art drawing come to life.
13. Add a Simple Leaf Pattern Border Design

Ever wondered how to give your drawing a finished, professional look? This is my go-to trick. You simply draw a repeating row of the same basic leaf shape along all four edges. I love using a fine-tipped pen, essential for detailing in kalamkari and pattachitra. for the final outlines to get those clean, crisp lines. Isn’t it satisfying to see your artwork neatly framed? Keep your leaf shapes simple and consistent. The real magic is in the rhythm of the pattern. A common beginner hurdle is making awkward corners on your easy indian folk art drawing, so plan your turn with a small, neat cluster of leaves. Trust me, when you step back, you will feel a huge sense of accomplishment.
14. Draw a Sun God Face With Radiating Rays

Who would have thought a sun god could be so approachable? Trust me, it all starts with a perfect circle for the outer shape. Inside that, you sketch the face with simple oval eyes and a gentle, upward-curved mouth for a benevolent expression. The real magic comes when you add those dynamic, radiating rays around the edge. I love how this simple technique builds up from basic shapes to something so iconic. The trick is to vary the length and shape of your rays to keep the energy flowing, preventing any easy Indian folk art drawing from looking static, much like the vibrant scenes in phad painting. You will feel a real sense of accomplishment when that radiant face comes together on the page. Follow easy Bhil painting guides can help you understand the basics of traditional art. for more radiant designs.
15. Form a Traditional Pot With Geometric Fill

Ever wondered how those crisp geometric patterns wrap so perfectly around a vase? This one is a fantastic exercise for your eye. You will start by sketching a symmetrical pot shape, using a vertical center line as your guide. Then, the real fun begins as you fill that curved surface with repeating diamonds or squares. Here is the key insight: those shapes must distort to follow the pot’s form. A square on the curved side will look like a trapezoid. Trust me, once you see your pattern wrap around the 3D form of an easy indian folk art drawing, it feels like a magic trick. Your drawing will gain incredible depth. Pro tip: begin with a simple grid as your guide before drawing the final pattern lines. Does that not look stunning?
16. Draw a Geometric Bird With Upward Wings

This one looks sharp but is built from simple shapes you already know. Start by sketching the bird’s body as a horizontal rectangle or trapezoid. Attach a triangle for the head and a small triangle for the beak, then connect them with short, straight lines. The key is the upward wings. From the body, draw two large, angled triangles or trapezoids pointing skyward. Use light pressure at first and a ruler if you want perfect lines. Keep your strokes confident and your angles symmetrical for that dynamic lift. I love how this geometric style feels both structured and full of energy. You will see these principles echo when following beautiful mandala drawing ideas.
17. Sketch a Warli Farmer With Farming Tools

Who knew a story of daily work could be told with just a triangle and a line? This Warli farmer sketch is all about capturing simple motion. Start with an inverted triangle for the chest and a smaller upward one below for the hips, forming the core shape of your easy indian folk art drawing. Top it with a circle for the head. Use flowing lines for bent limbs to show action and add a simple plough shape. I love how this minimalist style feels so alive and connected to nature. If you enjoy this, you might also like exploring simple Pichwai painting ideas for another beautiful folk art form.
18. Create a Delicate Petal Border Motif Design

Who would have thought a simple border could feel so elegant in traditional art? This motif relies on drawing a row of soft, flowing petal shapes. Keep your initial pencil pressure light to sketch the basic teardrop or oval forms. Then, trace them with a gentle, consistent line for the final outline, akin to the precision found in phad painting. The real trick is maintaining that airy, rhythmic feel. Even spacing between each petal is more important than perfect symmetry. I love how this design works with the art styles of India. organic flow of your wrist, creating a natural, graceful pattern. Feel that delicate touch come to life when you finish an easy indian folk art drawing session.
19. Draw a Star Shaped Flower Pattern Unit

Ever noticed how many intricate folk art borders are built from simple repeating units in an easy indian folk art drawing? This star flower is one of those perfect foundational pieces. Start by lightly sketching a small circle for the center. Then, use a compass or protractor to mark five or six equally spaced points around it. Draw curved lines from each point to create those soft, teardrop shaped petals. I love this one because the guide lines do all the heavy lifting for perfect symmetry. Trust me, once you have your first unit down, you will want to repeat it everywhere. For a lovely way to use this motif, explore Madhubani painting for beginners.
20. Outline a Stylized Deer With Antlers Motif

Do not think of this as drawing a real deer. A stylized version is about capturing its spirit through simple, beautiful shapes. I love starting with a graceful, curved neck and a simple triangular head. The magic is in the antlers. Try a symmetrical, branching pattern that feels more like a tree or an elegant, swirling Art Nouveau shape. It works because the strong silhouette does all the talking. For a lovely, balanced result, try framing your deer motif within a circular border, much like you would with some beautiful mandala drawing ideas. Does that not look stunning?
21. Add a Dotted Line Diamond Pattern Strip

Ever wondered how those intricate dot borders in folk art are made? This one looks detailed, but trust me, it is wonderfully simple to draw. You start by lightly sketching a row of diamond shapes along your border. Then, instead of drawing solid lines, you use a fine-tipped pen to place individual dots along each line of the diamond. Your hand will find a rhythm as you go. Why does this work so well? The dotted line creates a delicate, textured feel that solid lines simply cannot match. It is a fantastic way to add a decorative strip around your main artwork. For the cleanest result, try turning your paper as you work to keep your dot spacing even. Feel the satisfaction when that perfect pattern emerges.
Applying Protective Fixatives for Long Preservation
A light, even coat of a workable fixative spray locks your delicate dot-work and ink lines in place immediately after you finish. This is non-negotiable for any piece using dry media or pencil underdrawing. For your final, completely dry painting on an easy indian folk art drawing, use a matte acrylic varnish applied with a soft, wide brush. This clear sealant protects the pigment from UV light and dust without adding a shiny, modern finish that would distract from the traditional look. It bonds the layers together, ensuring the internal hatching and patterns stay vibrant for years. Your art deserves this simple final step for long preservation.
Conclusion
Your first steps into Indian folk art are about connecting with a timeless, story-filled way of making marks. These traditions celebrate pattern and symbol over realism, which is a wonderful permission slip for any beginner. The best next step is to pick your favorite motif from this list and draw it three times on scrap paper. Notice how your hand relaxes and the lines become more confident each time. Remember, the goal is not a flawless copy but to capture the spirit and geometry that makes easy indian folk art drawing so personally rewarding. Keep your fine liners close and enjoy the process.
FAQs
Q: What is easy Indian folk art drawing and how does this artform differ from other styles?
A: Easy Indian folk art drawing is a simplified, accessible approach to traditional regional art forms that often emphasizes bold lines, bright colors, and symbolic motifs. This artform differs from Mughal or classical styles by focusing on community-based themes, social storytelling, and distinctive regional features rather than formal realism. It often seeks to captivate viewers through elegance and cultural identity rather than ornate detail.
Q: Which materials are commonly used in simple Indian folk art drawings?
A: A variety of material choices make these drawings approachable: cloth, cotton, paper scrolls, stone surfaces, and even mud walls. Artists may use rice paste, natural pigments, bright dyes, or modern acrylics. Resourceful makers adapt what is available—such as cloth or local stone—so the material reflects local culture and social life.


Q: Can you name popular regional styles and artists like chitrakar who developed these traditions?
A: Yes—popular regional styles include Pattachitra from Odisha, Madhubani from Bihar, and Rajasthani miniature and folk motifs. Artists like the chitrakar community created narrative scrolls to share epic stories such as the Ramayana, and themes of Jagannath and Krishna are central in Odishan traditions. These artists developed signature techniques that symbolize sacred stories and local identity.
Q: How do folk drawings depict religious themes, deities, and sacred narratives?
A: Folk drawings often depict divine figures, temple scenes, and epic narratives in a stylized manner. They portray deities like Krishna and Jagannath or episodes from the Ramayana and other epics, using symbolic features—such as specific color choices or motifs—to communicate holiness and storytelling. The role of these images is both devotional and educational within communities.
Q: What role do women and community artists play in keeping folk art alive?
A: Women and local artists bear a vital role in preserving and sharing folk traditions. In many regions, women decorated cloth, scrolls, and house walls with motifs that reflect social life—cows, village scenes, and domestic rituals. Their work helps develop cultural identity and passes down storytelling, grace, and beauty to younger generations.


