


Hardware Selection For Secure Nail Placement
The secret to preventing your board from splitting is leaving a nail depth of a solid half to three-quarters of an inch. Trust me, this single measurement makes all the difference between a project that holds tension for years and one that fails on the first wrap. When you explore various diy string art ideas, this foundational step ensures every structure remains secure and taut over time.
Wood Surface Preparation And Staining Techniques
A smooth, sanded wood surface is non-negotiable if you want to avoid thread snags that ruin your clean lines. Start with a good sanding pass across the entire board, paying extra attention to the edges where your hands will work. The visual impact of your finished piece relies on high-contrast pairings, like a rich, dark-stained pine base with vibrant neon embroidery floss. A stained background makes every color pop. Before you transfer your template, ensure the wood is completely dry and free of dust. This preparation step is what separates an amateur look from a polished gallery-worthy display, ensuring your diy string art ideas shine on the perfect canvas.
1. Build a Monochrome Heart Geometric Wall Art Piece
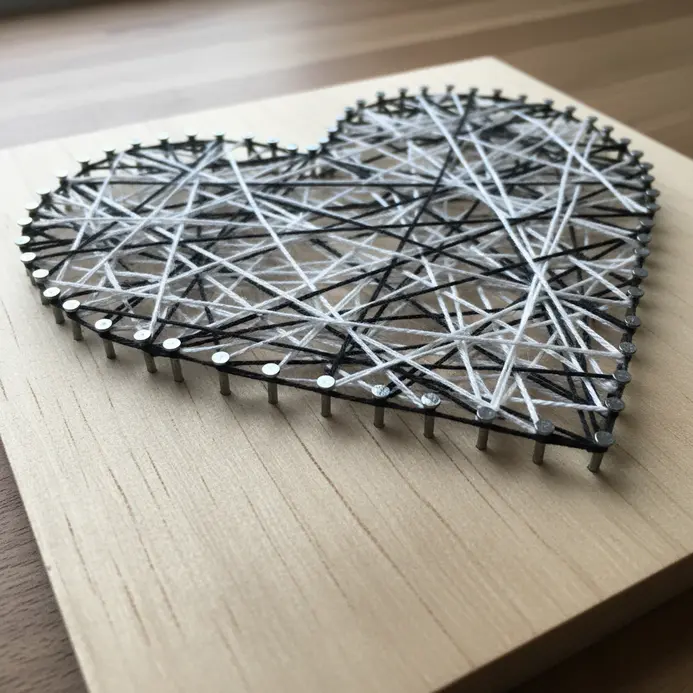
Ever wondered how to make a simple heart shape look ultra modern? I love how this project uses clean lines and shades of gray to create something so striking. You will start by designing a symmetrical heart in a vector graphics program like Illustrator, then slice it into geometric segments. Filling those segments with alternating tones of black, white, and gray gives your diy string art ideas amazing depth and texture.
It works because the monochrome palette is incredibly versatile, letting the geometric forms do all the talking. For a great next step, explore more DIY crafting project ideas to keep your creative momentum going. Doesn’t that sound satisfying?
2. Craft a Rustic Mountain Peak Landscape Piece

Ever wanted to create art you can literally feel? This piece is all about building up modeling paste and sand to form a tactile mountain ridge. Many top diy string art ideas work because you are not just painting a scene, you are sculpting a little piece of raw, natural beauty. Trust me, the satisfaction of running your fingers over that textured peak is unbeatable.
3. Create a Minimalist Compass Rose Nautical Design

Who would have thought a nautical classic could look so clean and modern? You start by placing nails at the central hub and along the points for the cardinal directions. When testing diy string art ideas, I love how pulling your embroidery floss taut between these nails creates those sharp, satisfying lines. That geometric precision is what makes this piece feel so orderly and calm.
Trust me on this one: keep your nail spacing consistent for perfect symmetry. You will end up with a stunning piece that whispers of adventure.
4. Assemble a Vintage Bicycle Wheel Circular Pattern

Ever wondered how those intricate bicycle wheel patterns are made? It is a satisfyingly mechanical process. You will start by inserting spokes from the inside of the hub flange, threading them to the rim in a specific cross pattern. This creates a strong, classic wheel that ranks high among my favorite diy string art ideas for a restoration project. A spoke wrench is your essential tool for tightening the nipples during assembly.
5. Make a Neon Rainbow Geometric Starburst Design

Ever wanted to create something that looks like a futuristic firework? This design is all about controlled energy. You will start with a single, sharp geometric shape radiating from the center of your canvas, then duplicate and rotate it to build the full starburst. The magic behind many diy string art ideas happens when you fill those rays with a vibrant neon rainbow against a dark background, making them pop with an electric glow.
I love how the precise geometry gives it structure while the colors make it feel alive. Trust me, you will feel a real thrill when that final glow effect comes together.
6. Outline Cursive Love Word Typography Art

Ever wondered how those elegant, outlined love words are made? You start by sketching your cursive word on paper, focusing on smooth, flowing letterforms. Then, you add a single outline around your letters, which is what makes the design pop. I love this part because it turns simple writing into a graphic masterpiece that belongs on your board of diy string art ideas.
For a fun family twist, this technique works perfectly for creative holiday craft projects too.
7. Build a Forest Pine Tree Silhouette Design
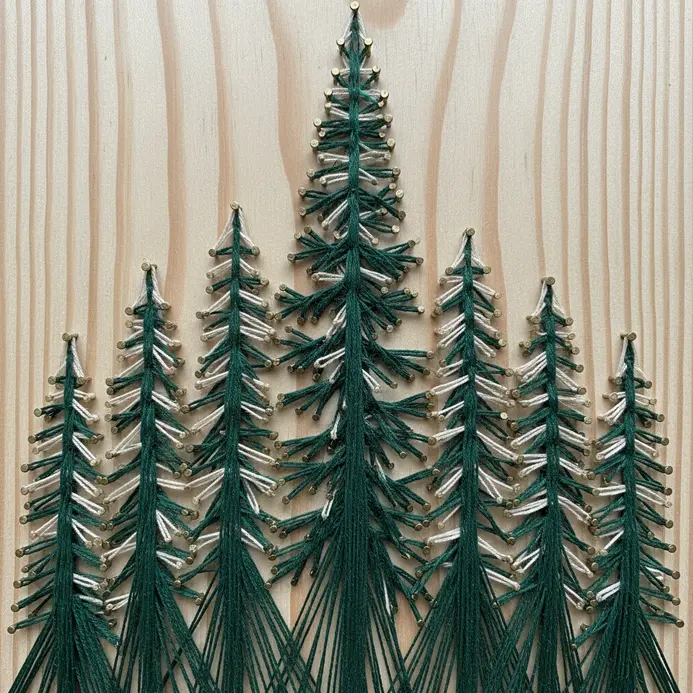
Ever wondered how to create a whole forest scene with just a few simple shapes? This one is a favorite of mine. You start by picking two contrasting colors, like a light blue and a deep black. Use the Pen Tool to draw a classic pine tree outline, focusing on that cone shape with spiky edges.
Duplicate that shape a few times and resize each one. Overlap them at different heights to build depth, which is why overlapping silhouettes dominate many successful diy string art ideas. It works so well because the strong silhouette does all the work, letting the viewer fill in the details. Trust me, seeing those dark shapes come together against the bright background is incredibly satisfying.
8. Create an Abstract Golden Ratio Spiral Texture

Ever wondered why some abstract designs feel so naturally balanced? This texture uses a Golden Ratio Spiral as its foundation, a pattern you find in seashells and sunflowers. I love starting with a precise digital template in my software, then tracing it with a bright pen tool. You will build depth by duplicating that line, a core technique in advanced diy string art ideas, changing brush sizes and playing with layer opacities.
It is satisfying because the math creates perfect harmony, letting you focus on the fun part. Adding color and blur delivers a truly artistic effect that feels effortless.
9. Assemble a Modern Hexagon Array Wall Hanging

That chic geometric wall art you have seen everywhere? It is surprisingly simple to assemble. The secret is getting your 30-degree cuts perfect for clean hexagon shapes. Sand, paint, or stain your pieces, then lay out your pattern before you commit. That flexibility is exactly why layout grids remain popular across modern diy string art ideas.
I love how flexible this is. You can glue them to a board or use strong tape to mount each one individually for a floating look. For another accessible craft medium, try these simple rock craft ideas. It feels so satisfying to create a custom, modern statement piece for your home.
10. Outline a Floral Rosebud Intricate Threaded Design

Ever wondered how to make your floral string art look truly realistic? This design focuses on a central, unfurling rosebud with detailed petals and surrounding leaves. Start with fine satin stitches for the inner petals, a common starting point for floral diy string art ideas, then build outward with long and short stitch for blending. I love how the variety of threads creates such amazing depth.
Feel the pride when your rosebud looks like it could bloom right off the fabric.
11. Craft a Boho Sunburst Radial Pattern Art

Ever wondered how to make a geometric pattern feel warm and free-spirited? This boho sunburst looks intricate, but it is built from one simple central shape. Start with a detailed mandala-inspired centerpiece on your canvas. Then, draw your first radiating lines outwards, making them wavy and organic instead of perfectly straight.
That intentional imperfection is what gives it that lovely, handcrafted feel. I love using a palette of earthy watercolor tones to keep the vibe relaxed, keeping your color choices aligned with cozy diy string art ideas. You can even add texture by incorporating natural elements, similar to the approach in animal-themed rock painting. Trust me, seeing those layers come together is incredibly satisfying.
12. Build a Detailed Anchor Maritime Wall Decor

An anchor wall piece looks complex, but trust me, you can build a stunning one without a shipyard. I love this project because you choose your own adventure. Start by cutting your main shape from plywood or foam board using a paper template. Then, add character with a weathered paint finish and wrap some rope around the crossbar. It works so well because a nautical theme brings instant, classic charm to any room, proving why coastal diy string art ideas never go out of style.
Feel that satisfying coastal vibe when you hang your handmade focal point.
13. Create a Monogram Initial Bold Block Letter

This one is a favorite for making a big, personal statement. Start by typing your initial in a design program and choose a thick, sans-serif font like Impact or Bebas Neue. Convert the text to outlines so you can tweak the shape, ensuring it is solid and perfectly proportioned. This creates a powerful, clean form that stands out in almost any collection of diy string art ideas. You will love how crisp and modern your personalized piece looks.
14. Make a Butterfly Wing Multi-Color Gradient Piece

Who says you need a butterfly net to capture that gorgeous, fluttering color? This project is all about mimicking the natural beauty of a wing’s gradient. I love picking a specific butterfly, like a Monarch, and studying how its deep orange shifts to bright yellow. You will sketch the wing shape, then focus on blending your chosen paints or dyes to create those seamless transitions. The key is keeping your base colors wet for smooth blending, whether you are using acrylics or watercolors on your favorite diy string art ideas. For another colorful project perfect for your patio, check out these crafts for outdoor spaces. It feels magical when those colors finally flow together.
15. Outline a City Skyline Architectural Silhouette Art

Ever feel like a cityscape is too complex to capture? This one surprised me. The magic is in leaving all the details out. You start by simplifying iconic buildings down to their most recognizable outlines, focusing on their unique shapes against the sky. Hammer nails along your traced outline on a wooden board and weave string between them to fill the shape. I love how this creates a striking, minimalist piece that feels both modern and personal, making it perfect for architectural diy string art ideas.
Try it and feel proud when that skyline silhouette comes to life.
16. Build a Soft Pastel Watercolor Effect Mandala

This one is my absolute favorite for its dreamy, calming vibe. The trick is to use a wet-on-wet technique with very diluted watercolor paints on your paper. You will lightly sketch your radial design first, then let the soft colors like lavender and mint green flow gently into each other. It is surprisingly forgiving, which is exactly what beginners look for when starting their first diy string art ideas. If you love this serene effect, you might also enjoy these unique art project ideas for another creative outlet. The result feels light and airy every single time.
17. Craft a Geometric Deer Head Trophy Shape

Who would have thought a modern deer head could be made from flat shapes? I love this one. You start by cutting out all the polygonal facets from a material like heavy cardstock or thin wood. Then, you carefully glue each piece edge to edge, building the angular antlers and snout. It is a fantastic home decor craft because the abstract style fits anywhere, placing it squarely among versatile diy string art ideas.
Trust me, the feeling when you see that final 3D shape come together is pure satisfaction.
18. Make a Coffee Cup Kitchen Wall Sign

Who does not love a warm, personal touch in their kitchen? This project is a fantastic way to add it. You start by cutting a simple coffee cup shape from a wood board. After sanding it smooth, you paint or stain it to match your style, adding fun text or details. I love this one because it turns a simple shape into a cozy, custom piece of decor, which is why kitchen-themed diy string art ideas remain so popular.
19. Create a Sparkling Snowflake Winter Holiday Piece
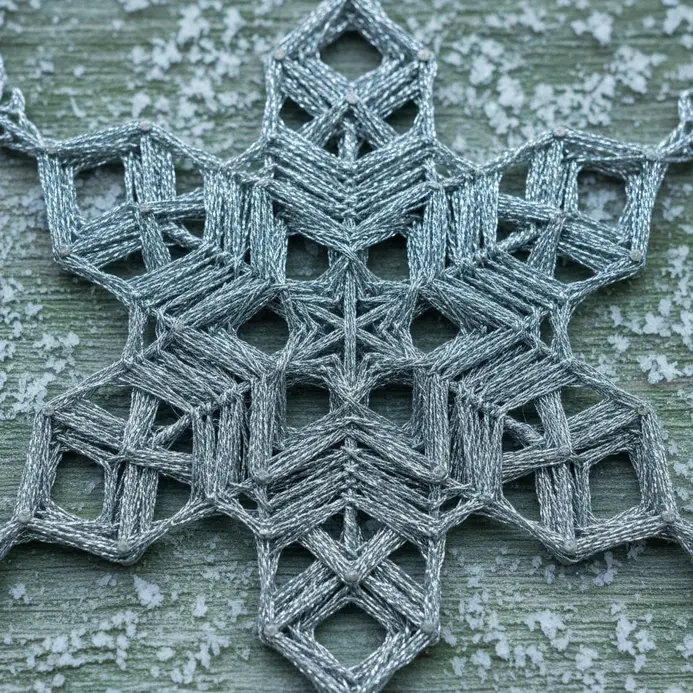
Ever wanted to capture a snowflake’s magic on your mantel? This project layers clear acrylic snowflakes, each coated with a fine iridescent glitter, to build a three-dimensional sculpture. You weave warm fairy lights through the structure, making every rhinestone and glass bead sparkle. It works because the light bounces off all those reflective layers, creating a truly ethereal glow. Explore decorative home craft projects for more seasonal inspiration. My favorite part is hiding the battery pack behind the main snowflake to keep the focus on the shimmer, a detail worth adding to your winter diy string art ideas.
Trust me, you will feel so proud when you switch on those lights.
20. Assemble an Abstract Interlocking Triangle Mesh Pattern

This one looks complex, but the process is wonderfully meditative. Start by drawing your foundational equilateral triangle and then repeat it to build a grid. I love using isometric graph paper to keep my angles perfectly aligned. Vary your line weight and add a pop of color to different sections to make those interlocking shapes pop. The payoff comes when seeing that intricate mesh come together, rewarding your patience on any of these diy string art ideas.
Seeing that intricate mesh come together feels like solving a beautiful puzzle.
21. Outline a World Map Continent Design

Ever tried to draw a recognizable world map? It looks complex, but for string art, you want the bold silhouette. I love this approach. Focus on the unique shape of a continent, like the boot of Italy or the horn of Africa. Simplify those intricate coastlines into clear lines for your nails. This makes your final piece instantly familiar without getting lost in tiny details, a smart shortcut for any beginner exploring diy string art ideas. You will find loads of inspiration for your next DIY crafting project ideas to keep your creative momentum going.
22. Build a Textured Feather Detailed String Art

Ever wondered how to make your string art look truly lifelike? This project focuses on building a feather with incredible texture, not just a flat outline. You will hammer many small nails along the feather’s shape, then use different types of string to create its delicate structure. I love how combining fluffy yarn with standard embroidery floss mimics the soft barbules and strong quill. The result is a stunning, three-dimensional piece that feels incredibly rewarding to complete.
23. Craft a Flamingo Silhouette Tropical Wall Art

Who says tropical wall art has to be flat? This project uses layered paper to create a beautiful, dimensional scene. You will cut a vibrant pink flamingo silhouette and arrange it over lush, green tropical leaves. I love how the foam dots lift the elements, giving your art real depth and shadow.
Pro tip: plan your entire layout on the background paper before you glue a single piece. Trust me, it makes the final assembly so much smoother and more satisfying.
24. Create a Geometric Cubism Abstract Portrait Outline

Ever wondered how to translate a face into a web of sharp, intersecting angles? This one surprised me with its intellectual challenge. You will break the head into overlapping planes and show multiple perspectives of the eyes and nose at once. I love using a distorted oval as the foundation, then carving out angular shapes for each feature. It is satisfying because you solve the puzzle of representing a person through pure form and line. For more inspiration on seasonal craft ideas, give this abstract approach a try and feel the creative payoff.
25. Make an Owl Silhouette Nighttime Design Piece

Ever wanted to create a piece of art that feels both mysterious and peaceful? This project is all about contrast. You will start with a dark painted background to represent the night sky. Then, you will use nails and string to build the crisp owl silhouette outline against it. The magic happens when you add tiny strings for stars or a moon, making the owl pop. I love how this relies on simple shapes to create such a dramatic feel.
Your finished piece will have a wonderfully watchful and tranquil vibe.
26. Build Crossed Arrows Rustic Western Decor

Ever wanted a piece of rustic decor that feels meaningful? This project delivers that with its symbolism of friendship and unity. I love starting with two lengths of reclaimed wood for the authentic look. Shape arrowheads and fletching from the same piece, then assemble everything with strong wood glue and clamps. Crossing and securing the finished arrows creates a stunning focal point.
It is a deeply satisfying piece to hang. For a different kind of hands-on project, you might enjoy these creative holiday craft projects.
27. Outline a Simple House Outline Home Sign

Ever feel like your entryway needs a personal touch? This project is your answer. It is all about creating a minimalist house shape paired with the word Home on your chosen material. I love using reclaimed wood for a rustic feel, but canvas or acrylic work great too. The real fun is in the application. You can paint it freehand, use a vinyl decal, or even try wood burning for texture.
Isn’t it satisfying to make a piece that so clearly says welcome? Feel the pride of creating a custom home accent.
28. Create Dandelion Seed Floating Radial Art

Ever looked at a dandelion puff and wished you could capture its delicate flight? This project does exactly that, and it is surprisingly simple. The secret is arranging the fluffy seeds in a perfect radial pattern from a single center point. I love how it creates such a light, airy effect that feels like magic. Use fine-tipped tweezers to gently place each seed onto tiny dots of clear glue along your sketched guidelines. Work in small sections so the adhesive does not dry. The radial symmetry is inherently pleasing, making your finished piece look balanced and beautiful. You will feel so proud when you see those seeds appear to float.
29. Make a Musical Treble Clef String Design

Ever wondered how to capture the flow of music in a craft? This treble clef design is surprisingly simple to nail down. You start by hammering small finishing nails along the outline of your printed template on a wooden board. Then, you weave your string back and forth to trace and fill that iconic shape. The geometric lines of the symbol are a perfect match for this tactile art form, creating a piece that feels both classic and personal.
Explore simple rock craft ideas for more rhythmic inspiration. Trust me, the process feels incredibly grounded.
30. Craft a Sunken Sea Shell Spiral Texture

Ever wondered how digital artists make shells look ancient and deep-sea worn? It is all about building layers. Start with a cool-toned base, then define the spiral with shadows and highlights. The real magic happens when you add subtle weathering and organic growth. I love using a textured spatter brush for that authentic pitted look.
Why does this work so well? It gives your art a story and a sense of place, making it feel real. Keep your colors muted and your touches light for a truly sunken feel.
Preserving Texture With Protective Spray Finishes
One layer of a matte clear coat takes two minutes to apply and locks in weeks of careful work. The good news is that a protective sealant does more than guard against dust. It also defines the final character of your piece by either enhancing or muting the natural texture of the thread. You will notice that a matte finish preserves the tactile, woven look of the strings, while a gloss can make the colors appear more saturated.
Apply the spray in a well-ventilated area using light, even passes. Let each coat dry fully. This final step ensures your tension and density work remains pristine, preventing any accidental unraveling or discoloration over time.
Conclusion
The best part about string art is how a handful of simple materials transforms into something uniquely yours. Each line you wrap builds not just the image, but a quiet moment of focus and creation. My advice is to start with a pattern that truly speaks to you, even if it feels a bit ambitious. The process is forgiving, and the satisfaction of finishing is immense. Pick your next favorite from our curated diy string art ideas list, and watch it become the perfect focal point in your favorite room.
FAQs
Q: What is the best type of wood to use for string art?
A: A solid, sanded softwood like pine or basswood is ideal. It holds nails securely without splitting and provides a smooth surface. Avoid particle board as it does not grip nails well over time.
Q: How do I keep my string art from getting loose or saggy?
A: Maintain consistent tension as you wrap. Pull the string firmly but do not over-stretch it. Use a sturdy board and ensure all nails are hammered to the same depth for an even anchor point.
Q: Can I use regular sewing thread for string art?
A: Sewing thread is too thin and fragile for this craft. Embroidery floss or crochet thread works much better. They are stronger, come in many colors, and create a more visible, substantial line.
Q: How do I transfer a complex pattern onto the wood?
A: Print your design and tape it to the board. Hammer nails directly through the paper along the pattern lines. Once all nails are in place, carefully tear the paper away to reveal your guide.
Q: What is a good beginner-friendly string art project?
A: Start with a simple shape like a heart, star, or monogram. These use fewer nails and straightforward string paths. A geometric design within a simple shape is also a great way to practice tension and layering.


