


Essential Drawing Supplies
Grab a regular pencil and a clean eraser. The pencil should have a sharp point for drawing the thin lines of your star. A clean eraser is important for removing your first guide lines without smudging the dark final lines. You will also need a sheet of plain paper. A smooth paper surface helps you draw the straight lines for the star more easily and erase cleanly.
The Two‑Stage Drawing Method for Success
We will build your star in two clear stages. First, you will draw very light, simple guide shapes. These light lines act like a map for your drawing hand. After the map is set, you will draw the bold, dark lines of the star right on top. The final step is to carefully erase those light guide lines. This light‑first‑then‑erase method gives you a clean, confident star every time.
1. Mark the Center Point as Your Invisible Structural Anchor

This first step creates the anchor point that every other line for your star will connect to. Learning how to draw a star begins with this simple center dot. Find the middle of your paper. Use a sharp H or HB pencil and barely touch the paper. Make one tiny, light dot right in the center. This dot is your guide, so keep it very faint. Do not press hard. Pro tip: Hold your pencil at an angle rather than straight up so the lines stay light and easy to erase later; this is a helpful technique for kids learning to draw. For more practice with simple shapes, try this guide on drawing stars. For more free resources, check out these simple drawings to practice.
2. Guide Lines: The Invisible Scaffolding Every Great Drawing Needs

This first step creates the light guide lines that will help you draw a perfect star – another essential part of how to draw a star accurately. Place your paper in front of you to begin your fun drawing adventure. Pick up a sharp pencil. Hold it near the end and use very light pressure. Draw a small dot in the middle of your paper. This is your center point. From this dot, draw a straight line going up. Keep the line light and short. Now draw another straight line from the center dot going down. These two lines form your vertical guide. Next, draw a line from the center going left, and another going right. You should now have a light plus sign on your paper. This is your basic framework for creating fun designs. Pro tip: If you press too hard, the lines will be hard to erase later. Hold your pencil loosely so the marks barely show. For more practice with simple shapes, try this guide on drawings to practice for beginners.
3. Draw the Intersecting Diagonals to Form Your Bottom Points

When you understand how to draw a star, you know that intersecting diagonals create the lower points naturally. Pick up your pencil. Draw a straight line from the top left corner of your hexagon down to the bottom right corner. Do not press hard. Next, draw another straight line from the top right corner down to the bottom left corner. These two lines should cross in the middle of your shape. Look at the bottom of your drawing. You will see two new points where the lines meet the hexagon’s sides. These are the bottom points of your star. For more practice with simple shapes, try this guide on simple drawings to practice. Pro tip: If your lines look messy, try moving your pencil in one smooth motion from corner to corner instead of making lots of short strokes.
4. The Symmetrical Silhouette: Outer Lines That Define the Shape

This step turns your guidelines into the actual star outline. Mastering how to draw a star means committing to symmetrical outer lines. Place your paper in front of you. Draw a small dot in the center of the paper. This is your guide point. From this center dot, draw a short line straight up. Keep your pencil pressure very light. Now, draw a short line straight down from the same center point. Your paper now has a light vertical line. This is your axis of symmetry. From the center, draw a short line to the left. Then draw a matching short line to the right. You should see a light plus sign. These lines are your guides for perfect balance. Pro tip: To check your symmetry, hold your drawing up to a mirror. The reflected image will make any lopsided lines easy to spot and fix. For more practice with balanced shapes, try this guide on Learn how to draw a snowflake with this step-by-step guide that kids will love..
5. Erase Your Inner Guidelines to Reveal the Clean Perimeter

You have your star shape, but it is surrounded by the light lines you used to build it. This step cleans up those lines to show your final star. A clean erasing technique is a vital part of how to draw a star successfully. Take your kneaded eraser and pinch it into a point. Use gentle, short strokes to erase the light lines inside the star. Move from the star’s outer edge toward the center. Do not rub over your dark outer lines. Erase the small lines that meet at the center of your shape. This leaves only the clean, crisp outline of your star. Pro tip: If a guideline is hard to erase, lift the graphite by pressing your eraser down and lifting it straight up instead of swiping. This method keeps your dark lines safe. For more practice with clean shapes, try this guide on how to draw a snowflake.
6. Permanent Ink: The Final Border Defining Your Sharp Points

Now you will make the permanent outline that defines the sharp shape of your star. This is where how to draw a star becomes permanent and confident. Pick up your fineliner pen. Start at the top point of your star. Draw one straight line down and to the right, stopping your pen just before it reaches the next corner. Lift your pen. Start again at that same top point. Draw another line down and to the left, stopping short of its corner. To connect these lines and make a sharp point, place your pen tip where the two lines almost meet. Draw one short, confident stroke to join them. Repeat this stop‑and‑connect method for all five points of your star. Keep your hand moving and use light pressure so the ink does not pool. Pro tip: To keep your points sharp, do not go back over an inked line. Drawing over it a second time makes the line look blurry and can cause the tip to lose its sharpness. For more practice with clean lines, try this guide on examples of line drawing art.
7. Apply Light Hatching on One Side to Establish Volume
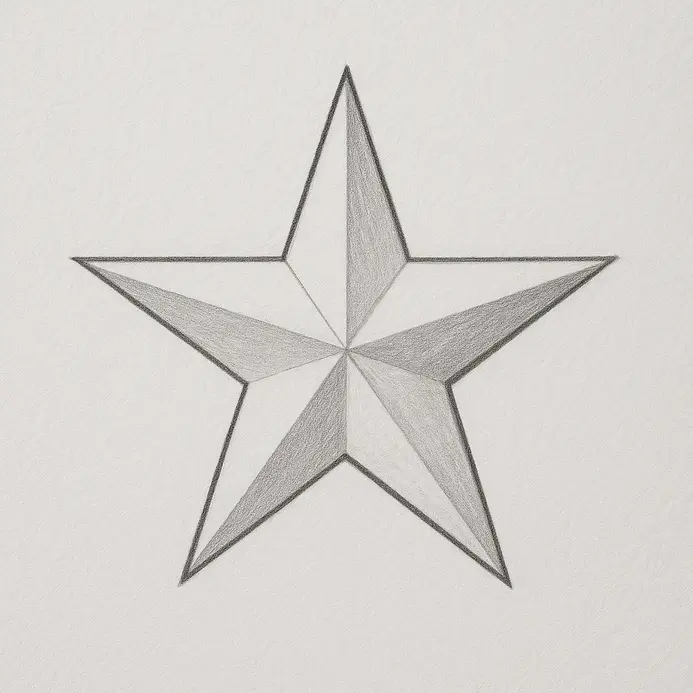
Now you will make your star look solid by adding a shadow to one side. Even after learning how to draw a star, shading adds the final polish. Pick a side of your star to be the shadow side, as shown in this helpful video. Imagine a light is shining from the opposite side. Using a light pencil, draw many straight, thin lines close together on the shadow side. Start these lines from the outer points and draw them inward toward the center; this is a fun step in the drawing process. Make the lines longest near the star’s points and shorter near the center. Press very gently so the lines are faint. Leave the other side of the star completely white. Pro tip: Hold your pencil near the end, not close to the tip, to help you keep your pressure light and even. This tutorial on simple drawings to practice is great for building your shading skills.
8. Bright Flat Colors That Bring the Polished Surface Alive

This step adds fun color to your star. A solid understanding of drawing stars is essential for creating beautiful artwork. how to draw a star gives you the confidence to experiment with bright pigments. Place your pencil tip in the middle of your paper and press down to make a small dot. This is your star’s center. From this dot, use a ruler to draw five straight lines outward, like spokes on a wheel. Space them evenly around the center dot. At the end of each line, draw a small dot. Now, connect every other outer dot with a straight line. You should see a five‑pointed star appear. Go over these main lines with a bit more pressure to make them clear and dark. Pro tip: If your star looks lopsided, check that the distance from the center to each outer dot is the same. This helps you create a balanced shape. For more practice with basic shapes, try this guide on simple drawings to practice.
Solving Common Star Drawing Problems
If your star looks lopsided, try turning your paper upside down to spot uneven sides. If the star’s arms look skinny, make your center guide shape smaller before drawing the points. If your pencil lines are too dark to erase, press much lighter when drawing your first guide map. If the points don’t meet in the middle, draw each line from the tip of the point all the way to the center dot without lifting your pencil.
Conclusion
You have successfully completed learning how to draw a star. Recognizing the invisible geometric logic behind this beloved five pointed shape ensures sharp angles correctly proportioned around a stable axis. The structural approach you practiced reinforces the importance of using light scaffolding marks before committing to final permanent lines. Try recreating the symmetry from memory to test your spatial reasoning without referencing the visual guide, or experiment by deliberately lengthening the outer point arms to vary the overall structural proportions. These simple modifications build lasting creative confidence and help kids enjoy the drawing process. Using the same underlying radial logic, attempt sketching a symmetrical sunburst or intricate geometric snowflake as your next artistic challenge. Display your finished piece on a physical bulletin board or personal portfolio viewer to show off your newly refined technical precision and solid drawing habits.
FAQs
Q: How do I draw a basic five-point star as a starting point?
A: Begin by drawing a simple pentagon or use a five-point guideline: mark five evenly spaced points on an invisible circle, connect every second point to create the classic star figure. This step-by-step tutorial approach helps as a starting point for proportion and symmetry; practice the outline in your sketchbook before inking or coloring.
Q: Can I follow a step-by-step tutorial if I’m a complete beginner?
A: Yes, a step-by-step tutorial is ideal for beginners. Look for guides that break the process into clear stages—placing guide points, drawing light construction lines, connecting points, refining the shape, and erasing guidelines. You can follow these steps in a sketchbook and repeat the sequence until it feels natural.
Q: Are there video tutorials or YouTube channels you recommend for drawing stars?
A: Many artists post video tutorials on YouTube that demonstrate drawing stars in real time, showing hand movement and corrections. Search for channels that offer clear narration and pause-friendly pacing; you can follow along, pause, and rewind as needed to match your drawing speed.
Q: How can I turn my star drawing into a coloring page or printable PDF?
A: After inking a clean line drawing of your star, scan or photograph it and convert to a high-contrast image. Use simple image editing to remove background noise, then save as a PDF for printing. This creates a coloring page you can share or post on a website or social feed.
Q: What’s the best way to practice different star designs in a sketchbook?
A: Dedicate a page to variations: try filled stars, outlined stars, stars with decorative elements, and different proportions. Number each attempt and note what you changed. Using a sketchbook helps track progress and provides a visual reference figure for future posts or tutorials.


