


What You Will Need
Keep your workspace organized with a standard HB pencil, since this graphite grade produces easily visible guidelines. Place a soft eraser nearby for quick corrections, and select a clean sheet of drawing paper. An optional wooden ruler assists with establishing straight initial axes, while a fine-tip ink pen helps define final outlines. Colored pencils remain entirely optional if you prefer a finished illustration with subtle tonal variations.
How to Use This Step-by-Step Tutorial
Complete each phase sequentially because every layer establishes the foundation for the following stage. Light construction marks receive careful attention early, allowing you to erase them cleanly once the final structure takes shape. Uneven early lines remain completely normal during initial practice attempts. The systematic approach transforms basic geometry into recognizable anatomy while maintaining a calm workflow.
1. Draw The Centerline And Placement Guide
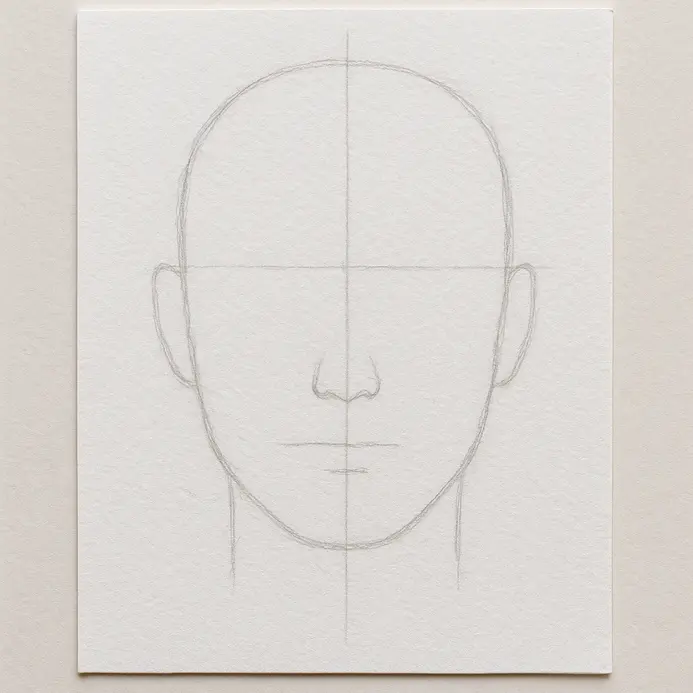
Start every portrait sketch by establishing a reliable foundation for facial symmetry. You will not define specific cartilage details or apply shading during this initial phase. Setting accurate coordinates guarantees proper alignment across the entire facial structure. Mastering how to draw a nose begins with establishing these invisible architectural guides. Apply minimal graphite pressure to your writing instrument and locate the exact midpoint of your canvas. Sketch a faint vertical axis that will guide every subsequent proportion measurement. Block in a subtle wedge shape around this central marker to indicate where the upper bridge and lower base will eventually sit. Keeping these preliminary marks extremely light prevents dark graphite strokes from interfering with your final rendering. Maintain minimal pencil pressure during this foundational stage to ensure effortless corrections later. Faint construction marks disappear cleanly when you finish the structural outline. You need clear visibility before committing to permanent ink lines while practicing how to draw a nose accurately.
2. Sketch The Nose Tip Circle

Transition from simple flat geometry into recognizable three-dimensional volume during this stage. The lower facial region requires careful spatial planning to establish accurate depth and forward projection. A spherical guide transforms flat marks into convincing anatomical mass. Understanding how to draw a nose relies heavily on treating each feature as interconnected geometric solids. Locate your preliminary horizontal axis and position a circular form directly across your vertical center marker. Match the diameter to the estimated distance between the inner eye corners you plan to render later. Tilt the circular shape slightly downward to align with the natural facial plane. Remember to maintain extremely light graphite contact with your paper surface throughout this process to accurately render the realistic nose. Treat this construction shape like a tilted sphere suspended in three-dimensional space rather than a flat disc. Adjust the sphere toward the outer cheek when rendering angled portraits to generate instant perspective of the bridge of the nose. This deliberate spatial offset creates convincing volume from the earliest moments of your study, which remains essential when learning how to draw a nose with proper anatomy.
3. Add The Curved Nostril Shapes

Move from basic structural mapping into recognizable organic detailing during this phase. Your initial geometric foundation transforms into recognizable cartilage anatomy once you place these openings accurately. You are now adding the curved voids that wrap around the central volume you constructed earlier. Recognizing how to draw a nose requires paying attention to subtle curvature rather than rigid geometric patterns. Sketch two soft, comma-like forms inside the lower left and right areas of your spherical guide. Treat them as gentle teardrops rather than rigid mathematical circles to maintain natural flow. The outer curve of each opening should arc inward from the fleshy wing, while the inner curve remains lighter near the facial midline. Remember to keep pencil pressure minimal so these lines remain fully adjustable. Avoid creating perfectly mirrored openings unless you are practicing strictly frontal portraiture. The viewer-facing opening appears slightly wider and more open, while the distant opening compresses into a gentle crescent sliver. This purposeful asymmetry generates instant realism in your final piece, which remains crucial when mastering how to draw a nose without flat symmetry.
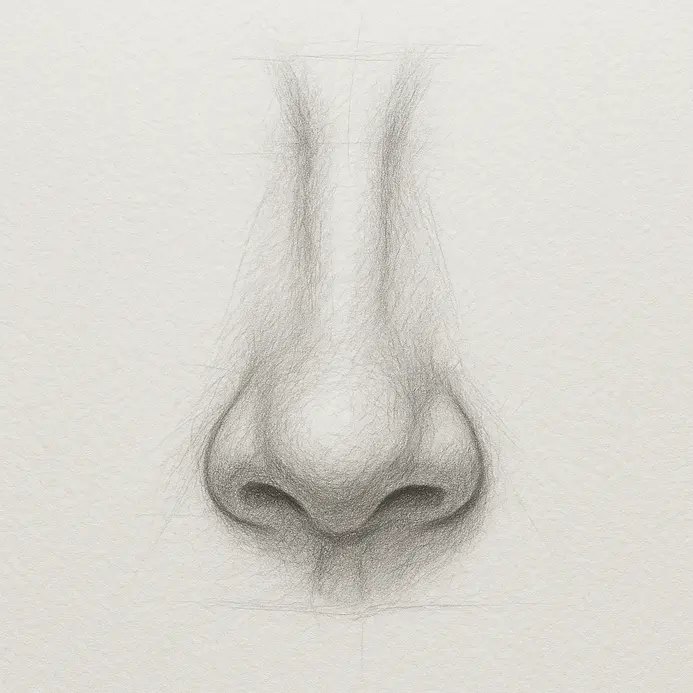
4. Shape The Nose Wings Beneath The Tip

Define the lateral tissue that connects the central tip mass to the surrounding cheek structure, which is an important part of the nose. These fleshy curves establish the outer boundaries that frame your previous cartilage work. Adding these transitional forms transforms a basic geometric exercise into believable facial topography. Students learning how to draw a nose often find this stage separates rough sketches from polished artwork. Trace a soft, downward sweeping line starting from each opening and extending outward toward the facial edge. Strengthen the middle portion of each sweep while allowing both ends to fade seamlessly into your underlying guides, particularly around the bridge of the nose. Add a parallel secondary curve just outside the primary stroke to indicate subtle cartilage thickness on the side of the nose. Maintain light graphite pressure to prevent harsh outlines from dominating your composition. Never draw perfectly closed circles or rigid dark borders around this anatomical region. Allow the tissue edges to emerge through light, repetitive gestural marks that follow natural curvature. Explore more organic shading techniques by reviewing our collection of aesthetic drawing ideas for additional inspiration. Practicing this delicate transition directly supports your overall goal of understanding how to draw a nose with anatomical precision, particularly the shape of the nose.
5. Refine The Bridge Lines With Soft Edges

Soften your initial construction marks to establish smooth tonal transitions along the central facial axis. Refining these upper boundaries transforms sharp guidelines into believable cartilage edges. You will achieve a natural three-dimensional appearance by carefully blending the graphite into the surrounding paper surface. Following a systematic workflow guarantees you will consistently improve at learning how to draw a nose with professional results. Trace your upper guide lines with lightweight feathery strokes, gradually reducing pressure as you move toward the outer boundaries. Blend the graphite outward using a paper blending tool to create seamless transitions into the adjacent forehead and cheek areas. Apply gentle circular motions to dissolve harsh marks while preserving the central structural ridge. Digital artists achieve identical results by lowering brush hardness settings to simulate traditional blending. Maintain a faint definition along the exact center ridge to prevent the facial structure from appearing completely flat. Over-blending eliminates necessary contrast, so preserve the subtle core values that communicate depth in the wings of the nose. Keeping these upper boundaries soft yet defined ensures your final study maintains anatomical credibility throughout.
6. Erase The Hidden Construction Marks Cleanly

Remove the underlying geometric scaffolding to reveal your refined anatomical study. This cleanup phase elevates a rough draft into a polished illustration ready for final detailing. Eliminating stray construction lines clarifies every curve and shadow boundary for maximum visual impact. A focused approach ensures you complete each phase of understanding how to draw a nose without residual graphite interference. Shape your kneaded eraser into a sharp point or tight wedge to target specific unwanted marks. Gently lift the graphite by pressing and rolling rather than dragging to protect the paper surface. Address stubborn remaining marks with a sharp vinyl eraser using short, controlled strokes that avoid aggressive scrubbing. A small precision shield protects your finished contours while you remove nearby preliminary guidelines. Apply repeated light passes instead of heavy single strokes to prevent paper fiber damage and preserve your refined lines. Clean your kneaded eraser frequently by kneading it back into a smooth mass for consistent performance. This careful cleanup process prepares your sketch for permanent ink application while maintaining surface integrity.
7. Ink The Final Nose Contours Carefully

Transfer your refined graphite study into permanent line work using controlled pen strokes. This commitment phase locks your anatomical research into crisp, definitive boundaries. Careful inking separates practice sketches from portfolio-ready illustrations by emphasizing the planes of the nose. Developing confident line control accelerates your overall progress when mastering how to draw a nose for long-term artistic growth. Examine your composition through a mirror or inverted orientation to catch hidden symmetry errors before applying permanent ink. Select a 0.1 millimeter fine liner and begin tracing the central vertical axis from the brow bridge downward to define the ball of the nose. Increase your line weight slightly along the lateral plane breaks to distinguish front-facing light catch from shadowed sides. Outline the lower tip mass and opening boundaries using single, continuous strokes that follow the natural curve of your underlying geometry. Test your pen on scrap paper to verify consistent ink flow before touching your illustration. Execute each contour with deliberate confidence because hesitation produces unwanted wobble. Varying your stroke thickness between delicate central highlights and heavier outer boundaries generates instant three-dimensional depth. Committing to permanent line work finalizes your preparation for advanced rendering techniques.
8. Shade The Bridge And Tip For Form
Introduce gradual value transitions to communicate light direction and surface curvature throughout the form. Strategic shadow placement transforms basic outlines into convincing volumetric mass. Layering dark and mid-tone graphite strokes simulates realistic cartilage thickness and tissue depth. Applying structured shading remains the final critical phase when studying how to draw a nose with professional realism. Designate a top-left light origin and block in faint curved strokes along the bottom-right bridge contour to enhance the shape of the nose. Build mid-tone density gradually using directional crosshatching that follows the cylindrical surface geometry. Leave the top-left ridge bright to preserve maximum highlight impact. Blend these value transitions gently to eliminate abrupt jumps between shadow and light areas. Introduce subtle reflected light near the base of the deepest shadows by lightly lifting graphite with a clean eraser tip. Sketch a soft cast shadow extending from the lower tip boundary to anchor the feature against the facial plane, especially around the wings of the nose. Maintaining gradual value shifts prevents flat, lifeless rendering. Directing every graphite stroke along the surface curve guarantees convincing three-dimensional volume.
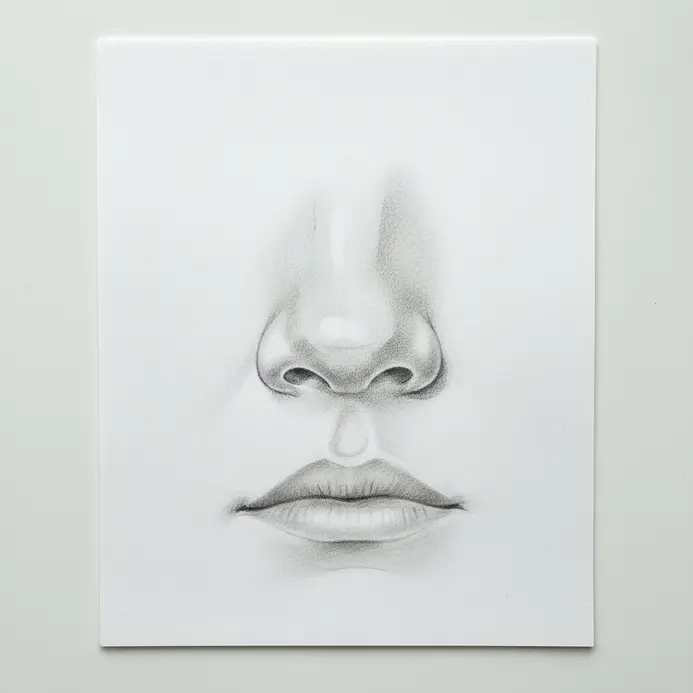
9. Add Soft Skin Tones To Finish

Apply subtle color layers to transform your structural study into living tissue. This finishing stage introduces temperature variations that mimic natural blood flow and skin transparency. Layering translucent washes bridges the gap between geometric construction and believable portraiture. Adding realistic color temperature completes the process and demonstrates how to draw a nose with lifelike warmth, enhancing the ball of the nose. Select a mid-tone peach base and sweep a translucent wash across the entire structure using minimal pressure. Dilute this base with cool mauve or pale blue to formulate shadow mixtures. Apply these cooler shadows exclusively beneath the tip and along the outer wings to maintain accurate local temperature relationships. Introduce warm off-white touches along the highest bridge ridge and tip crest to simulate directional light reflection. Blend each color layer thoroughly until no harsh boundaries interrupt the transition zones. Traditional artists use soft paper stumps, while digital creators apply airbrush blending modes for identical smoothness. Allowing underlying reds and yellows to show through the thinner tissue areas generates convincing biological realism. Explore additional stylized approaches by reviewing curated anime drawing ideas for complementary rendering workflows.
Tips to Improve Your Drawing
Execute multiple practice rounds without referencing your original guide sheet to reinforce muscle memory and spatial awareness. Dedicate additional repetition to the most complex transitional zones where curvature shifts rapidly between planes. Scale your practice sketches larger and smaller to verify proportional consistency across different compositions. Attach a simplified background or basic facial outline to test how the central structure integrates with surrounding features.
Conclusion
You completed a structured facial feature study built on geometric placement, controlled line refinement, and gradual tonal layering. This exact methodology transfers directly to rendering eyes, lips, and ears with equal precision. Repeating the exercise from memory strengthens your internal visualization skills while varying angles confirms structural mastery. Applying these techniques prepares you for full portrait rendering and ensures you consistently succeed whenever you approach how to draw a nose with professional results.
FAQs
Q: How can I easily draw the nose step by step for a portrait drawing?
A: A simple way to draw the nose step by step is to start with the basic structure: sketch three circles to map the tip and nostrils, add a vertical line for the septum and light lines to define the nose bridge and brow bone, then refine the top and bottom planes. Step 1: block in basic shapes. Step 2: define the main parts of the nose and nostrils. Step 3: start shading with the lightest tones and middle grays. Step 4: blend with a blending stump and add darker shades for the bottom of the nose and areas that protrude. This method lets you learn to draw a nose in simple steps and makes drawing noses easier.
Q: What is the best way to draw the nostrils without making the nose look flat?
A: To draw the nostrils without flattening the nose, treat them as part of the bottom planes and avoid hard dark holes. Use soft shading around the nostril edges, define the septum subtly, and show how the nostril curves into the tip of the nose. Emphasize roundness and the way the upper side and bottom of the nostrils catch light. Lines to define should be minimal; use shades of gray and blending to give depth so every nose looks believable.
Q: How do I draw a nose from any angle, like profile view or frontal view?
A: Practice the construction of the nose using basic shapes and flat planes. For a frontal view, focus on symmetry and the three main parts: nasal bone at the top, nose bridge, and bottom planes including the tip of the nose and nostrils. For a profile view, map the bone at the top and the protruding tip, and remember the septum and the way the nose and the septum affect the silhouette. Learning to draw the nose from any angle becomes easier when you simplify the nose into movable parts and draw from life as much as possible.
Q: What are the main parts of the nose I should study to draw realistic noses?
A: The main parts of the nose to learn are the nasal bone and bone at the top, the nose bridge, the septum, the tip of the nose, the nostrils, and the bottom planes that connect to the face. Studying how these areas of the nose relate in frontal view and profile view helps you with the basic structure. Once you understand these parts and how light falls on them—from the upper side and top of the nose to the bottom of the nose—you can draw realistic noses more consistently.
Q: Can I draw a nose that faces the light easily, and how do I render the highlights?
A: Yes. When the nose is facing the light, observe where the lightest highlights fall on the top of the nose, tip of the nose, and the upper side of the nostrils. Start shading with light tones and gradually build midtones and darker shadows on the bottom planes and right side of the nose (or left, depending on the light). Use a blending stump to smooth transitions and keep the bright highlights crisp. This technique helps you show how light makes the nose look three-dimensional.


