


Preparing Your Workspace And Prime Surfaces
A stretched pre-primed canvas is your best friend for acrylics, as it gives you a perfectly taut surface to work on without needing extra steps. I suggest starting with a smaller size, like an 8×10 inch canvas, so you can finish your first painting in one sitting. Clear a flat, stable table and cover it with old newspaper or a plastic sheet.
You will need a jar of clean water for your brushes and a paper towel or rag for wiping them. Trust me, having this simple setup ready makes the whole process feel less messy and more inviting. This initial prep work sets you up for success by removing any small hurdles before you even pick up a brush. With your workspace ready, you’re all set to explore these easy canvas painting ideas.
Essential Acrylic Color Mixing Foundations
The fastest way to overwhelm yourself is by opening a giant paint set with fifty colors. You only need six tubes to start: red, blue, yellow, titanium white, mars black, and maybe a pre-mixed green. Squeeze a pea-sized amount of each primary color onto your palette, leaving plenty of white space between them. The good news is, acrylics are wonderfully forgiving for mixing.
You will notice that adding a tiny touch of white to any color creates a tint, while black creates a shade. Always start with the lighter color and add the darker one slowly. This fundamental approach lets you create a whole spectrum from a simple palette, teaching you color relationships without the frustration of muddy results. Mastering these basics will help you tackle all the easy canvas painting ideas ahead.
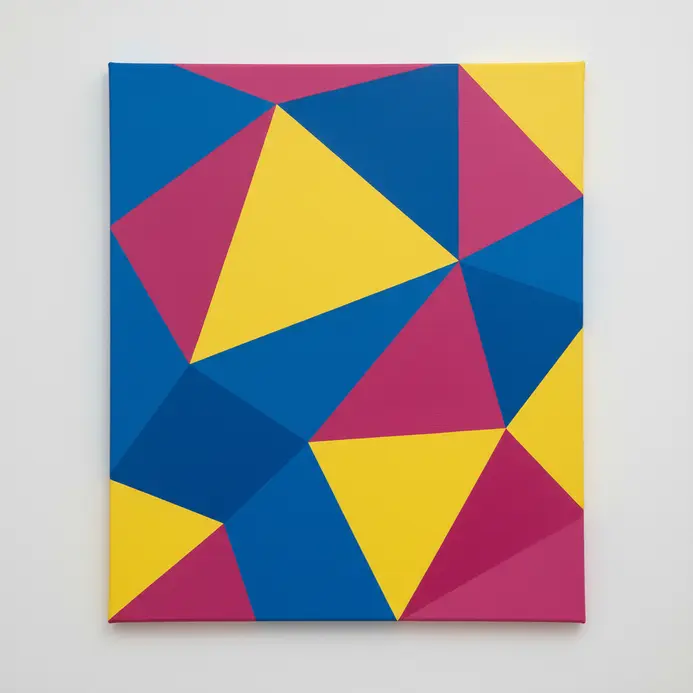
1. Paint a Minimalist Pastel Geometric Triangle Pattern

This one looks so modern and complex, but the secret is its simple repetition. You will create a clean pattern using a few soft pastel colors and just one basic shape. Start by sketching a few triangles on your canvas with a pencil, using a ruler for those crisp geometric lines to make it perfect for beginners testing out easy canvas painting ideas.
Trust me, limiting your palette is key to that soft, minimalist look. I love how this project feels both structured and soothing to paint. For a great way to practice this style on a smaller scale, check out these mini canvas painting ideas. Does that not look stunning when you step back?
2. Create an Acrylic Sunset Gradient Silhouette Palms
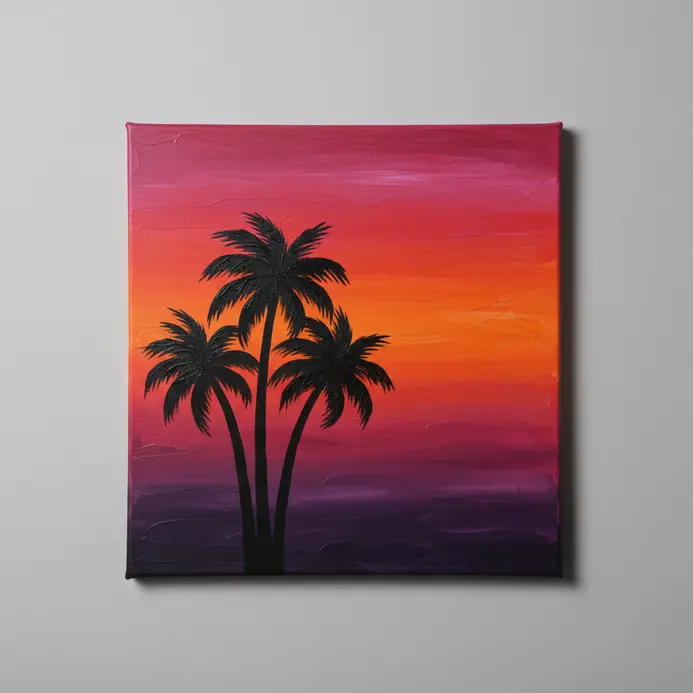
This one surprised me. It looks like a professional scene, but the technique is wonderfully straightforward. You will start by blending a gorgeous sunset gradient from yellow to purple using a large flat brush. Then, you paint your palm trees as solid black silhouettes against that bright sky.
I love how the sharp contrast makes the sunset glow pop instantly. The fast-drying nature of acrylics is perfect here, letting you layer the dark trees over the dry background without muddying your colors. Pro tip: use a small round brush for the trunk and a liner brush for those wispy fronds. Feel that tropical satisfaction when you step back and see your finished piece. It’s truly one of those easy canvas painting ideas that delivers a stunning payoff.
3. Build Palette Knife Impasto Textured Hydrangeas

Ever wondered how to get those lush, sculptural flower blooms? The secret is skipping the brush entirely and using a palette knife to scoop and spread thick paint directly. You will create each hydrangea petal cluster by pressing and twisting the knife to build up beautiful ridges and peaks. This technique lets you mix vibrant colors right on the canvas without muddying them.
I love how forgiving this is because hydrangeas are not perfectly symmetrical. The thick heavy body acrylics hold their shape beautifully, giving you a stunning, three-dimensional result that feels alive. For a great next step with your acrylics, explore these acrylic canvas painting ideas.
4. Apply a Metallic Gold Leaf Monogram Initial

Want to add a touch of elegance that looks far more complex than it is? This gilding technique is your secret weapon. You simply apply a tacky gilding size in the shape of your initial, wait for it to get sticky, then press on the delicate gold leaf. It feels like magic when that sheet transforms your canvas with a personalized, luxurious shimmer.
I love how this single detail can elevate a simple piece into something special. For a beautiful base to add your monogram to, try creating some easy flower canvas compositions first. Trust me, the final look is incredibly satisfying. This elegant touch makes it a standout among easy canvas painting ideas.
5. Capture a Watercolor Style Abstract Floral Wreath

Who would have thought an abstract floral wreath could feel so delicate and free? You are not painting realistic flowers, but suggesting them with soft blobs and simple shapes. Start with a faint pencil circle, then use the wet-on-wet technique to let translucent colors bloom into petals and leaves. It is all about layering light washes and leaving plenty of white space for that airy feel.
Trust me, the beauty is in the lack of pressure. You get to play with color gradients and organic shapes without any rules. Does that not sound like a relaxing way to create something beautiful? Let the paint do some of the work and feel the soft, ethereal payoff.
6. Mix a Neon Splatter Paint Galaxy Backdrop

This one looks like a chaotic, cosmic mess, but it is a total blast to make. Start by covering your entire canvas with a deep, dark base coat of navy blue or black to create your cosmos. Then, grab an old toothbrush and some neon acrylic paints.
Splatter the bright colors onto the dark background by flicking the bristles with your thumb, layering your stars and nebulae for depth. I love how the random, energetic splatters perfectly mimic a vibrant galaxy. Trust me, the contrast is everything here. The neon colors pop so dramatically against the dark base that it instantly feels otherworldly. For a polished look that builds on this technique, you might enjoy exploring oil painting on canvas for blending and depth. Does that not look stunning? It’s one of those easy canvas painting ideas where messing around leads to a masterpiece.
7. Stencil a Negative Space Tape Resist Chevron
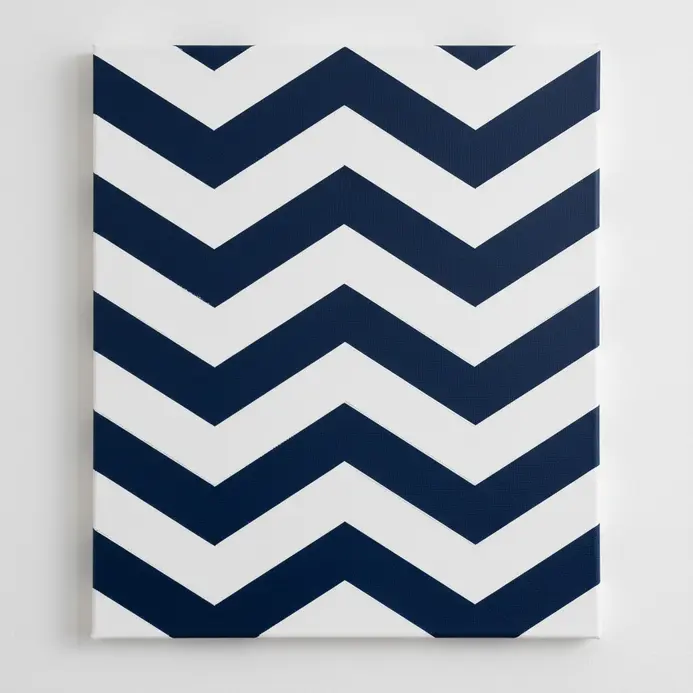
Ever wonder how to get those super crisp, graphic patterns on a tote bag or accent wall? This technique is your answer and it’s surprisingly simple. You’ll use strips of painter’s tape to block out a V-shaped chevron pattern, then paint all around it. When you peel the tape away, the original surface color shines through in a perfect, clean design.
The secret to no messy bleed is pressing the tape down firmly and using a dabbing motion with your brush. I love this method because it feels like a magic reveal every single time. For a totally different kind of clean, simple project, you might also enjoy these simple still life ideas.
8. Form a Pointillism Style Colorful Meadow Field

This one looks intricate, but trust me, it’s incredibly meditative and beginner-friendly. Start with a light pencil sketch to map out your meadow’s horizon and flower clusters. Then grab your dotting tools and begin applying tiny dots of pure color, letting them sit side by side instead of mixing on your palette. For depth, place a dot of orange next to a dot of blue in your sky.
Your meadow will seem like a jumble of dots up close, but step back and watch it magically blend into a vibrant, shimmery field. I love how this technique forces you to see color in a whole new way. Try it and feel the pride when your optical mixing creates a stunning landscape. This meditative technique is a hidden gem among easy canvas painting ideas.
9. Paint a Deep Sea Blue Whale Silhouette
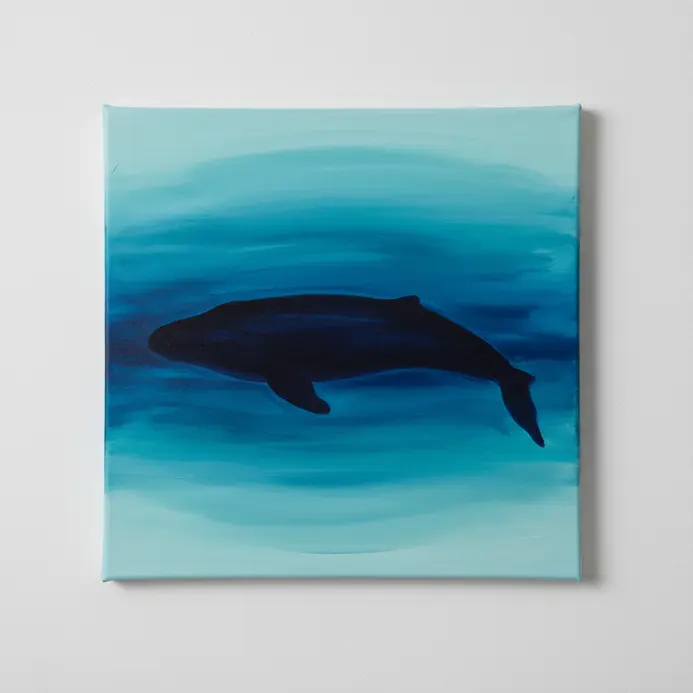
Ever feel like a painting needs to be complex to feel majestic? This silhouette proves otherwise. You will start by blending layers of deep sea blues like Ultramarine and Phthalo to create a luminous ocean background. Once that is dry, you paint a solid, graceful whale shape right on top.
The contrast is what makes it so powerful and serene. I love how this technique simplifies a massive subject into pure form. The key is a clean, flowing outline, so take your time with the initial pencil sketch using good reference photos. You end up with a piece that feels both tranquil and awe-inspiring. For a different kind of serene project, you might enjoy these whimsical painting concepts.
10. Block In a Monochromatic Forest Evergreen Tree Line

Ever felt daunted by painting a forest? This blocking in technique with one color makes it accessible. I always start by sketching a light horizon, then painting the whole tree line as a jagged, mid-tone shape. Add darker shades for closer trees to create instant depth.
It works because value does all the heavy lifting for form and distance. Try using a single tube of Payne’s Grey and just water to mix your values. Once you get the hang of it, you might enjoy tackling an easy lighthouse scene next. Isn’t it satisfying to see mood emerge from simplicity? These easy canvas painting ideas prove that less can truly be more.
11. Add Textured Sand to a Beach Ocean Shoreline

Ever wondered why some beach scenes look so real you can almost feel the sand? It is all about texture. Instead of painting one flat color, you will create variations for dry, damp, and wet sand using a roughness map to control the light reflection. I love adding small details like footprints or ripples with a normal map to give the surface believable depth.
This technique works because it mimics how real sand interacts with the environment, shaped by waves and wind. Trust me on this one, your shoreline will instantly feel more immersive and dynamic.
12. Sketch Whimsical Mushroom Stems on a Forest Floor
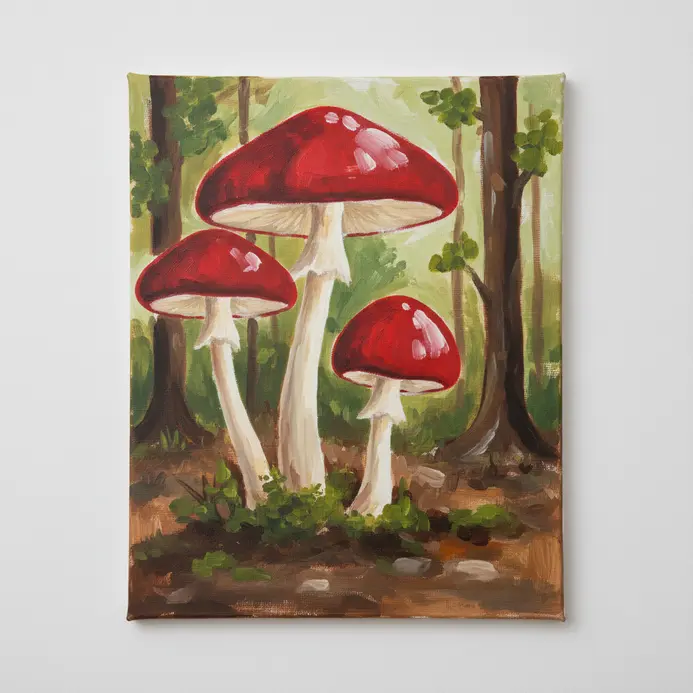
Ever looked at a forest floor and wanted to capture its hidden magic? This project is all about letting your pencil wander to create charming, personality-filled mushroom stems. I love starting by lightly sketching an undulating, uneven ground line to set the stage. Then, draw your stems using flowing S-curves and C-curves, making sure they are all different heights and thicknesses for that whimsical look.
Add character with little rings, fuzzy textures, or small knobs along the stems. The real payoff comes from overlapping a few stems to create a sense of depth in your sketch. It feels so satisfying to see a little world come to life on your page. Explore abstract canvas techniques.
13. Create a Bold Black and White Abstract Stripe

Who would have thought that a design built entirely on stripes could feel so dynamic and modern? I love this one because it embraces imperfection. You start with a canvas of pure white or black, then use a hard round brush to paint bold lines of the opposite color. Let your arm flow freely, creating stripes that vary wildly in width, direction, and length.
Let them overlap and intersect for real visual energy. Isn’t it satisfying how something so simple can have such a confident presence? Trust me on this one, and feel the creative freedom when you stop aiming for perfection.
14. Paint Lavender Sprigs with Impressionist Brush Strokes
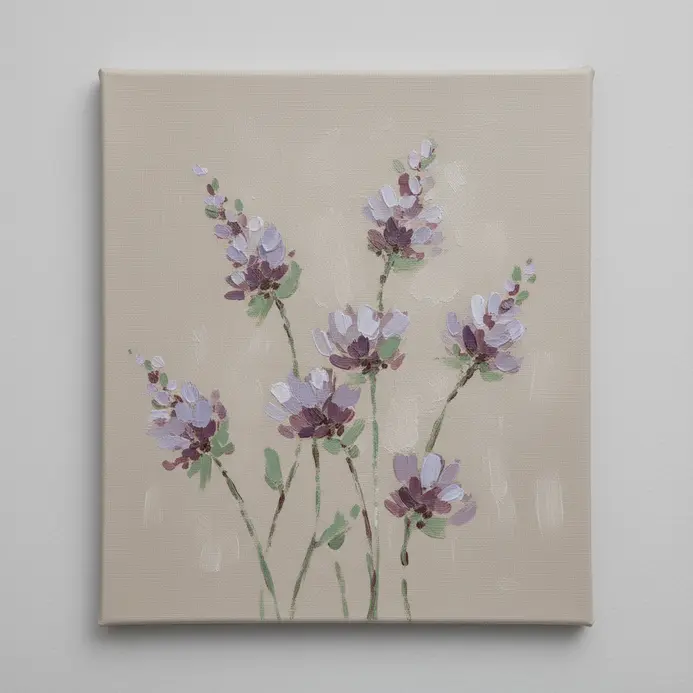
Who would have thought the soft, feathery look of lavender could be so beginner friendly? The trick is to let go of detail. Instead of painting every tiny floret, use small dabs of pure color side by side. Your eye blends them together, creating a shimmering mass of purple and green. I love this approach because it feels spontaneous and captures the light, not just the shape.
Start with a simple wash to block in your sprigs, then build up those vibrant dabs. Avoid the urge to over-blend on your canvas. Keep your strokes visible and your edges soft. Sound complicated? Trust me, it is not. Try it and feel the satisfaction of creating something truly impressionistic. It is perfect for small painting projects where atmosphere matters more than precision.
15. Outline a Vibrant Citrus Fruit Orange Slice
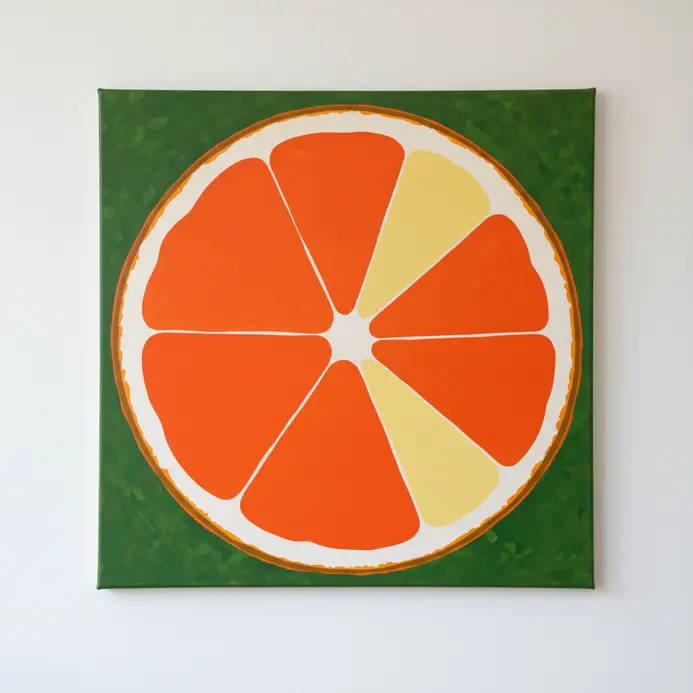
Does a simple orange slice sound too basic? Trust me, the magic is in the tiny details. Start by sketching that main crescent shape with a slight tilt for a more dynamic look. The key is using a varying line weight on the peel to suggest texture and light. Inside, draw those curved segment lines, then fill each one with clusters of tiny, irregular dots to show the juicy pulp.
Why does this work so well? It builds a perfect foundation for color, making your final painting look fresh and realistic. Try it and feel the satisfaction of creating a vibrant, juicy detail. For a different kind of vibrant scene, you can explore some cityscape canvas art as well.
16. Capture a Full Moon Nocturnal Landscape Silhouette

Ever wondered how photographers get that perfect shot of a huge moon behind a dark tree? This is a fantastic lesson in dramatic light and shadow you can use in your own work. You will need to plan your timing around the full moon phase and use a telephoto lens to make the moon appear large. Expose your camera for the moon’s brightness, which turns the foreground into a beautiful, crisp silhouette.
I love how this technique teaches you to create atmosphere with simple, bold contrasts. Try it and feel how powerful a single light source can be in your composition.
17. Blend a Soft Pink Cherry Blossom Branch

Who would have thought such a delicate-looking subject could be so beginner-friendly? Start by lightly sketching the flow of your gnarled branch. Then, block in your blossom clusters with a soft pink, focusing on their overall shape.
Here is the magic part. Build up thin layers of pale pink and white, adding a touch of deeper rose for depth. Use a soft round brush with a gentle touch to blend these colors into those dreamy, ethereal gradients. It is all about creating gentle transitions, not hard lines.
You will love the peaceful, graceful feeling this piece brings. The contrast between the fragile blooms and the sturdy branch makes it a beautiful, balanced piece. Explore minimalist painting concepts.
18. Paint a Rustic Wooden Barn Silhouette Horizon

Who would have thought a simple barn shape could create such a dramatic scene? This painting idea is all about contrast. You will create a soft, blended sky with warm sunset colors that fade into deep blues. Then, you will paint a solid, dark barn silhouette right against that glowing horizon.
The sharp outline of the barn makes the whole piece pop instantly. This works so well because you get to practice smooth blending without needing perfect details. I love how quickly this comes together once the sky dries. For a similar sense of peaceful drama, you might enjoy exploring celestial themed artworks too. Trust me, you will feel so proud when you step back and see your serene rural landscape.
19. Achieve an Abstract Fluid Marble Pour Effect

Ever wondered how those beautiful, swirling abstract pieces are made? This technique is a fantastic way to create stunning art without needing to draw anything specific. You’ll mix acrylic paints with a special pouring medium to get a smooth, flowing consistency, then tilt your canvas to let the colors blend and move into unique patterns. The magic happens when you add a drop or two of silicone oil to a few colors, which creates those amazing circular ‘cells’ that rise to the surface. It’s incredibly satisfying because you get to guide the paint, but the final organic design is always a wonderful surprise. Give it a try and feel the thrill of making something totally one-of-a-kind.
20. Stencil a Dotted Mandala Pattern Circular Design

Ever wondered how those intricate, perfect dot patterns are made? A stencil does the heavy lifting, giving you a precise guide for a gorgeous circular design. You simply dab paint through the cutouts using special dotting tools to build up the symmetrical pattern. The result is surprisingly meditative, and you end up with a piece that looks far more complex than the effort required.
I love the control this gives you. Work from the center out, layering different dot sizes and colors for amazing texture. The key is to use a repositionable spray adhesive on the back of your stencil to prevent any paint from bleeding underneath. Trust me, it makes all the difference for clean, sharp dots. Once you try this, you might find it’s the perfect relaxing project, and it pairs wonderfully with other creative approaches like collage art for canvas.
21. Sketch a Simple Red Poppy Flower
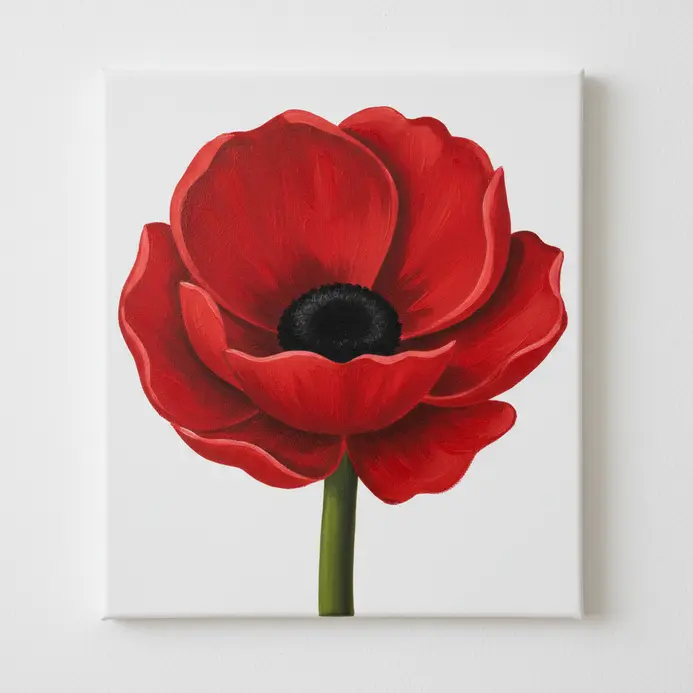
Ever wondered how to start a flower that looks organic, not stiff? The secret is in the center. Forget drawing a perfect circle. Instead, lightly sketch a slightly irregular oval where the seeds will be. Inside that, add a few tiny dots or a smaller circle for the stigma.
I love this approach because it immediately gives your poppy a natural, lively feel. Trust me, keeping your hand light here makes the whole drawing process flow better. This loose, squiggly bullseye technique works so well because it establishes the flower’s character from the very first step. It prevents that common beginner mistake of a rigid, unnatural center. For more inspiration on simple things to paint, you can always explore other easy subjects. Feel how satisfying it is to build from such a simple, confident start.
22. Paint Golden Hour Mountain Peak Reflections

Isn’t it amazing how a mountain’s reflection can look so real yet so different from the peak itself? For this serene scene, you will start by sketching your composition lightly, placing the horizon line and mountain silhouette off-center. The real magic happens when you block in the sky with a large flat brush, blending warm yellows and oranges near the horizon into cooler blues above.
When you paint the water, remember the reflection is not a perfect mirror. It will be slightly darker and less defined. I love mixing a bit of the mountain’s shadow color with the sky tones to get it just right. Feel that peaceful satisfaction when your golden hour glow settles over the whole canvas.
23. Add a Polka Dot Rainbow Confetti Design

Ever wondered how to make a painting feel like a party? This one surprised me, it looks complex but is wonderfully simple. You will start with a solid background and then use dotting tools to press colorful circles everywhere. I love letting the dots overlap and using all the rainbow colors for that festive, tossed-in-the-air look.
It works because the random, joyful energy is the whole point, and you do not need perfect circles to achieve it. Explore monochromatic painting concepts for contrast practice.
24. Blend a Cloudy Sky Dreamy Pastel Gradient
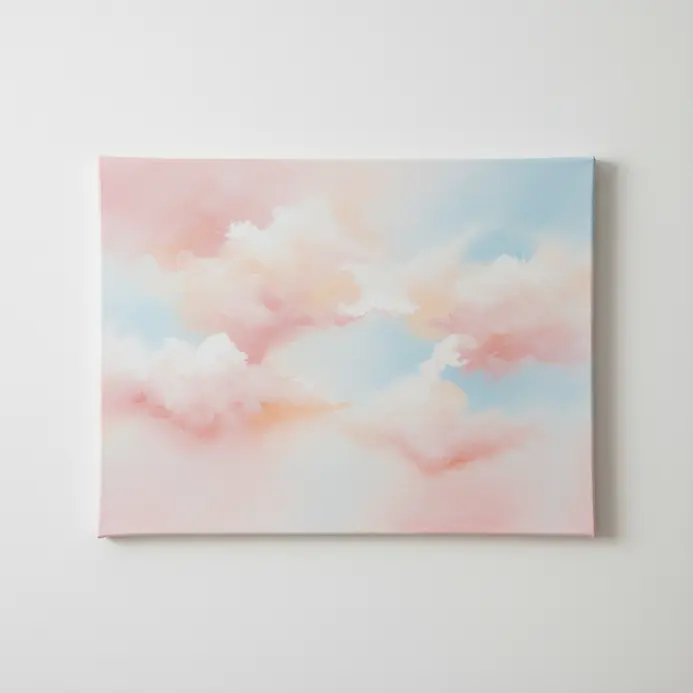
Ever wondered how digital artists create those impossibly soft, dreamy skies? This technique looks magical, but it is surprisingly simple once you know the trick. You will start by picking three to five complementary pastel colors, like a soft sky blue, a muted lavender, and a hint of blush pink. Then, you use the linear gradient tool in your software to blend them in a straight line, placing your colors in a logical order to avoid harsh lines.
I love how this creates an instant atmospheric background that feels calm and ethereal. The key is in your color selection; truly desaturated hues are what give it that dreamy quality. Try this gradient as a serene backdrop for a scene, like some lovely painted flower pot designs. Feel that sense of peaceful accomplishment when your colors melt seamlessly together.
25. Paint a Stylized Sunflower Close Up Macro

Ever feel like a flower is more about textures and patterns than just its shape? This painting zooms right in on a sunflower’s center, turning those detailed seeds and petals into a bold, abstract playground. I love starting with a light sketch of the main spiral and blocking in vibrant yellows and oranges for the petals. Use a small detail brush to exaggerate the seed patterns and add those fun, textured lines.
It works because you are not copying a photo, you are interpreting the energy of the flower. Trust me, the payoff is a piece full of life and your own artistic flair.
Applying Varnish For Long Term Protection
Wait at least seventy-two hours after your final brushstroke to let the acrylic paint cure completely. A single, even layer of matte acrylic varnish is all you need to lock in your colors and protect the surface from dust and UV light. Use a clean, wide, soft-bristle brush dedicated only to varnishing.
Work in one direction with smooth, overlapping strokes, and avoid going back over areas that are starting to dry. This final step takes only a few minutes but makes your painting look professional and ensures it lasts for years. You will be so glad you took this simple extra step to preserve all your hard work.
Conclusion
You started with a blank canvas and a bit of hesitation, and now you have a collection of beautiful, finished pieces. That is the real magic of these easy canvas painting ideas—they prove your creativity is already there, just waiting for the right project. For your next step, pick one of your favorites and paint it again on a larger canvas, or mix two techniques from different guides.
The best part of painting is that there is no final exam, only the next joyful experiment. I hope these easy canvas painting ideas have inspired you to keep painting and experimenting. Your artistic journey is just beginning, and each brushstroke adds to your unique story.
FAQs
Q: What type of paint is best for these beginner canvas ideas?
A: Student-grade acrylic paint works perfectly. It dries quickly, is easy to blend, and cleans up with water. Start with a basic set of primary colors, white, and black.
Q: Do I need expensive brushes to start?
A: A small pack of synthetic brushes is sufficient. Include a flat brush for large areas, a round brush for details, and a small angled brush for lines. A palette knife is useful for texture.
Q: How do I fix a mistake if the paint dries fast?
A: Paint a new layer over the area once the first layer is dry. Acrylic paint is opaque, so it covers previous layers well. You can also use a damp cloth to wipe away wet paint immediately.
Q: What is the easiest way to create clean lines and shapes?
A: Use painter’s tape to mask off areas. Press the tape down firmly, paint over it, and let the paint dry completely before peeling the tape off to reveal sharp edges.
Q: How can I make my painting look less flat?
A: Add visual interest with simple texture. Use a dry brush technique, dab paint with a sponge, or apply thick paint with a palette knife. Layering different shades of the same color also adds depth.


