


From Foundation to Masterpiece
Welcome to the vibrant world of miniature painting, where a detailed idea is the first brushstroke toward a masterpiece. While many guides offer broad categories or technique tiers, true inspiration often lies in the specific combination of advanced methods and artistic principles. This primer is designed to bridge that gap, providing the core concepts you need to understand before diving into a gallery of detailed miniature painting ideas. We’ll define the named styles and complex techniques that transform a base-coated model into a narrative-rich piece of art, setting the stage for you to explore specific visual concepts with confidence.
Decoding the Painter’s Toolkit
Before exploring specific ideas, it’s crucial to grasp the fundamental tools and theories that make them possible. This goes beyond simply knowing how to hold a brush. We’re talking about the artistic engine behind effects like glowing runes, shimmering swords without metallic paint, and the gritty, worn look of Grimdark. Understanding color theory informs your palette, while light theory dictates where shadows and highlights logically fall. Your approach must also adapt to the scale of your miniature and the material it’s made from. These are the foundational elements that separate a good paint job from a truly inspired one, and they form the essential vocabulary behind detailed miniature painting ideas.
1. Celestial Nebula Space Marine Painting Technique

Okay, picture this: you have a Space Marine who looks less like a soldier and more like a walking piece of the cosmos. How cool is that? The Celestial Nebula technique is one of those detailed miniature painting ideas built around transparent glazes that create beautiful, cloud-like colors on the armor, making it seem like the marine’s form is emerging from deep space. We’re not painting panels here; we’re creating a backdrop of stars and colorful gas. The magic is in the controlled randomness, where the colors flow organically without strict symmetry. It works because the slow build-up of thin, milky layers creates an ethereal glow you won’t get with regular opaque miniature paint. I always start by mapping out where I want my nebula clouds to drift, like across a shoulder pad or down one leg. A great tip is to use a soft makeup brush for the initial stippling; it gives you perfect, wispy cloud edges without harsh lines.
2. Volcanic Lava Daemon Painting Technique

Ready to create a piece that looks like it bubbled straight from the earth’s core using your miniature painting supplies? This technique is one of the most dynamic detailed miniature painting ideas because it blends sculpting with wild, fluid paint effects. We are not only painting a picture; we are building a tiny, textured volcanic landscape where the lava itself seems to form a sinister face or claw. It is all about controlled chaos, using gloss gels and alcohol to make paint flow and bubble like molten rock. Painters love this style because it lets them play with fire and form in a safe, satisfying way, resulting in a piece packed with terrifying life. My top tip is to mix your fluid acrylic paints with gloss heavy gel to get that perfect, gooey lava consistency before you start pouring it over your textured base.
3. Deep Sea Bioluminescent Aelf Painting Technique

Okay, picture this: you’re not only painting a miniature, you’re cultivating an entire glowing ecosystem on a tiny scale. The Cerulean Lumen Technique sits among the boldest detailed miniature painting ideas because it uses living, bioluminescent organisms as your actual paint. We’re talking about dinoflagellates that flash blue-green on command and bacterial gels that glow with a continuous, eerie light. You cultivate these living pigments and apply them to special substrates like treated chitin or hydroid meshes to create art that breathes and changes. It transforms your painting from a static display into a living, temporal experience. The real magic is in the piezoelectric stylus, a tool that uses tiny electrical charges to trigger specific flashes and patterns in your luminous cultures. A fun tip is to start with simpler bacterial gels on a small plate before trying the full multi-organism symphonies.
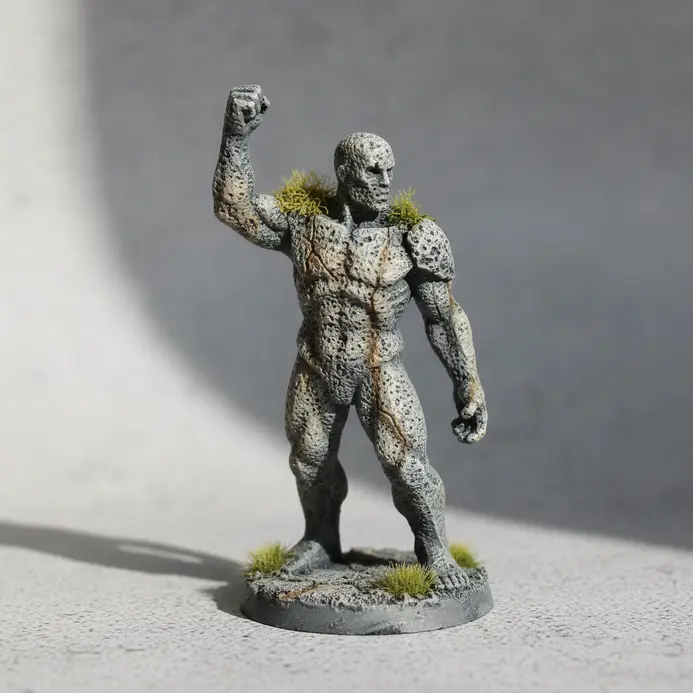
4. Ancient Moss-Covered Undead Painting Technique

Okay, get ready to give your miniature a backstory that spans centuries. This is one of those detailed miniature painting ideas focused on a figure that looks forgotten in a damp crypt, with nature slowly reclaiming it. We’re talking about applying crackle mediums and textured pastes to simulate deep cracks, then layering in eerie greens and browns for moss and decay. You’ll build up thin glazes of terre verte and burnt umber to make the undead flesh look ancient and water-damaged. It tells a visual story about time and decay on a single, tiny model. A fantastic tip is to mix a little baking soda into your green texture paste for a gritty lichen effect, adding a little extra realism to your work. It adds an organic touch that sells the whole concept.
5. Autumn Forest Sylvaneth Painting Technique

Picture your Sylvaneth model glowing with the warm light of a perfect fall afternoon. We are going to layer up those bark textures with rich browns and hit them with warm orange glazes to make them look like ancient, sun-drenched trees. The core idea is to build from a dark base color up through progressively lighter, warmer tones, which makes all that sculpted texture pop. This works so well because it tricks the eye into seeing real depth and captures that seasonal feeling many painters love. It also stands out among detailed miniature painting ideas because the effect depends on texture control as much as color choice. My favorite tip is to use a heavy dry brush with a color like Skrag Brown over your mid-tones before applying a super thin glaze for that final autumn warmth.
6. Grimdark Industrial Battle Damage Painting Technique
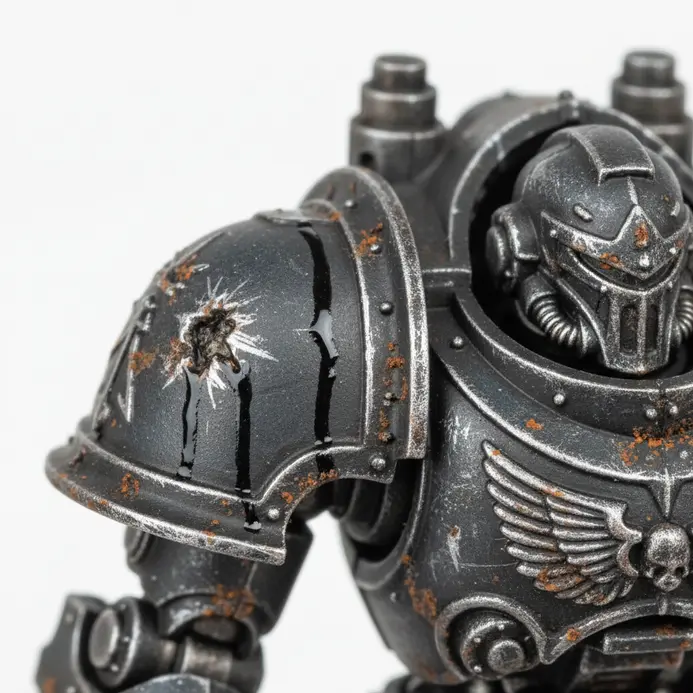
Okay, let’s get our hands dirty and tell a story of glorious, grimy decay. We’re moving past simple scratches into a world where your miniature looks like it’s survived decades in a toxic factory or a brutal warzone. This technique is all about layered storytelling with paint, using every chip and rust streak to show a history of neglect and hard use. We start with a dark base and build up uneven, industrial colors, then drown it in grime, a classic method in painting your miniature. The secret weapon is enamel or oil paints thinned down into a filter, brushed over everything and wiped away in vertical streaks to create grimy rain marks. These kinds of detailed miniature painting ideas work because they force you to think about the environment and history of your piece, not only a clean coat of paint. Next, we add the real character: battle damage. Grab a torn piece of sponge, dab it in a contrasting darker paint, and lightly tap it on edges and corners for realistic paint chips. The hairspray technique lets you scratch away the top layers of paint to reveal the color underneath, perfect for deep, accumulated damage. My top tip is to think about where water would pool and run off, creating long, vertical streaks from bolts and seams.
7. Crystalline Gemstone Golem Painting Technique

Picture a golem that doesn’t only have gems stuck to it, but one that’s literally born from a geode, perfect for your Games Workshop miniatures. We’re talking about a magical construct where every facet catches the light and seems to pulse with inner energy. This is one of the most spectacular detailed miniature painting ideas because it forces you to think like a gemologist. You’ll build its form with a geometric armature of interlocking shapes instead of muscles, then layer colors to mimic deep crystal cores and sparkling refractive light. Start with a dark underpainting to map your light-catching facet planes, then work in thin glazed layers from the deepest base color up to the brightest highlights. A pro tip is to add tiny wispy lines or cloudy zones inside your gemstone blocks so they look formed by the earth, not simply painted on, while using paint on your brush.
8. Arcane Glowing Rune Warrior Painting Technique

Okay, let’s get magical. Picture a warrior whose armor and skin are alive with pulsing, otherworldly light, not only painted on but radiating from within. This is the core of the Arcane Glowing Rune technique, where we treat light as a physical substance flowing through our character. It remains one of the strongest detailed miniature painting ideas for painters who want to push object source lighting without losing the model’s structure. We start by sketching a dynamic pose and deciding if the magic is contained power or wild energy, essential considerations when working with Games Workshop miniatures. First, block in the entire figure in greyscale, establishing shadows and highlights as if the runes weren’t there. Then apply muted local colors and paint deep shadows right around the rune placements so the later glow pops hard. A killer tip is to use a super soft, low-opacity brush for the first glow layer, letting that magical light bleed farther into the surrounding atmosphere before you hit it with intense color.
9. Petrified Stone Statue Conversion Painting Technique
Want to make your new miniature statue look like it was unearthed from a forgotten temple? This petrified stone approach is one of my favorite detailed miniature painting ideas because it’s all about creating a story of age. We aren’t only painting something gray; we’re simulating centuries of rain stains, mineral deposits, and slow biological growth. The magic happens by layering thin wash coats and using dry brush passes to make textures pop. Start with a warm or cool gray base coat, then flood the recesses with a watery mix of Raw Umber and Paynes Grey. Build up mineral streaks and mossy patches with careful glaze layers of Sap Green and Yellow Ochre. My top tip is to dab on some thinned texture paste with a sponge before you prime for a rough surface that catches the paint beautifully.
10. Monochromatic Blue Ice Warrior Painting Technique
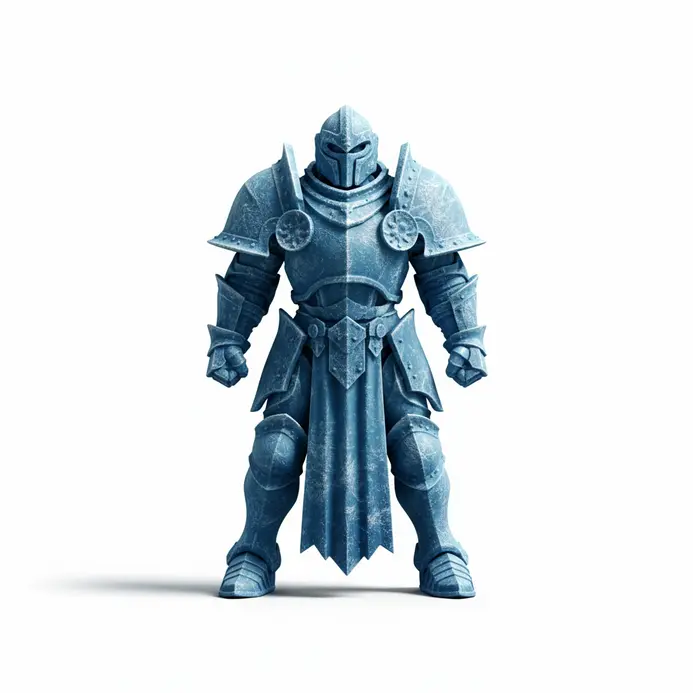
Okay, picture this: a warrior sculpted from a glacier, looking epic using only shades of blue, showcasing the potential of Games Workshop miniatures. This technique is all about creating a powerful, atmospheric character study using a single color. We build depth and drama through value control and subtle temperature shifts, from deep indigo shadows to icy cyan highlights. It’s a fantastic challenge that forces you to think about light and form in a fresh way, which is why it deserves a place among standout detailed miniature painting ideas. I start with a 1-10 value scale, mixing my own shades and tints from a single Phthalo Blue base. Keep your highlights from going pure white so the final miniature paint scheme holds together. Decide on the warrior’s story first, since that narrative will guide your temperature choices.
11. Desert Sand-Worn Nomad Painting Technique

Picture this: your tiny figure looks like it was dug up from an ancient desert caravan route, with layers of grit and faded color telling a story of endless travel. We’re not painting a fresh model here. We’re creating a relic. This style belongs with detailed miniature painting ideas that lean on texture as much as color. It is all about layering texture and paint, then selectively eroding it back with sandpaper and water to mimic years of sun and wind. It gives your miniature an instant, tangible history that a perfectly clean finish won’t match. If you’re working on a first miniature, try mixing a little fine sand into your gesso or base paint for a rough foundation before the rest of the scheme goes on, following tips and tricks for success.
12. Ethereal Ghost Army Translucency Painting Technique

Let’s make your miniatures look like they’re fading from memory right on the base. This technique is all about painting the absence of solidity, not only a pale figure. We use thin glaze layers to make the model look translucent, as if it’s a ghostly echo of the battlefield or swamp it stands on. That visual hook makes it one of the more atmospheric detailed miniature painting ideas on this list. You start by completely finishing your display base first. Then prime your miniature white or light grey and tint the whole figure with a glaze medium mixed with a tiny bit of color, letting the base show through. Keep opaque paint only for focal points like the face or a weapon hilt to sell the illusion of a spirit materializing. It looks complex, yet the process of painting stays clean and satisfying.
13. Mechanical Steampunk Cyborg Conversion Painting Technique

Picture this: a model that looks like it walked straight out of a Victorian workshop, with gleaming brass pistons replacing an arm and steam hissing from a boiler chest. This technique lets us convert any standard miniature into a gritty, half-mechanical marvel. We focus on blending weathered industrial metals with bruised, organic flesh to tell a story of surgical implants and crude grafting. People adore it because it merges precise historical aesthetics with limitless conversion work, making it one of the most narrative-driven detailed miniature painting ideas here. Start by planning the function of each mechanical part before you pick up a brush, deciding if that arm is hydraulic or that eye is telescopic. A great practical tip is to basecoat all metal parts with a dark gunmetal instead of bright silver, which gives you more depth for rust and shade layers later.
14. Jungle Camouflage Scout Trooper Painting Technique

Picture this: a lone scout trooper, nearly invisible in dense foliage, with a paint job that tells a story of stealth and survival. This technique is all about creating a realistic, organic camouflage pattern that breaks up the figure’s silhouette. We’ll use multiple thin layers of paint to build up a base of deep greens and browns, then add disruptive shapes in lighter tones. The goal is to mimic how light filters through a jungle canopy, which makes this one of the most immersive detailed miniature painting ideas you can tackle. Start with a dark green basecoat and let the paint is dry before dabbing on irregular brown patches with a torn sponge. Then use a fine detail brush to add smaller leaf-like shapes in khaki or olive. My favorite tip is to add a super thin glaze of a yellow-green mix over the highest raised areas to simulate dappled sunlight.
15. Royal Gold Filigree Armor Painting Technique

Picture this: a knight’s armor that looks less like plain steel and more like a museum piece, with delicate golden vines and scrolls shining against a dark, ancient metal base. That’s the magic of the Royal Gold Filigree technique, and it’s one of the most rewarding detailed miniature painting ideas to master. We’re talking about painting the illusion of hand-soldered gold wire onto a miniature’s armor. You start with a deep bronze or steel base, then carefully apply the paint for those intricate golden patterns with a super fine brush. The strength of the look comes from the contrast between the dark, tarnished-looking metal and the brilliant gold. A fantastic tip is to sketch your filigree pattern lightly first, aiming for flowing organic shapes like vines or heraldic symbols instead of perfect symmetry.
16. Mud-Splattered Trench Warrior Painting Technique

Okay, let’s get this soldier absolutely filthy. The real magic here isn’t only slopping on brown paint; it’s about telling a story of where he’s been through strategic, layered grime. We’re talking about caked-on mud on boots, directional splatter up the legs, and that dull dusty filter that ties the whole uniform into the base, enhancing your Games Workshop miniatures. It works because a clean soldier in a trench makes no sense, and that realism is why this remains one of the strongest detailed miniature painting ideas for military subjects. Start by painting the model clean and sealing it with a matte varnish so your weathering behaves. Then mix a thin mud wash and apply it to the lower two-thirds of the figure, a great technique in miniature painting supplies. For thicker mud, use texture paste on knees, elbows, and boot tops, and study reference photos to see how grime collects across different areas of the model while painting your miniature.
17. Celestial Constellation Robe Mage Painting Technique

Okay, picture this: a miniature wizard’s robe where the constellations don’t only sit there, they pulse with captured starlight. That’s the magic of the Celestial Constellation Robe technique. It transforms a simple cloak into a living artifact of power and navigation, which is why it fits so naturally among imaginative detailed miniature painting ideas. You start with a robe primed with a ground that supports your star pattern, then build each constellation with careful dot placement and faint connecting lines. For a beginner-friendly version, paint a single static constellation with a glow medium on a dark fabric cloak. That approach still gives you the celestial vibe while keeping the painting technique manageable during a short painting session.
18. Rust-Verdigris Ancient Construct Painting Technique

Okay, picture this: you’ve got a massive, forgotten robot from a bygone era, and its surface tells a complete story of decay and material interaction. That’s the magic of the rust-verdigris technique. We’re combining two types of corrosion—red-brown rust from iron and blue-green verdigris from copper—to create a miniature that looks authentically ancient. It adds instant history and a sense of environment, making it one of the most grounded detailed miniature painting ideas for sci-fi or fantasy constructs. Start by painting a solid foundation of layered rust on the ferrous parts, then add copper or bronze sections with metallic paint and chip them to show wear. The fun begins when you place verdigris into the recesses and pull it into drips that stain the rust below. The secret sauce is cross-contamination, so let a little thinned rust color creep back onto the copper edges too.
19. Blood-Spattered Arena Gladiator Painting Technique

Okay, let’s get messy. The real magic of this approach is making a scene feel alive and brutal with one key ingredient: believable blood. We’re not only slapping on red paint; we’re telling a story of a specific combat moment through spatter, pooling, and drying effects. That storytelling focus is what keeps it among the most dramatic detailed miniature painting ideas. You must paint the entire figure first, finishing all the skin, metal, and leather before you add gore. Blood works as a transparent effect layer, not a replacement for strong foundational work. I keep an old stiff brush as a dedicated blood brush for spatter and mix my own reds instead of using a flat black paint or poster red straight from the bottle. Think about direction and environment too, since a flicked brush gives one result while stippled blood mixed with sand gives another, demonstrating the versatility of miniature companies.
20. Aurora Borealis Ice Mage Painting Technique

What if the sky wasn’t only a background, but the actual source of your character’s magic? We’re painting a scene where the aurora borealis is the Ice Mage’s power made visible, a fusion of character and environment. You’ll work with a palette that dances between deep cold blues and the aurora’s greens and pinks. This idea captivates painters because it turns a cool character into a living part of a frozen world, and that narrative strength makes it one of the most memorable detailed miniature painting ideas in the whole collection. Start by planning whether your mage is conjuring the lights or channeling them. Build your foundation with an indigo-violet sky and leave pure white paint on the snowy ground so you can later reflect the aurora glow across the base and lower robes.
Your Journey from Concept to Creation
Now that you’re armed with a deeper understanding of techniques, styles, and principles, the path from a detailed idea to a finished miniature is clearer. Remember, mastery is a process of experimentation. Don’t be afraid to combine a Grimdark base with precise edge highlight work, or to practice wet blending on a textured base. Start with one advanced painting technique, like rust effects or a simple zenithal prime, and build from there. Each painting session is a lesson, and every miniature, whether a humble 28mm soldier or a majestic display piece, is an opportunity to refine your skills. If you keep a short list of detailed miniature painting ideas beside your palette, it becomes easier to turn practice into a focused painting journey.
Beyond the Paint Pot
The true magic of detailed miniature painting lies in synthesis. It’s where technical skill meets creative vision. Use the explanations of lighting, weathering, and freehand as building blocks. Let color theory guide your palette for a celestial nebula effect, and apply light theory to make marble textures look convincingly solid. Consider how material choices differ for resin, metal, or plastic miniatures. This foundational knowledge empowers you to follow, deconstruct, and remix ideas into original work. The best detailed miniature painting ideas don’t stop at copying a tutorial; they teach you how to think through the whole process of painting from concept to finish.
More Detailed Miniature Painting Ideas to Try


Conclusion
Wow, what a visual journey. We’ve covered everything from the depths of the ocean to the cold void of space, all on the scale of a few inches. These detailed miniature painting ideas are more than steps; they’re starting points for your own creativity. Which one spoke to you the most? The key is to take these concepts and make them your own. Mix a little volcanic lava with celestial constellations, or add moss to your steampunk cyborg. The best part of this hobby is that practice keeps opening new options, and detailed miniature painting ideas like these give you plenty of room to experiment. So, pick your favorite from the list, grab your paint brushes, and start bringing that tiny world to life.
FAQs
Q: How do I start painting miniatures as a complete beginner?
A: Start by getting a simple guide to miniature painting, a few brushes, a type of paint suited for miniatures (acrylics are common), and a spray primer. Begin with a single miniature assembled and cleaned of mold line and sprue remnants using a craft knife, then thin a small amount of paint with water and practice basecoating to get a feel for brush control — learning how to paint miniatures this way helps new painters get the hang of the painting process.
Q: What tools do new painters absolutely need when they want to paint?
A: A basic starter kit for a new painter should include a craft knife for removing mold lines and sprue bits, files or sanding sticks for smoothing, a couple of brushes (including one to paint on a relatively wide area), a palette, water pot to paint with water, and both spray primer (black spray or grey/white depending on desired tone) and a small amount of paint of different colors — not much paint at first so you learn consistency and layering.
Q: Should I use spray primer or a brush-on primer, and is black spray okay?
A: Spray primer is fast and gives a smooth finish that helps paint adhere; black spray is fine and often recommended for beginners because it creates natural shadows and requires less initial layering. Make sure the miniature is clean, dry, and free of mold line and sprue remains before priming to avoid imperfections on the surface to paint.
Q: How much paint should I use and how do I avoid applying too much?
A: Take a little paint at a time and thin it with water until it flows easily — a small amount of paint goes a long way on miniatures. Avoid loading the brush with much paint; instead apply multiple thin coats. This helps you create highlights and preserve fine details on the miniature assembled model.
Q: What are common miniature painting mistakes beginners make and how can I avoid them?
A: New painters often use paint too thickly, skip cleaning mold lines or sprue marks, or neglect priming. To avoid these, use a craft knife to clean the miniature, apply spray primer for a smooth finish, thin paints and paint with water to improve flow, and practice the painting process slowly so you can learn how to paint layers and create highlights correctly.


