
Understanding Spinal Flow and Shoulder Placement
Place a full-size paper outline from the base of the neck to the waist before approving a spine design, since a small sketch hides how the artwork follows your curves. Mark the vertebrae, shoulder blades, and waistline on the mockup, then check whether the central motif stays aligned when your posture changes. A narrow vine often suits the spine, while wings and ornamental arches need enough shoulder width to avoid crowding. Ask the artist to show the composition at its intended scale beside healed work from similar placements. A body-placement mockup lets you compare shoulder width with the design before booking a long sitting. It also exposes awkward gaps near the ribs and lower back.
Selecting Line Weights for Durable Detail
Ask for a mix of fine and medium line weights when a back tattoo includes tiny petals, lettering, or dotwork, because one delicate width gives every detail equal visual pressure. Fine lines suit botanical stems and small celestial marks, yet dense shading beside them needs stronger outlines for separation. Leave open skin between motifs so aging ink keeps each edge readable rather than merging into a dark patch. Review healed examples from the artist, not fresh photographs, since early swelling makes lines look thicker and black ink settles as the skin recovers. A skilled tattooist also adjusts spacing near the shoulder blades, where movement and skin stretch alter visual balance. Medium-weight outlines create separation around tiny details without making the whole back look heavy.
1. Fine-Line Botanical Spine Vine for a Delicate Back Tattoo
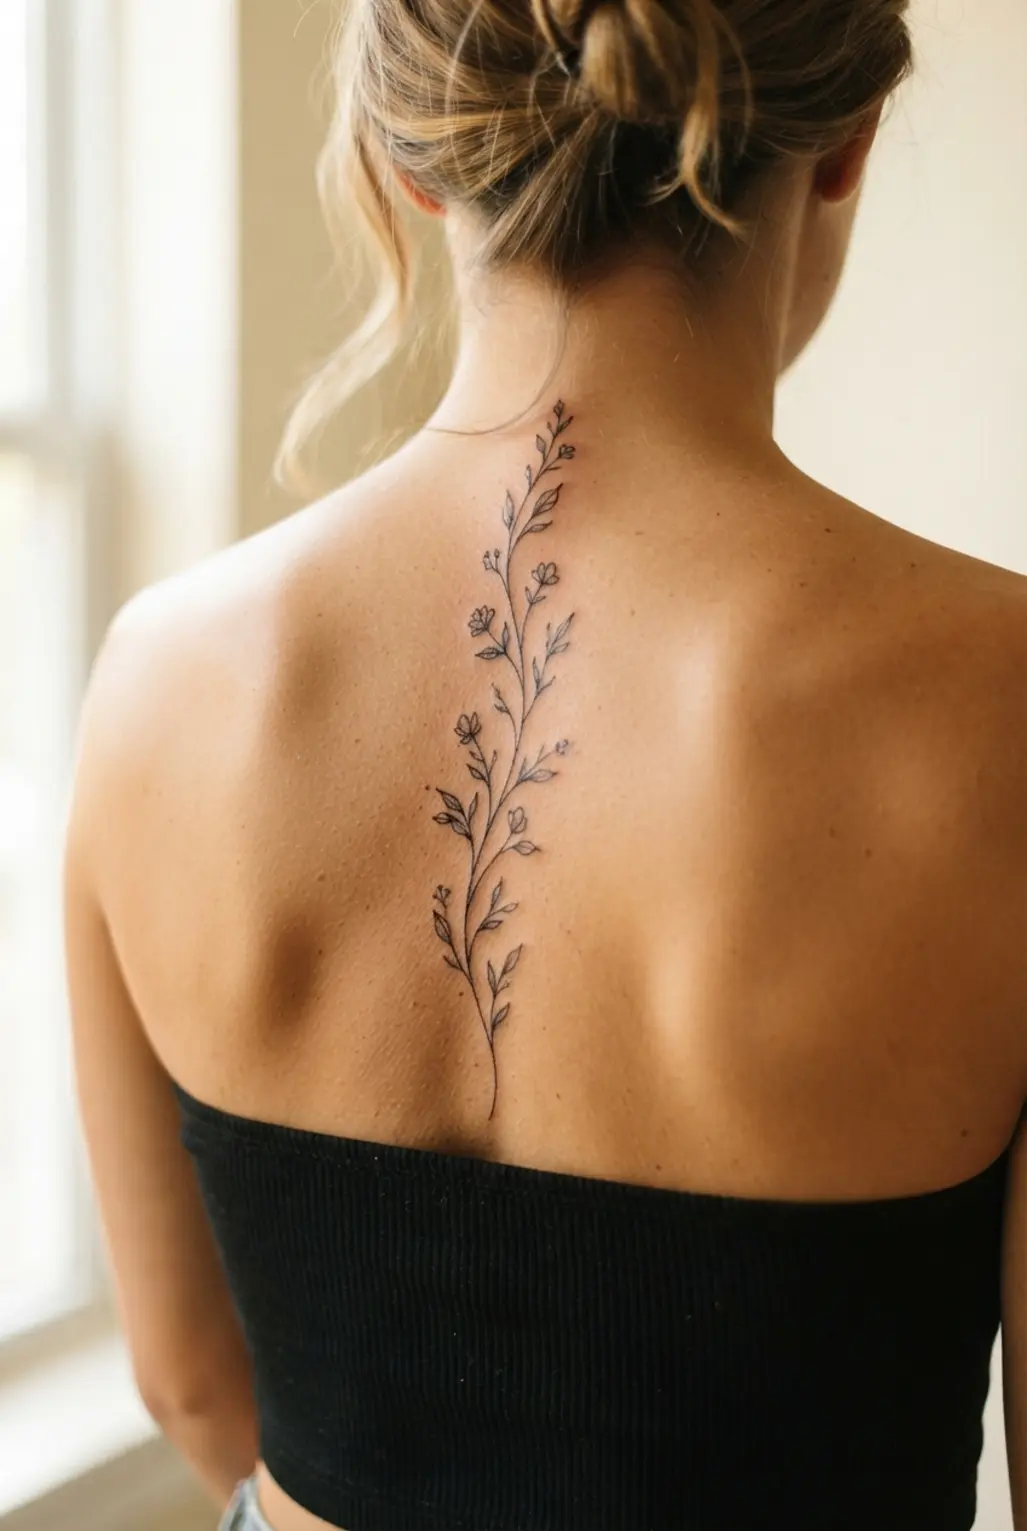
Ever wondered how a spine vine keeps a delicate back tattoo for women feeling light instead of crowded? Start with a fine-line black ink vine following the back’s natural curve, from between the shoulder blades toward the lower spine. Add slender stems, tiny leaves, and small wildflower blossoms with generous open spacing. I love how slight asymmetry gives the design gentle organic movement.
Ask your artist to taper both ends softly, keeping shading minimal and leaving clear gaps between each detail. A tiny moth, butterfly, or star works as a quiet accent, but too many extras weaken the airy look. The open layout helps this feminine tattoo stay refined as it ages. Trust me, careful spacing makes the whole piece feel graceful and fresh.
2. Minimalist Crescent Moon Shoulder Blade Tattoo

This crescent moon looks soft, polished, and feminine without taking up much space. Sound complicated, or is the clean placement doing all the work? Place a fine-line black ink crescent on the upper shoulder blade, angling its gentle curve toward the spine so it follows your natural shape. I love how tiny stars, evenly spaced dots, or a slim botanical sprig add interest while keeping the design light and open. Trust me, check the stencil from several angles before the needle touches skin, then choose an artist skilled in fine-line work for smooth curves. The moon’s links to intuition, renewal, and life’s changing phases give this understated back tattoo for women a sweet personal meaning.
3. Ornamental Geometric Mandala Center Back Piece

I love this back piece because its symmetry feels elegant without looking heavy. Start with a clear spine center line, then place the round mandala between the shoulder blades. Build repeating lotus petals, sacred-geometry shapes, pointed jewels, and lace-like filigree outward from the center. Ever wondered why it stays so graceful? Open gaps between each layer give the eye room to rest.
Extend teardrops, chains, or slim ornamental points upward and downward along the spine, creating a soft hourglass flow. Use dotwork shading for gentle depth instead of broad blocks of black, especially near the outer petals. I love how this approach suits a shoulder-blade piece or a longer spine tattoo without forcing a full back tattoo for women coverage. Keep the layout balanced from side to side, and ask your artist to check alignment before tattooing begins. Trust me, careful spacing keeps every detail crisp as the piece heals.
4. Vertical Script Spine Text Tattoo for Personal Meaning
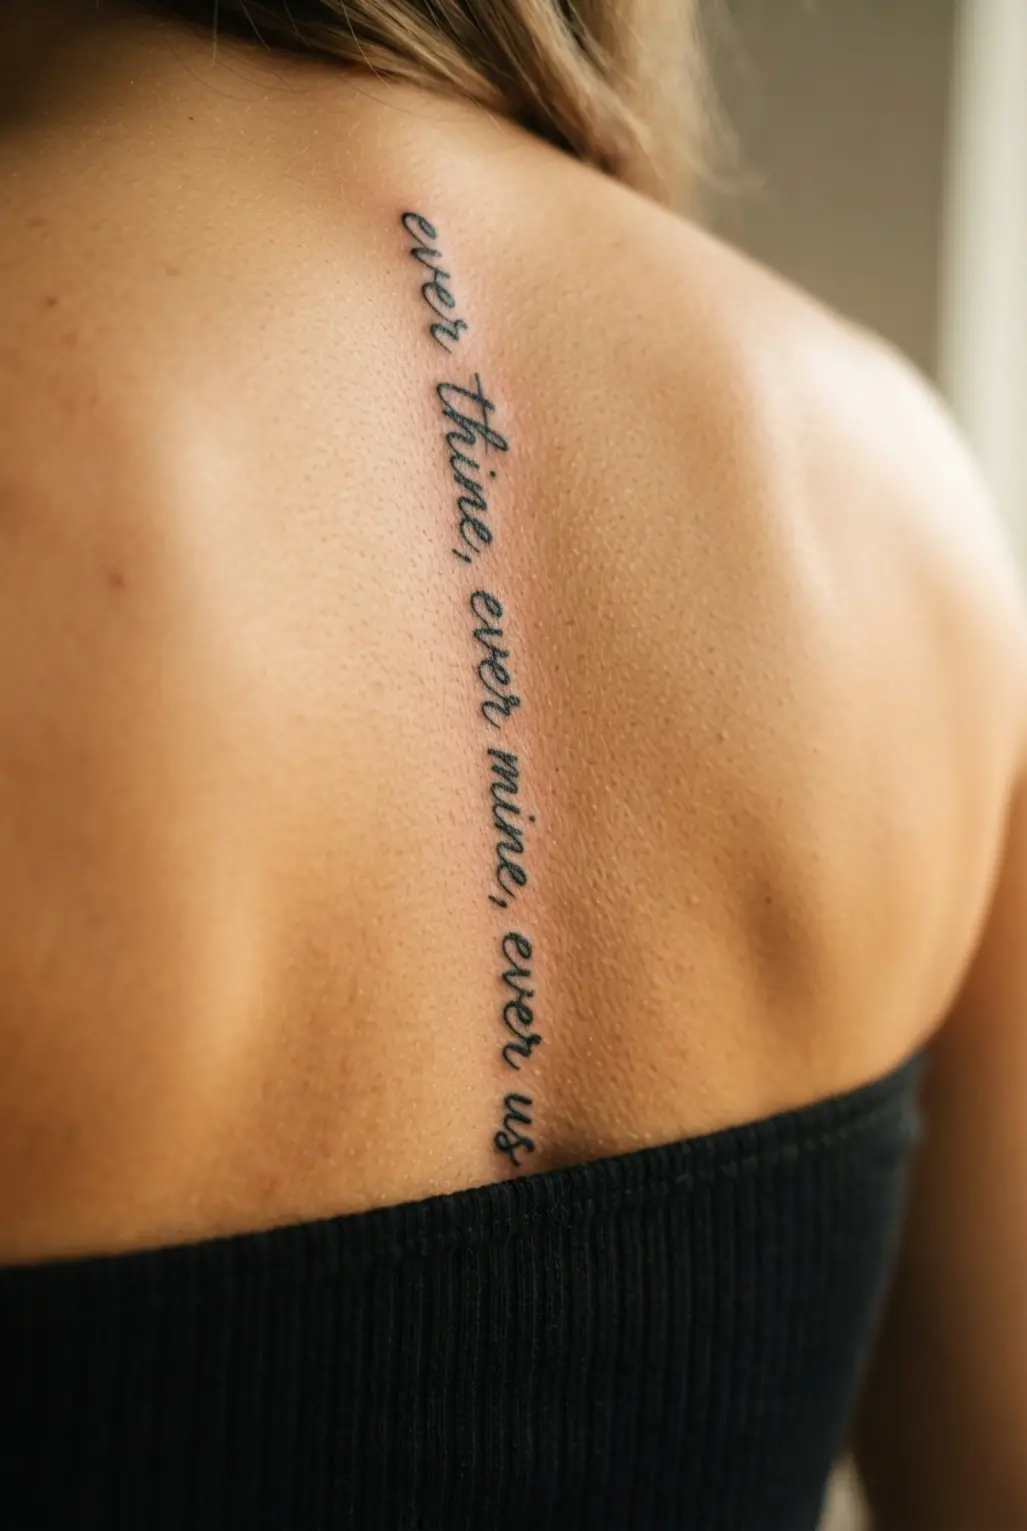
Fine black letters run in a graceful line from the upper back toward the lower spine, with each word resting neatly beneath the last. Isn’t it lovely how a short phrase becomes such a personal mark? Start with concise meaningful wording, then choose fine-line cursive, serif, typewriter, or a loved one’s handwriting. I love how tiny stars, moons, flowers, or dots add rhythm without stealing attention.
Your artist should map the text along the back’s natural curve, spacing each letter for clear reading and a balanced shape. Short phrases such as “Still I rise,” “I am enough,” or “Rooted and rising” suit this placement beautifully. The spine feels sensitive during tattooing, so plan a calm session and discuss comfort beforehand. Keep the ink minimal for a timeless finish, and feel proud every time your message sits close to your center.
5. Detailed Blackwork Butterfly Shoulder Blade Design
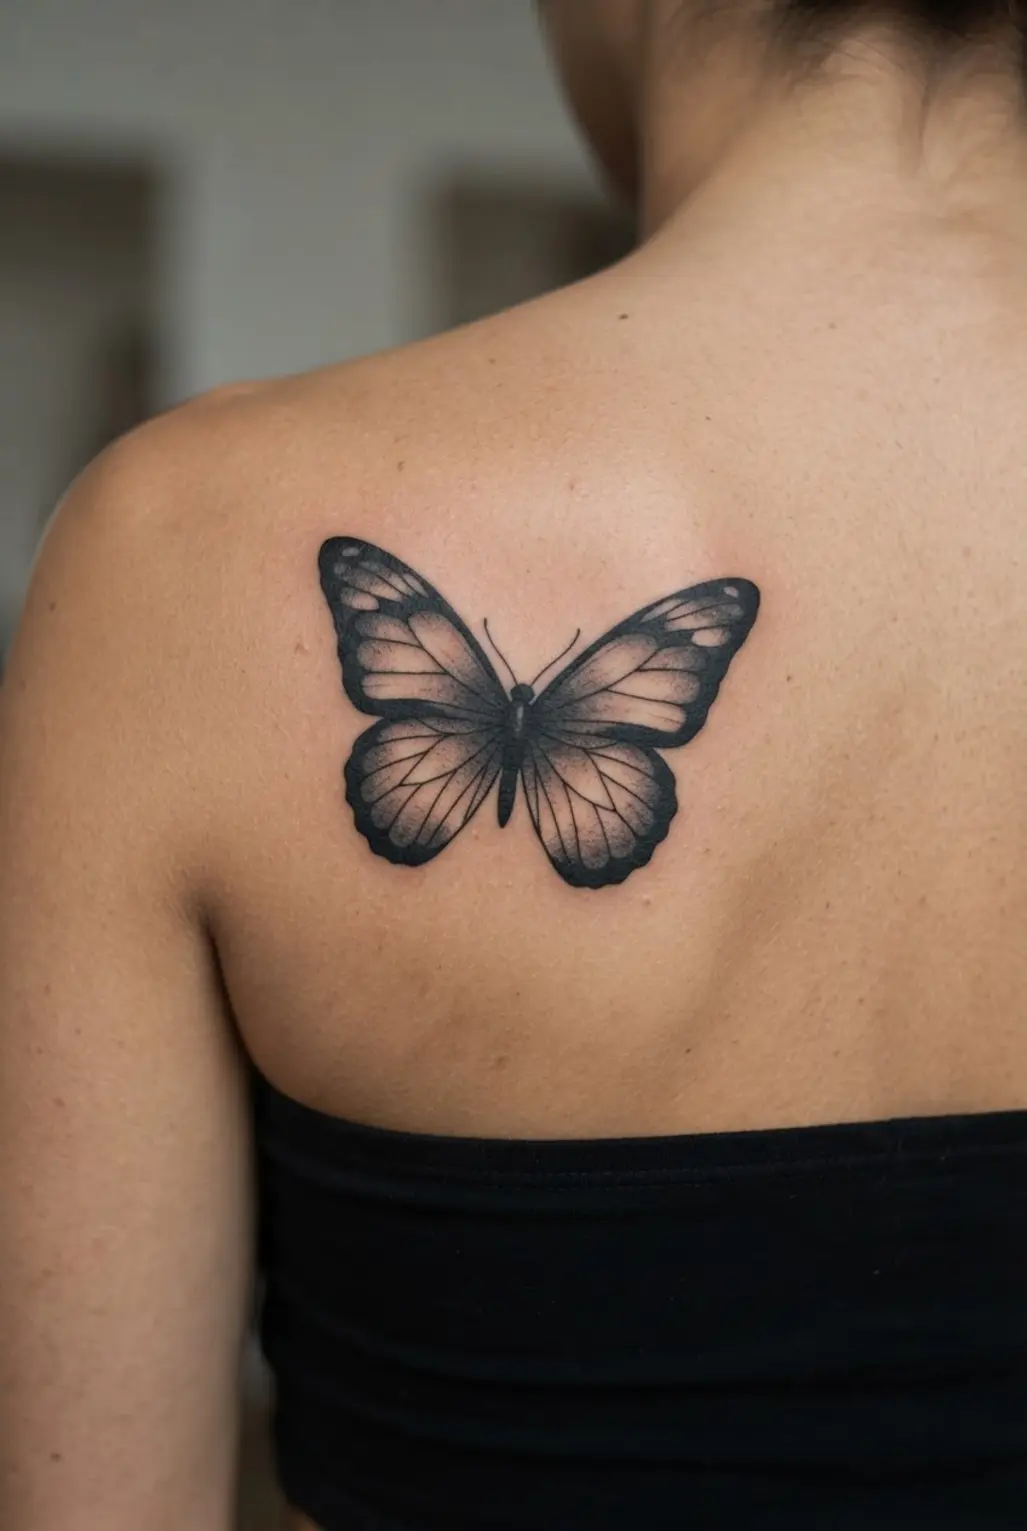
A common mistake with a back tattoo for women is filling every wing panel with black, leaving no room for the pattern to breathe. Keep clean negative space between bold sections so the butterfly stays crisp over the shoulder blade. Is the balance hard to picture? The shape becomes clear once the upper wings follow the scapula and the lower wings taper toward the ribs.
I love how a narrow black body gives the piece a steady center while pointed upper wings, rounded lower wings, and curved antennae follow your shoulder. Add fine veins, tiny diamonds, crescents, and pepper shading with a fine-line needle setup. Keep the darkest ink near the wing bases and outer edges, then soften inward with dots and untouched skin.
This contrast gives a detailed blackwork butterfly depth without gray wash, and the ornamental details feel personal rather than crowded. Ask your artist to use anatomy-based sizing, so the layout follows your shoulder blade instead of copying a fixed template. Trust me, watching the silhouette settle across the shoulder blade feels so satisfying.
6. Watercolor Style Lotus Upper Back Tattoo
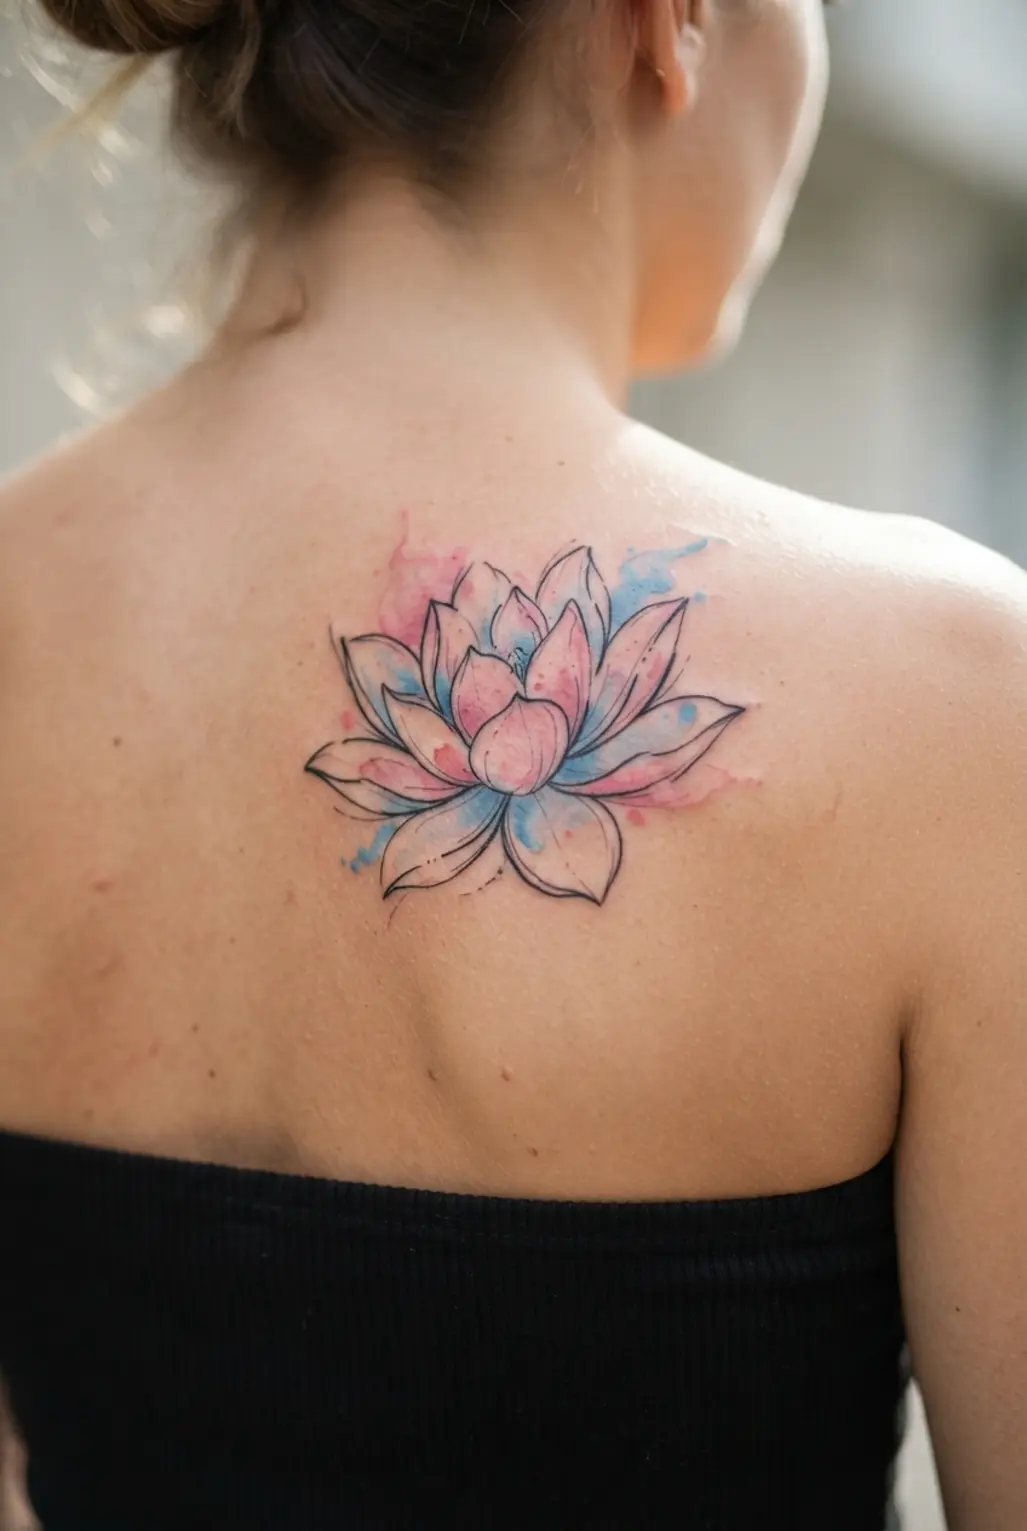
Center the lotus stencil between your shoulder blades, keeping the finished width near 5–7 inches. Trace the petals with thin muted-gray lines, then layer blush pink, lavender, and pale blue in loose, translucent passes. Sound complicated? It is not. Let each petal edge stay soft, with tiny splashes, droplets, or floating petals drifting lightly toward your shoulders.
This placement feels balanced while leaving enough open skin for an airy finish, and the lotus brings a gentle sense of rebirth, peace, and resilience. I love how restrained linework keeps the flower clear without stealing attention from the watercolor effect. Keep every accent light, and ask your artist to confirm the scale and center point before the session. Trust me, the finished piece feels soft, personal, and graceful.
7. Symmetrical Jewelry Style Lower Back Piece
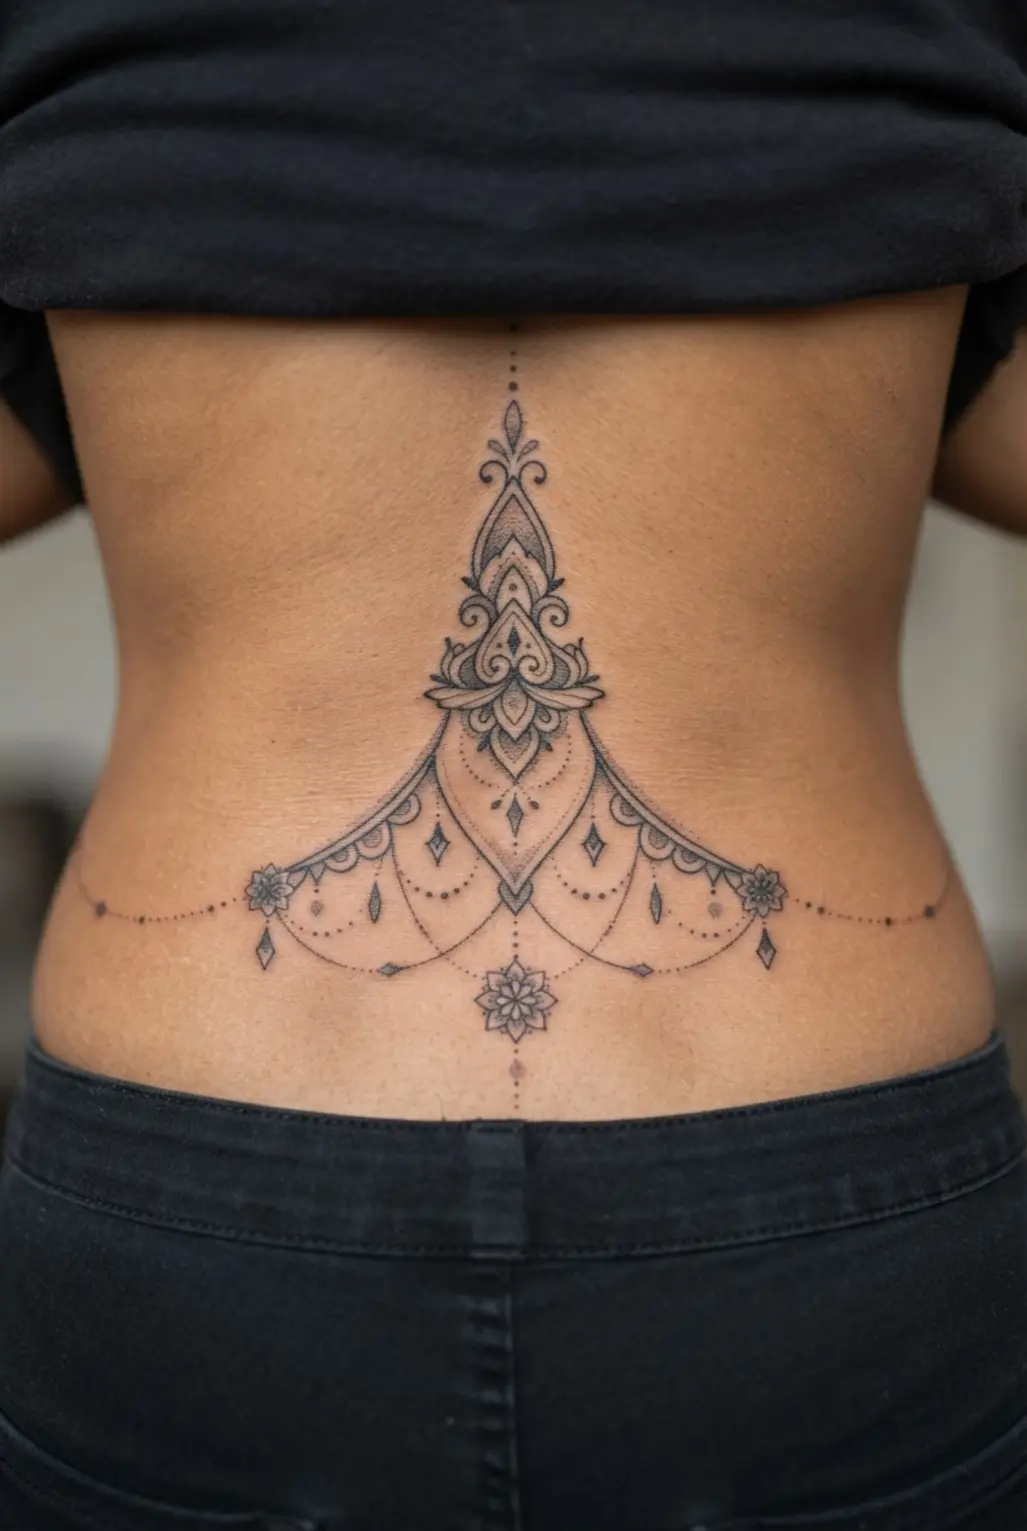
Want a lower-back tattoo with the polish of a fine piece of jewelry? Start with a pendant-like jewel above the spine, then extend mirrored filigree outward in smooth curves. Let the lines follow your waist and hips, with teardrops, lace-like touches, and tiny gemstone details adding a delicate finish. I love how the centered structure gives this back tattoo for women a neat focal point without filling the whole area.
Ask your artist to mark the central axis before building either side. Keep spacing even, avoid packing in too many fine lines, and taper the ends toward your sides instead of stopping them suddenly. Black-and-gray shading or dotwork adds depth, while a small red or blue accent gives the pendant a jewel-like spark.
8. Realistic Phoenix Rising Full Back Mural

This phoenix mural makes a full-back tattoo for women feel like a complete scene rather than a single symbol. Place the head high on the upper back, keep the body aligned with the spine, and spread the wings across the shoulder blades. Let long tail feathers travel toward the lower back, fading into smoke, ash, sparks, and glowing cracks in volcanic stone. Use cinematic lighting to set deep black shadows against red, orange, gold, and crimson feather highlights.
Sound complicated? It is not, provided the phoenix stays clear. Keep flames curling around the wings instead of hiding them, and leave the ruined setting darker so the bird leads the eye. I love how the movement makes the rebirth theme feel personal, while layered feather texture gives the piece depth. Ask your artist for a full-size placement plan before booking, then feel proud of the finished mural.
9. Tiny Constellation Upper Back Ink Art
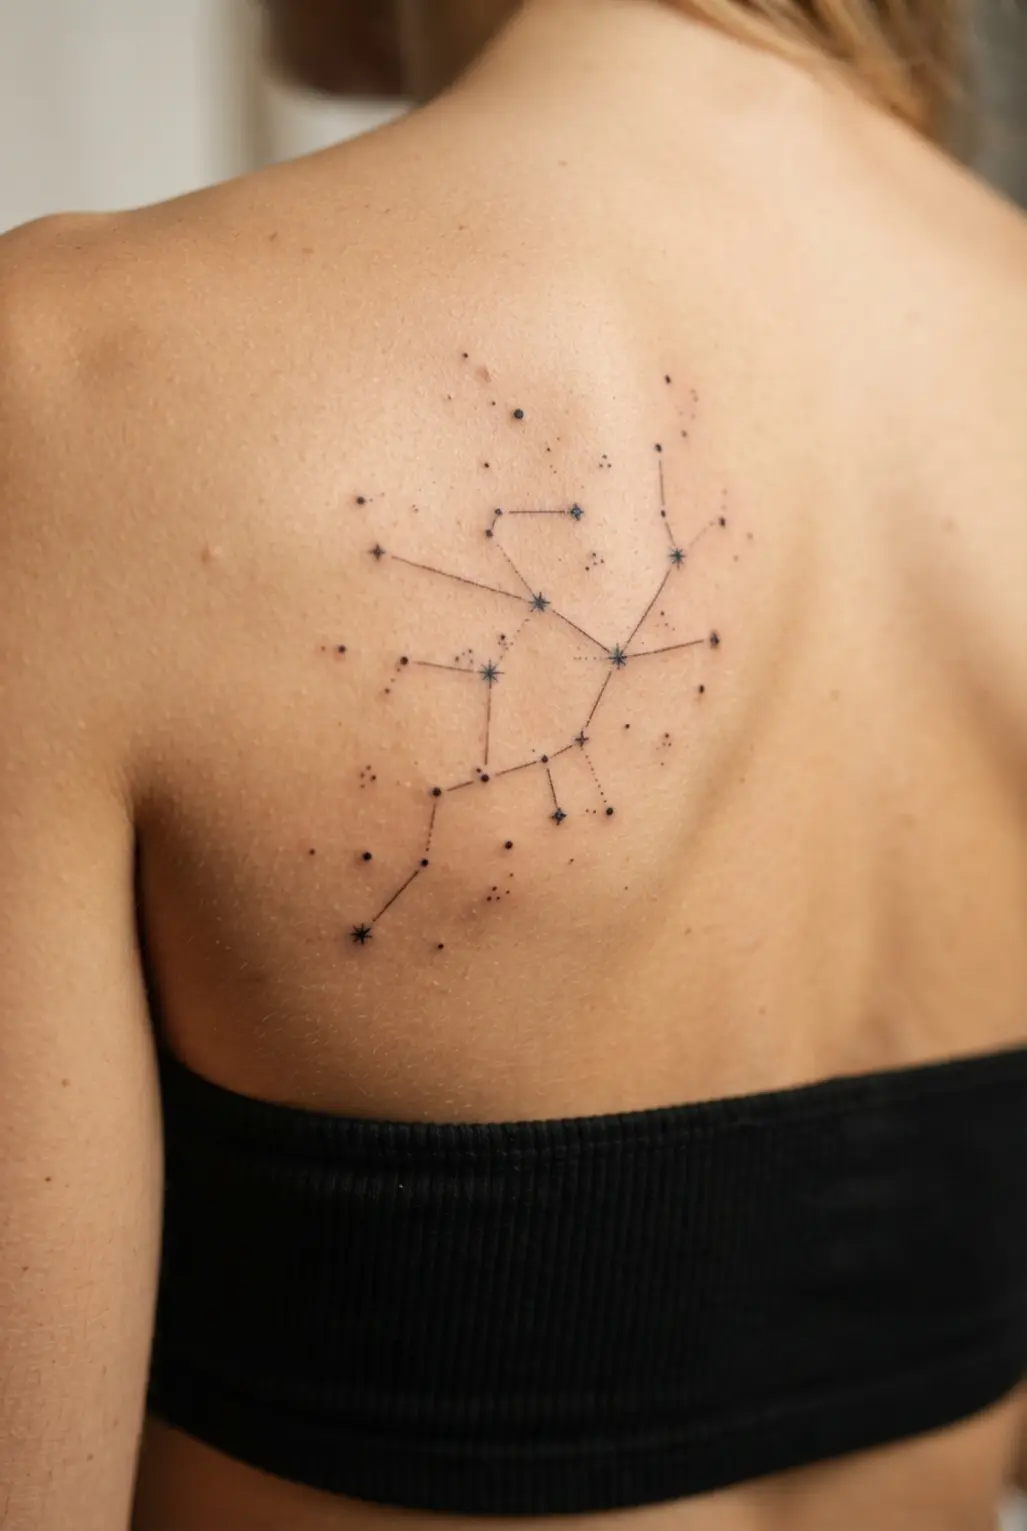
I love this one because it feels personal without taking over the upper back. Sound complicated? It is surprisingly clean, with a 2–4-inch constellation centered between the shoulder blades. Ultra-fine black lines connect tiny stars, while subtle dot work and generous negative space keep the design airy. A crescent moon, initial, or birthstone-inspired dot adds meaning without crowding the layout.
The open spacing gives this delicate tattoo a refined look, and I think its quiet detail makes it easy to appreciate every day. Ask your artist to check line clarity at the planned size before starting, then keep the stencil carefully centered. Trust me, fewer stars often create a prettier result. Feel proud when every point settles into place.
10. Dainty Hummingbird Nape of Neck Tattoo

Soft wing lines and teal, pink, and lavender give this tiny hummingbird a gentle, airy finish beneath the hairline. Is it not lovely how an updo reveals it while loose hair keeps it private? Begin with a small hummingbird silhouette, then add fine-line details and lightly defined wings.
A small floral accent near the bird adds a graceful finishing touch without crowding the narrow nape area. Black ink suits a clean minimalist look, while soft watercolor shades bring gentle color without making the bird feel loud. I love this placement because your hairstyle controls its visibility, giving the design a graceful change from day to evening. Trust me, a few restrained wing lines look sweeter than a crowded bird, so keep the detail light and balanced.
11. Detailed Lace Pattern Upper Back Tattoo
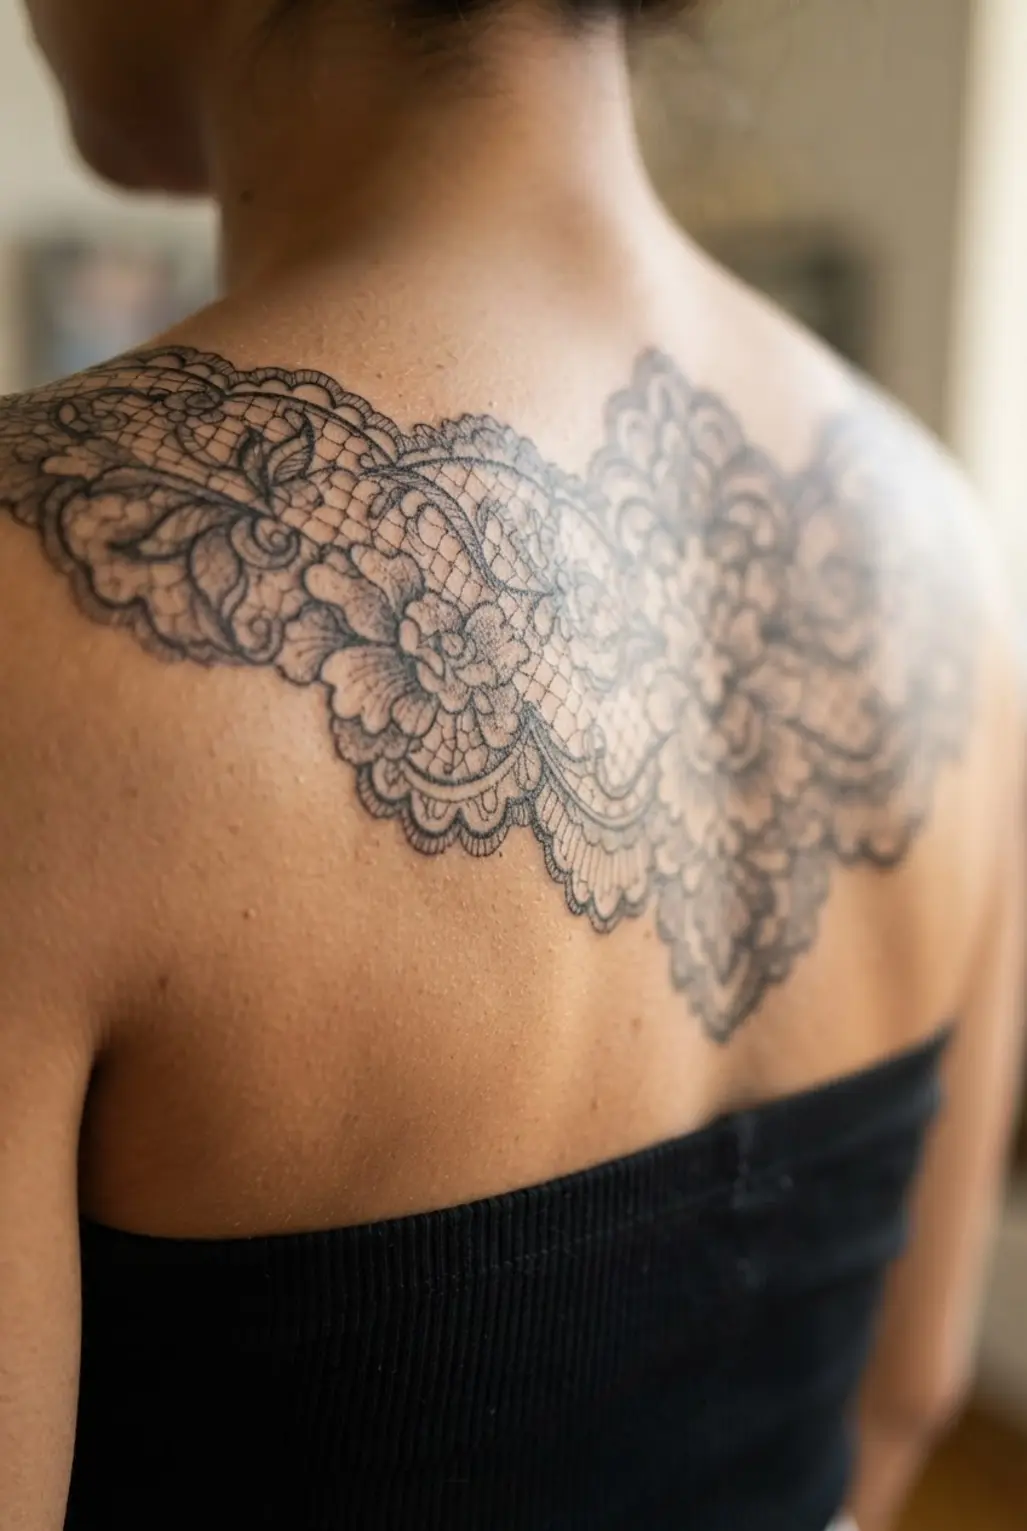
Does lacework need countless tiny lines? No, crowded details blur as ink settles. Start with a central floral medallion between the shoulder blades, then extend matching filigree toward each shoulder, leaving open space between the webbing and flowers. Scalloped edges should follow the shoulder curve, while small teardrops descend along the spine. Black-and-gray ink keeps the ornamental structure soft, with muted burgundy or deep purple reserved for a rose, peony, or lotus. I love how a balanced design feels graceful without covering the whole back. Trust your tattoo artist to check symmetry with a stencil before needlework begins, and enjoy the polished finish.
12. Small Sun and Moon Spine Design
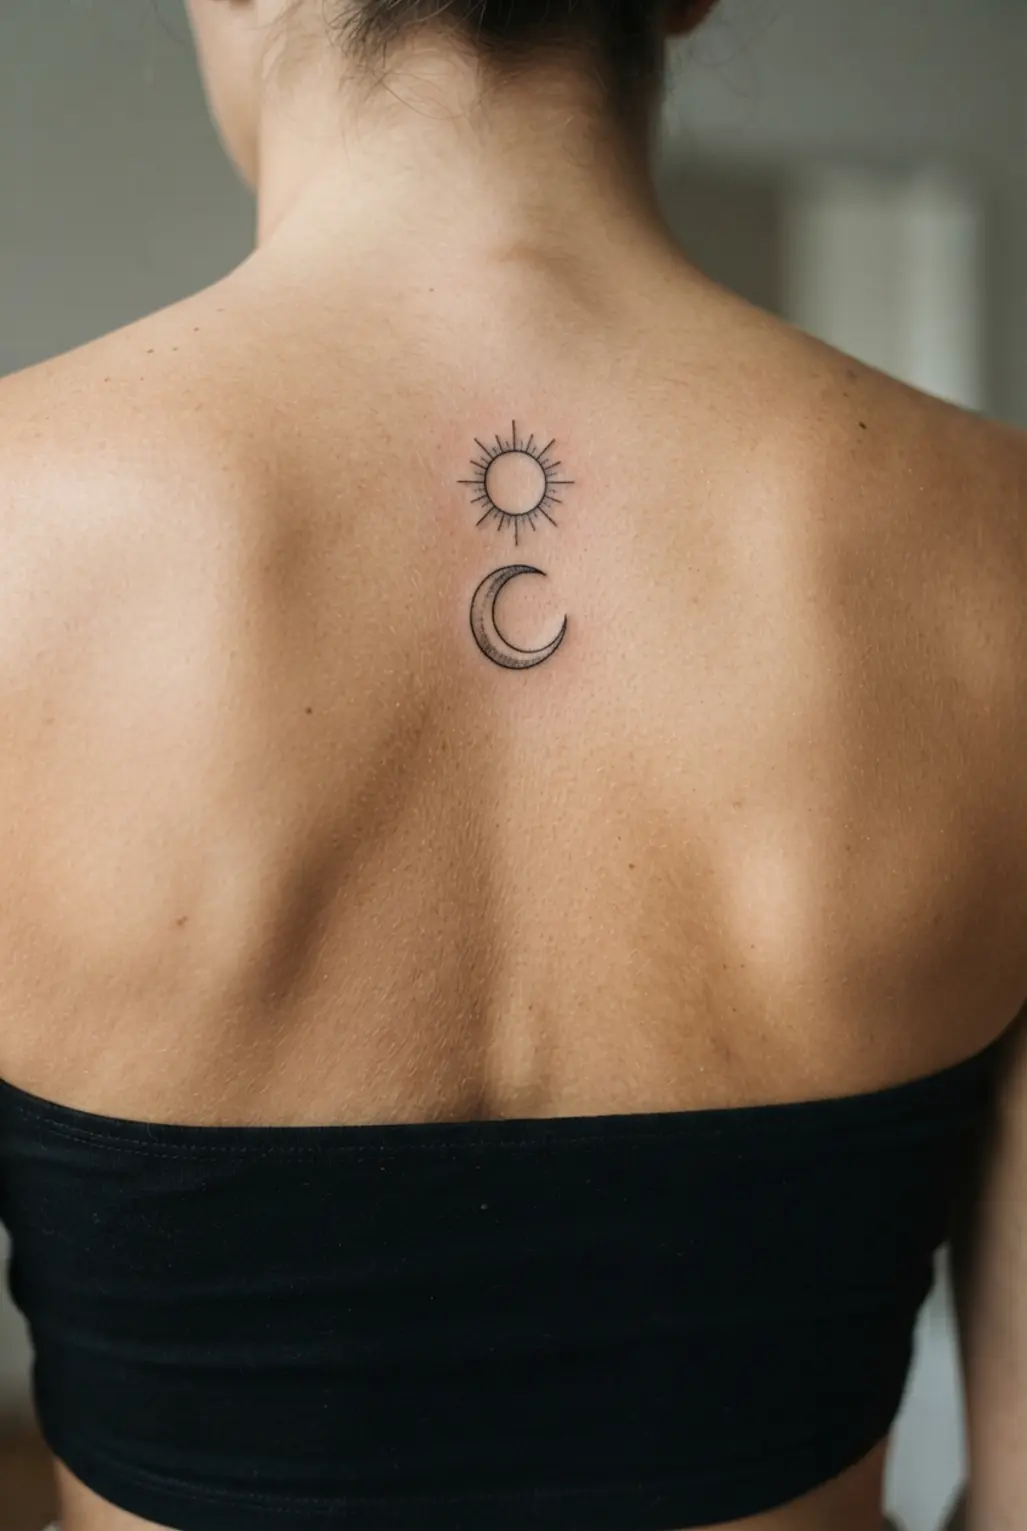
Place the crescent moon near the upper spine, then align a minimalist sun beneath it with fine-line black ink and light rays. Tiny stars and dot work help connect the symbols without crowding the narrow design. Keep the arrangement within four to six inches, following the spine’s natural curve. Sound complicated? It is not.
I love how the moon and sun create a calm sense of balance, while the vertical placement feels neat and graceful. Before tattooing, check the stencil from several angles so the symbols sit in one clear line. A light dotwork connection keeps the piece delicate, and restrained rays help it stay legible as it heals. Trust me, this small celestial layout looks lovely when every detail has breathing room.
13. Abstract Single-Needle Rose Back Tattoo

Ever wondered how a rose stays delicate without looking plain? I love this style because loose petals, broken contours, and a slim stem create an artistic back piece with plenty of open skin. Start with a single-needle outline in black ink.
Choose modern single line art styles to keep the rose airy, then place the bloom over the shoulder blade, upper spine, or beside the spine’s natural curve. Add soft-gray shading, wispy leaves, tiny thorns, dotwork, or a faint crescent with restraint. Preserve intentional gaps so the design feels light, while asymmetry gives the flower its modern character.
Trust me on this one: heavy outlines or dense shading erase the soft mood. Ask your artist to follow the spine or shoulder-blade curve during stencil placement, then keep every extra detail small. The result feels personal, clean, and quietly feminine.
14. Bold Dragon Wrap-Around Shoulder Piece
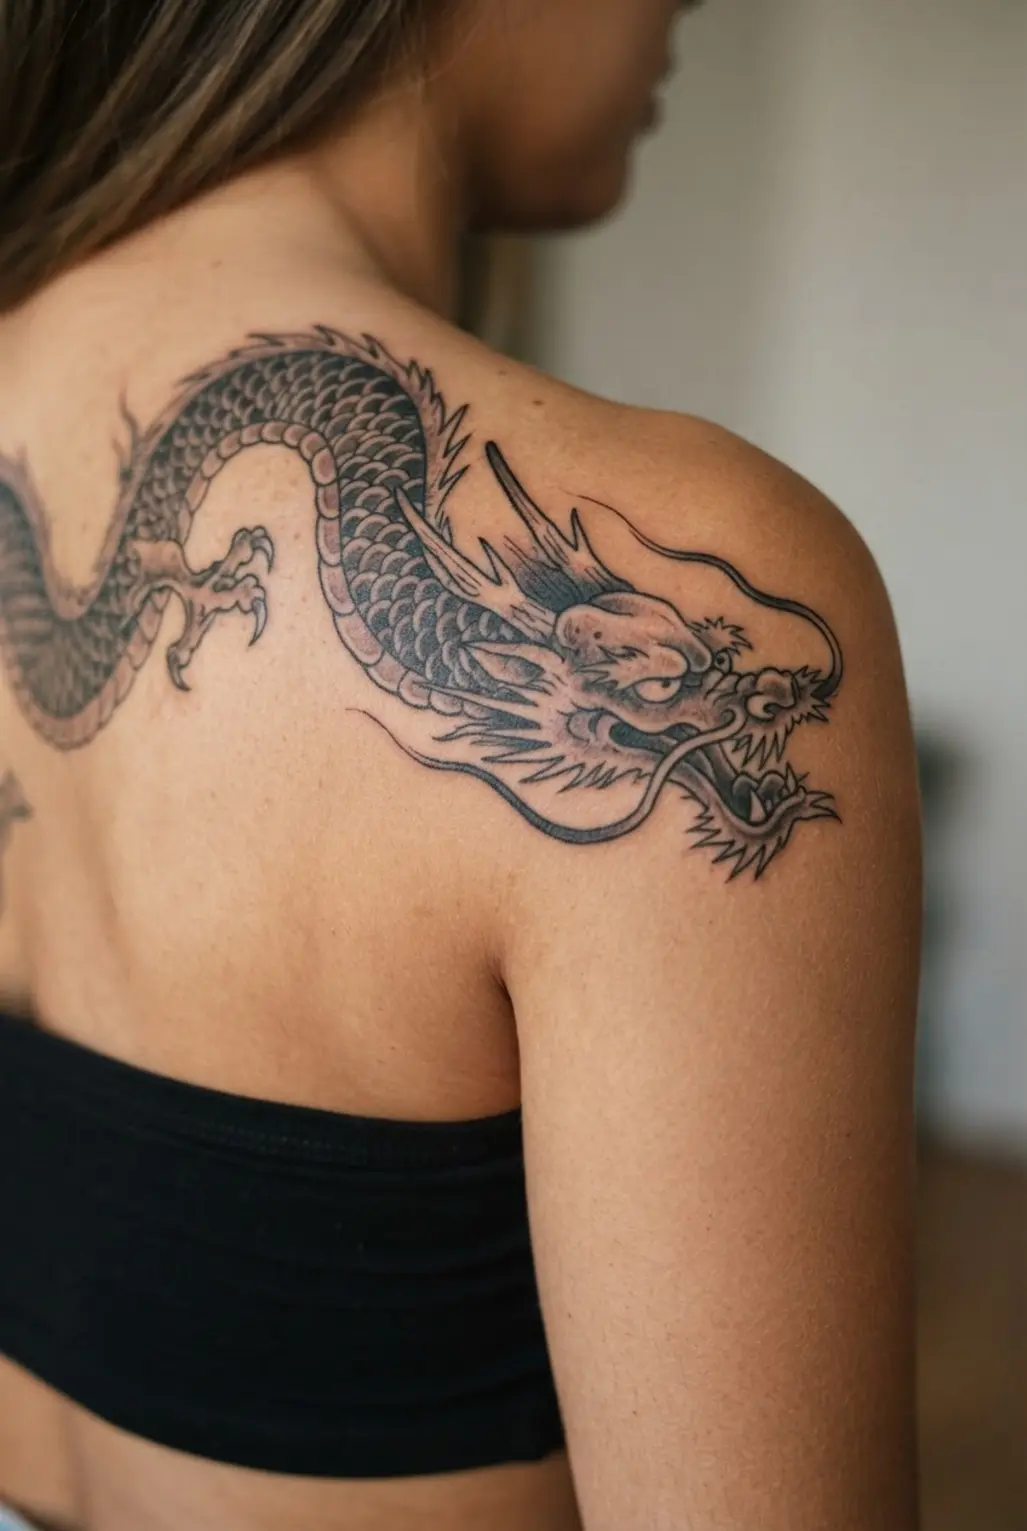
This piece feels fierce from the first look, with a dragon curling across the chest, shoulder, and upper arm. Sound complicated? It is not, once the pose follows the body’s natural curve. Start with bold black linework, then shape layered scales, sweeping horns, claws, and a tail around the deltoid and bicep. The head near the collarbone keeps the whole design easy to follow.
Ask your artist to test the stencil from the front, side, and back before any ink goes in. The shoulder cap and upper chest need to read as one connected surface, while negative space planning keeps wings, smoke, flames, or clouds from crowding the dragon. I love how this layout gives a back tattoo for women a fierce, protective feel without losing graceful movement.
Trust me on this tip: check the design with your arm relaxed and raised, since movement changes every curve. Keep the head, coiled body, and tail visually linked, then add shading in stages with a blackwork shading pass. The wrap-around shape feels satisfying because it follows your body instead of sitting flat. You will feel proud when every scale and contour still reads from each angle.
15. Fine-Line Birth Flower Spine Bouquet
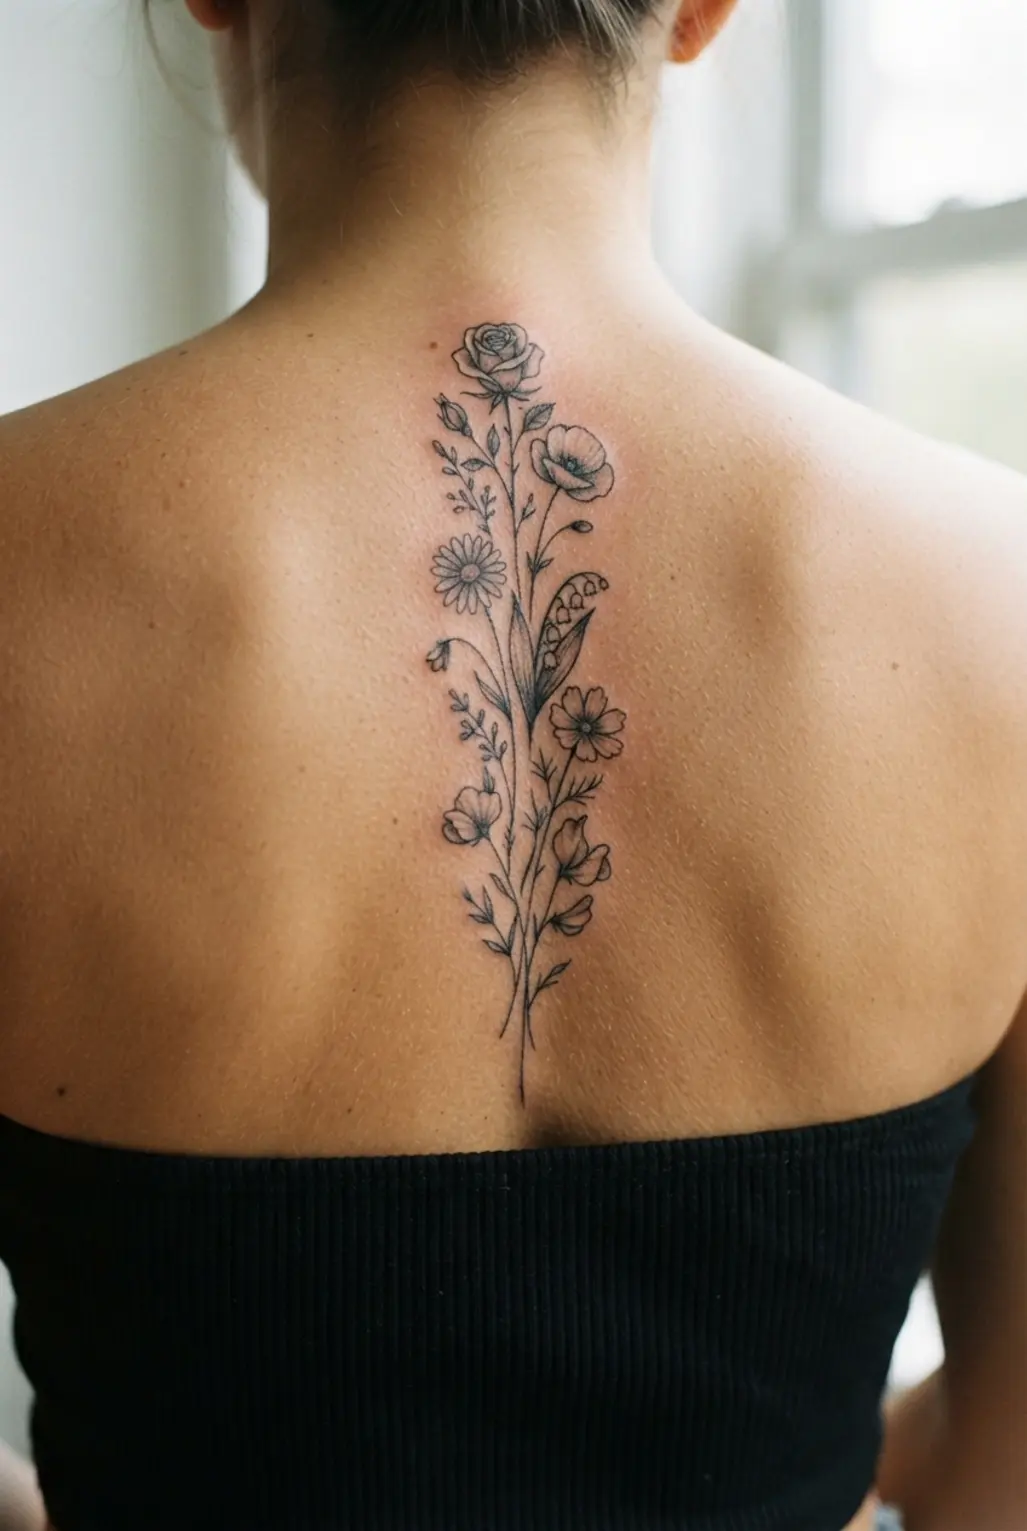
I love this one because it feels personal without looking heavy. Start by choosing birth flowers for each loved one or meaningful month, then arrange the blooms from the upper back toward the lower back. Is there a prettier way to honor several people in one slim piece?
Ask your artist to map slim curved stems along the spine, leaving open space between each flower. Small leaves, dots, stars, initials, or dates add detail, yet restraint keeps the bouquet airy and readable. The vertical flow suits a back tattoo for women, while black ink gives the piece a clean, lasting look. Trust me, planning the spacing first makes the final bouquet feel graceful and balanced.
16. Serpentine Spine Crawling Blackwork Tattoo

Glossy curves snake from the neck toward the lower back, with a sharp head between the shoulder blades and a thin tail near the waist. I love this heavy black silhouette for its gothic energy.
Begin with spine curve mapping, then add gentle coils around the vertebrae. Fill key sections with black and leave clean gaps for scale highlights. Pointed leaves, thorns, or smoke-like filigree should stay lighter, so the serpent stays the first thing your eye sees. A full-spine layout gives this back tattoo for women strong, graceful flow.
Sound intense? It reads clearly with negative-space highlights and a tapered tail. Ask your artist to keep open areas in the scales, since contrast protects the texture as the tattoo settles. Trust me, this composition feels bold without looking crowded.
17. Floating Feather Shoulder Blade Tattoo Art

Many people assume a floating feather needs heavy shading, but its charm comes from open space. Sound complicated? It isn’t. Place it high on the shoulder blade, slightly toward the spine, with the shaft sloping downward along the body’s curve. Start with a fine-line outer contour, then add Delicate butterfly tattoo ideas.
Soft black-and-gray shading and subtle stippling add depth without making the feather dense. A few loose barbs drifting away create motion and suggest freedom, resilience, or letting go. I love how negative space around the feather keeps this feminine back tattoo light and personal.
Keep stars, initials, wisps, or a short quote tiny so they don’t crowd the design. Trust me, varying the barb spacing makes the movement feel natural. Ask your artist to follow the shoulder blade’s natural curve, then enjoy the graceful, airy result.
18. Minimalist Geometric Line Full Spine Tattoo

Map a central stencil from the neck to the lower back, following the spine’s natural curve with careful stencil alignment. Place small triangles, circles, and diamonds along the line, leaving generous negative space between each shape. Keep fine-line black ink light and consistent, with the pattern widening across the upper back before narrowing near the waist. Sounds complicated? It is not.
I love how this back tattoo for women feels clean yet personal, since the repeating geometry gives your back a calm visual rhythm without heavy shading. Its vertical flow follows your body instead of fighting it, which makes the full-spine placement feel balanced. Trust me on this one: check the stencil while standing and sitting before any ink goes in. You will feel proud when every shape sits neatly in place.
19. Detailed Siren Full Back Tattoo Design
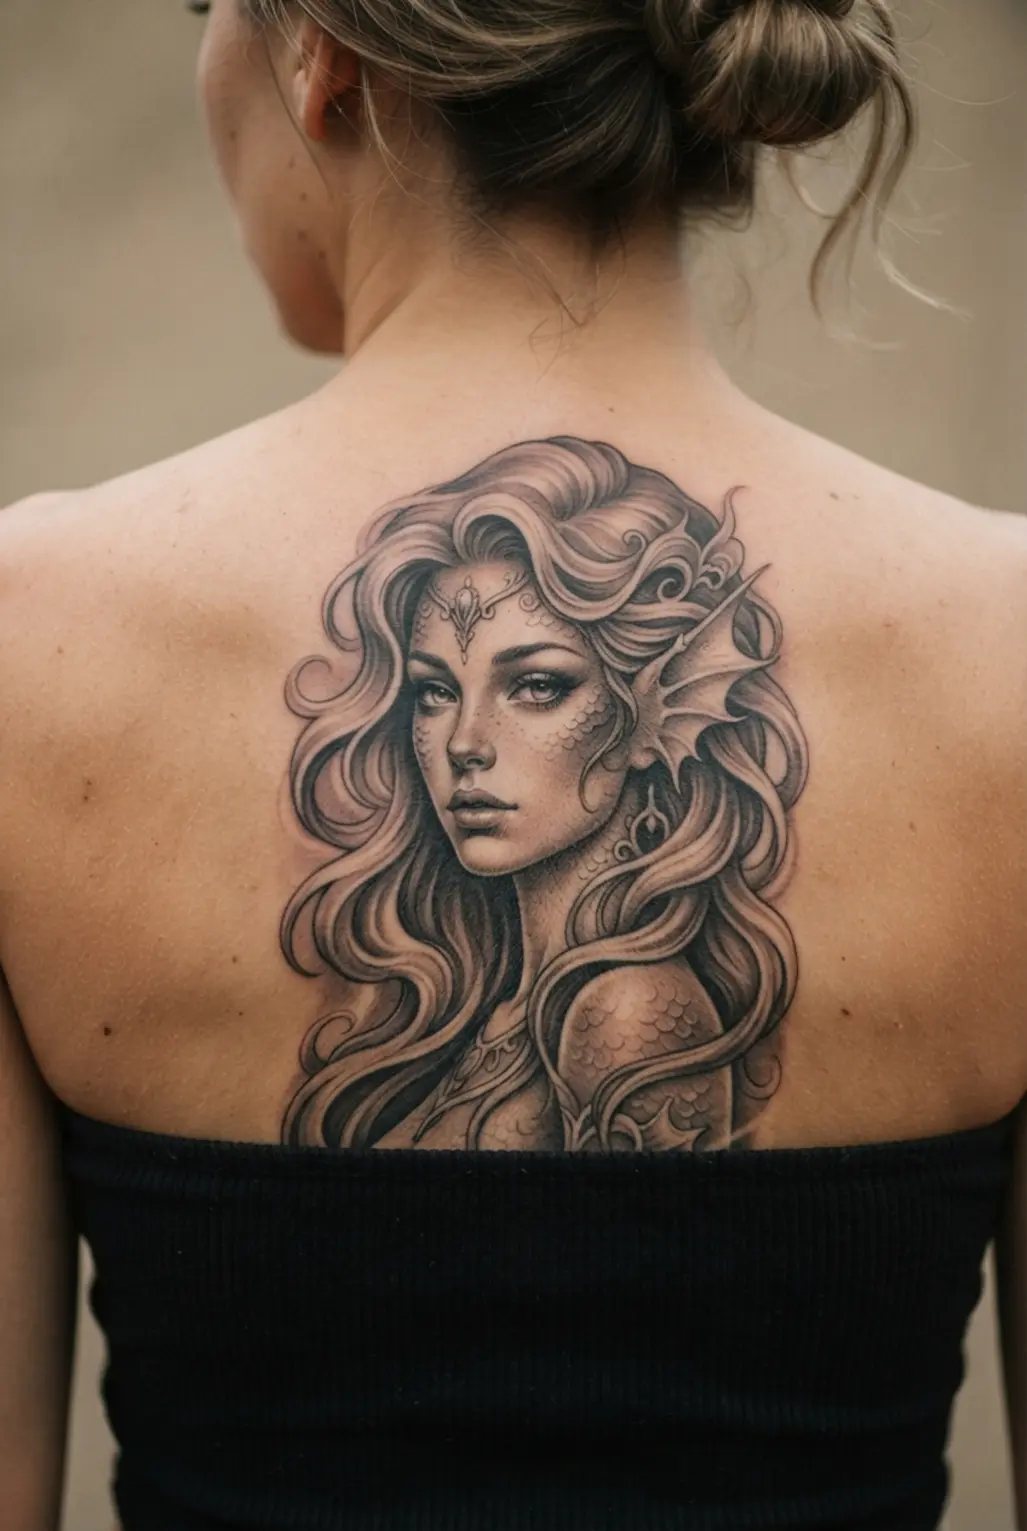
Is a calm siren’s face enough to guide a full ocean scene? Center her face and shell-covered torso between the shoulder blades, then guide a serpentine tail down the spine toward a split fin above the hips. Let flowing hair spread across both shoulders, changing into curling foam, seaweed, and fin-like wings. Use negative-space highlights for her eyes, pearls, jewelry, and bright wave edges, while dark water frames the figure.
I love how this full-back design gives every section a clear job: the face draws focus, the tail adds movement, and shipwreck pieces or coral fill the outer spaces without crowding her. Ask your artist for smooth grey gradients, fine lines, and a limited color palette. Pro tip: keep her expression clean before adding tiny details.
20. Ornate Filigree Lower Back Symmetry Piece
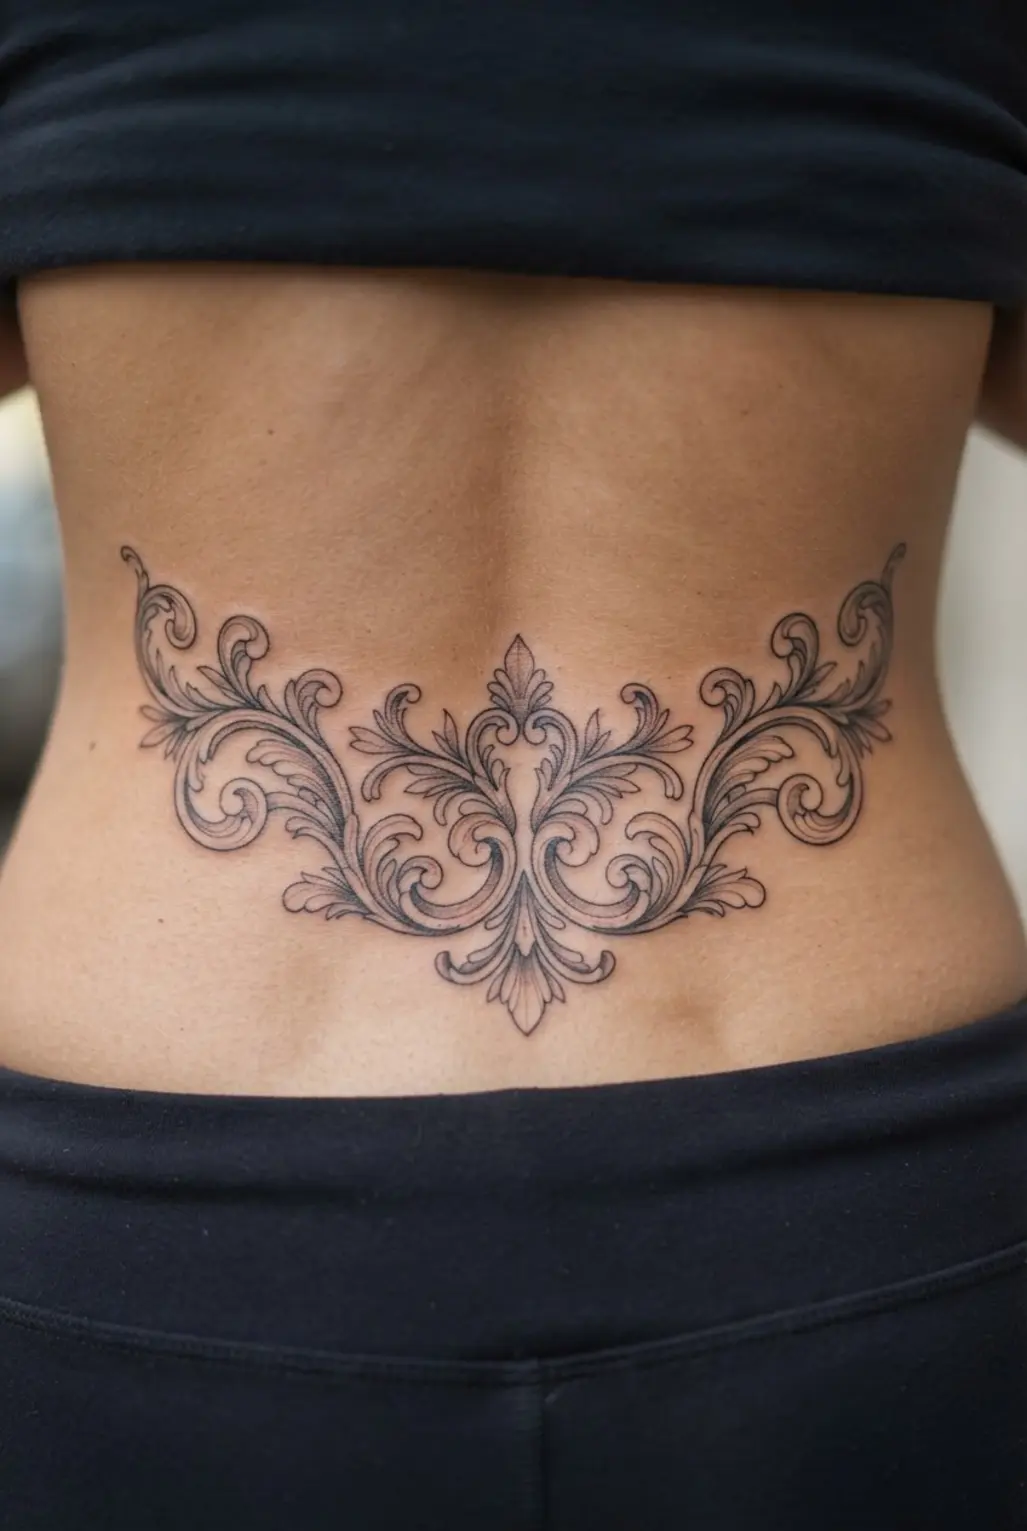
This ornate lower-back design looks lavish, yet its structure stays calm and orderly. Start with a clear center axis, placing a jewel, teardrop, or small mandala at the spine’s midpoint. From there, extend matching filigree curls toward each hip, keeping the outer edges at equal height and distance. Sound complicated? It is not when you sketch both halves lightly before committing to fine lines.
Add lace-like flourishes and soft dot work in open spaces, leaving enough breathing room for every curl to stay readable as the tattoo heals. I love how the central jewel gives a back tattoo for women a graceful focal point without making the whole piece feel crowded. Ask your artist to check the stencil while you stand naturally, since posture often shifts the apparent balance. Trust me, a clean mirror layout feels polished from every angle.
21. Fine-Line Koi Fish Upper Back Art

This is one of my favorite upper-back ideas because the koi feels graceful without taking over the skin. Sound complicated? It isn’t. A slim black outline follows the spine or angles gently across one shoulder blade, while fine-line details define scales, fins, whiskers, and a soft swimming curve. Keep the surrounding space open so the fish stays airy and calm.
Start with a stencil showing the full vertical flow, then add small ripples, lotus petals, falling petals, or a sun only where they support the composition. The negative-space plan keeps extra details from crowding the koi and helps every line stay readable. I love how this style suits a back tattoo for women while still feeling personal and refined. Ask your artist to shape the body with the spine, not against it, and enjoy the serene finish.
22. Hidden Heart Between Shoulder Blades Tattoo

Soft black vines curve along the spine while a tiny heart peeks through leaves between the shoulder blades. Does a quiet tattoo with a secret center suit your style? I love how the fine-line style keeps the meaning close, using light shading and a balanced width of about 2–4 inches. Your artist should refine the vines, place a stencil along the spine, then check symmetry against the shoulder blades before outlining. Keep the heart outline visible, so leafy details camouflage it without hiding its shape. This placement feels personal because you choose when its meaning is seen.
23. Celestial Phase Alignment Spine Tattoo Art

A common mistake with a back tattoo for women is letting the moon phases drift off the spine. Keep the sequence centered, with a crescent near the upper back, waxing and full moons through the middle, then waning phases below. Use a spine-aligned stencil before any ink goes in.
Sound complicated? It isn’t. Add a radiant sun or North Star at centre, then connect each phase with light orbit lines, tiny stars, and restrained dot work. I love how the repeated shapes create calm rhythm, while a tapered eclipse or teardrop gives the lower back a neat finish. Ask your artist to preserve open spacing so the celestial details stay airy and clear.
24. Stylized Tree of Life Back Design
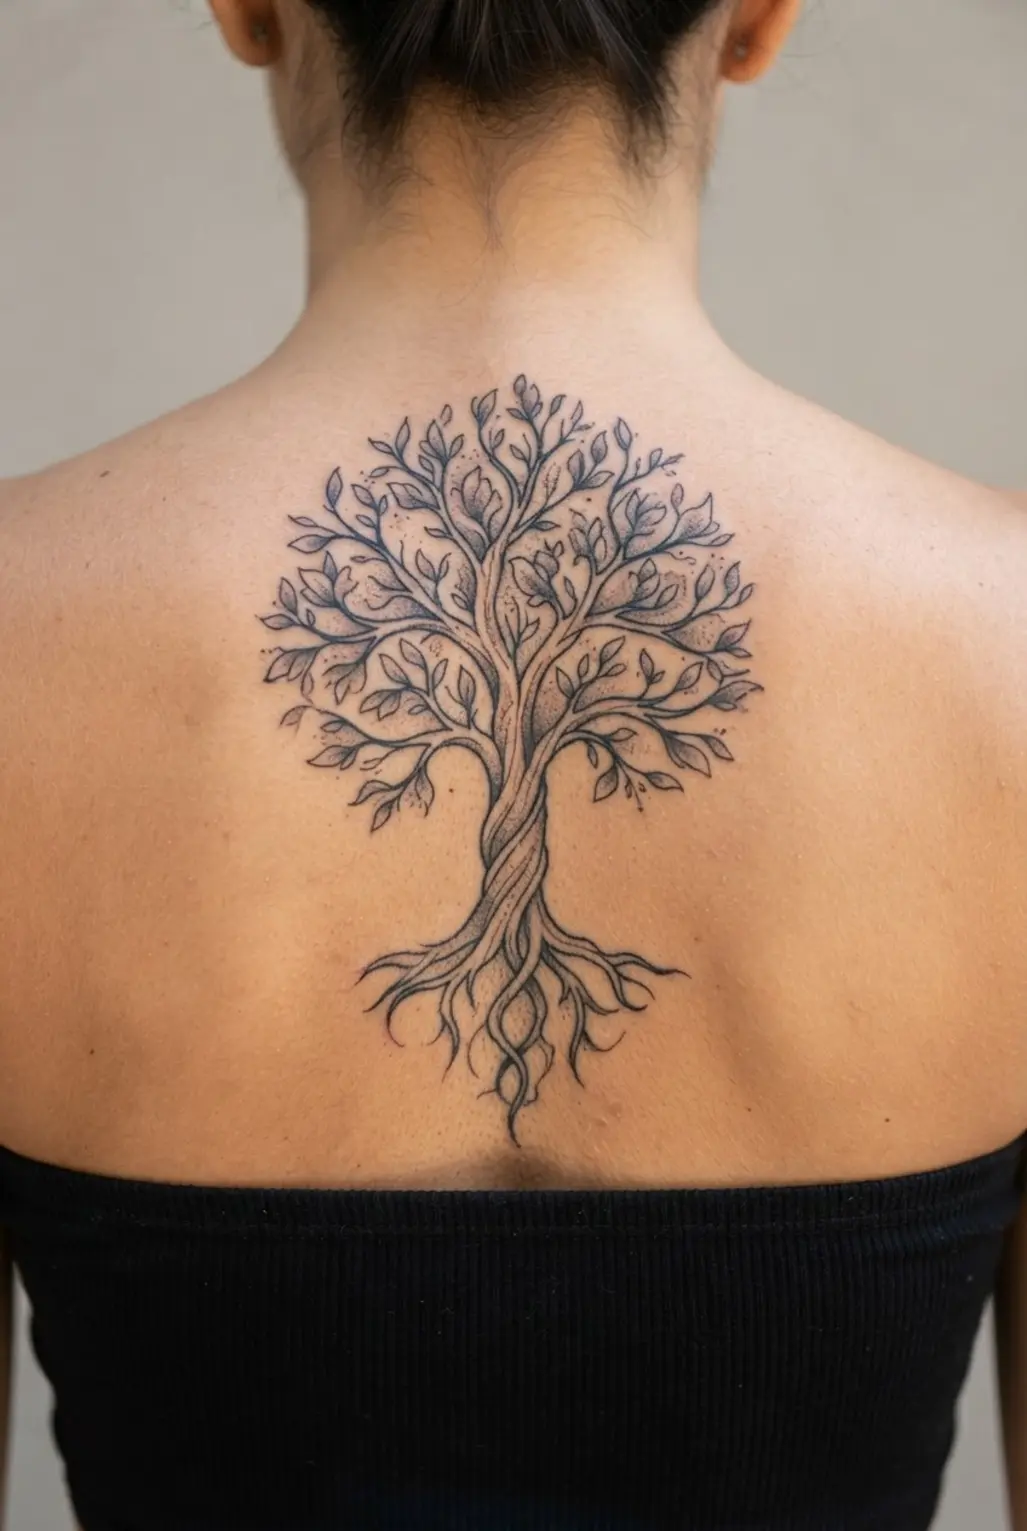
Map the central trunk along the spine first, then let balanced branches stretch across both shoulder blades. Add roots toward the lower back, filling the structure with flowing leaves, small geometric marks, and a few symbols such as birds, stars, or a crescent moon. Keep the outline elegant and open so every detail follows the back’s natural shape.
Sound complicated? It isn’t. Black-and-gray ink with selective shading gives the tree depth while keeping the fine lines clear, and hidden initials, dates, or family flowers bring a personal touch. I love how the finished layout feels meaningful without losing its calm ornamental look. Pro tip: ask for a symmetrical stencil, then check the trunk from several angles before the session begins. You’ll feel proud each time the branches frame your shoulders.
25. Elegant Roman Numeral Spine Placement Tattoo

Ever wondered how a meaningful date looks as body art? A centered column of Roman numerals runs from the nape toward the mid-spine, with delicate serif lettering, fine-line black ink, and calm spacing between each group. Small dots, stars, or botanical details add interest without taking over the clean design. I love how the vertical layout gives a personal milestone a quiet, timeless presence.
Start by converting your date accurately, then ask your artist to prepare a centered stencil placement before the session. Check the design from several angles, since even a small shift shows along the spine. Keep numeral groups open and easy to read, and choose an artist skilled in fine-line lettering. Your patience here pays off with a graceful result you will feel proud to wear.
Capturing Your Healed Tattoo in Natural Light
To properly document your healed back tattoo for women, photograph it eight to twelve weeks after the final session, once peeling and surface shine have ended. Use indirect window light beside a plain wall, since direct sun creates hard highlights across raised texture and hides subtle shading. Keep your shoulders relaxed and photograph from the same distance each time, with the camera level with the center of the back. A gray card beside the subject gives the artist a neutral color reference when skin tone or indoor bulbs shift the image. Avoid flash, filters, and heavy contrast, which exaggerate fine lines or deepen blackwork. Include one full-back view and closer views of the spine, shoulder-blade edges, and waist so every detail of your back tattoo for women remains crisp and clearly visible in the final image.
Conclusion
So, which design stayed with you after looking through these ideas? A back tattoo for women often means more than choosing a pretty picture. It gives you space for a memory, a symbol, a family detail, or a style you have loved for years. I hope you found an option with the right feeling and placement for your own story. Before booking, bring two or three reference images and tell your artist what you love about each one. Ask how the design will follow your spine, shoulder blades, or lower back as you move. A thoughtful conversation helps the final piece feel comfortable and personal. Take your time with the choice, keep the design true to you, and let your favorite detail lead the way. Your back deserves artwork you feel proud to wear, so pick the idea that makes you smile and take your next step with confidence.
FAQs
Q: How painful is a back tattoo for women?
A: Pain varies across the back. Areas near the spine, shoulder blades, and ribs often feel sharper, while fleshier areas tend to feel easier for many people.
Q: How should I choose between a spine tattoo and an upper back tattoo?
A: Choose a spine design for a narrow vertical look with strong direction. An upper back piece gives more width and works well with flowers, wings, moons, or symmetrical details.
Q: Will a fine-line back tattoo blur over time?
A: Fine lines often soften as years pass. A skilled artist, suitable spacing, good aftercare, and protection from strong sunlight help the design stay clear.
Q: What should I bring to my tattoo consultation?
A: Bring a few reference photos, notes about size and placement, and examples of lines or shading you prefer. Wear clothing with easy back access during the appointment.
Q: How long should I wait before exposing a new back tattoo to sunlight?
A: Keep fresh ink covered and follow your artist’s care directions during healing. After the skin settles, use broad-spectrum sunscreen whenever the area is exposed.