


Establishing Facial Proportions Through Measurement Techniques
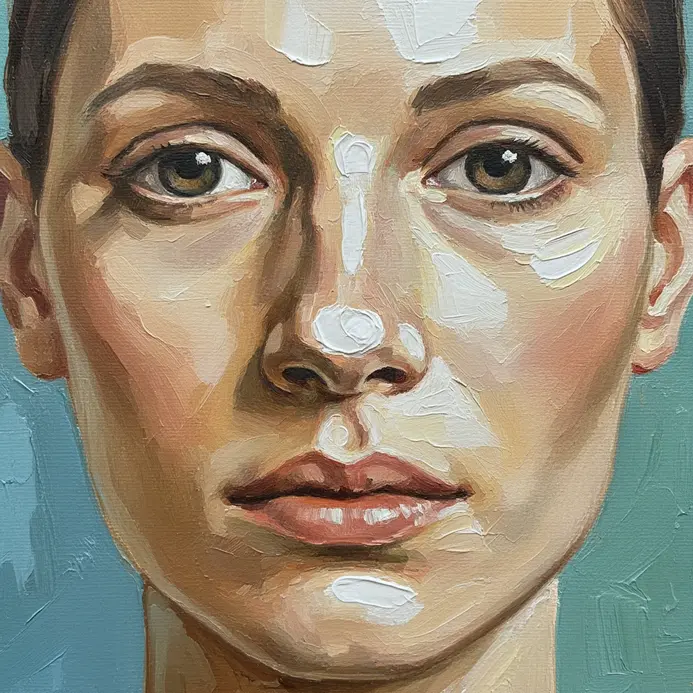
The fastest way to build a believable portrait is to start with a neutral grey underpainting to map your proportions. Trust me on this, that thin wash of grey gives you permission to make mistakes. You will use a simple pencil to measure from the brow line to the chin, then check that distance against the width from cheekbone to cheekbone. This basic structure is your road map, so take your time.
Applying this measuring method during your first easy acrylic portrait painting for beginners will save hours of frustration later. Beginners often rush this step, but getting these relationships right prevents endless corrections later. I always start by finding the center line of the face and marking the placement of the eyes, which sit halfway down the head. This reliable measuring technique creates a solid foundation for all your subsequent layers of paint.
Selecting Harmonious Color Palettes For Skin Tones
You will never find a perfect skin color tube of paint, and that is good news. Real skin is built from layers of transparent color. Start with a simple triad of a warm red, a cool blue, and a yellow ochre. Mix these on your palette with a touch of white to block in the large mid-tone shapes of the face.
The secret is to keep your mixtures slightly muted, not too saturated. For shadows, add more of your blue or a touch of burnt umber to the local color. Your highlights get a boost from titanium white with a hint of that original yellow. Mastering a limited palette is exactly what makes an easy acrylic portrait painting for beginners look so cohesive. This limited palette approach forces harmony and prevents the cartoonish look that comes from using a single premixed flesh tone.
1. Select a Clear, Well-Lit Reference Photo

Ever feel overwhelmed trying to paint a face from a blurry phone snapshot? Trust me on this one, your entire painting journey starts right here. A sharp, high-resolution photo lets you see every detail you need, from eyelashes to subtle skin tones. Good lighting, ideally from a single source to one side, creates those distinct shadows and highlights that give a face its form.
When selecting your reference for an easy acrylic portrait painting for beginners, always prioritize sharp contrasts over soft focus. This simple step removes so much guesswork, letting you focus on mixing colors and building shapes instead of squinting at a pixelated mess. For a great warm-up before you tackle a portrait, practicing some simple acrylic painting on canvas is a fantastic way to get comfortable with your brushes and paint flow first.
2. Prepare Your Canvas with a Neutral Primer

Ever start a portrait and feel the stark white canvas is too bright to judge your colors? I love this step because it solves that instantly. Mix a bit of Raw Umber or Payne’s Gray into your gesso to create a light gray or off-white wash. Apply this tinted primer evenly with a large brush for a smooth, consistent surface.
This toned ground makes it so much easier to see true values and color saturation as you paint. Your darks will look dark and your lights will look properly light from the very first stroke. Toning the canvas is a classic step in any easy acrylic portrait painting for beginners tutorial. Trust me, taking these few minutes to prep gives your entire portrait a more cohesive feel right from the start.
3. Sketch a Light Outline of the Facial Features

Ever felt the urge to jump right into drawing a detailed eye? I get it, but trust me, taking a light, preliminary pass is your secret weapon. This is where you use your HB or 2H pencil to lightly map out the almond shapes of the eyes, the soft bridge of the nose, and the line of the mouth, all using those handy construction lines you already drew.
That light sketch serves as your essential blueprint for every easy acrylic portrait painting for beginners you tackle. Your hand should feel feather-light, just placing simple shapes where they belong. This basic outline acts as your portrait’s blueprint, ensuring everything fits together correctly before you commit with easy subjects to paint. Resist the urge to perfect every eyelash now.
Isn’t it a relief to know these faint guides will steer you clear of major proportion mistakes later? Keep your strokes loose and observational. You will refine everything naturally as the painting progresses.
4. Mix Your Base Mid-Tone Skin Color

Does mixing skin color feel intimidating? Trust me, it is just a fun puzzle of adding tiny bits of paint. You will start with your dominant warm color, like Titanium White for lighter tones or Burnt Sienna for deeper ones. Then, you introduce a speck of red for life, and finally, you adjust the warmth with a tiny touch of blue or raw umber to get it right. This is my go-to process because it gives you a realistic foundation for all your highlights and shadows.
Remember, this is an iterative process, so mix a little, compare it to your reference, and adjust. Getting this base color correct is a fundamental step, and it is much easier once you have practiced with some easy subjects to paint. Your portrait will look vibrant and believably alive when your mid-tone is perfect. Mixing that foundational color is truly the core skill behind a successful easy acrylic portrait painting for beginners workflow.
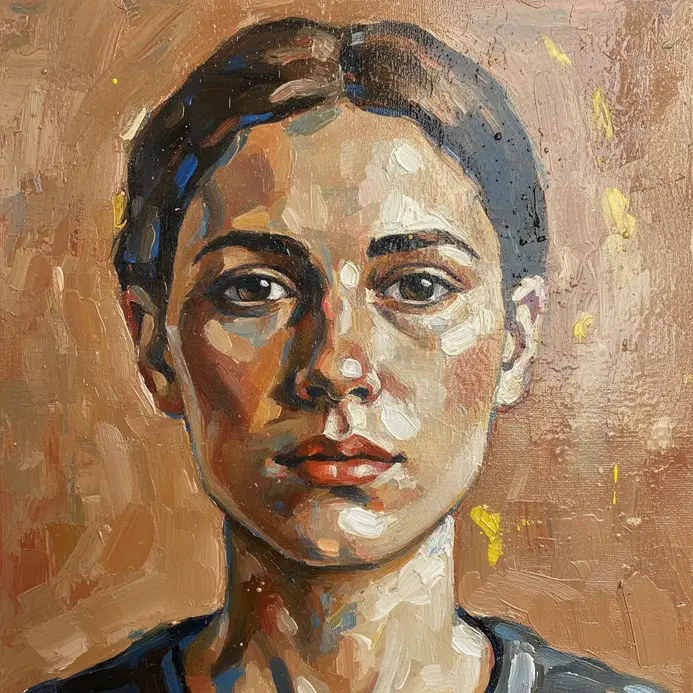
5. Block In the Main Shadow Shapes Across the Face

Ever feel overwhelmed trying to paint every little wrinkle and crease? Let’s skip that for now. The real trick is squinting your eyes at your reference until the details blur. You will see big, simple patches of shadow instead. I love this step because it turns a flat sketch into something sculptural instantly.
Use a thinned wash of burnt umber to lightly paint those main shapes. Think about the shadow under the brow, one side of the nose, and under the lower lip. Thinking in simple shadow masses completely transforms how you approach an easy acrylic portrait painting for beginners project. Your goal is to lay down a base mid-tone, not the final dark value.
It works because it establishes the three-dimensional form before you get lost. Trust me, getting this foundation right makes all the later blending and details so much easier. Your portrait will have convincing depth, and you will feel that satisfying click when the face looks solid.
6. Apply the Darkest Shadow Under the Jawline

This step sounds dramatic, but it is the secret to a sculpted, defined face. Feel for the hard bone of your jaw, then apply a cool-toned contour shade directly underneath it, following the bone from your earlobe to your chin. Trust me, a matte, greyish-brown shade works best to mimic a real shadow.
Dark colors recede, making that area look like it is set back, which instantly creates the illusion of a sharper jawline. Placing that single cool tone correctly anchors your easy acrylic portrait painting for beginners to a realistic space. Just remember to blend it seamlessly so it looks like a natural shadow, not a stripe of paint.
Isn’t it satisfying when that simple line makes your whole portrait look more three-dimensional? Keep the edges soft and follow the underlying anatomy. This subtle shadow work adds instant structural weight to your composition.
7. Define the Large Basic Shape of the Hair

Ever tried to paint hair and gotten lost in all the tiny strands? The trick is to not draw a single one yet. I love this step because it forces you to see the hair as one solid shape, like a sculptor would. Use a large, soft brush to block in the overall silhouette first, focusing on its main direction and how much space it fills. This gives your portrait a solid foundation and stops the hair from looking flat or pasted on.
Blocking the overall hair shape early keeps your easy acrylic portrait painting for beginners looking balanced and solid. For a great reference on future projects, exploring creative portrait concepts can spark new ideas. Trust me, nailing this basic form first makes all the detail work later feel so satisfying.
8. Layer Mid-Tones onto the Cheeks and Forehead

Ever wondered how portraits get that soft, lifelike glow? This step is your secret weapon. Mix a color that sits between your lightest highlight and darkest shadow for the skin. I love using a soft round brush to apply thin, translucent layers onto the rounded cheeks and broad forehead.
Layering those translucent mid-tones brings the gentle transitions you want in an easy acrylic portrait painting for beginners. It builds the foundation of the face, making it look three-dimensional instead of flat. Trust me, seeing those gentle transitions appear is incredibly satisfying.
9. Paint the Eye Sockets as Simple Dark Shapes

Ever feel intimidated by painting eyes? This trick simplifies everything. Instead of trying to draw the eyeball, you just lay down a simple dark shape where the socket goes. I love this approach because it instantly builds depth and structure. Use a medium-sized brush to block in that soft almond form, making the area right under the brow the darkest.
Your dark color should match your light source, so try a deep blue-grey for cool light or a burnt umber for warm light. Defining those soft dark shapes instantly builds depth, which is a major win for your easy acrylic portrait painting for beginners practice. This foundational step gives your portrait a three-dimensional quality right away. It is a perfect foundation for later details and a great way to explore abstract concepts for beginners.
10. Fill In the Base White of the Eyes

This step always surprises new painters. Did you know the white of the eye is rarely, well, white? It is usually a light grey, cream, or blue-grey. Start by outlining the eye shape carefully with your brush. Then, fill it in with that light, desaturated color in thin, even layers. Avoid pure white from the tube, as it looks unnatural.
I love how this simple choice instantly adds realism. Choosing that desaturated off-white instead of pure tube paint instantly elevates your easy acrylic portrait painting for beginners. It sets the perfect foundation for the iris and pupil later on. A precise application here makes everything else fall into place beautifully.
Try it and feel how much more alive your portrait looks. Keep your brush clean and your strokes smooth. The eye area responds best to gentle, layered applications.
11. Establish the Center Line and Shape of the Lips

Ever feel like the mouth is the hardest part to get straight? I love this one little trick that makes it foolproof. Find that little groove right below the nose, the philtrum, and draw a light line straight down from its center. That is your perfect center line for the lips.
Next, mark where the center of each pupil falls, and drop light lines from there to find the corners of the mouth. Mapping those vertical guidelines perfectly prevents lopsided features in your easy acrylic portrait painting for beginners journey. Does that sound complicated? It is not.
These simple construction lines give you a perfect box to draw within, so your lips will never look lopsided. Trust me, starting with this framework makes the whole portrait feel balanced and real. Keep your marks faint until you are ready to commit with pigment.
12. Mix a Lighter Color for Secondary Skin Highlights

Ever notice how skin looks flat without those soft, glowing transitions? This is where secondary highlights come in. They are broader and less intense than your main highlights, adding roundness and life. Start with your base skin tone or a primary highlight, then gradually add a touch of white and maybe a whisper of Naples Yellow to warm it up. This subtle shift in hue and saturation makes the light feel real.
Try your mix on a scrap first. Apply it with a softer brush to areas like the curve of the forehead and the bridge of the nose. This is my go-to trick for building realistic depth. It is perfect for practicing on ideas for small canvases where you can focus on detail.
Feel the satisfaction when your portrait starts to look luminously real. The highlights should blend naturally into your mid-tones. A smooth gradient creates a convincing illusion of rounded form.
13. Refine the Overall Shape and Planes of the Nose

Ever tried painting a nose and ended up with a flat, cartoonish shape? It happens to everyone at first. The trick is to stop thinking of it as a line and start seeing it as a simple wedge or block. This mental shift helps you nail the angle and projection right away.
I love this step because it feels like sculpting with light. Block in those major top, side, and bottom planes first, then soften the transitions between them with your brush. Isn’t it satisfying when that form suddenly pops off the canvas? Pay special attention to the tip and nostrils, as they are rarely a single sharp point.
Your portrait will instantly look more realistic and dimensional. Trust the underlying geometry rather than chasing fine outlines. Smooth your value shifts carefully to maintain a natural flow across the bridge.
14. Add Warm Highlights to the Forehead and Brow Bone

Ever feel like your portrait looks a bit flat? This step is my secret for making a face feel sculpted and alive. Apply a soft, warm-toned highlighter like a soft gold or peach to the very top of the forehead and just under the arch of the brow. Use a fluffy brush for a diffused glow, not a sharp line.
It works because it mimics how light naturally hits the highest points of the face. Try it and feel that instant lift and radiance in your finished work. Keep your strokes light and feathered to avoid harsh edges. The warmth should gently merge with your cooler skin transitions.
15. Darken the Pupil and Define the Iris Color

Ever feel like the eyes in your portrait look a bit flat? Darkening the pupil is your secret weapon for instant depth. Use a tiny brush with a touch of black paint, carefully filling in that central circle. Do not overdo it, though.
A subtle, dark pupil makes the eyes look alive and focused. Next, look at the colored ring around it. The iris is never one flat color. I love taking a clean, damp brush to gently blend and lift a little paint from the iris center, leaving the outer ring more intense.
This creates a natural gradient and makes the eye sparkle. Your subject’s gaze will suddenly feel real and engaging. Mastering these details builds your confidence with portrait features. It is the same foundational practice you get from working on simple still life setups, where you learn to observe subtle shifts in form and color. Feel proud when those eyes start to look back at you.
16. Apply Clean Highlights to the Eyes and Eyebrows

Ever notice how a portrait can look flat until you add that little sparkle? This step is all about subtle brightening. I love using a soft-edged white brush at a very low opacity on a separate layer. Gently paint over the catchlights in the eyes and along the top edge of the brow bone where light naturally hits. It is not about making things white, it is about lifting the tones that are already there.
Trust me, this tiny bit of definition makes the whole face look more awake and vibrant. Keep your brush clean and your marks minimal. The catchlight placement directly dictates the direction of the light source in your portrait. A precise, thoughtful placement draws the viewer into the subject’s expression instantly.
17. Define the Corners and Shadow of the Mouth

Those corners of the mouth are much more than two little lines. They are soft, rounded transitions where the upper and lower lips meet, and they are pulled by a whole network of facial muscles. I love paying attention to this because it is the key to showing a genuine smile or a thoughtful frown in your portrait.
To build realistic form, you need to define the shadow of the mouth. This is not a drawn line, but the actual shadow cast by the lips onto the skin below. Look for that soft, curved shape under the lower lip. Isn’t it amazing how that simple shadow instantly makes the face look three-dimensional?
Feel proud when you nail this subtle detail. Soften the edges with a clean brush to maintain a natural transition. The mouth anchors your facial expression, so take your time here.
18. Add Lighter Strokes for Hair Texture and Shine

Ever notice how hair in a portrait goes from a flat shape to something that looks alive? That is all about adding those final light strokes. I love this step because it is where the magic happens. You will take your fine-tipped brush, load it with a lighter mix of your hair color, and add delicate strokes where the light naturally hits, thinking about the crown and any curves facing your light source. This creates the illusion of shine and individual strands, giving your portrait’s hair incredible volume and movement.
It works because our eyes are trained to see light bouncing off surfaces. Adding those highlights tells the viewer exactly how the hair is shaped in three-dimensional space. For a truly polished look, studying a few mini acrylic canvas paintings can show you how masters handle light in a small, focused area. Trust me, you will feel so proud when that hair looks real.
19. Blend Transitions Between Different Skin Tones

Ever wonder how to make two skin tones look like they naturally belong together, not like a harsh line? The secret is you never jump directly from one color to the next. Instead, mix a few intermediate colors on your palette that sit between your light and dark tones, adjusting both the value and the hue slightly each time. Then, apply these in thin layers, letting them softly overlap on the canvas.
This approach works because it mimics how light and color actually behave on real skin, creating that smooth, believable depth you are after. Trust me, mastering this will make your portraits feel truly alive. Use a soft, clean brush to melt the boundaries together seamlessly.
20. Enhance Shadows Under the Nasal Bridge and Nostrils

Ever notice how a nose can look a little flat and undefined after you apply your base layers? A tiny bit of shadow work makes all the difference. Using a cool-toned contour shade, draw a soft, horizontal line right under the tip of the nose, where it meets your upper lip. Then, gently blend it upwards to create a seamless shadow.
This simple trick creates the illusion of depth, making your portrait’s features look more three-dimensional and sculpted. Trust me, mastering this small detail is a huge step in your acrylic pouring for beginners journey, as it builds your confidence with value and form. Feel that satisfaction when the face suddenly pops with realism. Keep the shadow edges soft and diffused to maintain natural anatomy.
21. Refine the Clean Edges of the Jawline and Chin

Ever feel like your portrait is almost there, but the face looks a bit soft or undefined? This final touch makes a huge difference. I love using a small, firm round brush loaded with a slightly darker skin tone to carefully trace that contour. Work slowly, letting the contrast between the face and neck do the heavy lifting to create that sharp edge.
It is satisfying because a clean jawline instantly gives your subject structure and presence. Try it and feel how your portrait snaps into focus. Maintain consistent pressure for an even, confident line along the neck boundary. The crisp edge will anchor the entire head composition firmly on the canvas.
22. Add the Final, Highest Skin Highlights
Ever notice how a portrait goes from good to glowing? This is that moment. You will place your very brightest dots of paint only on the skin most prominent points facing the light, like the brow bone and tip of the nose. I love using a tiny detail brush for this precise touch.
Keep these highlights subtle and build them slowly, thinking about the light color. The goal is a soft sparkle, not a greasy shine. You will see the skin suddenly look three-dimensional and alive. Try it and feel the magic when your subject features truly pop. Rest your hand lightly on the canvas edge to avoid smudging adjacent areas.
23. Clean Up the Edges of Any Background Objects

Ever notice how a messy edge can make your whole portrait look less polished? This final digital step is my secret for a professional finish. Start by using your software Select and Mask feature to refine the outline around your subject. Adjust the sliders for a smooth, natural transition, and always use the Decontaminate Colors option to remove any color fringes from the old background.
Getting those edges clean is deeply satisfying because it makes your subject pop from the canvas. Once you have mastered this, you can apply the same precise control to build up texture with easy impasto techniques for your next piece. Keep a steady hand and check your silhouette against a neutral value. A crisp boundary instantly elevates the overall presentation.
24. Assess the Likeness and Adjust Overall Values

Ever feel like your portrait looks a little off but you cannot quite pinpoint why? This is where the magic happens. You need to step back and assess the overall likeness and values. I love grabbing a handheld mirror to flip my painting. This fresh perspective instantly shows you if the eyes are spaced correctly or if the nose is angled right. It reveals mistakes your brain has gotten used to.
Then, squint your eyes to see the big picture of light and shadow. Are the shadows dark enough to create depth? Is the face looking flat? This is where you adjust those overall values with thin glazes to deepen shadows or brighten highlights. It transforms a generic face into your specific subject. Feel that incredible satisfaction when it finally looks just like them.
25. Apply a Protective Gloss Varnish Layer
Ever wondered why museum paintings look so vibrant? That final, glossy layer makes all the difference. I love pulling out my acrylic gloss varnish for this step. It is a clear liquid you brush smoothly over your entire dry portrait. This creates a uniform, protective shield that locks in your colors.
This is not just about shine. The gloss varnish works by reflecting light back through your paint layers, making every hue appear richer and deeper. It safeguards your work from dust, scratches, and UV rays. You will see your portrait pop with a professional, finished look.
Trust me on this one. Wait for your painting to be bone dry, then apply thin, even coats. Let each coat dry fully before adding another. Stand back and admire your protected masterpiece.
Does that not feel satisfying? Keep your workspace ventilated and free of floating dust. The final finish will preserve your hard work indefinitely.
Preserving Finished Work With Archival Varnish Application
One thin layer of matte acrylic varnish protects weeks of work from dust and UV damage in about two minutes. Apply it only after your painting is completely dry, which for acrylics means waiting at least 48 hours. Use a wide, soft brush reserved only for varnishing and work in consistent, overlapping strokes.
A matte finish is my go-to for portraits because it eliminates glare and gives a professional, unified look. This sealant locks in your colors and provides a stable surface for the painting longevity. Make sure your work area is clean and dust-free before you start. That final coat is what turns your practice piece into a finished artwork you can be proud of for years. Store your completed canvases flat to prevent warping during the curing phase.
Conclusion
You have just walked through the entire process of building a portrait from the ground up. That feeling of accomplishment when you step back and see a face you created is what keeps us coming back to the easel. Remember, the goal of your first portrait is not photorealism, but learning to see the face as a collection of light, shadow, and simple shapes. For your next project, try using the same steps with a reference photo under different lighting. Each easy acrylic portrait painting for beginners you complete will build your confidence and refine your eye. Your personal artistic voice grows with every layer you place on the canvas.
FAQs
Q: What is the best brush set for a beginner portrait painter?
A: Start with a few synthetic brushes in basic shapes. You need a medium flat brush for blocking in large areas, a medium round brush for details like eyes, and a small round brush for fine lines. Synthetic brushes hold acrylic paint well and are easy to clean.
Q: How do I mix realistic skin tones with acrylics?
A: Begin with a base of red, yellow, and white. Add a tiny amount of blue or green to create natural shadows and neutrals. Mix more than you think you need, as matching a color halfway through a painting is difficult. Test your mix on a scrap paper next to your reference photo.
Q: My portrait looks flat. How can I add more dimension?
A: Focus on increasing the contrast between your lightest lights and darkest darks. Check your reference photo and make your shadows darker and your highlights brighter. Do not be afraid to push the values further than feels comfortable at first.
Q: How long should I wait for acrylic layers to dry?
A: Thin layers of acrylic paint dry to the touch in about twenty minutes. Thicker applications need an hour or more. You can work quickly on adjacent wet areas, but wait for a layer to dry completely before painting precise details or glazes on top.
Q: Is it necessary to varnish an acrylic painting?
A: Varnishing is strongly recommended. It protects the painting from dust, UV light, and minor abrasions. It also unifies the surface sheen, making colors appear more vibrant. Always ensure your painting is completely dry, which can take a week, before applying varnish.


