


Classroom Adhesive Selection for Paper and Wood
When you gather materials for groundhog day crafts for kids, you will find the fastest way to a project falling apart is using a standard glue stick on popsicle sticks. You need a fast-grab white craft glue that bonds porous materials. That tacky, thick formula gives you a few seconds to adjust the stick onto your paper burrow before it sets. Trust me, a thin, runny school glue will simply soak into the wood and paper, leaving nothing to hold. For attaching paper shadow layers to a paper plate base, a standard stick works fine. The key is matching the adhesive to the job at hand. A strong bond for moving parts means less frustration for little hands and a craft that survives the trip home.
Template Design Strategies for Rapid Assembly
Pre-cutting the groundhog body from brown cardstock eliminates the biggest time sink for your youngest students. Designing rapid templates for groundhog day crafts for kids means providing a simple silhouette with one straight edge at the bottom for easy gluing. Provide a separate, pre-cut black paper shadow that is slightly larger. This lets the children focus on the fun part, which is assembling the layers and adding personality with markers. The visual impact comes from that high-contrast color palette you planned. Giving them these key pieces means the entire class can move from coloring to interactive play in one smooth session, and everyone finishes with a project that looks intentional.
1. Make a Friendly Paper Plate Groundhog Face Mask

This one is a classic for a reason. Adding a face mask is a beloved approach to groundhog day crafts for kids because it sparks imaginative role-play from the very start. You start by coloring or covering your charming groundhog. paper plate brown and cutting out two eye holes for vision. Then, you add rounded ears with pink centers and a little pink nose. Drawing on a smile and whiskers brings your groundhog to life. I love how this simple project lets kids create a toy they can wear. You can find more inspiration by checking out these easy crafts for kids. A great tip is to have your child hold the plate to their face so you mark the eye spots perfectly.
2. Build a Playful Cardboard Tube Pop-up Groundhog Toy

This is one of my favorite interactive crafts, especially to celebrate Groundhog Day. Designing movable parts for groundhog day crafts for kids brings instant entertainment when you build this pop-up mechanism. You start by decorating a cardboard toilet paper tube with green grass and a brown burrow. The magic happens when you slide your homemade groundhog, attached to a craft stick, up and down inside. Cut your groundhog from brown paper, add a lighter belly and snout, and don’t forget those googly eyes. I love how the simple up-and-down motion brings the whole scene to life. Trust me, seeing that little face pop up never gets old for young creators.
3. Create a Brown Paper Bag Groundhog Puppet for Storytelling

This one is a favorite of mine – you get a finished puppet ready for a show in about ten minutes. Creating story puppets remains one of the most beloved groundhog day crafts for kids for building narrative skills. Lay your brown paper lunch bag flat with the bottom flap up to form the head. Glue on a light brown muzzle, a brown nose, and some big googly eyes for a friendly face. Cut out brown ears with lighter inner pieces and fold a small tab to attach them securely to the top corners of the head. Want to make a whole cast? This project pairs perfectly with other fun family craft ideas. It is so satisfying to see a child bring their groundhog to life for a story.
4. Craft a Shadow Groundhog Silhouette on a Wooden Stick

This one is a real crowd-pleaser. Exploring light and shadow adds a magical layer to groundhog day crafts for kids when you trace shapes onto sturdy wood. You trace a simple groundhog shape onto a piece of 1/4-inch plywood, cut it out, and sand the edges smooth. Then, paint the whole thing a solid black and attach it to a wooden dowel to represent Punxsutawney Phil. Why does it work so well? The bold, dark silhouette is instantly recognizable and looks fantastic stuck in a potted plant or your garden. It is a wonderful way to make a simple holiday decoration that lasts. You can discover similar projects by exploring creative popsicle stick crafts.
5. Assemble a Fluffy Cotton Ball Texture Groundhog Collage

Who would have thought something so soft and cute could be so simple? Focusing on sensory development means cotton collage work becomes one of my favorite groundhog day crafts for kids to lead. You will start with a groundhog outline on sturdy cardboard. Apply a generous layer of white school glue inside the shape, then fill it by pulling apart and attaching fluffy cotton balls. Once the main body is covered, add personality with googly eyes and a little pom-pom nose. Trust me on this one, gently pulling the cotton apart before gluing gives your groundhog a wonderfully natural, fluffy texture. You will love how this charming collage of groundhogs turns out!
6. Form a Construction Paper Groundhog Handprint Art Keepsake

This is the one I love most for its sweet, personal touch. Capturing tiny shapes creates lasting memories, which makes handprint art a cherished choice among groundhog day crafts for kids. You start by tracing your little one’s hand on brown construction paper and cutting it out. Glue that handprint onto a blue paper background, letting the fingers point down like a groundhog peeking from its burrow. Add a light paper snout, some googly eyes, and a tiny black nose. Isn’t it amazing how a simple hand shape transforms into a cute animal? The result is a wonderful keepsake that captures their size right now, especially as you celebrate Groundhog Day. Explore other seasonal art by trying these suncatcher craft ideas.
7. Build a Spring-loaded Cardstock Groundhog Toy

This one sounds complex, but the pop-up surprise is so worth it. Teaching basic mechanics alongside play makes spring mechanisms a brilliant addition to groundhog day crafts for kids. You will cut a simple groundhog shape from brown cardstock and create a small burrow box. The magic happens when you attach a small compression spring inside, letting your groundhog peek out on command. I love how this simple mechanism teaches a bit of science while kids play. The key is using a hot glue gun (with adult help) to secure the spring firmly. You might also enjoy looking at crafts for Father’s Day for similar builds. You will feel so clever when it works.
8. Sew a Simple Felt Finger Puppet Groundhog Character

Ever wondered how to make a puppet that fits right on your finger? Practicing fine motor control naturally happens when sewing becomes part of your groundhog day crafts for kids. This project looks detailed, but trust me, the simple shapes make it perfect for a first sewing attempt. You will cut two main body pieces from brown felt and attach a lighter belly and snout. Then you stitch on tiny black eyes and a nose for that friendly face. I love this one because it builds fine motor skills and gives kids a toy they made themselves. The best part is seeing them use it for storytelling. Does that not sound like a fun activity?
9. Create a Paper Cup Hidden Groundhog Surprise

Ever wondered how to make the groundhog’s burrow pop-up magic happen? Adding interactive surprises inside everyday containers elevates groundhog day crafts for kids into hands-on play sessions. You start by decorating a simple paper cup with markers or paper to look like a little hill. Then, you attach your cut-out groundhog to a craft stick and slide it through a hole in the cup’s bottom. Push the stick up and down, and voila, your groundhog peeks out! The interactive surprise is what makes this so fun for kids. It is a perfect, simple activity for celebrating the day, matching the joy found in Mother’s Day crafts for kids. My favorite tip is to make the hole snug so the stick does not wobble. Feel the delight when your groundhog pops up!
10. Paint a Wooden Spoon Groundhog Puppet

Who would have thought a humble wooden spoon could become such a charming little character? Transforming ordinary kitchen tools opens up wonderful creative pathways for groundhog day crafts for kids. This project transforms a common kitchen item into a friendly groundhog puppet perfect for storytelling. Paint the entire spoon with a base coat of medium brown acrylic paint, letting it dry completely between thin layers. Then, use a small brush to add the face details and pink inner ears for that adorable touch. I love this one because it is so accessible and encourages imaginative play. The key to a neat finish is patience with those paint layers. You can find seasonal inspiration by browsing Easter crafts for preschoolers.
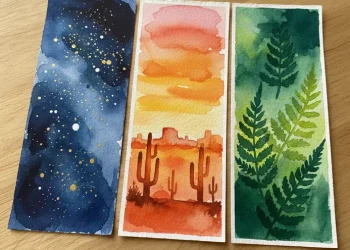
11. Print a Coffee Filter Shadow Scene with Watercolors

This one looks like magic, but it is all about simple science. Painting porous filters demonstrates simple watercolor techniques beautifully within groundhog day crafts for kids. You flatten out a basket-style coffee filter and sketch a simple shape, like a little groundhog, to cut out. Then, paint it with watercolors while it is still a bit damp so the colors bleed softly into each other. Once you have a few painted shapes, arrange them on a window or a sheet of clear contact paper. The real payoff comes when you hold it up to the light. Isn’t it stunning how the layers create a soft, dreamy shadow scene? I love how this project turns everyday materials into something so beautiful.
12. Fold an Origami Corner Bookmark Groundhog Face

This one is a personal favorite of mine – it looks like a complex origami project but it is surprisingly simple. Teaching spatial folding techniques keeps learners engaged during paper projects for groundhog day crafts for kids. The magic is in transforming a basic corner bookmark fold into a cute groundhog with a few extra folds and a marker. You will start with a square of brown paper, fold it into the pocket shape, and then gently fold down the top corners to create little ears. Then comes the fun part where you get to draw the face. Isn’t it satisfying to see a simple shape become a character? Use a black marker for the eyes and nose, and add a pink one for rosy cheeks. When it is done, you have a festive and functional little craft. For more seasonal fun, you might also enjoy these easy Halloween crafts to try later in the year.
13. Build a Popsicle Stick Log Cabin Diorama

Ever wondered how to build a whole tiny world? Building miniature structures builds structural awareness during groundhog day crafts for kids sessions in the classroom. This project looks impressive, but it is simply about stacking sticks and adding fun details to make a charming groundhog. You will start by gluing popsicle sticks side by side to form your cabin walls. Let each layer dry completely before adding the next for a sturdy structure. Then, paint your cabin and create a winter landscape on a cardboard base using moss and small pebbles to complement your groundhog. I love how this combines building with imaginative play. For more creative ideas, explore creative popsicle stick crafts. Feel proud of your miniature masterpiece.
14. Make a Paper Plate Groundhog Spinning Wheel
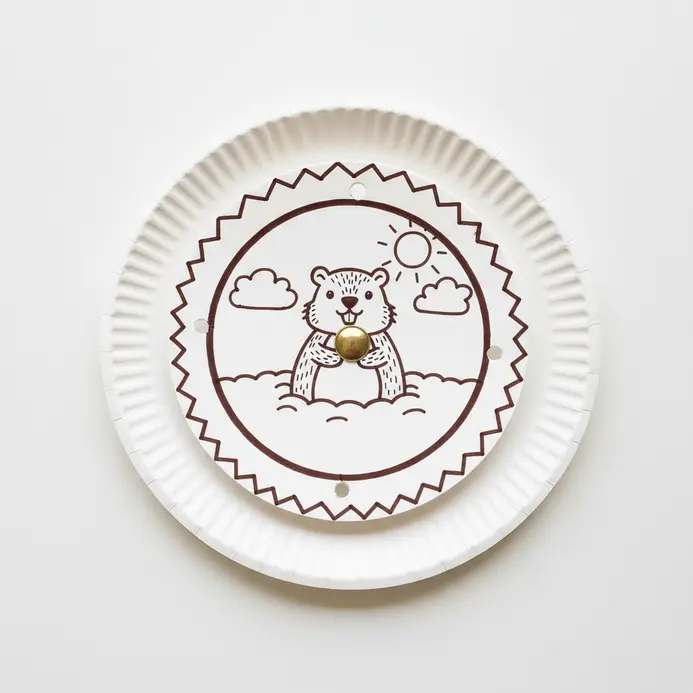
This one surprised me – it looks complex but really takes under 10 minutes to put together, perfect for February. Adding spinning wheels captures visual attention perfectly in groundhog day crafts for kids that tell a complete story. You start by decorating one plate with a sky and ground, then cut two windows in a second plate. The magic trick is gluing the groundhog shadow onto your project. brown groundhog cutout and its black shadow underneath the top plate so they pop up as you spin. It works so well because the spinning action perfectly shows the holiday’s story in a way kids can touch and see. Trust me, watching a child’s face light up when their groundhog appears is the best payoff during this winter tradition.
15. Assemble a Cardboard Box Shadow Theater Stage

Ever wanted to put on a real show with your shadow puppets? This project gives you the perfect stage. You will need a sturdy cardboard box and some parchment paper for the screen. Cut a large window in the front, tape the paper over it from the inside, and reinforce the box’s seams with more tape. Place a flashlight behind it, and you are ready for your performance. I love how this turns a simple box into a platform for storytelling about Punxsutawney Phil. It is a fantastic way to spark creativity and dramatic play. For another great artistic project, check out these easy canvas painting ideas.
16. Wrap a Yarn Groundhog Craft Figure for Texture

This might look like a complicated project, but it’s a wonderfully simple technique. Wrapping textured materials creates wonderful tactile details for your classroom activities. You’ll start by cutting a basic groundhog shape from cardboard or using a Styrofoam egg. Then, you’ll wrap yarn tightly around the entire figure, securing it with tacky glue as you go. The result is a soft, furry-looking creature that feels fantastic to hold. It works so well because the yarn mimics real fur texture in a way paint simply cannot match. My favorite tip is to plan your wrapping path so you start and finish on the backside for a neat finish. For more fun craft ideas, try these Here are some creative clothespin craft ideas featuring groundhogs..
17. Cut a Printable Groundhog Moving Jaw Puppet

This one looks tricky, but it is such a fun and interactive project. You will print the template, cut out all the pieces, and then attach the lower jaw with its hinge so it can open and close. The real secret for success is using cardstock paper instead of regular printer paper. That extra thickness makes the jaw mechanism durable enough for lots of play. Align the hinge carefully before gluing to ensure smooth movement. Your kids will love making their groundhog ‘talk’ for the holiday! The moving parts bring so much personality to each creation.
18. Create a Coffee Stirrer Groundhog Hill Scene

Who would have thought leftover coffee stirrers could become such a cute little landscape? Recycling kitchen supplies adds rustic charm to holiday projects. You start by building a simple hill shape from layered cardboard, then cover it with broken and cut stirrers glued on in overlapping rows. This gives your hill that wonderful, rustic texture that makes it look real. I love how a hot glue gun makes this part quick and secure, even for little hands with supervision. Once your textured hill is ready, you tuck your groundhog figure into the burrow opening you created. Then, add some green felt or moss on top for grass and maybe a few tiny pebbles. The whole thing comes together as a charming diorama perfect for celebrating the holiday, much like these easy Thanksgiving crafts.
19. Cut a Glitter Foam Groundhog Sun Motif

This one looks so festive and is a breeze to put together. Adding shiny accents brings bright holiday cheer to your paper projects. Trace your groundhog and sun shapes onto the non-glitter back of your foam sheets, then carefully cut them out with sharp scissors. I love how the sparkling foam instantly makes this a cheerful craft. For a fun twist, you could add a magnet to the back and turn your groundhog into a seasonal decoration or explore some DIY keychain ideas for a portable project. Does that not look stunning? The vibrant colors really pop against the blue background.
20. Weave a Paper Strip Groundhog Burrow

This one looks like a serious construction project, but trust me, it’s surprisingly easy and so satisfying to see come together. Weaving flat materials teaches basic patterning skills in a hands-on way. You’ll start by creating a simple cardboard loom with an arched burrow entrance. Then, the fun part: weaving brown paper strips over and under to build up the earthy walls. Push each new row down snugly against the last to make your burrow nice and dense. Isn’t it cool how a simple over-and-under pattern creates such a realistic texture? It’s a fantastic way to introduce basic weaving while celebrating the holiday. I love that kids get to decorate their finished tunnel with green grass and a little groundhog peeking out. You’ll be amazed at the charming little habitat they create, and they’ll feel so proud of their three-dimensional masterpiece.
Interactive Shadow Theater Presentation Techniques
Turn a simple desk into a stage by draping a large piece of black construction paper over a stack of books. The kids can kneel behind it and hold their puppets close to the paper, using a flashlight or the classroom window light to cast a sharp shadow. Encourage them to narrate their groundhog’s story as it pops up and down. This is where the brass fasteners on moving parts really shine, allowing for smooth puppet animation. That moment of performance validates all the assembly work. It transforms a cute craft into a memorable lesson about light, shadows, and seasonal change that the whole class can share.
Conclusion
The real magic of these projects is watching a child’s face light up when their groundhog puppet pops up or their shadow figure dances on the wall. It is not about a perfect finished product, but about the joy of making something that moves and tells a story. My best advice is to keep it simple; let the kids lead with their imagination, and focus on the fun of the process. Using these groundhog day crafts for kids is a wonderful way to create a little seasonal memory, one googly eye and paper tube at a time. The classroom stays engaged when hands-on learning meets playful storytelling.
FAQs
Q: What are some easy groundhog day crafts for kids that use simple materials?
A: A few easy projects include a paper plate adorable groundhog mask, a toilet-roll groundhog puppet, and a chalk groundhog scene drawn on black paper. These crafts use simple materials like paper plates, construction paper, glue, crayons, and markers, making them perfect for kindergarten or at-home activities.
Q: How can I make a groundhog puppet that helps kids predict the weather?
A: To make groundhog puppets, cut a groundhog shape from cardstock, attach it to a craft stick, and decorate with googly eyes and a pom-pom nose to create an adorable groundhog named Sam or another character. Use the puppet in a game where children “predict” whether the groundhog sees his shadow; if he does, they say “six more weeks of winter,” and if not, they celebrate early spring with a related treat or activity.
Q: Are there free printable templates for groundhog day crafts and activities?
A: Yes, many websites offer free printable groundhog templates and PDFs for masks, coloring pages, and themed decorations. Look for a free printable that includes a groundhog picture, cupcake toppers, and a groundhog scene that you can color and cut out for an easy way to celebrate Groundhog Day on February 2.
Q: What is a fun classroom activity that lets kids predict the weather on February 2?
A: Create a prediction station where each child fills out a simple card saying whether they think the groundhog will see his shadow. Display the cards, read predictions aloud, and later compare results. Pair the activity with a story about Pennsylvania groundhog traditions and a themed treat like a groundhog cupcake to make the festivity memorable.
Q: How can I turn groundhog crafts into a group activity for kindergarten?
A: Set up stations with simple materials for different projects: mask-making, puppet-building, and a chalk groundhog scene. Rotate small groups so each child contributes to a cooperative groundhog scene mural. This approach encourages fine motor skills, creative play, and a shared way to celebrate Groundhog Day in class.


