


Luminosity Through Strategic Pigment Layering
The brightest white in your painting is the untouched paper, so you must plan your highlights first. This means painting around the shapes of light on a plum or the glisten on a berry, letting that pure white paper shine through. Applying these easy watercolor fruit painting ideas starts with understanding how light interacts with fresh washes. You build luminosity by applying thin washes of pigment, starting with the lightest yellow in a lemon slice and letting each layer dry before adding a deeper orange glaze. Your goal is to create depth without muddiness, which is why a limited palette of two or three primary colors works best. This method allows light to bounce through the transparent layers, giving your fruit that glowing, juicy look we all love in watercolor. Remember, you want to avoid the beginner trap of painting dark too soon, as it flattens the form and kills that essential light.
Achieving Organic Texture With Controlled Water Ratios
Juicy texture on a raspberry or the bloom on a grape comes from mastering the water-to-paint ratio on your brush. For soft, blended transitions like the inside of a peach, load a round brush with plenty of water and pigment and drop it onto damp paper. Then, for crisp seeds or stem details, switch to a nearly dry brush with thick paint and apply it to dry paper. Mastering controlled water ratios is essential for easy watercolor fruit painting ideas that feel genuinely fresh. This contrast between wet-on-wet and wet-on-dry techniques is what makes the painting feel alive. You will notice that cold-press watercolor paper holds these washes perfectly, giving you time to work. The key is to let each stage dry completely before adding the next layer of texture, preventing colors from bleeding together into a muddy mess. This control over water is what separates a flat study from a piece that looks fresh-picked.
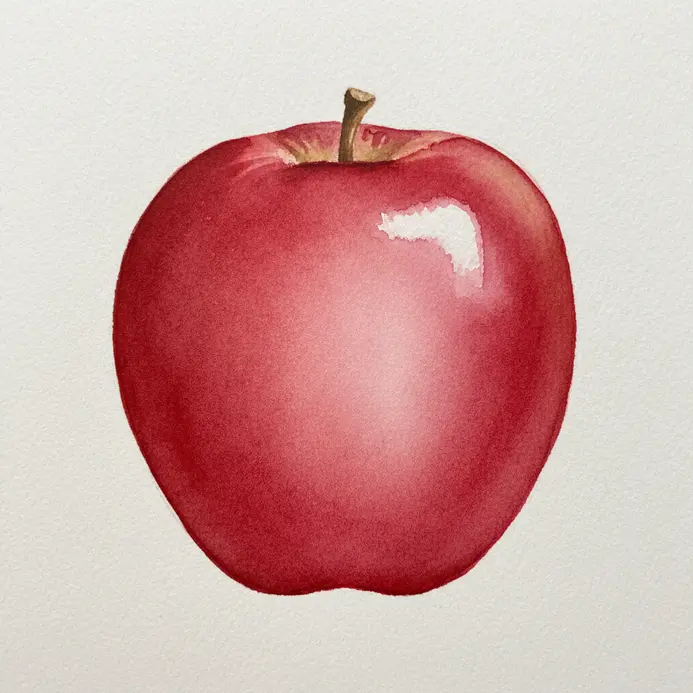
1. Paint a Single Red Apple with a Wet Gradient
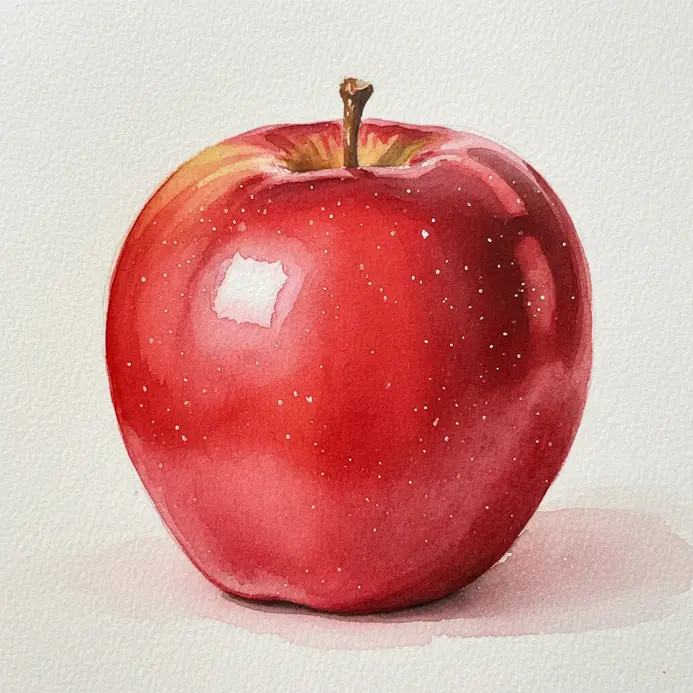
This technique looks complex but is wonderfully forgiving for beginners. You start with a light pencil sketch, then use a large round brush to wet the paper inside your apple outline. While the paper is still glistening, drop in your first wash of bright red paint. The magic happens as you introduce darker reds and a touch of yellow while the surface is damp, watching them blend into a seamless, luminous gradient. This wet-on-wet method gives your apple that juicy, realistic glow we all love in watercolor, making it a perfect starting point for easy watercolor fruit painting ideas. For a whole collection of beginner-friendly projects, check out more watercolor painting ideas to build your skills.
2. Golden Pear with Cast Shadow: Build Form with Simple Washes
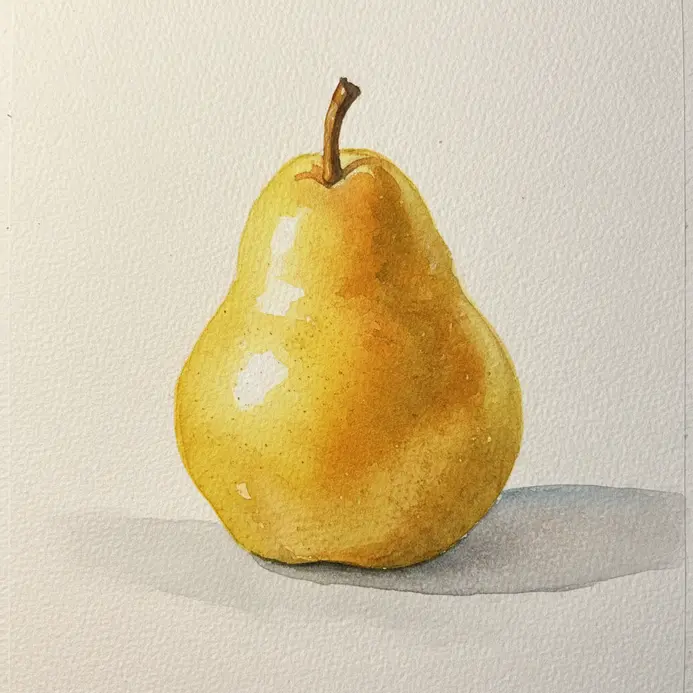
Ever wondered how a simple wash can make a fruit look so round and real? You will start with a light sketch, then apply a diluted yellow wash everywhere except your highlight. Let that dry completely, then layer on warmer yellows and oranges to build its curves. For the shadow, mix in a cool blue to make it darkest near the pear and softly fade away. This works so well because watercolor’s transparency creates a glowing, luminous look, a core principle behind easy watercolor fruit painting ideas. I love how the cool shadow makes that warm pear pop right off the page. Trust me, starting light and building up slowly is your secret to a beautiful, three-dimensional piece. Feel that satisfaction when your pear looks good enough to pick!
3. Capture a Bright Yellow Whole Lemon Study
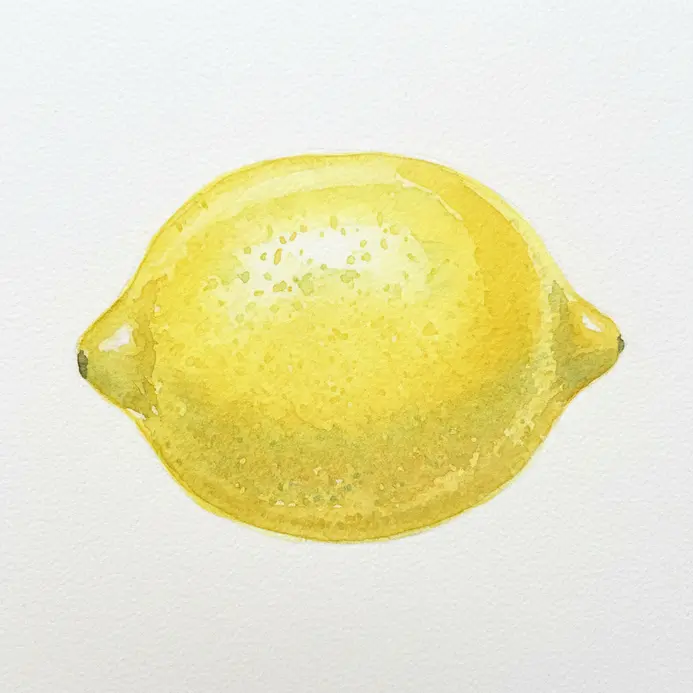
Who would have thought a simple lemon be such a vibrant subject? For this study, I love focusing on the feeling of that bright yellow form rather than every tiny detail. Use a loose, impressionistic style with your watercolor brush to build the shape. Let the color do the work by mixing in hints of green and orange, and use a touch of purple in the shadow to make that yellow sing. This approach teaches you to see light and form through color, not just line, a vital skill for easy watercolor fruit painting ideas. A great next step to build on this expressive color work is to explore pastel watercolor techniques. Feel that fresh, juicy zest come to life on your paper.
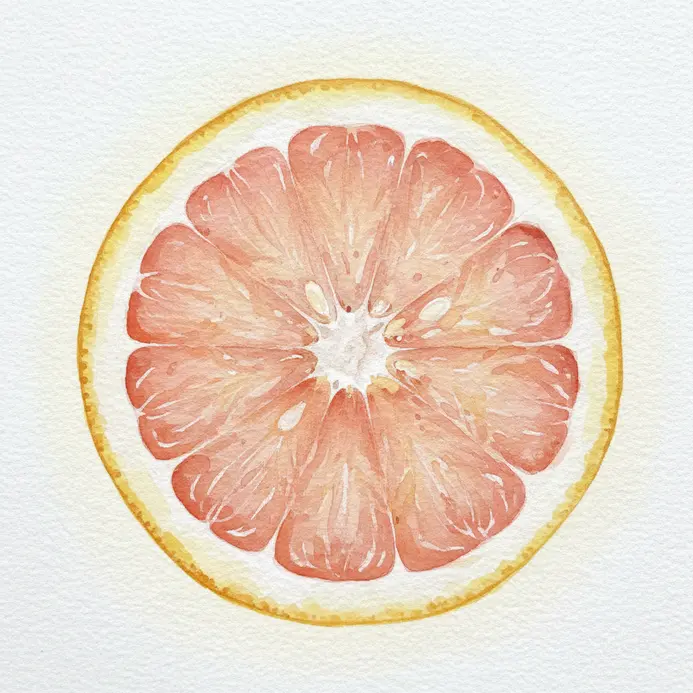
4. Cross Section Orange Slice Detail: Layer Transparent Color
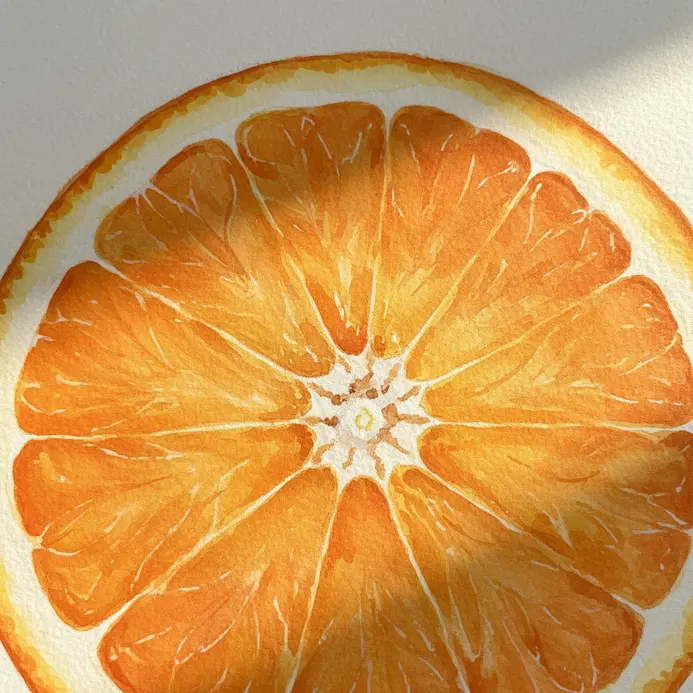
Ever wondered how artists make fruit look so juicy and real? The secret for an orange slice is building up transparent color layers. You start with a simple mid-tone, then add darker glazes for depth and bright, luminous ones where the light shines through. I love how this mimics the way light actually glows within the pulp, creating a realistic foundation for vibrant watercolor fruit. easy watercolor fruit painting ideas. It feels incredibly satisfying when those thin layers come together to create a convincing translucent effect. For a deeper dive into this kind of technique, explore how to achieve realistic watercolor effects in your other projects, remember to use the first layer technique for vibrant watercolor fruit.
5. Create a Cluster of Deep Blue Blueberries
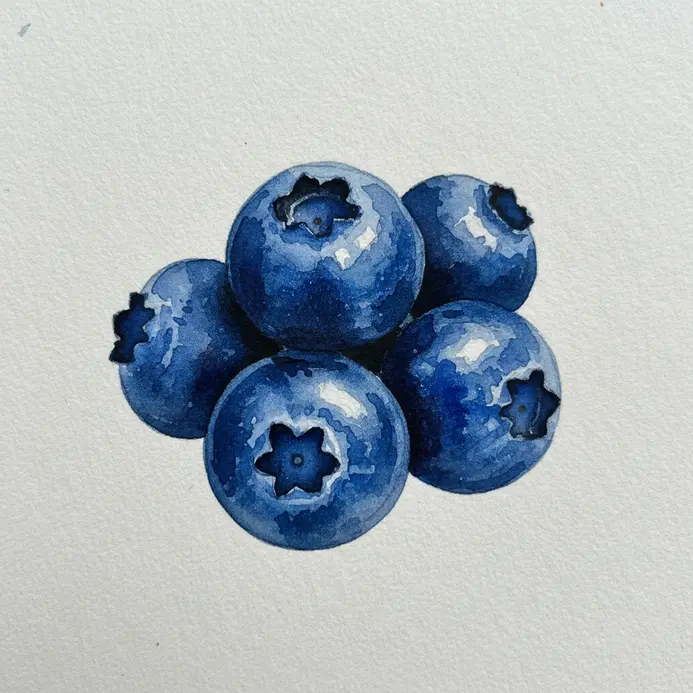
Ever wondered how to capture that perfect waxy bloom on blueberries? The secret is all in the layers. Start with a light deep blue wash on your overlapping circles. While it’s damp, add darker blues where berries touch to create instant depth in your vibrant watercolor fruit. Once dry, a whisper of light gray dabbed on top gives you that fresh, powdery look. This technique is so satisfying because it makes the fruit look juicy and real, not flat, which is why artists love this layering technique for developing vibrant watercolor fruit. easy watercolor fruit painting ideas. My go-to tip is to use a very diluted light gray for the bloom. A heavy hand makes them look dusty. Feel the freshness come to life on your paper.
6. Single Strawberry with Green Cap: Use a Small Round Brush
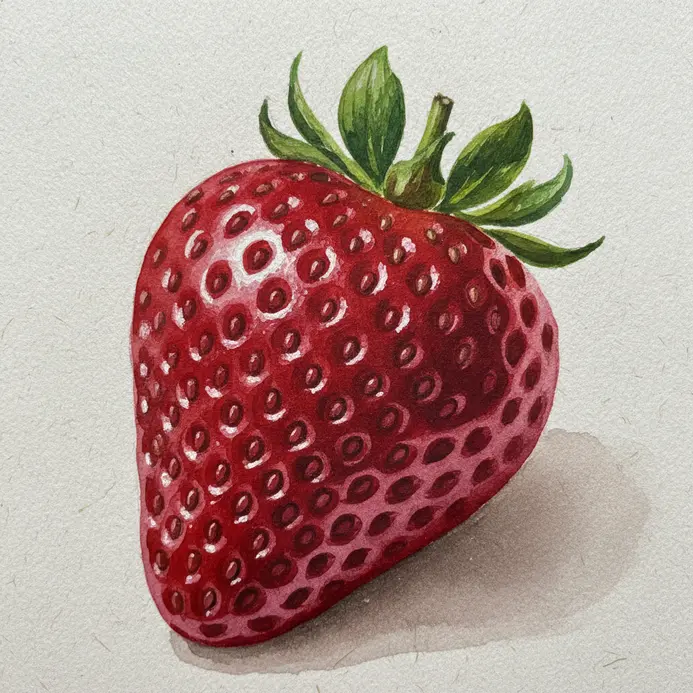
This project looks detailed but is surprisingly quick. Grab your small round brush and start with a light red wash for the strawberry’s body, letting it dry a bit before adding the green cap. Then, use the fine point of that same brush to layer darker reds for shadows and to dot in those tiny, yellow seed accents. I love how the transparency of watercolor builds up that juicy, realistic look, proving why beginners gravitate toward easy watercolor fruit painting ideas. Try it and feel the satisfaction when your strawberry pops off the page. For a different, playful style, you can also discover whimsical watercolor painting.
7. Watermelon Wedge with Black Seeds: Apply Bold Color Blocks
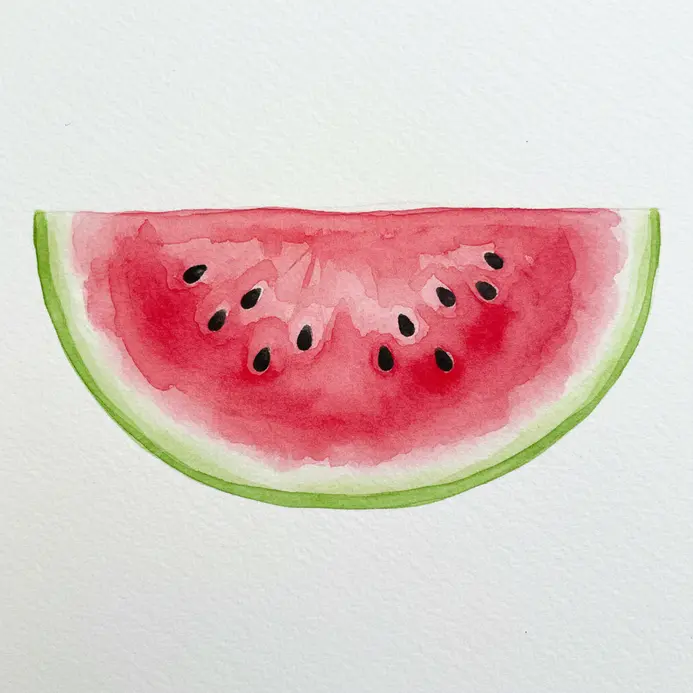
Who would have thought a simple fruit slice look so graphic and striking? This approach is all about bold color blocks. You fill each distinct section of your wedge with a solid, vibrant color. The red flesh, white pith, green rind, and black seeds are all separate, crisp zones of color with no blending. I love this direct method because it makes the natural geometry of the fruit pop. It is satisfyingly simple, yet the result is a clean, impactful illustration that fits nicely into collections of easy watercolor fruit painting ideas. If you enjoy this graphic style, you can try easy still life painting to build a whole collection. Pro tip: let each color dry completely before painting the one next to it to keep those edges sharp. Feel how fresh and vibrant your finished piece looks.
8. Form a Bunch of Purple Watercolor Grapes
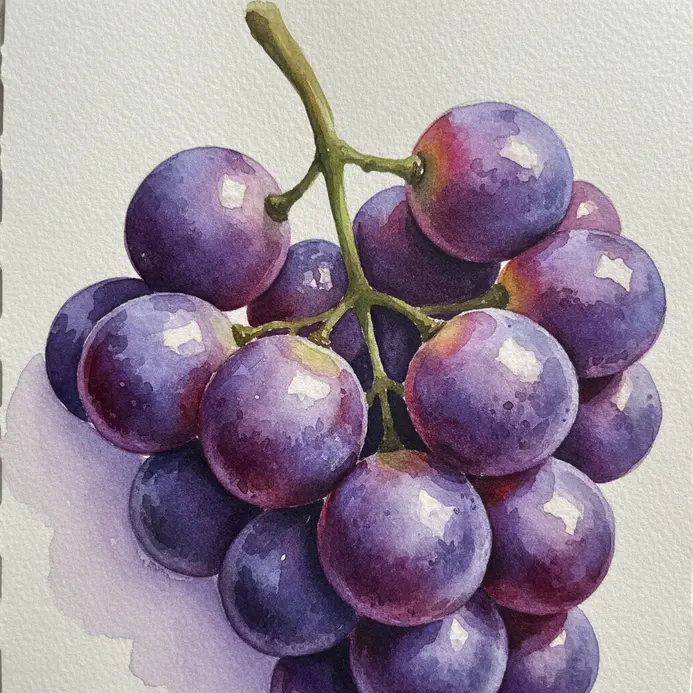
Ever wondered how artists get grapes to look so juicy and three-dimensional? It all starts with a light sketch of overlapping circles, then a slightly diluted wash of a warm purple for each grape, leaving a tiny white spot for the highlight. Once that’s dry, you build depth by adding slightly deeper tones to the shadowed sides. I love this approach because the gradual layering creates natural color variations and makes each grape look round and plump, a favorite trick for developing vibrant watercolor fruit. easy watercolor fruit painting ideas. Trust me, you will feel a real sense of accomplishment when your cluster of grapes starts to look convincingly real.
9. Spotted Banana with Dark Tip: Achieve a Gentle Curve
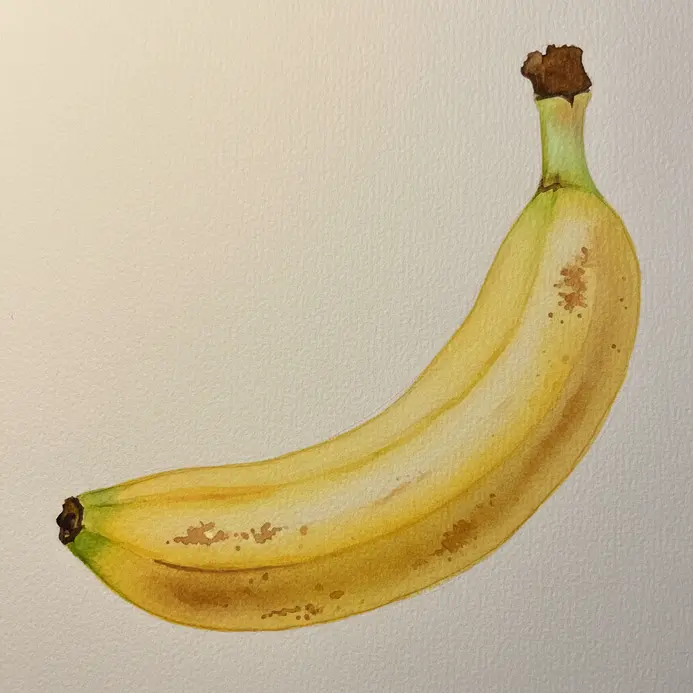
Ever notice how a banana’s curve is what makes it feel real, not just a yellow crescent? The secret is a soft, flowing line as your foundation. I love starting with a light HB pencil sketch, letting my hand follow that natural arc. Then, I build the form by shading the opposite side of the light source, keeping the darkest area at the tip and letting it fade as it follows the curve. This works because your eye naturally reads that gradual shadow transition as a three-dimensional object. For those signature spots, add them last with a small round brush, making sure they get lighter and less dense on the highlighted side. It is a fantastic exercise in seeing light and form, and you will find many guides for easy watercolor fruit painting ideas recommend this exact method. You can learn watercolor painting techniques in this step-by-step tutorial to master the art. to bring it all to life with color. Feel that satisfaction when your banana looks good enough to eat!
10. Sliced Kiwi Segment Inner Texture: Detail with Dry Brush
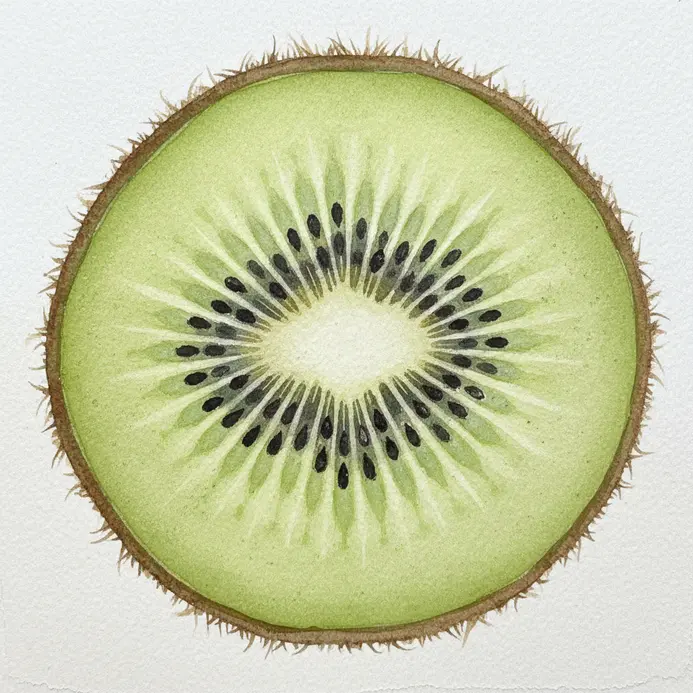
Ever wondered how to paint those tiny, fuzzy fibers inside a kiwi without making a muddy mess? This is where the dry brush technique becomes your secret weapon. After your base wash is completely dry, wipe almost all the paint off a small, stiff brush onto a paper towel. Then, gently drag it across the surface to create those scratchy, broken lines that mimic the fruit’s granular texture perfectly. It feels so satisfying to see that realistic depth appear with such a simple, controlled touch. Observe your reference closely to see where the fibers cluster and where shadows form. I love using a slightly darker green for these areas to build subtle dimension. For a great next step after mastering this textural detail, you can discover easy paintings for beginners that use similar techniques. Trust me, your fruit studies will look incredibly juicy and lifelike when you apply this dry brush step to easy watercolor fruit painting ideas.
11. Peach with Soft Fuzzy Gradient: Blend Warm Orange Tones
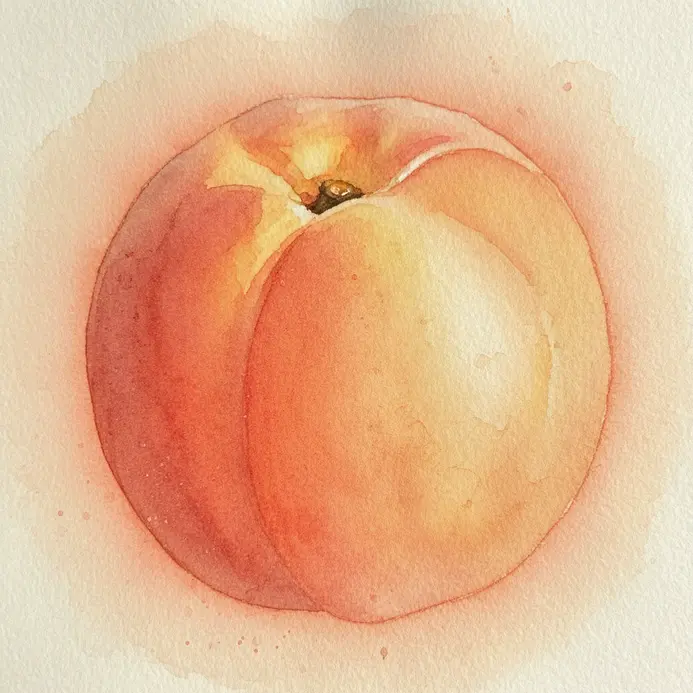
Ever wanted to paint a peach that looks good enough to eat? This one is a favorite of mine because it looks complex but is all about a simple, forgiving blend. The key is using a first layer of soft apricot hue to build your base. wet-on-wet technique. Start by dampening your paper and dropping in light yellow-orange, then gently introduce deeper peach and orange tones while everything is still wet. You will love how the colors merge on their own to create that soft, fuzzy skin. Let the paint do the work for you, especially when creating vibrant watercolor fruit. Do not over-blend with your brush; instead, allow the vibrant watercolor fruit to shine through. Just guide the pigments and watch that beautiful, warm gradient appear. The result feels wonderfully realistic and luminous, capturing the fruit’s delicate texture just as intended in easy watercolor fruit painting ideas. Trust me, the satisfaction of seeing those seamless transitions is fantastic.
12. Juicy Pomegranate Open Interior View: Layer Red and White
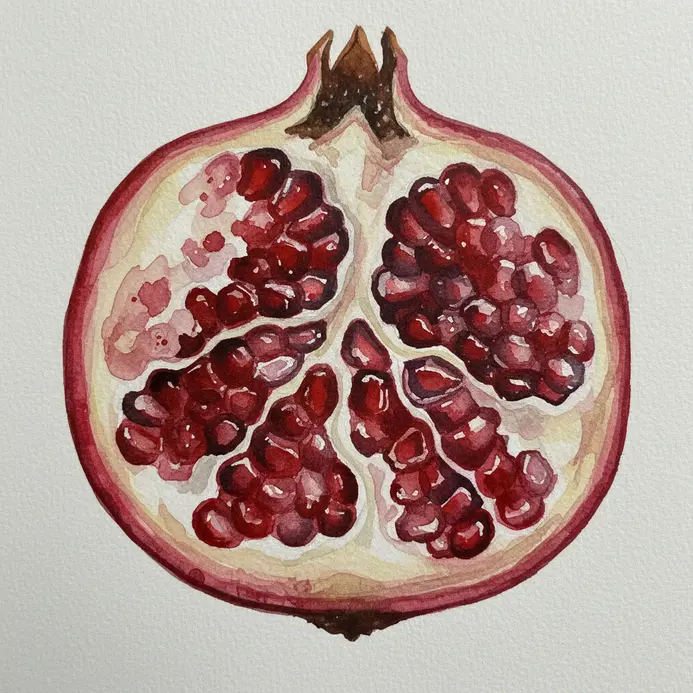
Who would have thought the inside of a pomegranate be such a satisfying watercolor subject? You are not just painting a fruit. You are capturing the stunning contrast between the jewel-like red arils and the creamy white pith. Start with a light wash for that creamy white pith. Let it dry completely, then build up those ruby red arils with multiple thin, transparent layers. That layering is what creates the luminous, juicy look you are after. Trust me, the moment those vibrant reds pop against the clean whites is pure magic, showcasing the best of easy watercolor fruit painting ideas. For more small canvas painting inspiration, explore similar detailed subjects.
13. Cherry Pair with Realistic Stem: Add Fine Line Details
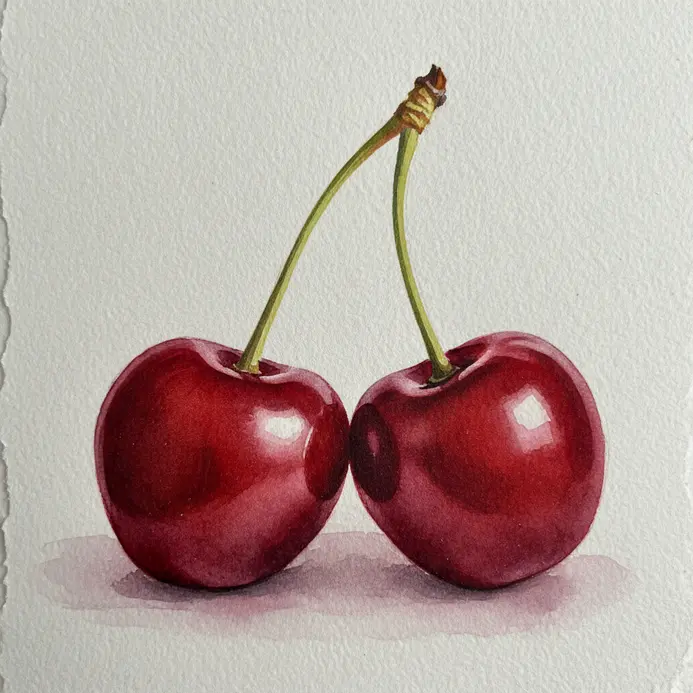
Ever wonder how to make your cherries look real, not just round? This stage is all about those tiny, perfecting touches. I love using a fine-tipped pen or a sharp pencil to add subtle speckles on the skin and fine lines along the stem. Vary your pressure to create natural texture without overdoing it. Work from a good reference photo and build up these details lightly. It is that final layer of observation that makes your fruit painting pop with life, a crucial detail for successful easy watercolor fruit painting ideas. Trust me, seeing those realistic details come together is incredibly satisfying.
14. Tropical Mango with Color Blend: Mix Yellow and Red Washes
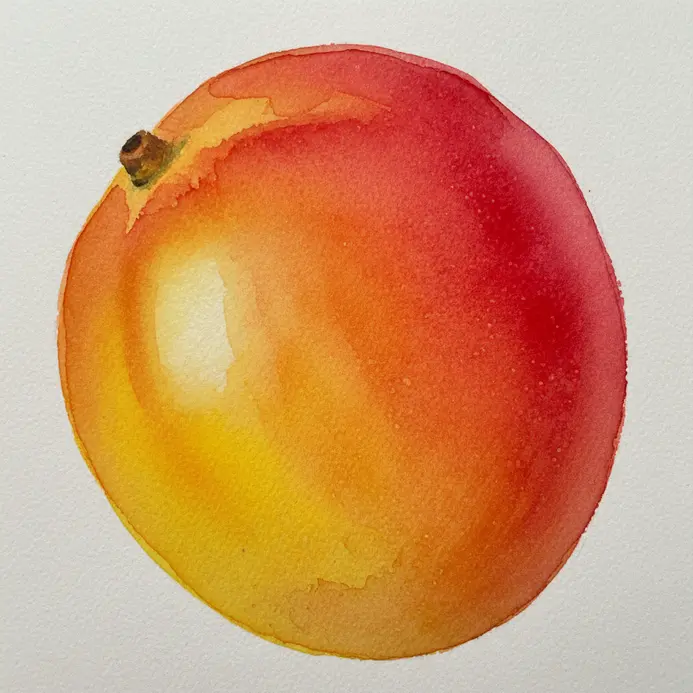
Ever wondered how artists get that perfect, juicy mango glow? The secret is all in a simple wet-on-wet wash. You start by dampening your paper, then float a warm yellow wash onto one side. While it’s still wet, you introduce a touch of red right next to it and watch the colors bleed into gorgeous oranges. This works so well because the transparency of the paint lets the paper’s luminosity shine through, mimicking the fruit’s ripe skin. I love how forgiving this technique is for beginners. The key is to get your wash consistency just right—think weak tea, not water, for any easy watercolor fruit painting ideas. For a fun twist on color blending, you can always explore abstract painting ideas to see how these washes create other effects. Trust me, seeing that seamless gradient appear is incredibly satisfying. Feel the tropical warmth come to life on your page!
15. Plum with Natural Waxy Bloom: Reserve Paper for Highlights

Have you ever noticed the soft, dusty look on a fresh plum? That is the waxy bloom, and capturing it is easier than you think. The secret is to develop your own unique style by experimenting with vibrant watercolor fruit techniques. reserve your paper for the brightest highlights from the very start. Lightly sketch where the light catches the fruit, then carefully paint around those spots with transparent washes of crimson and blue. This approach works because letting the white paper shine through creates a luminous, realistic texture that paint cannot replicate. Trust me, planning those highlights first makes all the difference when tackling easy watercolor fruit painting ideas. For your next project, find more watercolor painting ideas to keep practicing this essential skill.
16. Pineapple Texture with Green Crown: Use a Patterned Approach
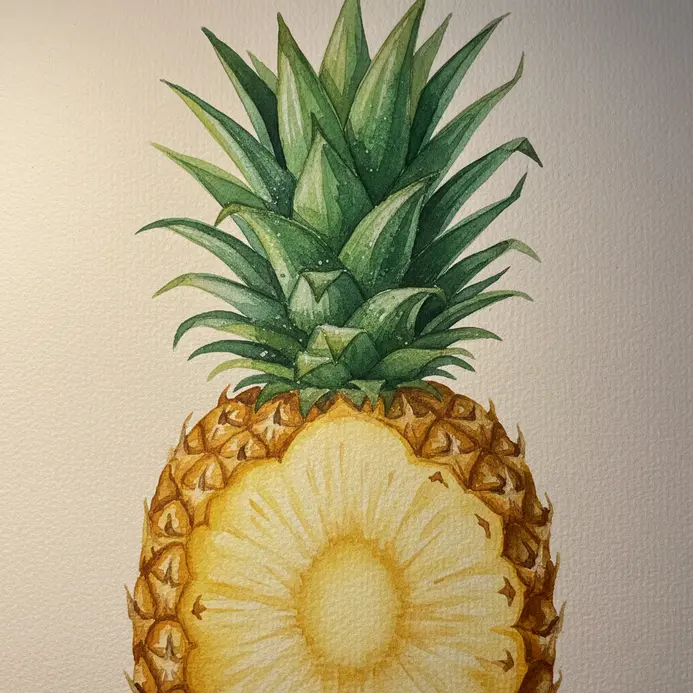
Ever stared at a pineapple and wondered how to capture that crazy texture? It looks complex, but trust me, the secret is a simple patterned approach. You will start by designing one perfect scale, then repeat it in diagonal, offset rows to build the body. Do not forget those crucial V-shaped grooves between them for depth. This method breaks a tricky subject into manageable, satisfactory steps, making it a staple for easy watercolor fruit painting ideas. I love how systematic it feels. Try it and watch your pineapple come to life with amazing realism.
17. Build a Raspberry Cluster with Leaf Accent
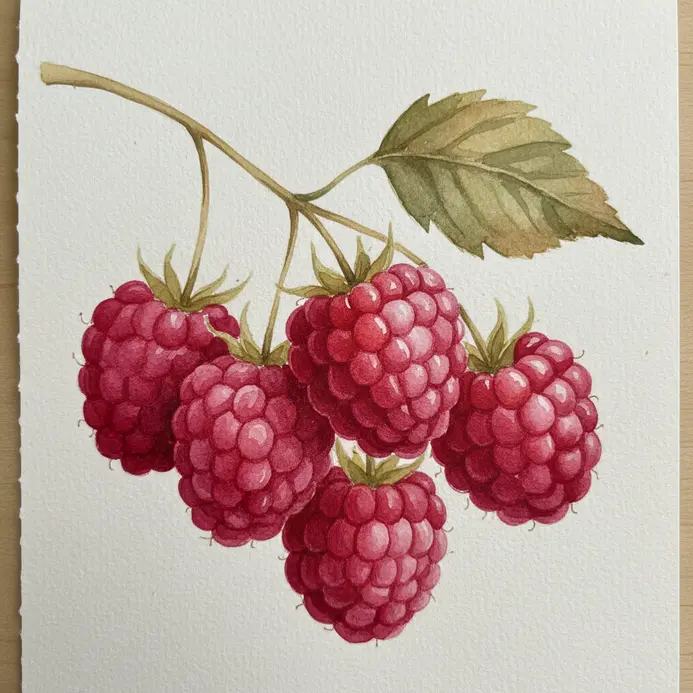
Ever wondered how to combine tech and art on your desk? Here’s a tutorial that shows you how to do it step-by-step. This project blends the computational power of a Raspberry Pi cluster with a beautiful, leafy design accent. You network several of these tiny computers together, then house them in a custom case featuring a laser-cut or 3D printed leaf pattern. I love how it transforms a purely functional setup into a unique conversation piece that celebrates both engineering and creativity. The key is planning your centralized power supply and cooling from the start to keep everything running smoothly. A systematic mindset that also helps with organizing your easy watercolor fruit painting ideas. For a softer, more artistic touch on your other projects, you can explore pastel watercolor techniques. Feel that wonderful mix of form and function when you power it on.
18. Fig Cut in Half Displaying Seeds: Focus on Interior Structure
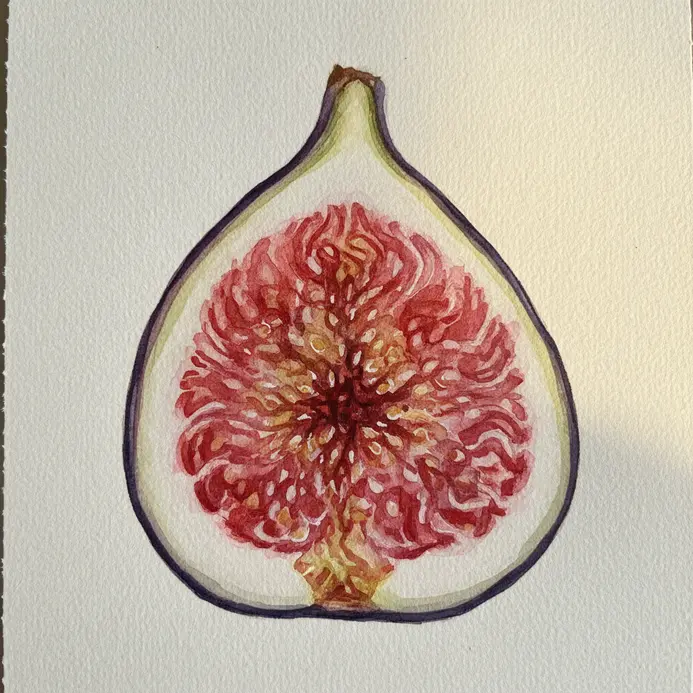
Ever wondered what those tiny crunchy bits inside a fig are? Cutting one open reveals a fascinating interior called a syconium, which is an inverted cluster of flowers. What we call seeds are individual fruits, or achenes, each with its own hard shell. I love painting this because the structure is so orderly. Focus on the central cavity lined with hundreds of tiny dots. Use a fine brush tip to suggest the dense, crunchy texture of the achenes against the soft, fleshy wall. This study teaches you to see pattern within organic form, a skill that helps you tackle easy watercolor fruit painting ideas with precision. This study teaches you to see pattern within organic form, a skill that helps you achieve realistic watercolor effects. Try it and feel the satisfaction of capturing such a unique botanical detail.
19. Lime Slice with Water Droplets: Add Sparkling Details
Ever wondered how to make your lime slice look freshly cut and dripping with juice? The secret is all in the tiny water droplets. You paint the main lime colors first, let them dry, then use a light touch of clean water to lift off tiny circles for your droplet shapes. Leave a stark white spot for the main highlight, and add a softer, lighter green reflection on the droplet’s opposite edge to show its roundness. This works because our eyes read those bright spots as light bouncing off a wet, three-dimensional surface. Trust me, that final touch of sparkle makes your whole painting feel crisp and refreshing.
20. Grapefruit Half with Pink Pulp: Achieve a Subtle Color Shift
Ever noticed how a single garnish transform a simple fruit into something special? This idea is all about enhancing the natural pink of a grapefruit half, not changing it. You strategically add a few fresh mint leaves or vibrant red berries right on top. A light drizzle of berry syrup can also give the pulp a deeper, more appealing glow. It works because color contrast makes the existing pink seem brighter and more lively. I love how this little trick feels like a secret upgrade. For a fun next step, you can discover whimsical watercolor painting to capture that same playful energy on paper.
21. Green Apple Slice Side View: Simplify a Complex Shape
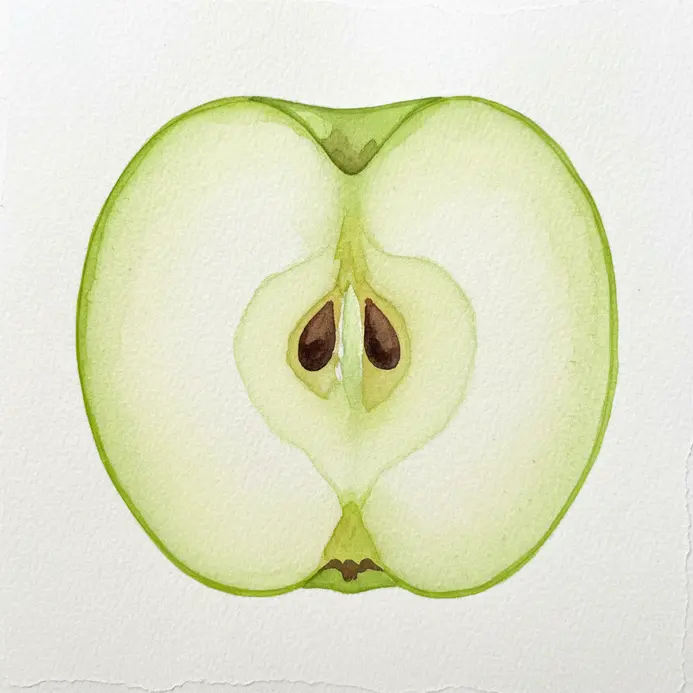
Ever felt intimidated by the irregular curves and star-shaped core of an apple slice? Trust me, it looks far more complex than it is. The trick is to start with a simple, smooth outer shape, like a slightly flattened oval. Then, define the core with a few straight lines to form a clear star. This works because our brains fill in the gaps. A single, bright green wash for the flesh and a dark brown for the core instantly reads as an apple. You capture its essence without sweating every tiny seed. It is a fantastic confidence booster for quick studies, and you can even try easy still life painting with a whole bowl of simplified fruit, add details like a soft apricot hue for a more appealing look. Give it a go and feel how satisfying it is to paint something recognizable in minutes.
22. Red Currant Branch with Berries: Paint a Delicate Composition
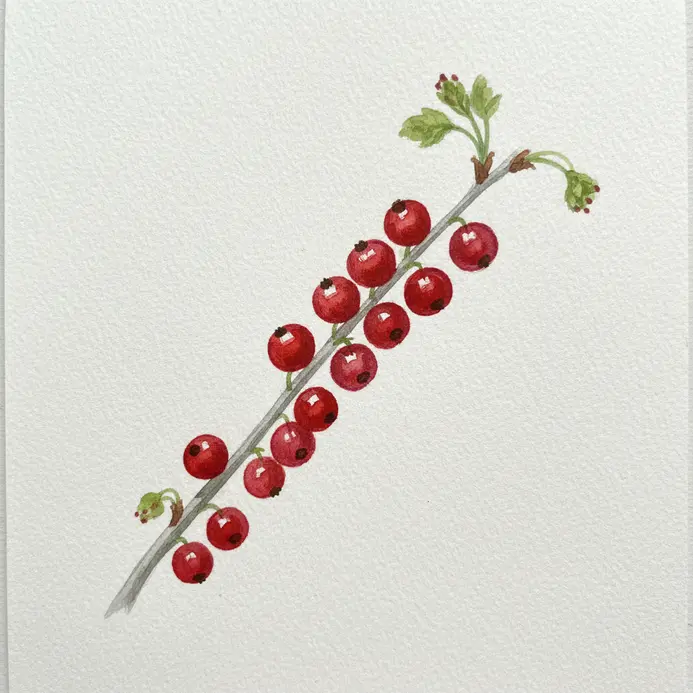
Ever wondered how to capture something so delicate and jewel-like? This composition is all about that gentle touch. Start with a light pencil sketch of a slender, curving branch. Then, apply pale washes for the leaves and a faint pink for the berry clusters to map out their round forms. Let each layer dry completely to keep your colors clean. Build up the vibrant reds on the berries with multiple translucent layers, letting the paper’s brightness shine through for that juicy look. I love how the tiny calyx detail at the base of each berry adds such a realistic touch. It works because the bright berries pop beautifully against the soft greens and browns, creating a fresh, elegant feel. Trust me, the satisfaction of seeing those translucent reds come to life is wonderful.
23. Apricot with Soft Orange Hue: Master a Single Wash
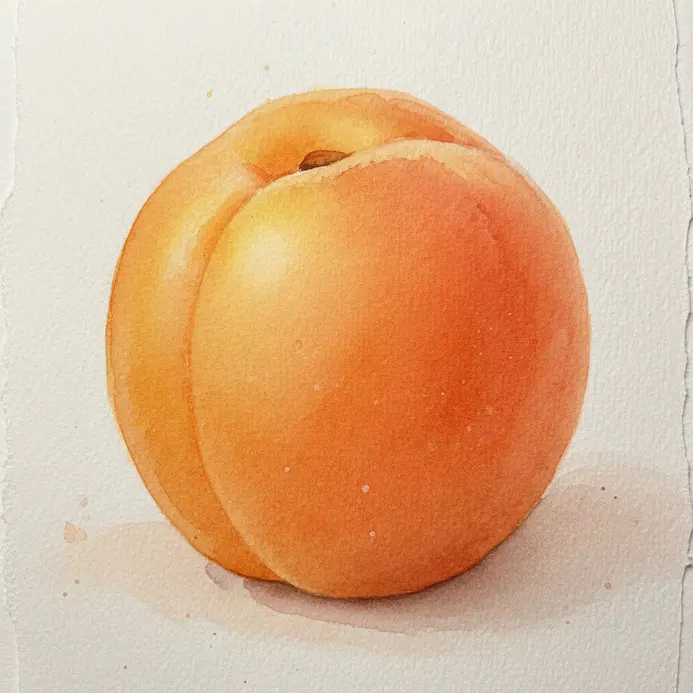
Ever wondered how to get that smooth, glowing color you see in pro watercolor studies? It all starts with a perfect single wash. Mix a generous puddle of your soft apricot hue in a vibrant watercolor fruit tutorial on the palette, using cadmium orange and cadmium yellow for that warm, peachy tone. The key is getting the water-to-paint ratio right. Aim for a consistency like weak tea so it flows easily and dries transparently, letting the paper’s light shine through. Load a large brush fully and apply one confident, continuous stroke across your paper. I love how this foundational technique builds control and creates such a luminous base. For a deeper dive into controlling water and pigment, you can learn watercolor painting techniques to expand your skills. Feel the satisfaction of a streak-free, vibrant field of color.
24. Dragon Fruit Cut Open Half: Embrace Bold Color Contrast
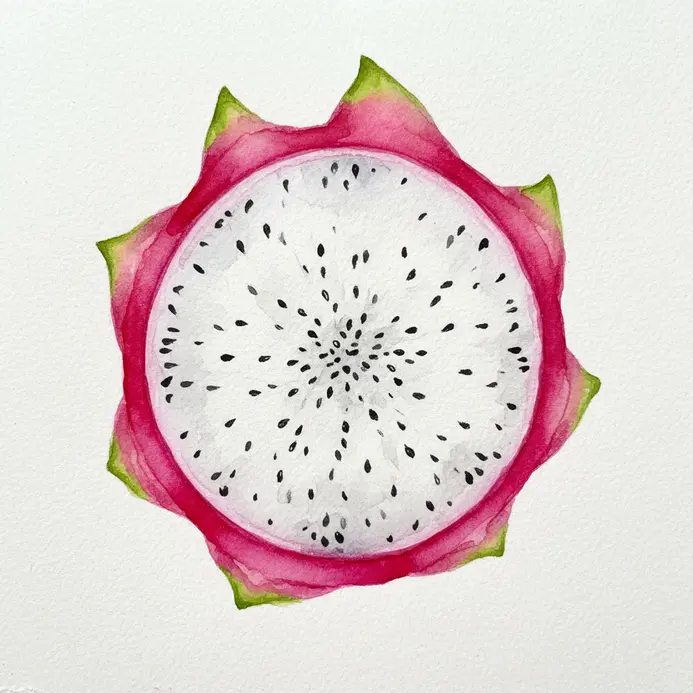
Who would have thought a fruit be so visually dramatic? I love this one for its incredible contrast. Start with a light wash of vibrant fuchsia or magenta for the skin, letting it dry completely. Then, tackle the interior with a cool white or deep pink base. The real magic happens when you dot in all those tiny black seeds with a fine brush. Isn’t that satisfying? The stark difference between the bright skin and the speckled flesh makes the whole piece pop. For more ideas, you can discover easy paintings for beginners.
25. Blackberry Sprig with Small Leaves: Use a Dark, Rich Pigment
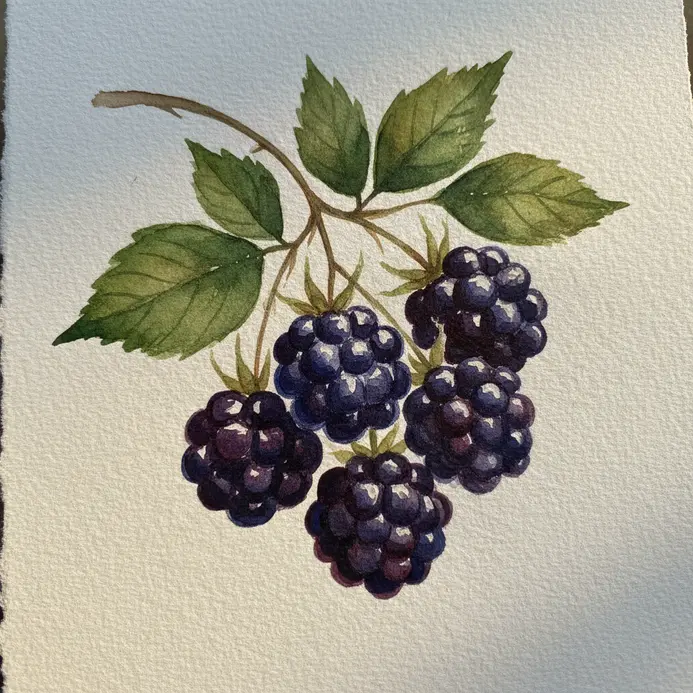
Ever wondered how to make a simple blackberry sprig look dramatic? This is your answer. The secret is picking a single, intense dark pigment, like a deep Perylene Maroon or a cool Indigo, and using it for everything. You will build up the delicate leaves and stem in light layers, letting that rich color define all the shadows and forms. It works because the unified, saturated dark creates incredible depth and makes those tiny botanical details pop. Trust me, mixing your own dark from two colors, instead of using straight black, makes the final result feel so much more vibrant and alive in this step-by-step tutorial.
Preserving Longevity Through Archival Varnish Application
A finished watercolor is fragile, and the fastest way to protect it from UV light and dust is with a professional fixative. Unlike other mediums, you cannot apply a liquid varnish directly as it will reactivate the paints. Instead, you need a UV-protective archival spray designed for works on paper. Hold the can about twelve inches from your painting and apply light, even coats in a well-ventilated space, letting each coat dry fully. This creates a stable barrier that locks in your colors without altering their transparency or causing yellowing over time. For the best preservation, you should still frame the piece behind glass with a mat, but this spray adds a crucial layer of defense. It takes only a few minutes and ensures your vibrant fruit study stays as fresh as the day you painted it.
Conclusion
Working through these easy watercolor fruit painting ideas reminds us that the best subjects are often the ones we see every day. Each piece you finish builds that muscle memory for handling water, pigment, and the white of the paper. Keep your palette simple, let the washes blend on their own, and do not worry about making it perfect. The next time you feel like painting, try arranging a few of these studies together on one page for a simple still life. Your brush will already know the shapes, and you will have a beautiful collection of your progress. These projects show how a little focus on one technique can make the whole process feel more joyful and less intimidating.
FAQs
Q: What basic materials do I need to start a watercolor fruit painting?
A: You need watercolor paper (140 lb/300 gsm is a common starting point), a small set of good-quality watercolor paints (including primary colors and a few earth tones), a range of brushes (round sizes 0–8 and a flat wash brush), a palette, clean water, paper towels, and a pencil and eraser for light sketches. Using smaller brushes helps with details like fruit highlights and stems.
Q: How do I choose the best paper for watercolor fruit painting?
A: Choose 100% cotton or high-quality cellulose paper with sufficient weight (140–300 lb) to prevent buckling. Cold-pressed paper gives a nice texture for fruit skin, while hot-pressed is smoother for crisp edges. For practice, smaller, less expensive pads can be useful, but upgrade to a larger sheet of cotton paper for final pieces.
Q: What are the easiest fruit subjects for beginners?
A: Start with simple shapes like apples, pears, bananas, or lemons. These fruits have clear contours and recognizable color areas that make it easier to practice washes, gradients, and simple shadow shapes before moving to more complex textures like grapes or pomegranates.
Q: How do I layer colors without muddying them in a watercolor fruit painting?
A: Work from light to dark and allow paint layers to dry between glazes. Use transparent pigments and mix clean secondary colors on the palette rather than repeatedly layering complementary colors on the paper. Lift excess pigment with a damp brush or tissue while still wet to keep highlights clean, and test mixes on scrap paper to avoid unintended muddy tones.
Q: What techniques create realistic fruit textures like fuzz, pores, or glossy skin?
A: Use dry brush strokes for rough textures, soft wet-on-wet blends for smooth skin, and lifting or masking fluid to preserve tiny highlights. For fuzz or pores, try a stippling technique with a small round brush or a toothbrush flick for subtle speckling. Glaze with translucent washes to build depth without losing surface detail.


