Essential Drawing Materials for Plant Studies
You do not need fancy gear for this activity. Grab a standard graphite tip, an eraser, and any white sheet you own. A metal ruler can help with straight guides, but it stays optional. Later, you might want ink and colored options to add some green life. Knowing exactly how to draw a cactus starts with gathering these basic supplies. That is it. You possess everything required to begin.
Building a Foundation Through Light Construction Lines
This session shows you exactly how to draw a cactus step-by-step. Start by sketching your guide shapes very lightly with your tool of choice. Those initial marks serve as a roadmap, and you will erase them later. Do not stress if those first forms look slightly wonky. That remains a normal part of the process. With each added layer, understanding how to draw a cactus becomes clear and confident.
1. Sketch Your Main Oval Body Shape

This initial phase creates the fundamental body structure for your desert plant. Every following detail builds directly on top of that central egg shape. Pick up your HB pencil and press gently against your page. Skip the urge to sketch the curve in one flawless stroke; instead, think of it as a step by step process. Instead, use several overlapping lines to map out the proportions. Letting those strokes cross naturally teaches you how to draw a cactus with better control. Keep your wrist relaxed and trace smooth arcs. Once you like the overall silhouette, darken your favorite outer edges slightly. Pro tip: If your marks look too heavy, you are pressing too hard. Maintain a feather-light touch so corrections remain simple. For more practice, explore this collection of easy drawing ideas for beginners.
2. Add Smaller Branching Arm Shapes

Now that you hold the primary mass in place, let us extend smaller branches outward. Adding secondary growth and cactus arms makes the entire composition feel more alive and realistic. Pick up your sharp pencil and maintain that gentle pressure. Sketch curving extensions emerging from the left and right sides. Vary the length so some reach higher and others sit lower. Begin each extension thicker and taper the width outward. You will notice how to draw a cactus gets easier once layers connect naturally. Try attaching tiny secondary shoots to those fresh arms as well. Pro tip: Avoid making every single limb identical in size or positioning. A little asymmetry pushes the piece closer to reality.
3. Define the Form with Vertical Rib Lines

We already possess the silhouette, so it is time to introduce surface texture and depth. We will sketch those signature vertical grooves found on actual succulents, focusing on how to draw rib lines. Grab your HB or B pencil Again, practice makes perfect when creating a realistic cactus drawing. Pull light strokes from the top crown all the way down to the base. Let each line curve outward to match the underlying body volume. Mastering how to draw a cactus relies heavily on following these natural ridges. Place several extra lines beside your first attempt. Keep them spaced unevenly on purpose. Real specimens never align with perfect mathematical precision. Pro tip: Try pulling those strokes in one continuous sweep from your elbow joint rather than your fingers alone. That technique guarantees a smoother, more organic arc. This approach on easy flower drawings for beginners follows the exact same contour principle.
4. Erase Your Guide Lines for a Clean Sketch
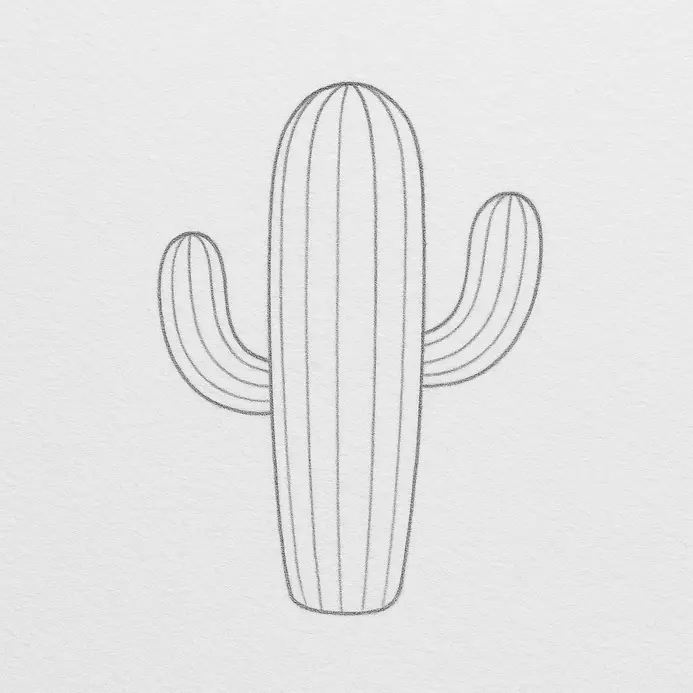
Your main outline stands out nicely now, which means removing those initial mapping marks becomes necessary. This cleanup stage readies the artwork for final detailing. Press your kneaded eraser gently over one faint construction mark. Lift the tool straight upward without friction. Scrubbing back and forth only spreads graphite particles everywhere. Practicing how to draw a cactus cleanly means lifting, not wiping. Move systematically across the entire composition until every ghost mark fades away. For stubborn remnants, dab a fresh corner of a kneaded eraser to maintain the integrity of your realistic cactus drawing. plastic eraser over the spot. Sweep away loose crumbs with your palm or a soft brush to keep your coloring page clean. Pro tip: Do not panic if a tiny gray ghost remains visible. Those faint remnants stay invisible once color fills the page. For additional botanical practice, visit this guide on how to draw a flower.
5. Ink Your Final Outline and Rib Lines

Now that the graphite sketch looks sharp, we will lock those shapes permanently with ink. You will rely on a fineliner pen to retrace every contour. Many artists wonder exactly how to draw a cactus with crisp, unshakable borders. Trace the outer shell first, applying steady downward pressure for a solid black stroke. Next, revisit those internal vertical grooves you mapped earlier. Maintain a firm grip as you trace downward. Tie each interior mark securely into the outer border. Wobbly ink strokes grant the piece authentic character, enhancing the realistic cactus drawing. Studying how to draw a cactus with steady hands improves line confidence. Practice longer strokes frequently to improve your technique in drawing realistic cactus forms. Pro tip: If your fingers tremble, shift momentum to your entire shoulder instead. Larger muscle groups produce significantly smoother trajectories. For more practice with organic outlines, try this resource on How to draw a tree can be a great introduction before tackling a realistic cactus drawing..
6. Sprinkle On Small V-Shaped Spines
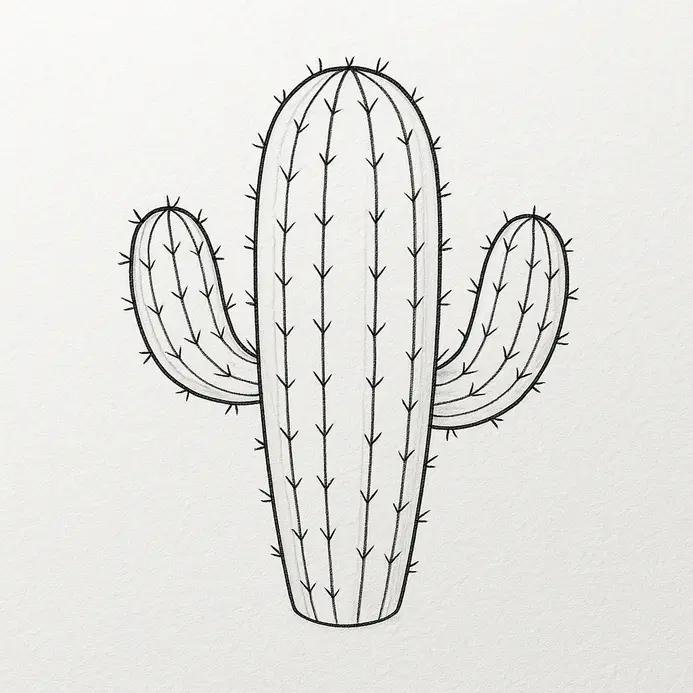
Your silhouette feels complete, so introducing surface prickles comes next. You will scatter dozens of tiny defensive thorns across every visible area. Switch to your HB or 2B pencil and keep pressure minimal. Draft miniature arrowheads that resemble tiny flying birds for a coloring page. Distribute them randomly over the main trunk and all secondary branches to create a more realistic effect. Figuring out how to draw a cactus spines correctly means clustering them naturally instead of marching them in neat rows. Vary the density, placing tight groups near edges and sparse patches in the middle center. Rotate their angles so they follow the surface curvature perfectly. Treat the process like placing scattered freckles, only sharper. Pro tip: Test pressure levels on a spare corner before committing. Experimenting safely remains the fastest path to improve your drawing skills.
7. Add Shading for a Sense of Volume

Your flat sketch needs dimensional weight, which arrives through strategic shadow placement. Choose one edge of the canvas to represent the sun direction. Mark a tiny directional arrow there to prevent confusion. Apply gentle graphite pressure to the opposite side of every section. Learning how to draw a cactus in three dimensions relies entirely on this contrast, especially when coloring a pdf version. Build darkness gradually along the boundary where light transitions into darkness. That boundary becomes your core shadow. On the illuminated side, leave the paper mostly untouched to highlight the light green of the cactus arms. Preserve a bright highlight at the peak of exposure. Blend edges softly using your fingertip for a polished transition. Pro tip: Avoid heavy pressure during early passes. Layering creates control. Explore more depth techniques in this collection of easy landscape drawing ideas.
8. Bring It to Life with Green and Yellow

Your monochrome draft stands ready for its final transformation. We will introduce vibrant pigments to finish the piece. Load your green colored pencils. Sweep a light emerald wash across the entire body. Keep initial strokes delicate. Select a deeper forest shade next. Concentrate that darker pigment along one flank to anchor shadows. Mixing tones teaches you exactly how to draw a cactus that feels sun-baked and alive. Switch to a yellow pencil next. Dot bright gold marks along the ridges to represent sunlit thorns. Place one intense highlight where rays strike strongest. Combine pale and deep shades to force roundness. Pro tip: Skip the temptation to stick with one flat shade. Layering multiple hues creates realism instantly. For another natural scene, explore this tutorial on how to draw a mountain.
Techniques to Improve Texture and Naturalism
Once the initial piece satisfies your standards, attempt a fresh version entirely from memory. Drill the thorn arrangement on scrap paper until muscle memory kicks in. Alter dimensions drastically or place the specimen inside a ceramic container. Repeating this cycle guarantees you master exactly how to draw a cactus with fluid, confident gestures. Your linework naturally tightens alongside repetition. Try rotating the light source in new attempts for fresh challenges. Understanding how to draw a cactus under varied conditions accelerates artistic growth tremendously. Keep sketching regularly.
Conclusion
You completed the journey! Look at that wonderful desert plant sitting proudly on your desk. Mastering how to draw a cactus gives you a reliable blueprint for tackling countless organic subjects. That foundation transfers beautifully into other botanical studies. Try recreating the piece entirely from imagination next time. Sketch multiple desert residents sharing one canvas later. Planting your creation inside a simple terracotta vase makes an exciting next challenge. Share your finished artwork proudly with friends or family members. Keep practicing whenever a blank page appears.
FAQs
Q: How do I get started with an easy step-by-step cactus drawing tutorial?
A: To get started, gather basic art supplies like a marker, pencil, fine brush, and watercolor paint if you want color. Follow an easy step-by-step tutorial by first sketching an oval shape or curving line to construct the main body, add smaller arms or oval branches, outline the cactus, then add vertical lines and short lines for texture before the final step of coloring.
Q: What are the best tools and art supplies to learn to draw a cactus?
A: Good art supplies include a pencil for the initial sketch, an eraser, a marker for bold outlines, fine brush and watercolor paint for soft shading, and colored pencils or paint in dark green for cactus coloring. A sharp spike-like pen or fine liner helps create sharp spikes and short lines that represent spines.
Q: How can I draw a realistic cactus sketch or create a drawing that looks 3D?
A: To draw a realistic cactus sketch, start with an outline the cactus using light pencil strokes, add contours and vertical lines to suggest ribs, include shadow on one side with watercolor or darker paint, and emphasize depth by layering highlights and shadows. Use step-by-step instructions to build up form, add sharp spikes, and finish the last step with subtle color variation to make it look 3D.
Q: What are some easy step-by-step instructions for drawing a saguaro cactus?
A: An easy step-by-step guide for a saguaro cactus: 1) draw a tall cactus body with an oval shape at the top for any arms, 2) add smaller arms branching off with curving lines, 3) construct vertical lines and short lines to show texture, 4) add spikes, and 5) color with dark green tones and a sand patch beneath for context in the final step.
Q: How do I add spikes and texture without making the drawing look cluttered?
A: Use short lines and small V-shaped marks to indicate spikes sparingly rather than filling every surface. Place sharp spikes along the vertical lines or ribs of the cactus and vary the size—larger spikes near the top of the cactus and smaller ones on the arms—to create a natural look while keeping the illustration clean and fun and easy to follow.