


Selecting Precise Line Weights and Color Palettes
When planning your checkered nail art, your pattern’s visual impact lives or dies by the width of your lines. You want a fine liner brush for micro-grids to keep those tiny squares distinct, but a standard nail art brush works for bold, oversized panels. High-contrast colors like black and white create instant graphic pop, while tonal palettes offer a softer, more modern feel. Trust me on this, the key is ensuring your two chosen polishes have similar formulas and drying times. This prevents one color from pulling or bleeding into the other as you work, which completely destroys that crisp geometric clarity we are after. That precise intersection where lines meet cleanly is the hallmark of a professional finish.
Surface Preparation for Crisp Geometric Grid Geometry
The fastest route to ruining your checkered nail art is painting your grid on a tacky base coat. You need a completely dry, smooth surface to support your lines. Apply your base color and let it cure fully, which often takes longer than you think. I recommend waiting a solid ten minutes before you even touch tape or your first line. This patience prevents the heartbreak of peeling up your base color when you remove guides. For freehand work, a slightly thicker, non-runny polish gives you more control over your stroke. Surface tension is your friend here, helping you pull a straight line without the polish flooding into your previous squares.
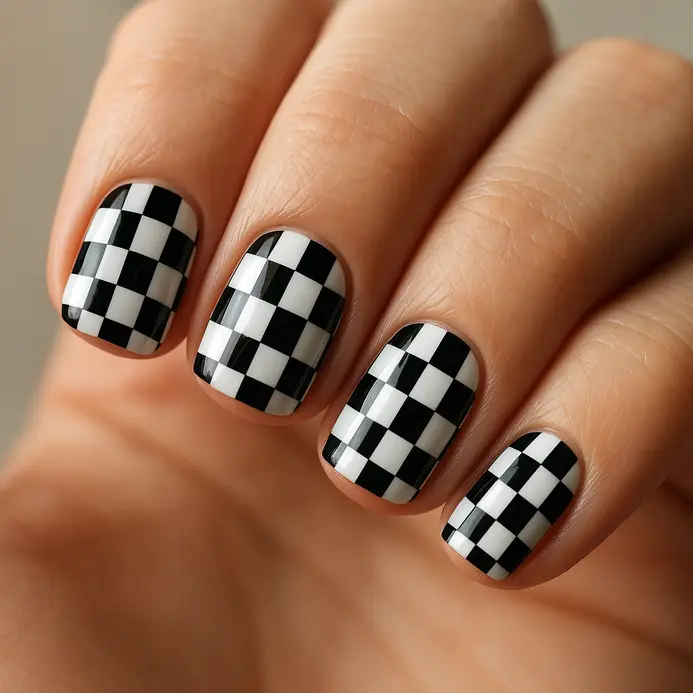
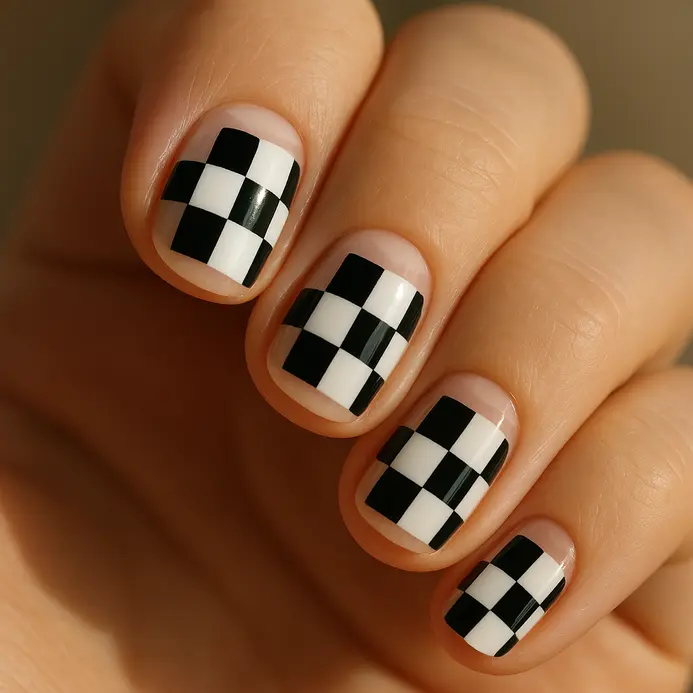
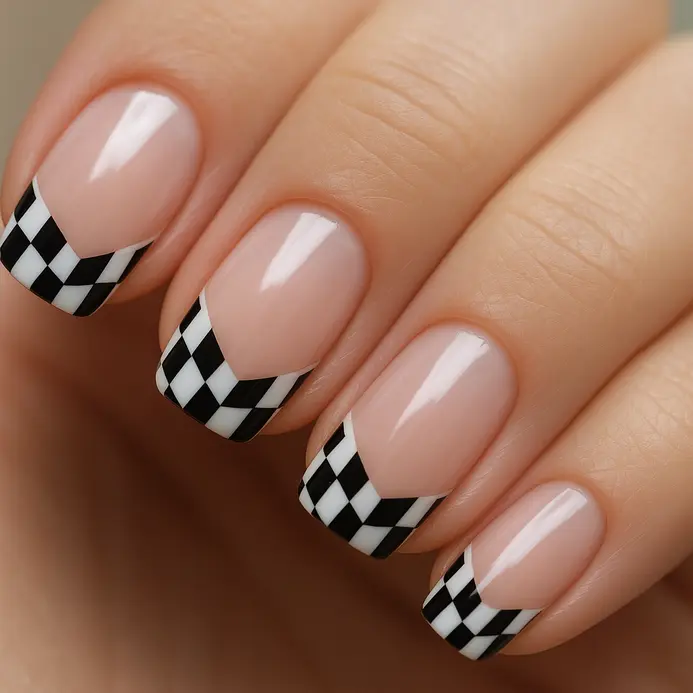
1. Wear the Classic Black and White Checkerboard
This checkered nail art design looks intimidating at first glance, but trust me, it is surprisingly forgiving. You will love the bold, graphic impact it gives your nails. It is all about creating a simple grid of alternating squares. Apply a solid white base and let it dry completely. Then, use a fine-tipped nail art brush with black polish to draw your grid lines for the checkered nail art. Fill in every other square to create that classic checkerboard effect. The high contrast makes it pop instantly. I find this layout works because it is both structured and playful. It feels timeless, yet it holds a sharp modern edge. For a fresh twist, you could pair this bold look with some cute Valentine’s nail designs on your other hand. Does that not look stunning? Feel proud of your clean, crisp lines.
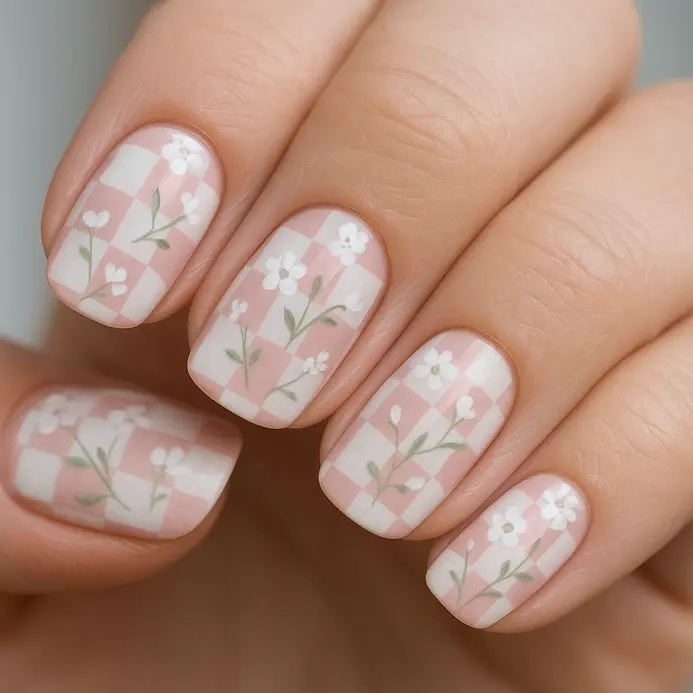
2. Rock Pastel Pink and White Gingham
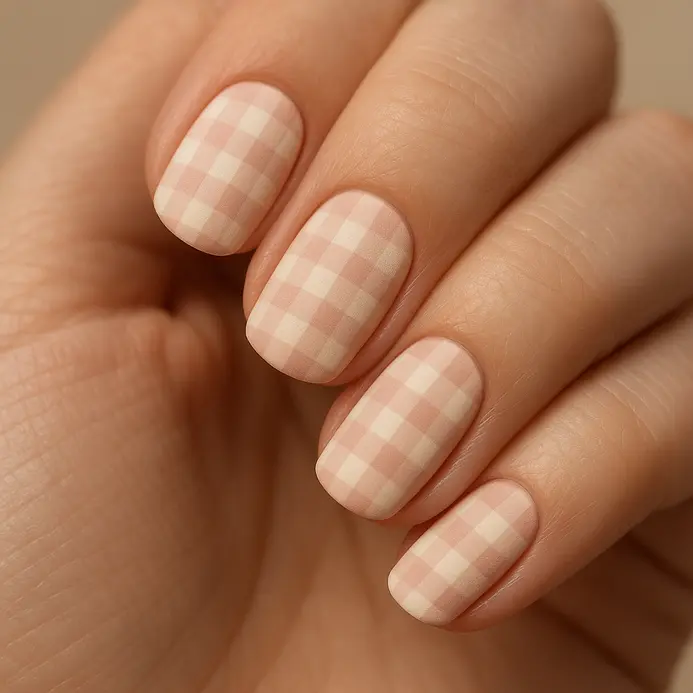
This checkered nail art design takes that soft, sweet pastel pink and white pattern and gives it a rock and roll twist. You will paint the crisp gingham grid first, using a thin detail brush for those perfect lines. That is where you add the real attitude. Think about swapping to a matte top coat for an instant grunge feel. It is that exact contrast between the pretty layout and the punk finish that makes this so cool. I love how it feels both feminine and bold. Getting the lines straight is the trickiest part. My go-to tip is to brace your painting hand on the table and take your time. Let each white line dry fully before you cross it with another, or you will get a smudged mess. Trust me, that patience pays off with a super clean finish. Does that not look stunning?
3. Style Neon Green and Black Micro-Checks
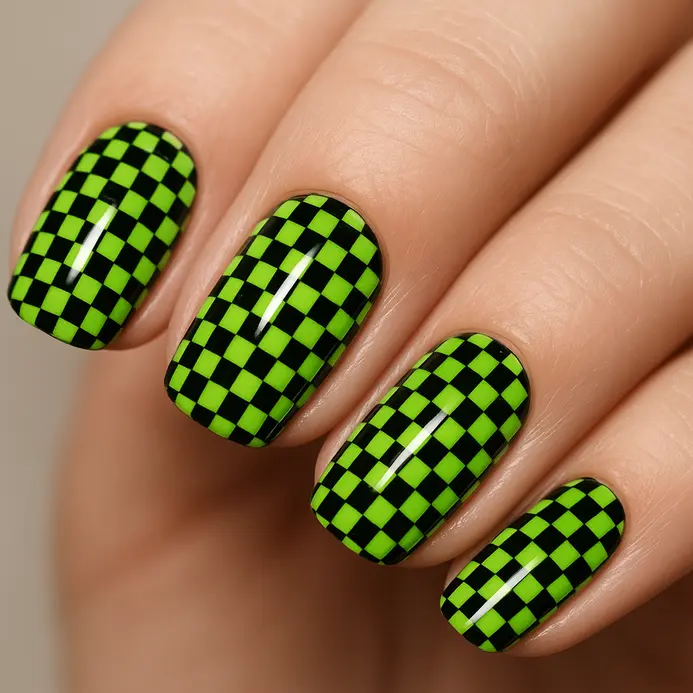
Who would have thought such a bold, graphic look could feel so chic? This design delivers a massive visual punch with its tiny, precise squares of vibrant neon green against a deep black base. It looks complex, but the process is straightforward once you get the rhythm down. After your black base is fully dry, map your checkered nail art grid using a thin detail brush. Start with thin horizontal lines, then cross them with vertical ones to form your micro-checks. The key is keeping those lines straight and evenly spaced for that clean, modern effect. I love how this layout feels both edgy and polished at the same time. For a perfect finish, let each layer dry completely before moving on. This prevents smudging and keeps your lines crisp. When you are done, you have a stunning, high-contrast manicure that works for any season. It is a fantastic choice for adding some graphic flair to your fun summer nail art lineup.
4. Choose a Negative Space Clear Base Checkers
Trying a negative space take on checkered nail art is a total favorite of mine for a chic, modern spin on a classic pattern. The technique is surprisingly straightforward. You start by applying your A clear base coat is essential for achieving the best results with checkered nail designs. and letting it dry completely. Then, with a thin striper brush, you draw a perfect grid of lines using your chosen polish color. The real magic happens when you only fill in alternating squares, leaving the others transparent. This negative space effect creates an airy, sophisticated look that feels fresh and not too heavy. Isn’t it satisfying how such a simple choice can transform the whole vibe? My go-to tip is to use a steady, light hand when applying nail polish. With a steady, light hand, you can perfect your checkered nail wraps for a salon-quality finish. when drawing those grid lines to keep them crisp. You can get tons of inspiration for other clean, graphic patterns from these small design ideas for women. Finish with a glossy top coat and feel that designer-level polish on your fingertips.
5. Place a Wavy Psychedelic Distortion Checkerboard
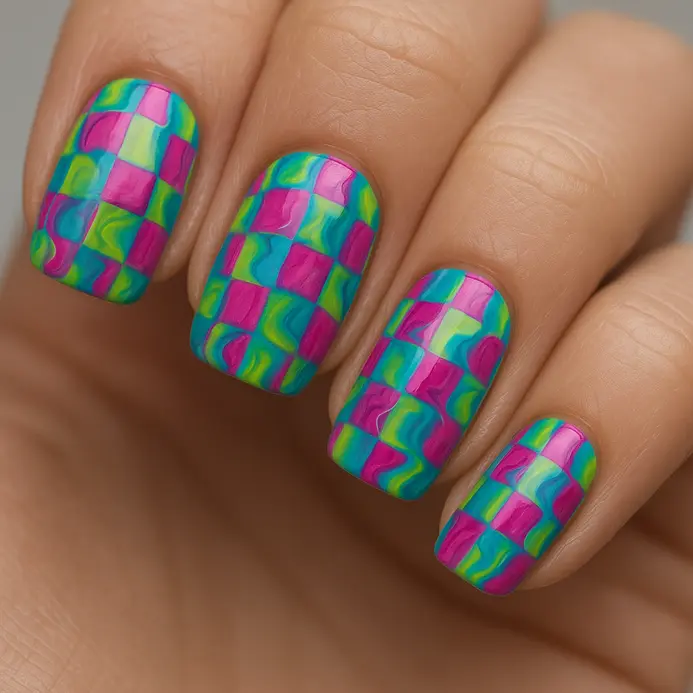
Creating a wavy version of this look looks super trippy and complex, but trust me, it’s all done with a few digital tricks. Ever wondered how to make a simple grid look like it is melting? You’ll start by mapping a basic pattern in your software, then use distortion filters Use effects like Wave or Ripple to bend those straight lines into wild, wavy shapes, perfect for a creative nail trend. To get that true psychedelic feel, you’ll layer on vibrant, clashing colors with adjustment layers, similar to how you would combine burgundy and brown in nail polish for a striking look. I love this effect because it packs so much dynamic energy and retro flair into one piece, reminiscent of popular nail trends. The key is to avoid overdoing the distortion so your foundation stays somewhat visible, much like a well-executed checkered french. Try it and feel the creative rush when those colors start to pop!
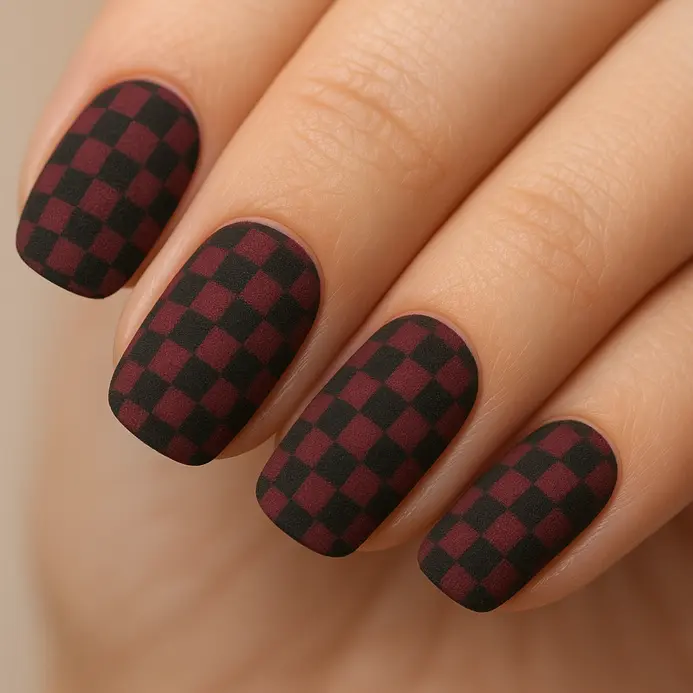
6. Achieve Oversized Matte Red and Black Squares
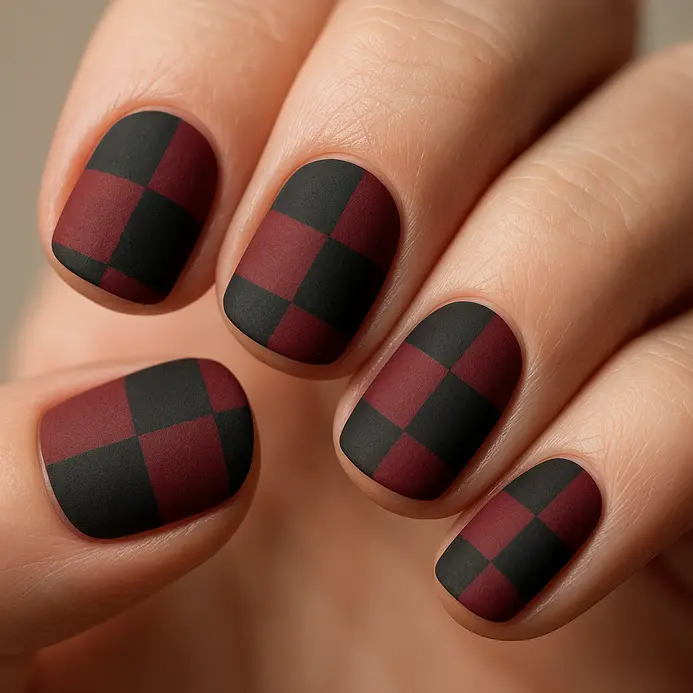
An oversized take on this classic pattern feels incredibly sophisticated when you focus on the finish. You are not using any shiny polish here. Instead, you will create those large, dominant squares with a matte top coat over a deep oxblood red and a softened black. Paint your base color and let it dry completely. Then, use striping tape to map out your oversized grid. Fill in the squares with your contrasting color, making sure your brushstrokes are smooth and opaque. The real magic happens when you seal it with that flat, non-reflective top coat. This checkered nail art layout works because the matte texture takes the edge off the high contrast, giving it a modern and incredibly chic feel. Trust me, once you try this, you will be hooked on the powerful, minimalist vibe. It is a fantastic look that also pairs well with other small design ideas for men who appreciate clean, graphic style.
7. Wear a Metallic Gold and Silver Checkerboard
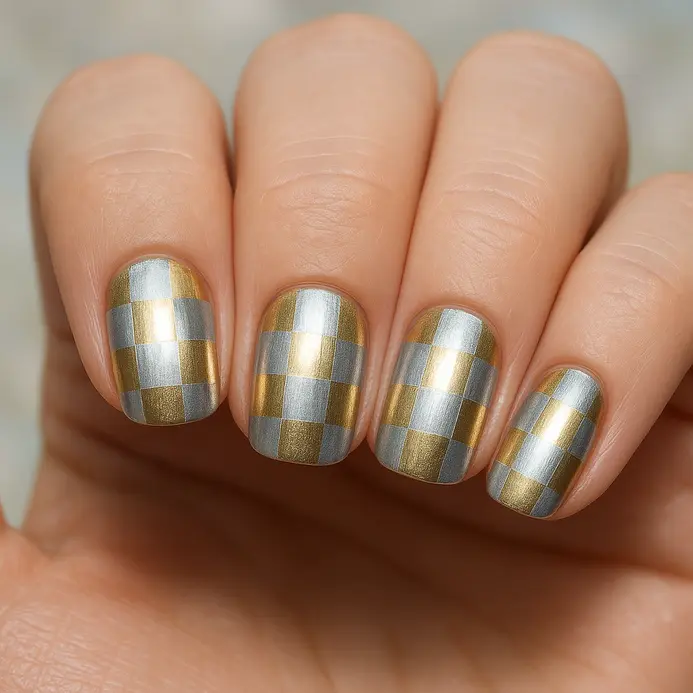
Want a metallic take on checkered nail art that screams glamour but is secretly simple? It looks like you spent hours, but the process is straightforward once you have your grid mapped out. I love how the two shimmering colors play off each other, creating a layout that feels modern and luxurious. Start with a solid base color if your metallic polishes are sheer, then use a thin nail art brush to paint your grid lines. Fill in the alternating squares carefully, letting each color dry a bit before moving to the next. The key is patience to keep those lines crisp. This layout works because the geometric grid feels sophisticated, while the metallic finish adds a festive, eye-catching sparkle. It is a perfect statement look for a night out or any special occasion. For a romantic twist, you could pair this glamorous pattern with some checkered nail designs. cute Valentine’s nail designs. Trust me, you will feel absolutely stunning with this manicure.
8. Rock Diagonal Tilted Checkerboard French Tips
Ever wanted a French tip that feels more like a rock concert? This design is for you. It starts with a classic sheer or nude base, letting the graphic pattern on your tips take center stage. The magic is in the diagonal tilt of the layout. You can paint the grid freehand for a custom look or use a checkerboard stamping plate for perfect, repeatable squares. High contrast colors, like black and white, make the pattern pop. A common pitfall with checkered nail art is using colors with low contrast, which makes the design hard to see. I love how this look blends elegance with an edgy vibe. The tilted squares feel dynamic and modern, not stiff. Trust me, go bold with your color choices. The payoff is a statement nail that feels both sophisticated and totally rebellious.
9. Style Muted Earth Tone Checkered Accents
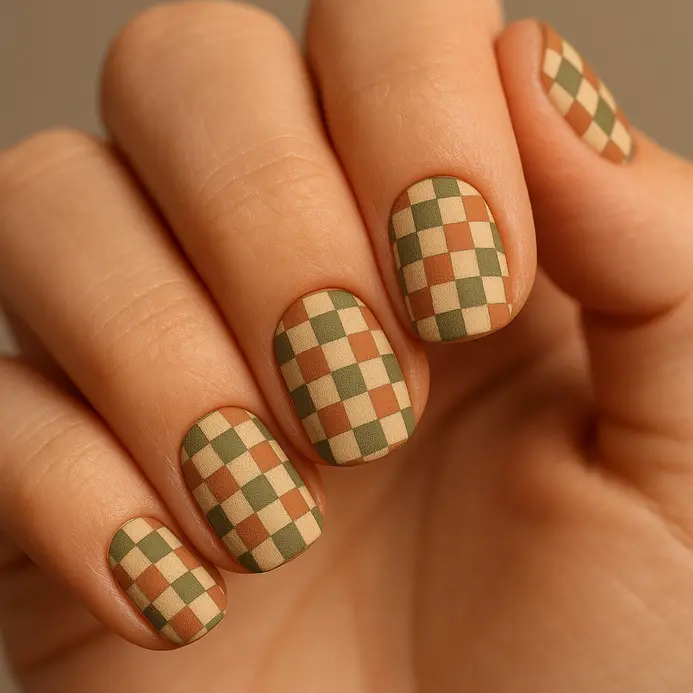
Adding a muted earth tone approach to checkered nail art gives you a softer, more grounded look. This style is all about taking familiar grids and dressing them in a palette of warm, quiet colors. You will work with shades like sage, taupe, and soft caramel, using a fine-tipped nail art brush To create delicate gingham or subtle plaid patterns, consider using checkered french tips. The low contrast between your chosen tones is what gives the whole look its sophisticated, muted charm. I love how this approach feels both traditional and completely fresh. It works because those earthy, desaturated colors add visual interest without ever shouting for attention. For a crisp, professional finish, try using striping tape to guide your lines before you fill in the squares. This creates a beautifully understated design that pairs perfectly with your favorite cozy sweaters or even some fun summer nail art.
10. Choose Dark Gothic Velvet Texture Checkers
Ever wanted a gothic take on checkered nail art that feels as dramatic as it looks? This design is all about turning a simple grid into something you can feel. You start with a dark gel polish base, like black or deep plum, and then paint your contrasting squares with another rich color. The magic happens when you apply a velvet flocking powder onto uncured top coat over those squares. It gives them this incredible soft, textured depth that catches the light. I love how the tactile velvet elevates the classic pattern, making it feel opulent and mysterious. It works because it combines a structured look with a luxurious, three-dimensional finish, much like a well-done checkered nail design. For a perfect application, make sure your gel is still wet when you sprinkle the powder on. This layout is a fantastic way to add a touch of dark elegance, and it pairs wonderfully with other small design ideas for women. Does that not feel stunning?
11. Wear a Rainbow Gradient Square Tile Pattern
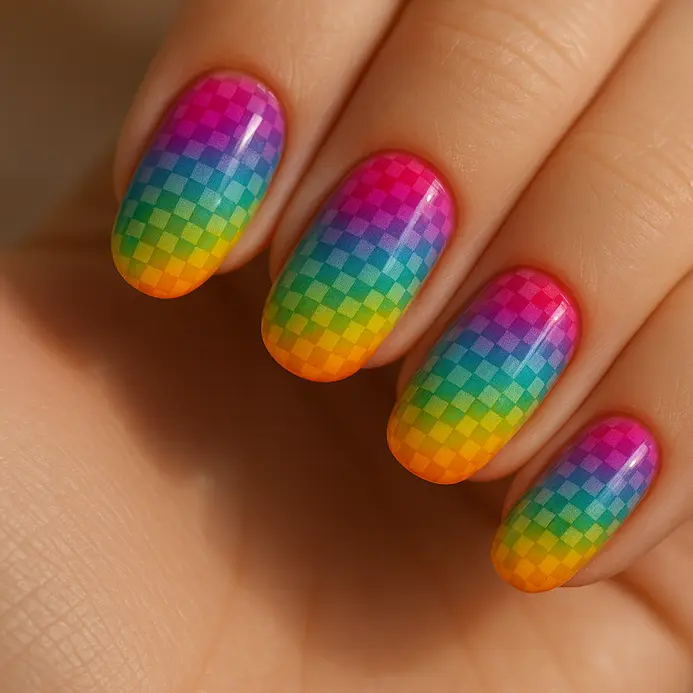
A rainbow gradient approach to checkered nail art looks like pixel art or chic bathroom tiles, but the color flow is what makes it magic. Start with a solid white or light nude base to make those rainbow hues pop. Then, use a fine detail brush to paint a delicate grid of lines, creating your squares. Inside each little box, blend tiny stripes of red, orange, yellow, green, blue, indigo, and violet for a seamless gradient effect. It works because the orderly grid gives a modern structure, while the flowing rainbows inside add pure, joyful energy. My go-to tip is to work with thin layers of polish and clean your brush often to keep the colors from getting muddy in those small spaces. You will love how vibrant and eye-catching your final manicure looks.
12. Rock Floral Embedded Checkerboard Nail Art
Ever wondered how to get that layered, peek-a-boo look where florals hide beneath a pattern? This design nails it. You start by painting your floral motifs directly on the nail and letting them dry completely. Then, the magic happens with a sheer jelly polish brushed over the top. This creates a translucent film that makes the flowers look truly embedded. Once that’s dry, you build your checkered nail art right on top using a fine liner brush. I love using earthy tones or a matte finish here to lean into the rock vibe. The contrast between the soft florals and the sharp grid is so satisfying. You get this gorgeous, dimensional look that feels like a tiny piece of art on your fingertips. For more inspiration on small design ideas for men, the same principles of balance and detail apply beautifully.
13. Place Royal Blue and Yellow Pop Squares
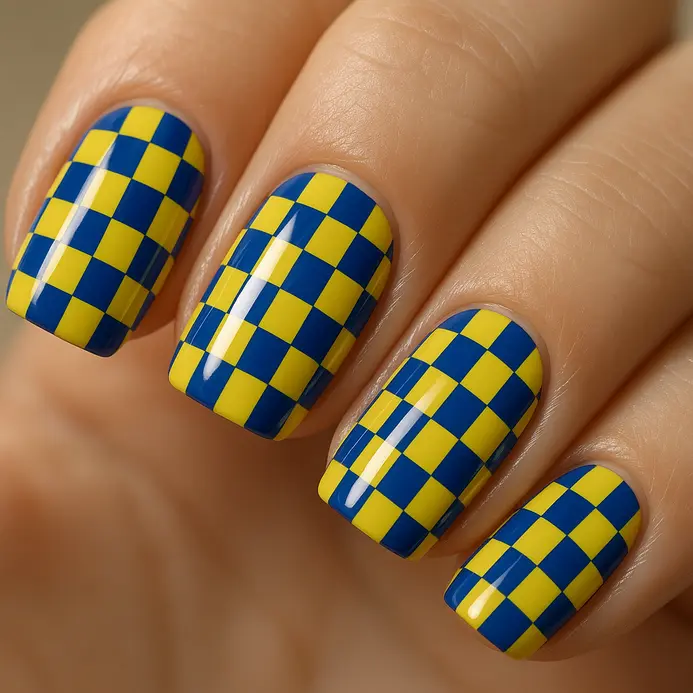
This royal blue and yellow take on checkered nail art feels like pure energy. I love how these squares create a bold, modern look that’s surprisingly simple to execute. Start with a solid base of either color and let it dry completely. Then, use your fine-tipped nail art brush to paint small, even squares of the opposite color in a staggered pattern. The trick is to work in a grid and take your time with each shape. The high contrast between the colors makes each square pop, giving you that satisfying graphic punch. For a crisp finish, try using striping tape as a guide for your lines. This technique is perfect for creating a fun geometric accent that works with so many other styles. You can even pair it with some cute Valentine’s nail designs for a playful twist.
14. Style Subtle Nude and White Micro-Checks
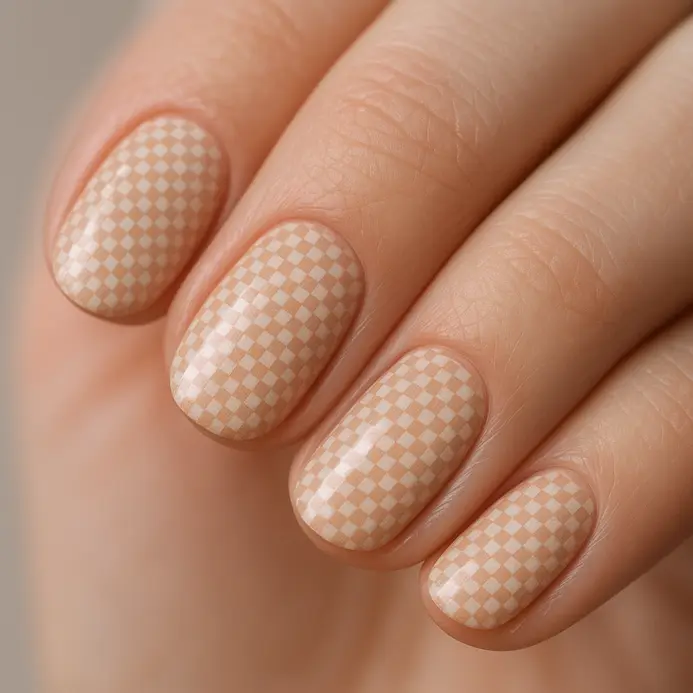
This subtle approach proves that checkered nail art works beautifully when it stays quiet and refined. The style uses a tightly woven micro-check pattern in soft nude and crisp white. Think of it like a whisper of texture, not a shout. From a distance, it reads as a beautiful, solid neutral, but up close you get that satisfying woven detail. What makes it work so well? The scale is perfect for adding interest without overwhelm, especially in checkered french tips. I love how it feels both modern and timeless. You can pair these pieces with almost anything in your closet, from denim to tailored trousers. Trust me on this one. The real magic is in the monochromatic base. Layer your micro-check top under a solid blazer or over a simple tank. Finish with minimalist jewelry and feel that effortless, polished confidence.
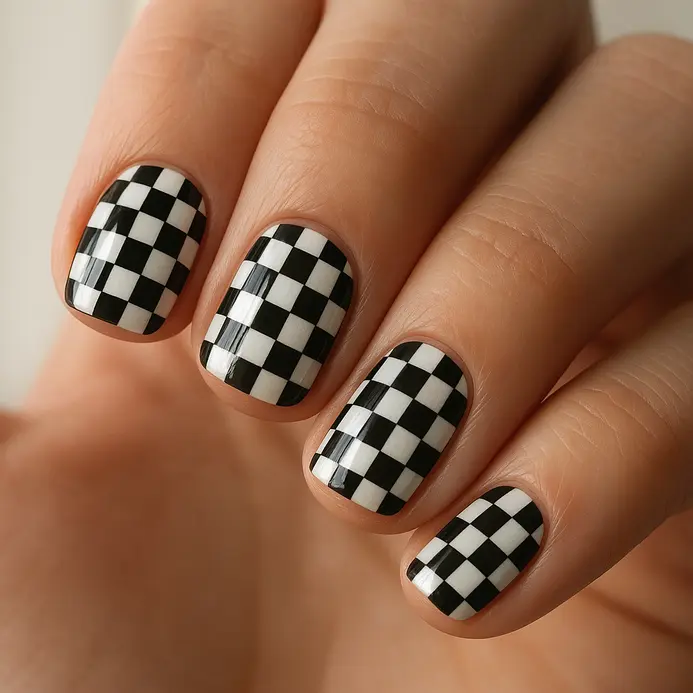
15. Achieve a High Gloss Monochrome Checkerboard Design
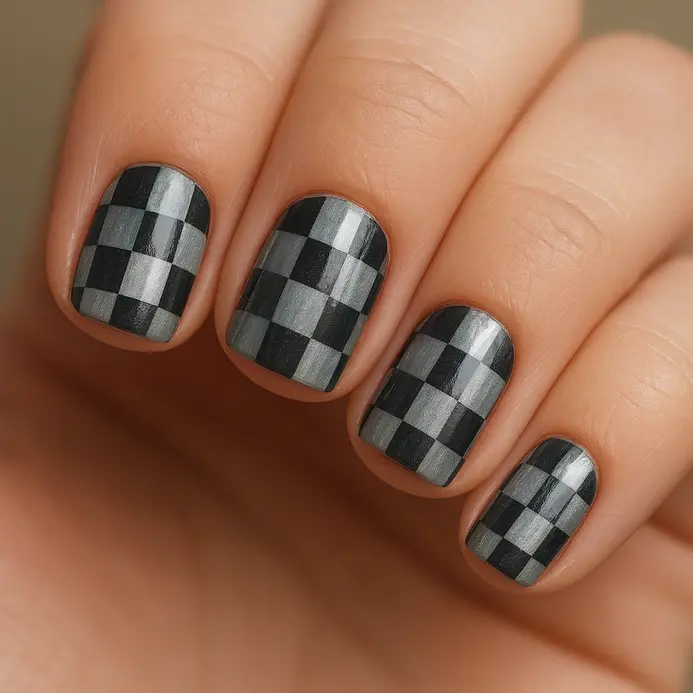
Who says checkered nail art has to be bold and colorful? This monochrome version is my absolute favorite for its sleek, modern finish. You will create a perfect grid using just black and white polish, then seal it all under a thick, shiny top coat. The trick is in the crisp, clean lines between your squares, which a good striping brush makes much easier. It works so well because the high contrast layout gets amplified by that glass-like shine, creating a seriously eye-catching look. For a fresh, playful twist on this graphic style, check out these fun summer nail art ideas. Trust me, you will feel so polished when you are done!
Sealing Designs for Long Lasting Wearability
A high-shine quick-dry top coat is non-negotiable for sealing your checkered nail art design. Apply it with a light, floating hand to avoid dragging your wet polish and smudging those perfect lines. The sealant does more than add gloss, it creates a protective barrier that prevents premature wear, especially at the free edges where designs chip first. Make sure you cap the tip of every nail with the top coat for extra durability. One generous layer is better than two thin, streaky ones. You will notice this final step also deepens your colors and makes the entire layout look more intentional and polished, which is exactly the finish you want.
More Checkered Nail Art Gallery for Inspiration


Conclusion
Your nails are such a great canvas for personal expression, and a checkered pattern is one of those classic looks that never really goes away. It has this timeless, graphic quality that you adapt to any season or mood. The best part is finding the specific color combination or scale that feels uniquely yours. My advice? Save a picture of your favorite design from this gallery. Whether you show it to your nail artist or use it as a guide for your own practice, having that visual reference makes all the difference. I hope one of these checkered nail art ideas sparks that feeling of yes, that is the one for your next mani.
FAQs
Q: What is checkered nail art and how does it differ from a checkerboard print?
A: Checkered nail art is a manicure style featuring alternating squares or shapes on the nail surface; a checkerboard print is the classic two-tone grid version of this concept. Artists often adapt the checkerboard pattern into variations—smaller squares, diagonal checks, or mixed textures—to create looks from minimal monochrome checkered designs to bright, bold color mixes.
Q: Can I get a checkered design at a salon or do it at home?
A: Both are possible. A salon technician can deliver precise checkerboard patterns, especially on long nails or intricate mix-and-match designs, while at-home kits, striping tape, and stencils make DIY checkered nail art achievable for a minimal or understated look.
Q: Which nail shape works best for checkered nail art: almond, round, or long nails?
A: Checkered patterns suit many shapes. Almond and round nails offer a softer canvas for understated or minimal checks, while long nails provide more surface area for detailed checkerboard patterning or multi-color, mix-and-match layouts.
Q: How do I choose colors—should I go monochrome checkered or try bright shades like lilac, green checkered, or purple?
A: Color choice depends on your style. Monochrome checkered creates a chic, minimal aesthetic; bright shades like lilac, purple, green checkered, or chocolate tones make a statement. Mix-and-match colorways let you pair contrasting hues (e.g., bright lilac with chocolate accents) for a playful effect.
Q: Is checkered nail art suitable for an understated look or more for bold, statement nails?
A: It can be both. Reduce scale and use neutral tones for an understated look; choose a monochrome checkered palette or subtle contrasts. For bold statements, enlarge the checkerboard squares and select bright or saturated colors like green checkered, purple, or chocolate shades.


