

7 Beginner-Friendly Minecraft Drawing Projects
The secret to Minecraft drawing is embracing the blocks. These seven ideas progress from a single cube to the main characters, each teaching a core skill. If you want to find an easy step-by-step path to success, start here.
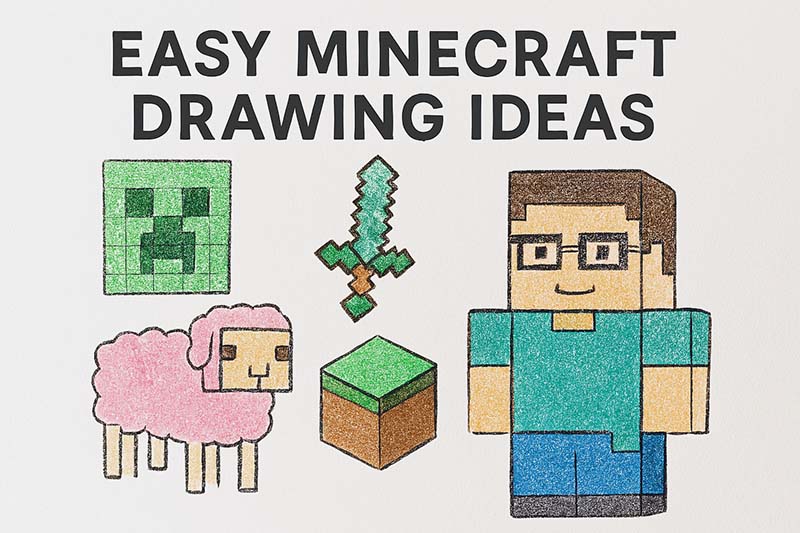
1. Master the Foundation: Draw a Perfect 3D Minecraft Block
Before drawing characters, you must decipher the basic 3D cube. This is the building block of everything in Minecraft, from a dirt pile to a Nether fortress. It is the most essential step in learning to draw a Minecraft world.
- Action Steps: Initiate your drawing with a perfect square. Extend two straight lines from adjacent corners at the same 45-degree angle. Connect these lines with parallel lines to form the cube’s sides.
- Why It Works: This teaches you the isometric perspective that makes Minecraft art pop. It’s less about artistic flair and more about clean lines.
- Try It Today: Practice drawing a Grass Block. Color the top green and the sides brown. You’ve just created your first Minecraft object!

2. Create an Icon: Draw the Creeper’s Face
The Creeper’s pixelated face is instantly recognizable and a perfect step-by-step lesson in symmetry and grid-based design. It is often the star of any minecraft coloring page.
- Action Steps: Outline a large square. Subdivide it into a 4×4 grid with two vertical and two horizontal lines. Reference an image and fill in the specific smaller squares to form the face’s scowling expression.
- Pro Tip: Use graph paper for this. The grid is already there, making it the easy step-by-step how to draw method beginners love.
- Visual Idea: An infographic showing a blank square transforming into a grid, then into the final Creeper face with specific squares shaded dark green.

3. Draw a Friendly Mob: The Cube-Shaped Sheep
Minecraft animals are charming because they’re geometric. A sheep is a fluffy cube on sticks—ideal for beginners who want to draw minecraft mobs.


- Action Steps: Sketch a woolly, cloud-like cube (a rounded square) for the body. Anchor a smaller cube on top for the head. Attach four simple lines for legs and two small ovals for ears.
- The Benefit: This project combines the 3D block skill with simple character design. It’s a cartoon come to life.
- Make It Fun: Color your sheep bright pink or blue! The simple shape means you can’t go wrong, making it a huge confidence booster for any kid or student.

4. Design Your Own Tool: Draw a Diamond Sword
Items are less daunting than creatures. A Diamond Sword is just a few rectangles and a triangle, teaching clean outline and detail work.
- Action Steps: Construct a long, thin rectangle for the hilt. Fuse a wider rectangle (the crossguard) to its top. Crown it with a diamond shape (two triangles) for the blade.
- Here’s the thing: Getting the proportions right—the blade should be longer than the hilt—makes it look authentic. Use a pencil lightly first so you can erase and adjust.

5. Build Your Blocky Hero: Draw Steve Step-by-Step
Steve, the classic default skin, is the perfect first full character. His design is a collection of simple rectangles and cubes, making him easier to draw than most popular cartoon characters.
- Action Steps: Assemble his form from the bottom up. Start with two tall, thin rectangles for his blue-jean legs. Cap them with a slightly wider light blue rectangle for his torso. Top it with a square, flesh-colored head. Add two thin rectangles for arms and simple squares for hands and feet.
- Key Detail: Steve’s hair is a dark brown rectangle that sits on top of his head, covering the top third. His face is just two dots for eyes and a simple line for a mouth.
- Pro Tip: Draw a light vertical line down the center of your paper first to help keep your character balanced. This prevents him from looking like he’s leaning.

6. Sketch His Companion: How to Draw Alex
Alex is Steve’s counterpart, with a slimmer build and different hair. Mastering her teaches you to tweak proportions within the same style.
- Action Steps: Begin with the same basic structure as Steve: legs, torso, head. Modify the torso to be a bit narrower. Craft her signature hair by drawing two large, orange rectangular “buns” on either side of her head, with a smaller rectangle of hair on top connecting them.
- The Difference: Her arm is also slightly thinner (3 pixels wide vs. Steve’s 4). Her pants are often a darker, more saturated green. Observing these small changes is key to drawing different Minecraft characters.
- Actionable Takeaway: Try drawing Steve and Alex standing side-by-side. This direct comparison is a fantastic lesson in character design and proportion.

7. Create a Minecraft Self-Portrait
This is where you galvanize your skills to create something unique: a blocky version of yourself using everything you’ve learned. A Minecraft self portrait is a fantastic lesson in creativity.
- Action Steps: Break down your features into squares and rectangles. Hair becomes a blocky shape. Glasses are two squares. Your smile is a line of pixels. Assemble these parts on a square head and rectangular body, using Steve or Alex as your base model.
- Why It’s Powerful: It moves you from copying to creating. You’re applying the Minecraft aesthetic to your own ideas.
- Personal Example: I helped a young player do this. He used a black marker for his glasses. The joy of seeing himself in Minecraft style was incredible.

More Easy Minecraft Drawing Ideas Gallery for Inspiration


Conclusion
Look, the path from “I can’t draw” to “I made this!” is built one block at a time. These seven Easy Minecraft Drawing Ideas are your blueprint. You’ve learned blocks, faces, mobs, items, and the two main favorite characters, Steve and Alex. The game‘s style is your greatest ally; its rules (straight lines, squares) make learning clear. So, grab your paper and pencil. Inside you’ll find an easy path to becoming an artist. Start with Steve. Follow the steps for his rectangular body and blocky limbs. Once you have him down, try giving him your own hair color or shirt. That’s how you make the style your own.
FAQs
Q: What are some easy Minecraft drawing ideas for beginners to follow step by step?
A: Start with simple iconic objects like a grass block, pickaxe, torch, and creeper face. Use a step-by-step approach by sketching basic shapes first: squares for blocks, rectangles for tools, and circles for mobs. A basic drawing lesson that breaks each element into stages helps beginners improve quickly.
Q: How can I turn an easy Minecraft drawing idea into a full step-by-step tutorial?
A: Break the drawing into incremental steps: outline, refine shapes, add details, ink, and color. Include clear instructions for each stage and recommend tools such as pencils, an eraser for corrections, thin markers for outlines, and colored pencils or digital brushes for shading. Label each step so learners can follow the progression easily.
Q: Are there printable resources like a PDF tutorial available for easy Minecraft drawing ideas?
A: Yes, many creators offer downloadable pdf tutorials that include templates, step-by-step images, and practice sheets. A PDF tutorial is useful for offline practice and for printing multiple copies to trace or erase mistakes with an eraser as you learn.
Q: Can I learn easy Minecraft drawing ideas from a video or do I need written tutorials?
A: Both formats work well. A video often provides real-time demonstrations and pacing, which is helpful for watching hand movements and shading techniques. A written or pdf tutorial complements videos by offering reference images and step lists you can follow at your own speed. Combine both for the best results.
Q: What simple Minecraft mobs can I include in a drawing lesson besides creepers?
A: Try drawing a pig, sheep, skeleton, and spider in simplified forms. For a spider, start with an oval body, add a smaller head, and sketch eight legs in basic lines before refining. Each mob can be taught in a short drawing lesson that focuses on their recognizable features.


