

Material-Specific Cleaning Before Decorative Repairs
Use a stiff nylon brush and mild dish soap to remove soil, algae, and loose mineral crust before filling cracks or painting an old pot. Terracotta needs a gentle touch because heavy scraping widens chips and leaves grooves beneath paint. For glazed ceramic, check the rim and underside for loose glaze, then keep decorative repairs away from dusty flakes. Plastic benefits from degreasing with diluted dish soap because silicone residue blocks bonding primer. Rusty metal needs dry wire brushing and rust converter only where corrosion has stained the surface. Concrete and stone require a masonry brush to expose crumbly areas before epoxy or masonry repair. Let every surface dry fully, since trapped moisture weakens repairs and encourages fresh mildew. A clean nylon scrub brush protects sound surfaces while lifting grime from textured areas. Preparing surfaces correctly remains the foundation of most Flower Pot Restoration Ideas.
Drainage Choices For Functional Restored Planters
Keep at least one open drainage hole in every restored pot used for live plants, since standing water quickly damages roots and weakens repaired walls. Check each opening for paint, adhesive, mineral buildup, or displaced fragments before adding soil. A shallow saucer protects furniture and patio surfaces without sealing the hole from below. Small ceramic pots with fragile bases suit a separate nursery pot, especially when visible cracks or repaired rims raise concerns about water pressure. A decorative cachepot should hold the planted container rather than receive wet soil directly. Gravel at the base does not replace drainage, so choose a liner with its own holes when the original pot lacks them. Keep watering access clear after restoration, and lift containers periodically to spot moisture collecting beneath them. Proper airflow management guides successful Flower Pot Restoration Ideas year after year.
1. Gold Leaf Kintsugi Ceramic Planter with Repaired Cracks
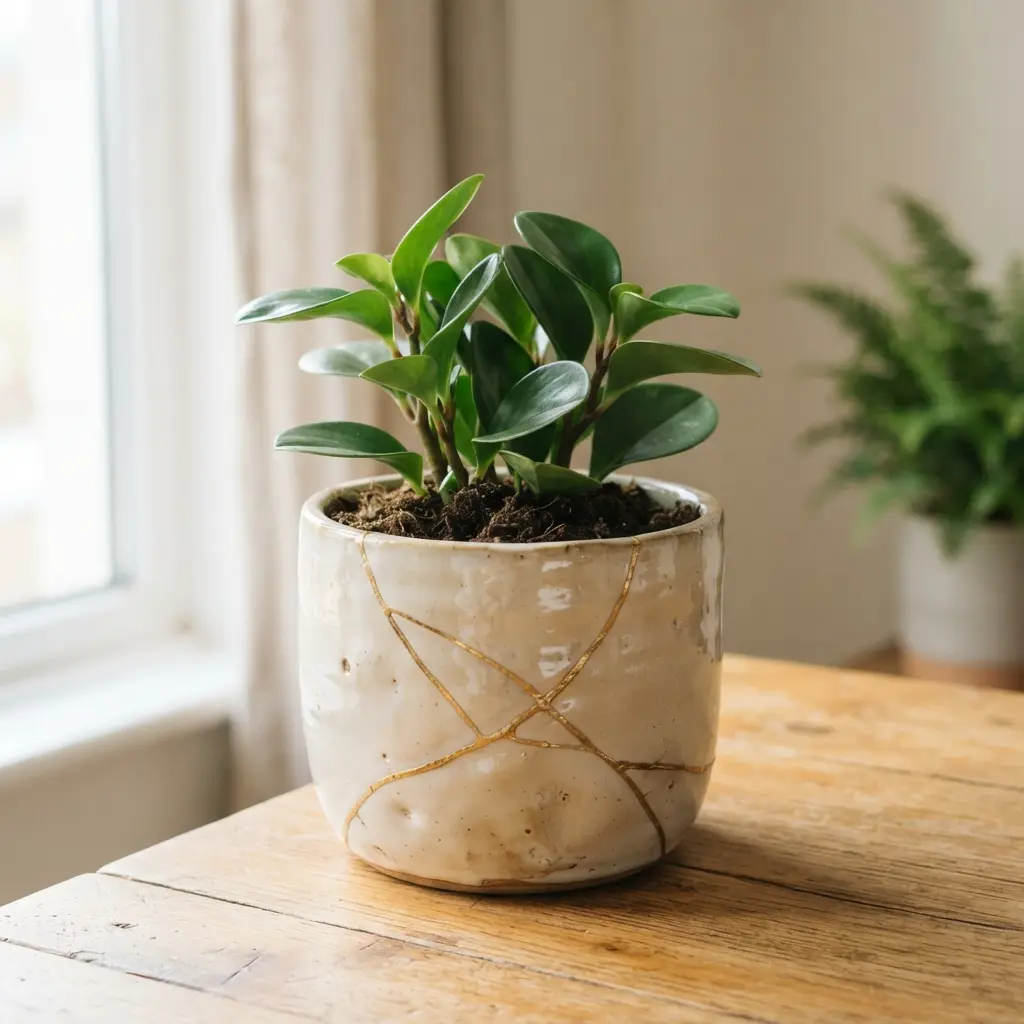
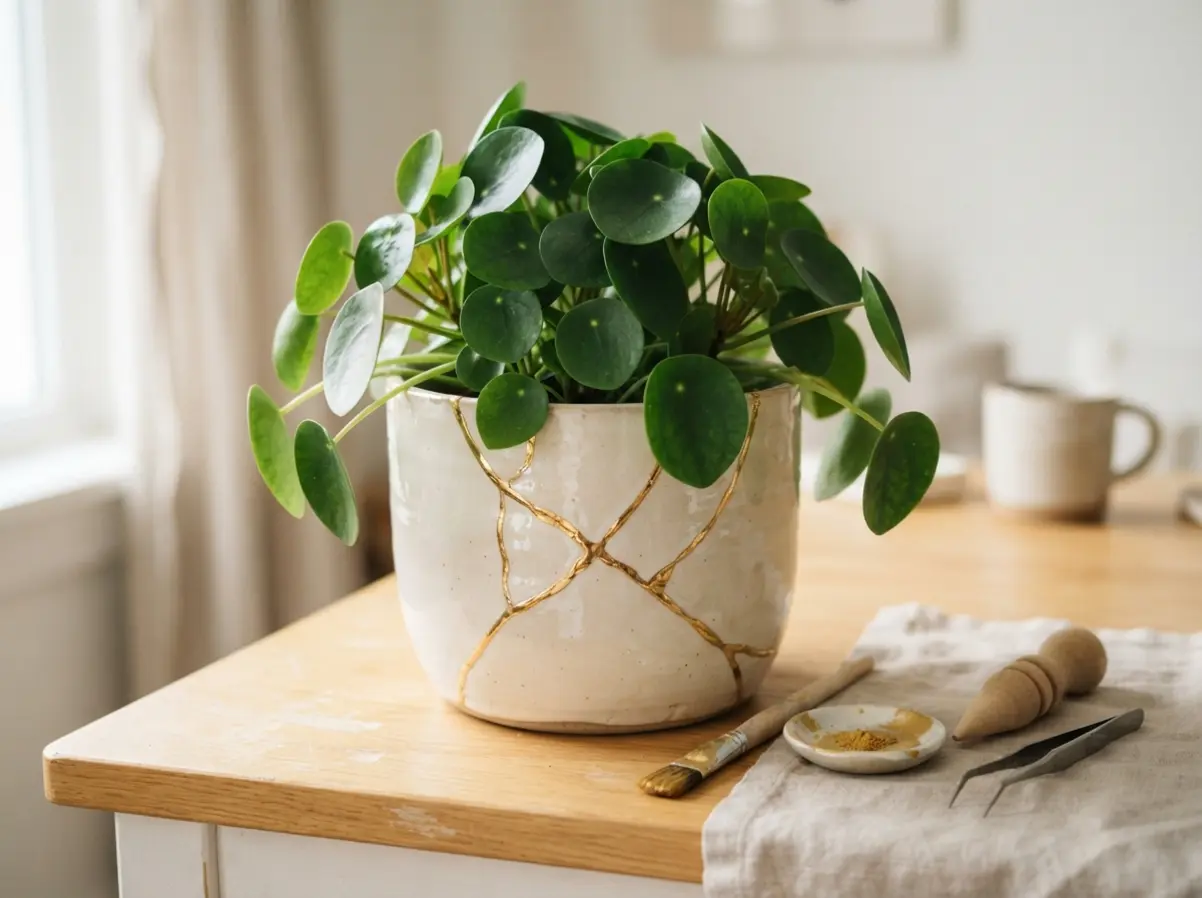
Ever wondered how a cracked ceramic pot could look more special after repair? Start with a clean, dry planter and study each split before filling it with a suitable ceramic repair adhesive. Press the pieces together, wipe away excess, and let the repair cure fully according to the product label. I love leaving the surface softly imperfect, with the original glaze showing around every repaired line. Documenting these steps often inspires new Flower Pot Restoration Ideas.
Paint the cured seams with metallic gold paint, using a fine brush for narrow breaks and a lighter touch on chipped areas. Keep the gold slightly uneven rather than covering the whole pot, then add a clear outdoor sealer once everything is dry. The warm lines draw attention to the pot’s history, while the finished piece still feels calm and useful. Work over a tray, and keep drainage holes clear. Your restored planter will feel personal and proudly handmade. Following this sequence guarantees reliable Flower Pot Restoration Ideas.
2. Distressed White Farmhouse Terracotta Pot with Aged Finish
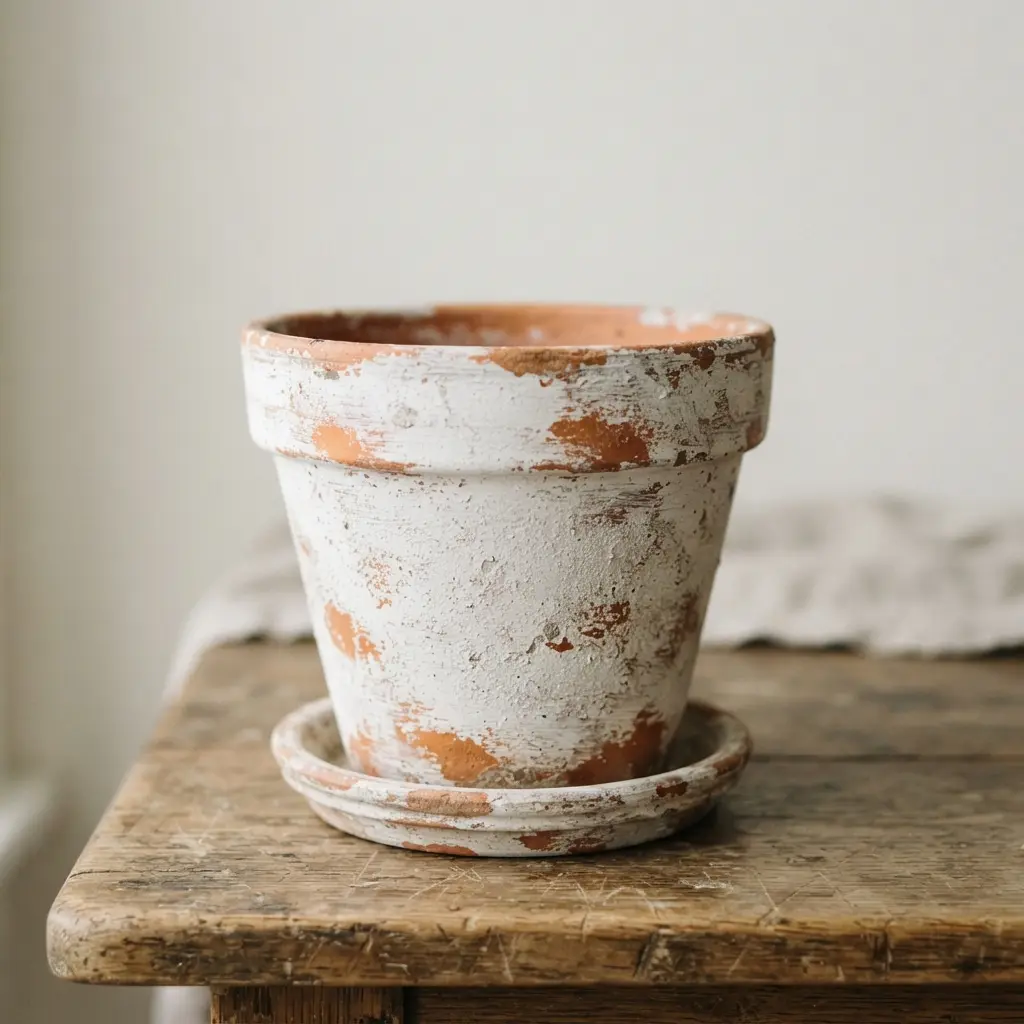
This finish gives a plain terracotta pot the soft, timeworn charm of a farmhouse shelf. Start with a clean, dry pot, then brush on matte white paint, leaving a little terracotta visible around the rim and raised texture. I love how a thin, uneven coat keeps the pot from looking too polished. This technique anchors many practical Flower Pot Restoration Ideas.
After it dries, rub fine sandpaper over the edges, rim, and a few raised spots until warm clay peeks through. Add a small amount of diluted brown paint into creases for an aged patina, then wipe the surface with a soft cloth. Sound complicated? It is not, and each light pass gives you more control over the worn finish. You will notice similar aging methods across popular Flower Pot Restoration Ideas.
Seal the surface with a matte outdoor sealer if the pot will sit outdoors, keeping the coat light around the drainage hole. Avoid heavy sanding or thick dark washes, since both choices hide the gentle farmhouse look. Trust me on this one, subtle wear feels more natural and leaves you proud of the finished pot. Weatherproofing remains a critical step for durable Flower Pot Restoration Ideas.
3. Geometric Black and White Modern Planter with Clean Lines
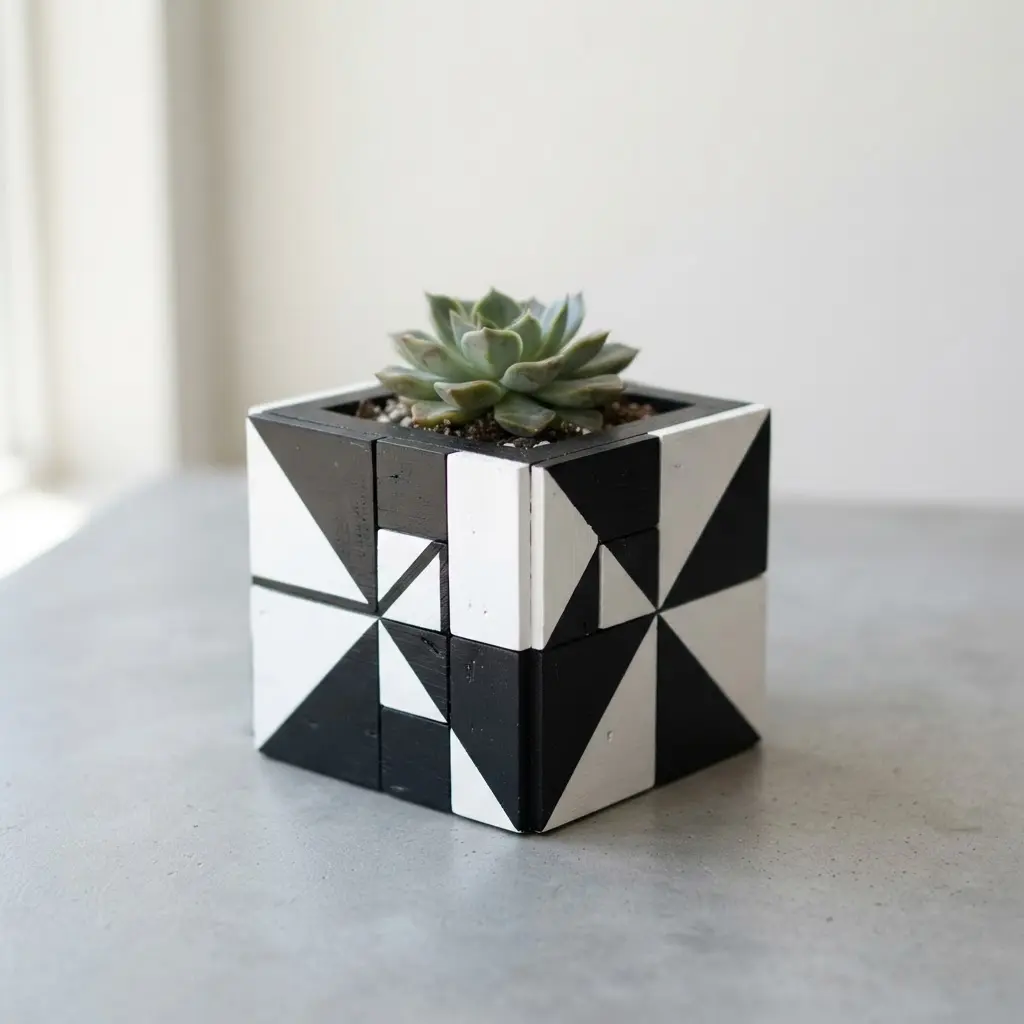
This one is my favorite because crisp geometry makes an old planter feel fresh and current. After cleaning the surface, smooth any rough spots and apply a white base coat. Once dry, mark triangles, squares, or angled bands, then fill selected areas with black paint, keeping each shape bold and uncluttered. Geometric layouts define several contemporary Flower Pot Restoration Ideas.
Sound complicated? It isn’t. Use painter’s tape around each shape so the edges stay sharp, then peel it away while the final coat is slightly soft. The high contrast gives succulents and small houseplants a neat architectural setting for desks, shelves, entryways, or patios. I love how one clean pattern makes the whole pot feel polished, so take your time with each line and enjoy the fresh finish. Careful taping elevates your Flower Pot Restoration Ideas.
4. Blue Mediterranean Mosaic Tiled Pot with Coastal Color
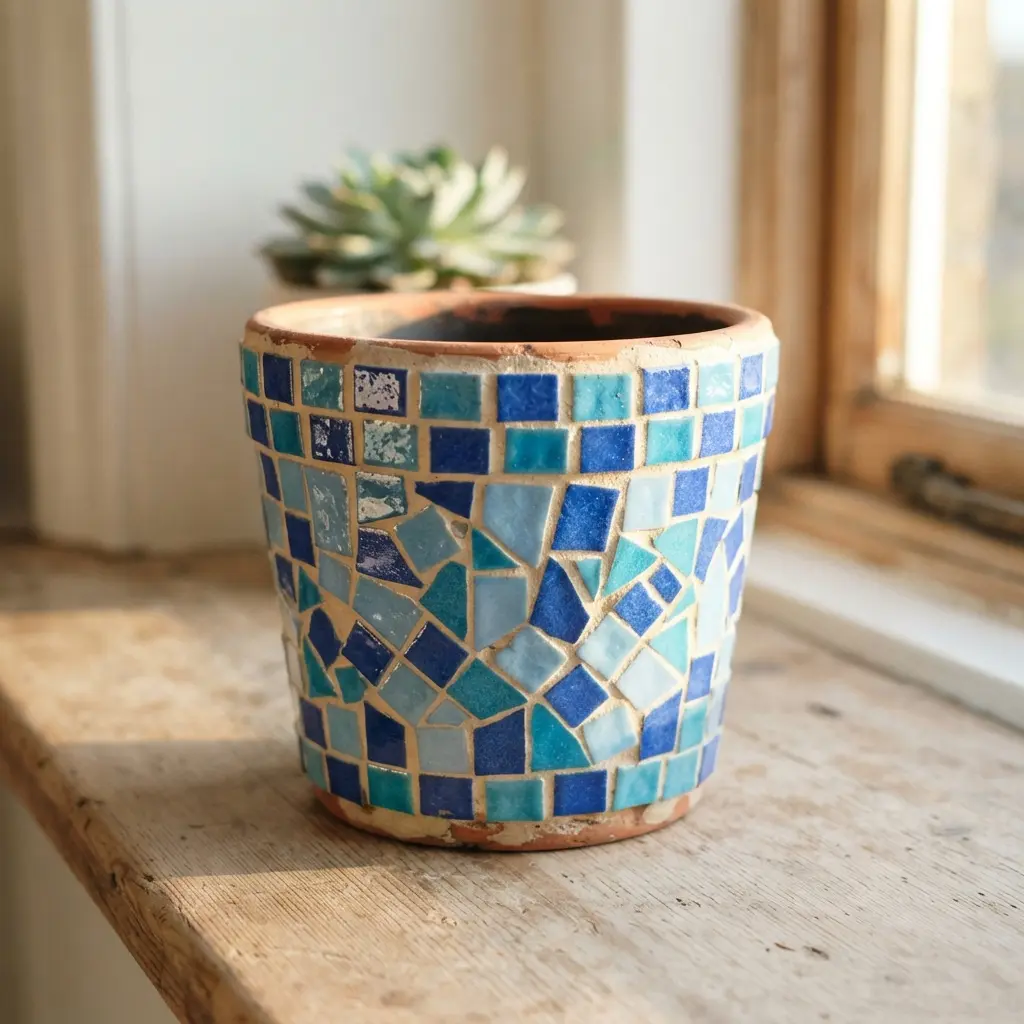
Blue tile pieces catch the sunlight, bringing cool texture and small flashes of color across the pot’s curved surface. A coastal palette of sea blue, pale white, and sandy beige gives the restored piece a fresh seaside look, doesn’t it? Begin with a clean, dry pot and arrange a planned tile layout before fixing anything in place, keeping the pattern balanced around the curve. I love how uneven edges add hand-finished character without needing a fussy design, and placing the pot near herbs or pale flowers makes the colors feel even fresher. Tile work consistently appears in detailed Flower Pot Restoration Ideas.
5. Macrame Wrapped Bohemian Garden Pot with Soft Knots
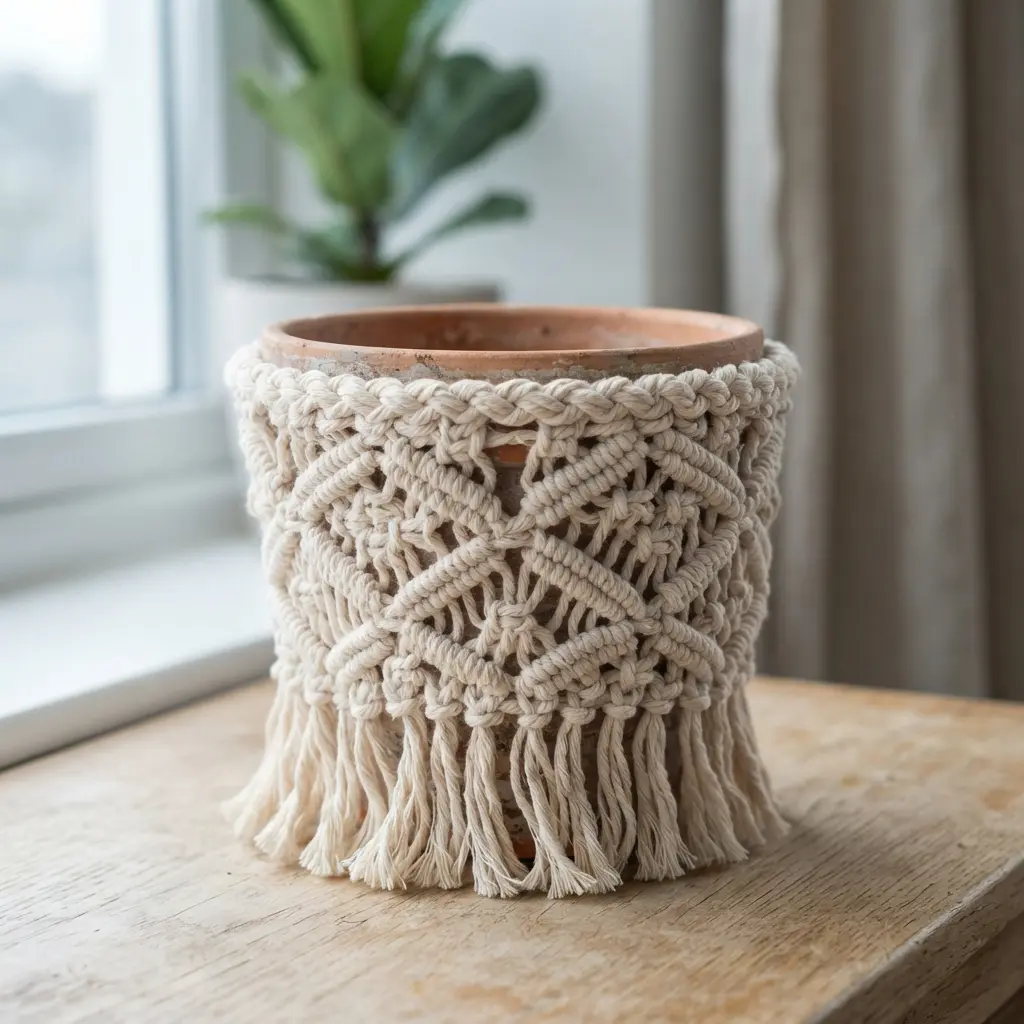
Many people assume a macramé-wrapped pot needs complex knots, but soft, even knots create the look with less fuss. Start with sturdy cotton cord and a clean flowerpot, then wrap the cord around the vessel in loose rows, leaving small gaps so the pot’s color shows through. Keep the hanging strands long enough to form a gentle fringe at the base. Fiber wrapping techniques expand your range of Flower Pot Restoration Ideas.
Sound complicated? It’s not, especially when you use a small pot for your first try. I love how natural cord warms a tired planter and gives it a relaxed bohemian garden style. Check the wrap before adding soil, so the pot sits level and the cord stays dry. Feel proud when those soft knots turn a plain pot into a cheerful plant accent. Testing tension early improves all Flower Pot Restoration Ideas.
6. Soft Sage Green Limewashed Planter for Rustic Gardens
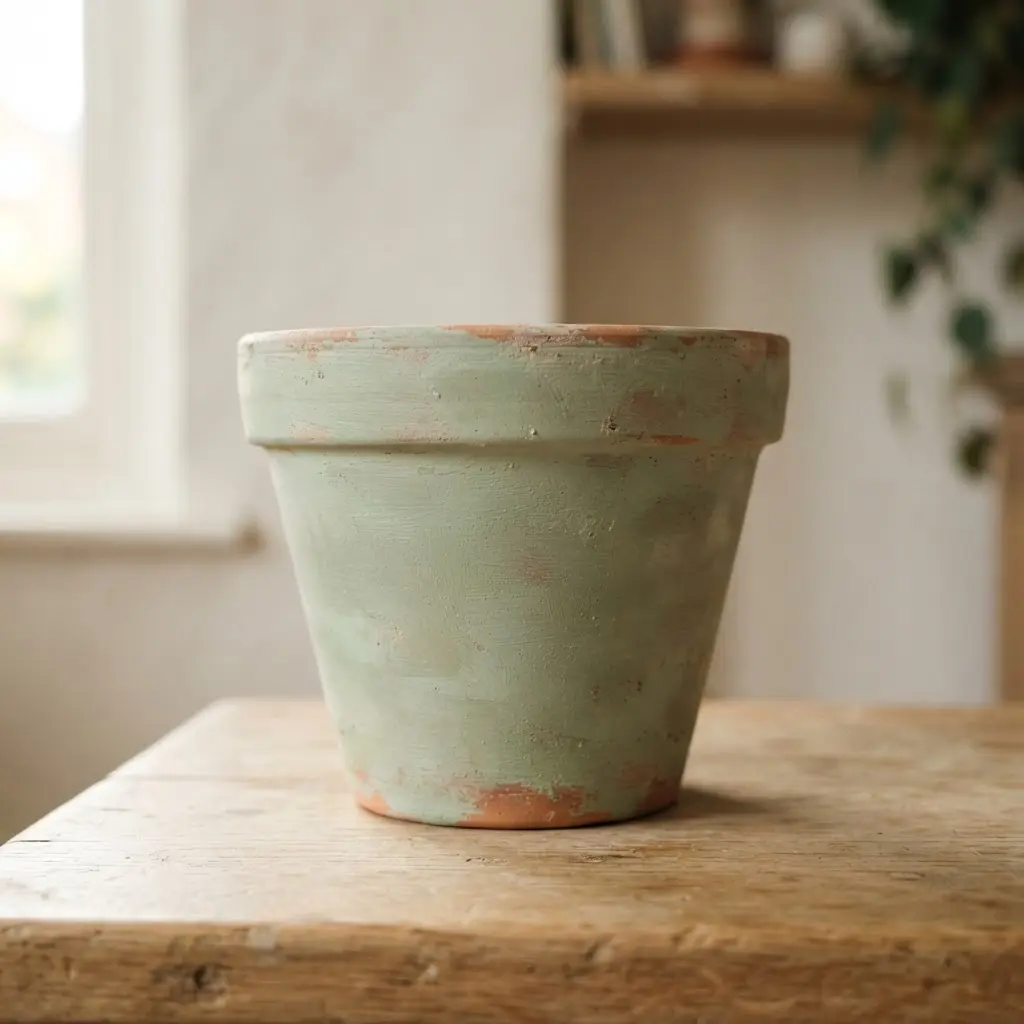
Cover the work area, then apply a thin, uneven layer of soft sage green limewash to your planter. Let small areas of the original surface show through instead of chasing a smooth, opaque coat. Sound complicated? It isn’t, and I love how quickly the worn finish starts to appear. Lime wash application ranks highly among breathable Flower Pot Restoration Ideas.
Once the surface looks gently weathered, fill it with suitable planting soil and choose trailing ivy, lavender, rosemary, ornamental grasses, or pale flowers. The muted green suits cottage gardens, farmhouse patios, Mediterranean spaces, and rustic entryways. It brings a calm touch beside terracotta pots or reclaimed wood. Selecting compatible earths supports your Flower Pot Restoration Ideas.
Keep the planter near a bench, doorway, or existing greenery, where its uneven texture adds depth without taking over. I’d leave the finish slightly varied, since a perfectly even coating loses the aged character. Trust me on this tip: pair it with weathered metal or natural stone, then feel proud of your relaxed garden corner. Material pairing completes your Flower Pot Restoration Ideas.
7. Metallic Copper Dipped Concrete Pot with Bold Contrast
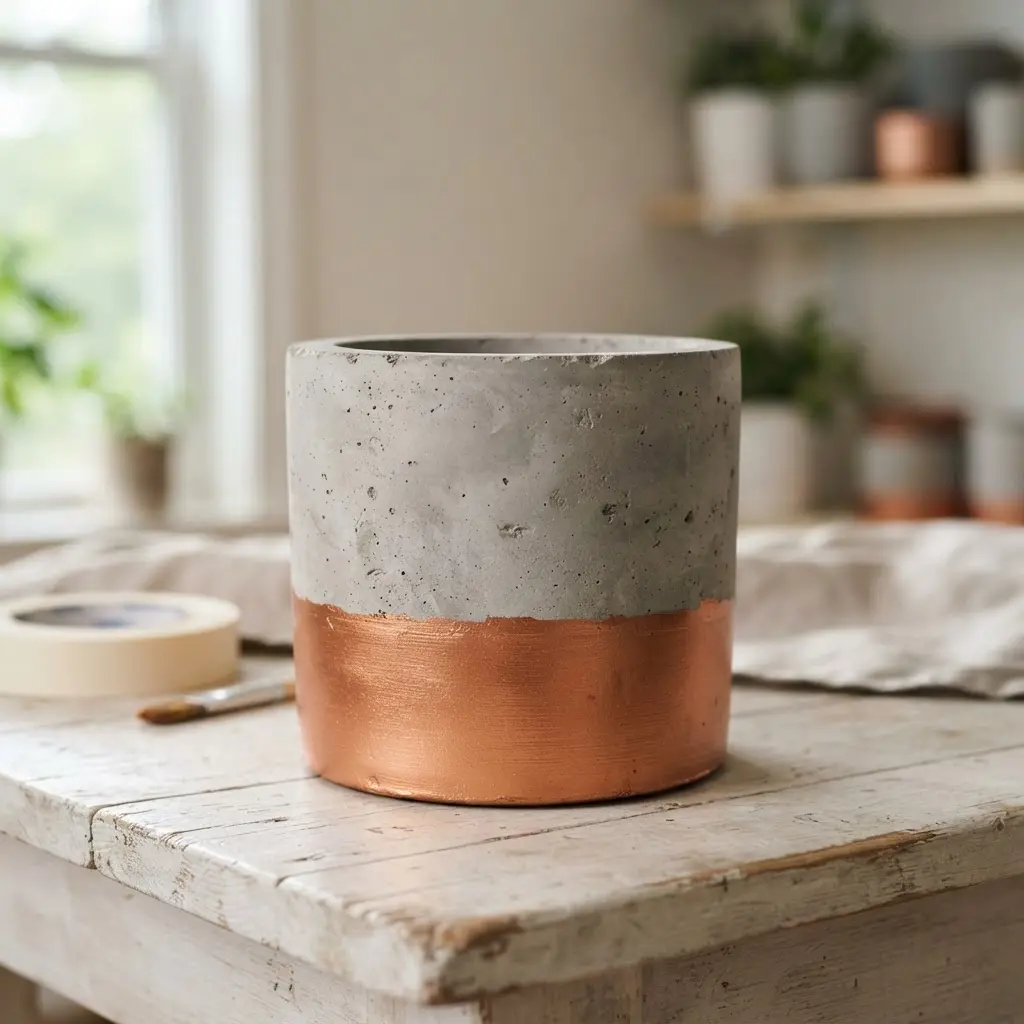
Ever wondered how a plain concrete planter gets such a polished presence? Start with the raw, matte-gray surface and mark the upper section for the copper treatment. Apply a rich metallic copper finish above the line, leaving the lower half untouched so its cool texture stays visible. Keep the boundary crisp for a clean two-tone look. Sharp demarcations guide effective Flower Pot Restoration Ideas.
I love how the warm copper catches light while the gray base keeps the piece grounded. This finish suits modern rooms, office corners, patios, and entryways, especially beside sculptural greenery or a trailing plant. Preserve the matte-gray lower half so the industrial character stays clear. Maintaining raw zones aligns with industrial Flower Pot Restoration Ideas.
For the strongest display, choose dark-leaved botanicals and leave enough copper visible around the foliage. Dense leaves might hide the metallic finish and soften the intended contrast. Trust me, showcase the copper band and enjoy the satisfying balance of warmth, texture, and clean modern style. Strategic foliage placement optimizes your Flower Pot Restoration Ideas.
8. Botanical Stenciled Herb Garden Container with Labels
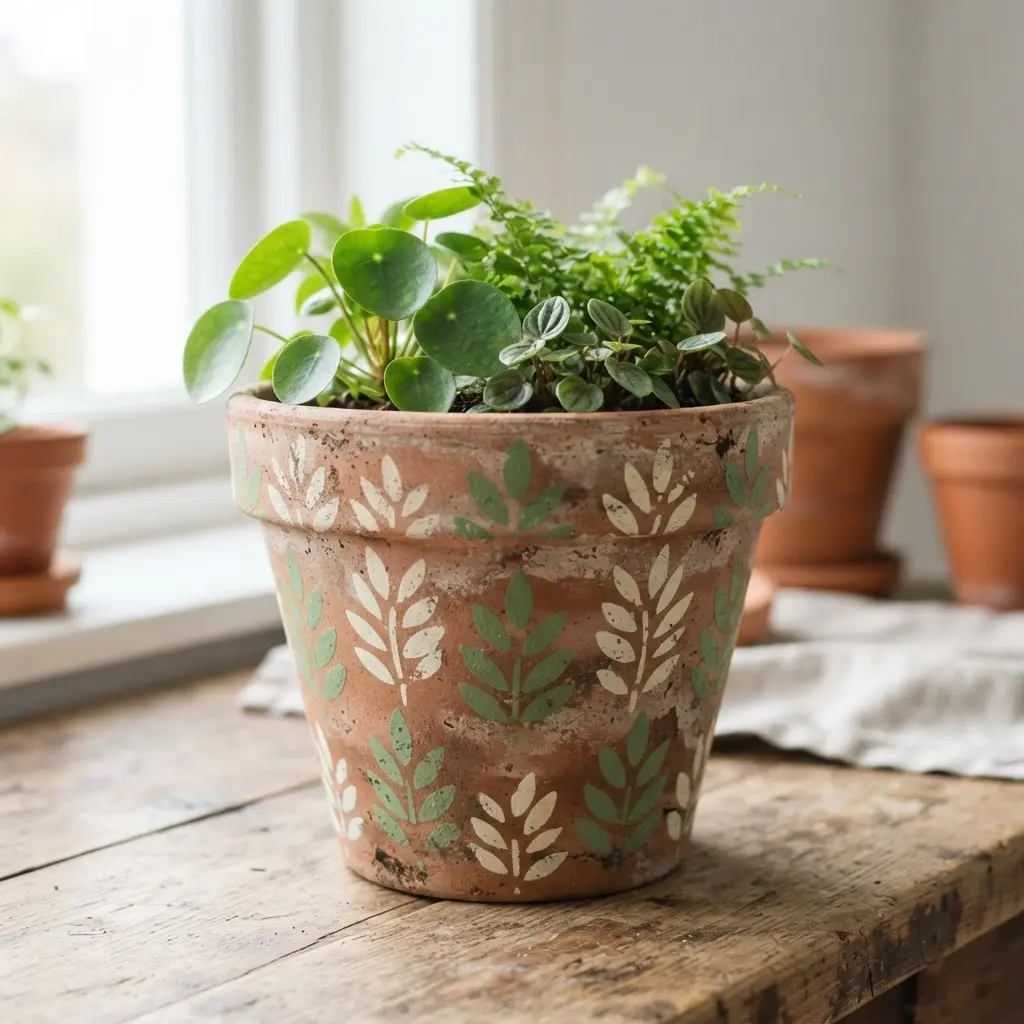
This project gives an ordinary planter a fresh, garden-ready personality without much fuss. Start with a clean wooden box, crate, or terracotta pot, then smooth rough spots with fine-grit sandpaper before adding a base coat. Once dry, tape a leaf stencil in place and dab on paint with a nearly dry sponge, lifting the stencil carefully so crisp botanical shapes stay visible. Stenciling techniques consistently appear in floral Flower Pot Restoration Ideas.
Write Basil, Rosemary, Thyme, Mint, or Parsley on small wooden markers with a paint pen, then add tiny leaf sketches for extra charm. Is there anything nicer than knowing every herb at a glance? Fill the container with soil, settle in your plants, and seal outdoor pieces with weather-resistant sealant. I love how the labels make watering and snipping feel organized, while matching leaves turn a useful windowsill or patio garden into a cheerful display. Trust me, careful paint control makes the whole piece feel polished. Precise application elevates practical Flower Pot Restoration Ideas.
9. Jute Rope Wrapped Planter Sleeve for Natural Texture
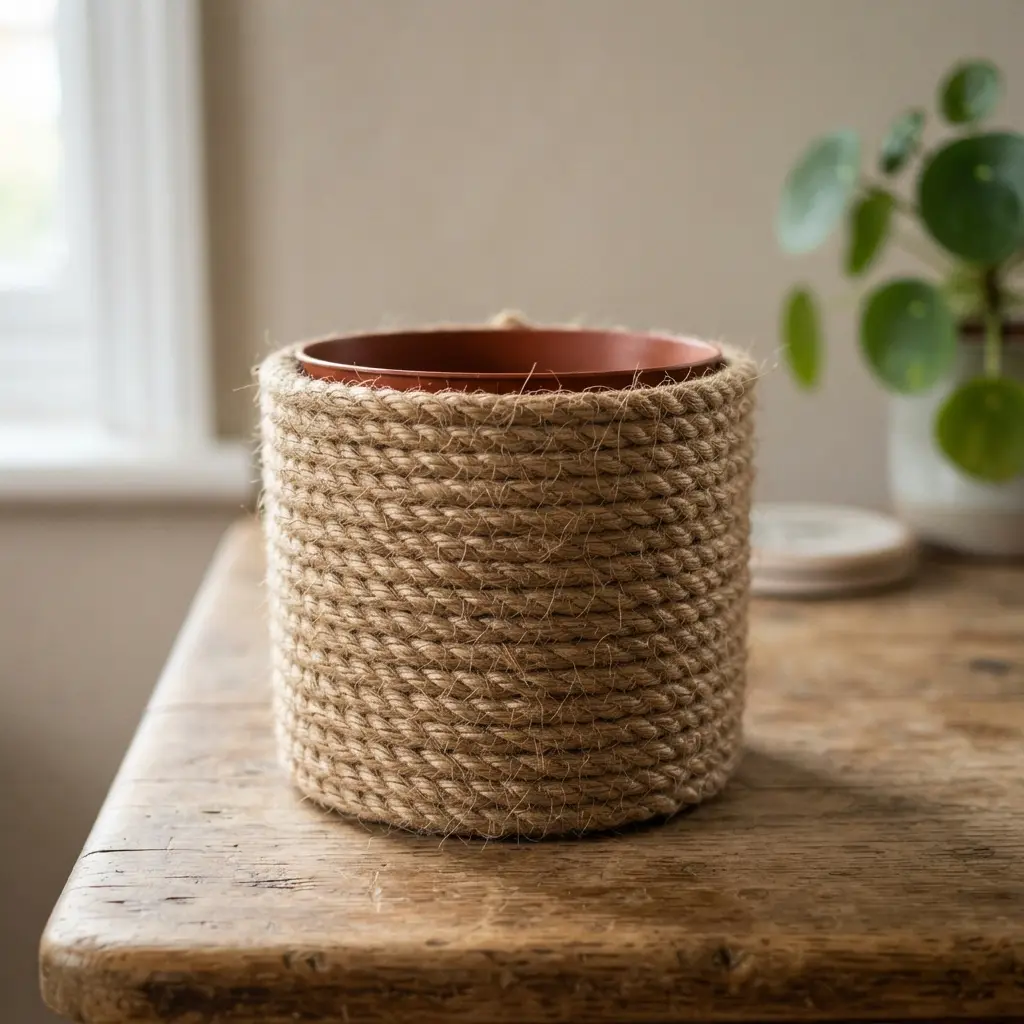
This is one of my favorite ways to refresh a tired planter because the finished texture feels warm and handmade. Sound complicated? It is not. Start with a plain planter or recycled container, then gather your jute rope and hot glue. Coil wrapping features prominently in tactile Flower Pot Restoration Ideas.
Begin near the base with a thin line of glue, press the rope into place, and wind each coil snugly against the last. Add small glue spots as you move upward, keeping the rows close and even. Trim the cord neatly at the rim and hold the final end in place until set.
The close coils soften hard plastic or plain ceramic, giving succulents, herbs, flowers, or leafy houseplants a cozy rustic texture. I love how much character this simple covering adds without changing the pot itself. Fiber layers enhance many natural Flower Pot Restoration Ideas.
Keep moisture away with a waterproof pot insert. Too much glue creates bumps, so a light touch keeps the sleeve neat. Feel proud when the warm rope texture brings fresh life to an old container. Protecting cores guarantees lasting Flower Pot Restoration Ideas.
10. Neon Painted Abstract Splash Pot with Bright Accents
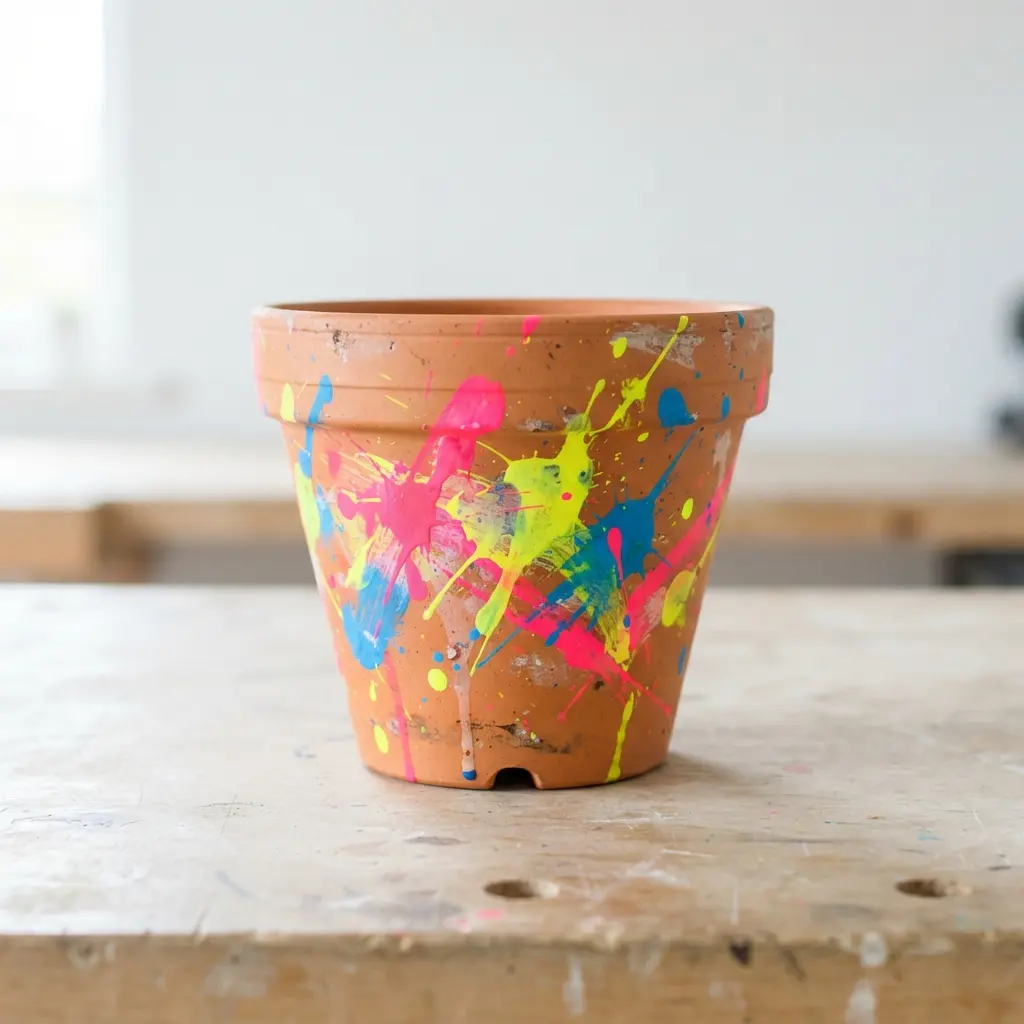
Glossy ceramic flashes with neon pink, electric blue, lime green, orange, and yellow, while loose splashes cross the surface in lively irregular marks. Doesn’t this look cheerful against a clean white setting? Start with a clean, dry ceramic flower pot, then place broad, uneven strokes in separate areas so each color stays clear. Color blocking drives energetic Flower Pot Restoration Ideas.
Let each layer dry before adding nearby accents, and resist lining up every mark. I love how the rough placement gives the pot movement without needing a fixed pattern. Finish with a glossy protective coating once the paint feels dry, testing your chosen paint and coating on a small hidden spot first. Feel proud when the bright surface catches the light. Seal selection matters for vibrant Flower Pot Restoration Ideas.
11. Stone Texture Faux Terracotta Finish for Weathered Pots
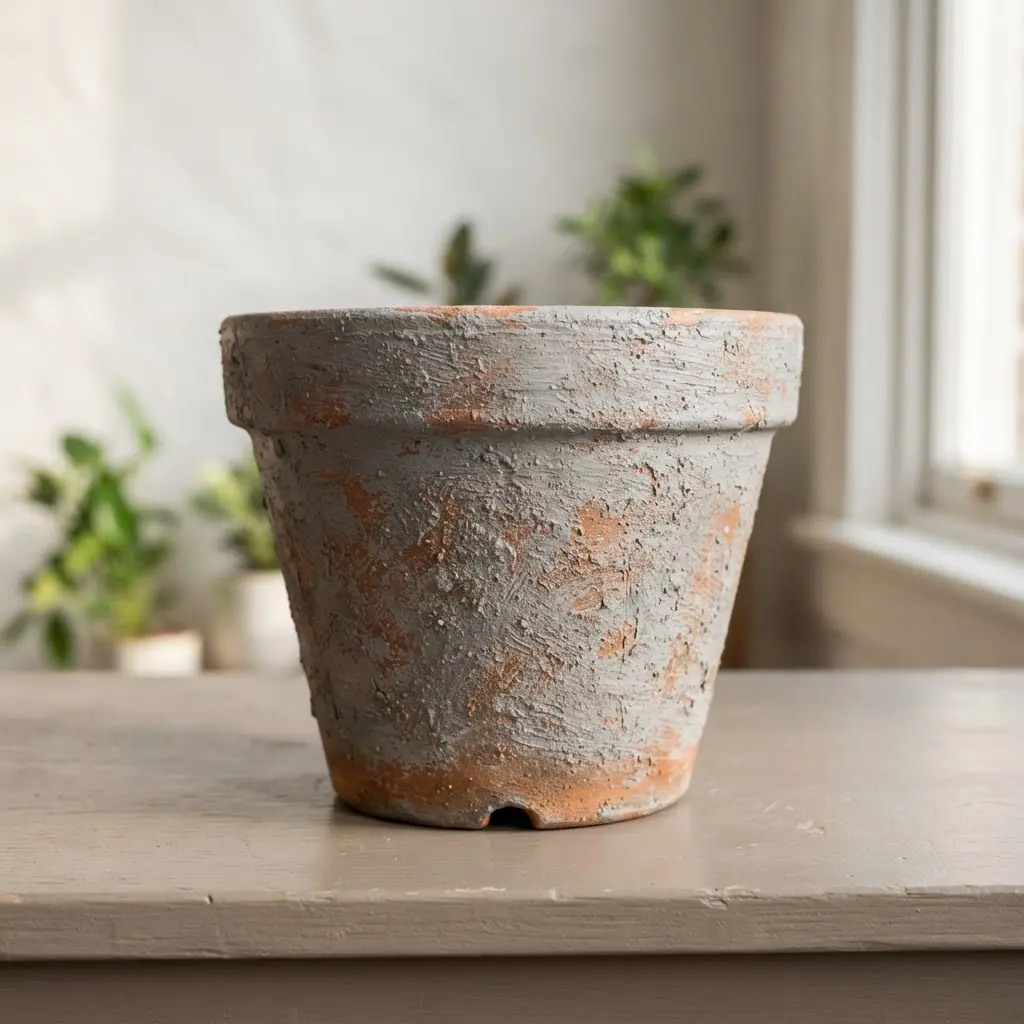
A common mistake is making every patch of texture even, which leaves a pot looking newly coated. Start with a clean, lightly sanded surface and primer, then dab on uneven texture paste with a sponge or stiff brush. Let raised spots, shallow crevices, and a few thin areas remain visible. Sound complicated? It isn’t, and I love how quickly the surface gains character. Texture variation defines authentic Flower Pot Restoration Ideas.
Paint a muted terracotta base, then tap warm beige, stone gray, and cream over the high points. Push diluted dark brown into cracks and around the rim, wipe excess with a damp cloth, and add a restrained green-gray wash near the base. Finish with two thin sealer coats once every layer is dry. The color changes feel natural because shadows settle into recesses while pale highlights catch the rough texture. Trust me, this finish makes mixed pot materials look wonderfully unified. Layered finishing strengthens professional Flower Pot Restoration Ideas.
12. Decoupage Floral Pattern Vintage Planter with Soft Edges
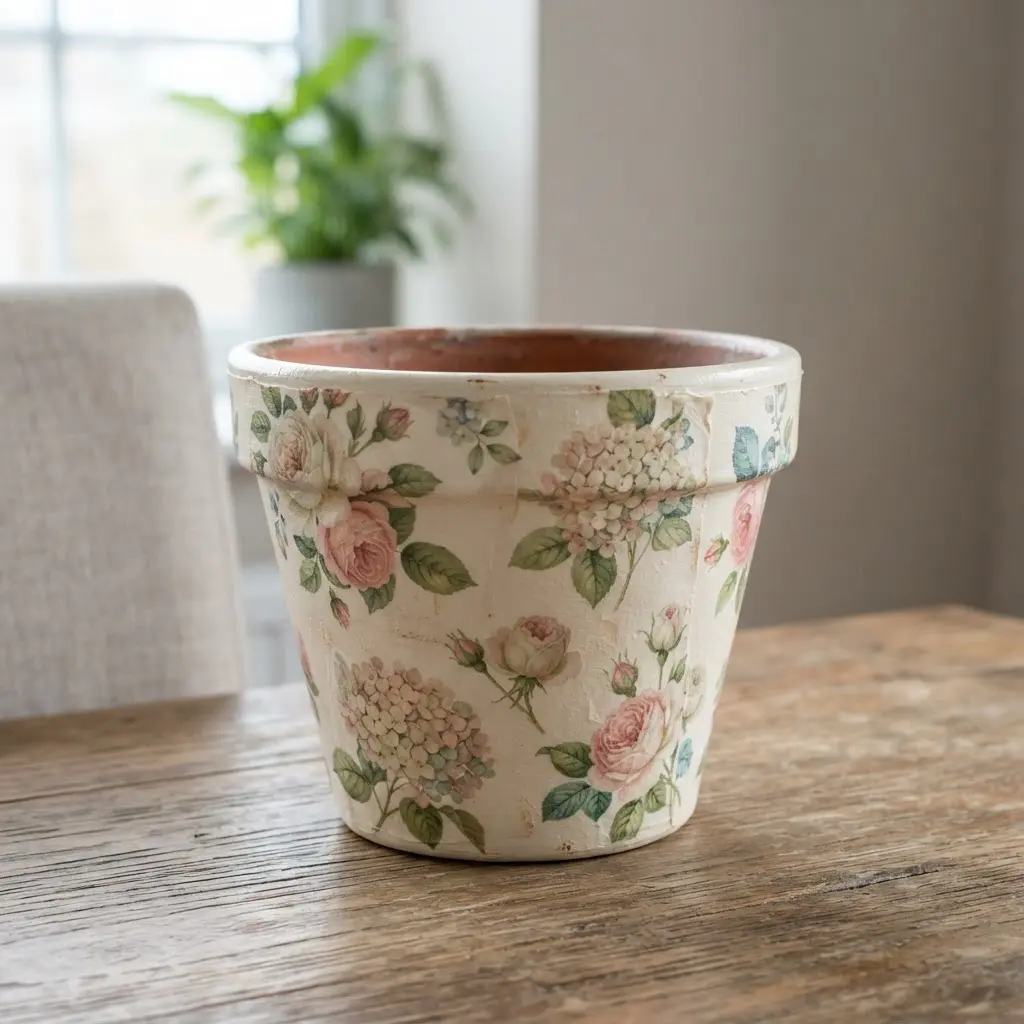
Start with a planter with softly rounded edges, then smooth its surface before adding a floral paper pattern. Press each piece around the curves with care, keeping the flowers aligned and the overlaps discreet. Sound complicated? It’s not. I love how the pattern gives a plain planter a sweet cottagecore feel without hiding its shape. Paper adhesion remains essential for delicate Flower Pot Restoration Ideas.
Once the surface is dry, add a gently distressed finish along the raised edges and selected areas, leaving the floral details clear. A light touch keeps the aged look soft rather than worn out, while a small herb, leafy plant, or artificial greenery completes the display. Trust me, this design works because the rounded form, faded color, and floral detail feel quietly connected. Keep it near gentle décor, and feel proud when its vintage character shines. Edge softening rounds out vintage Flower Pot Restoration Ideas.
13. Chalk Painted Navy Blue Pot with Soft Matte Finish
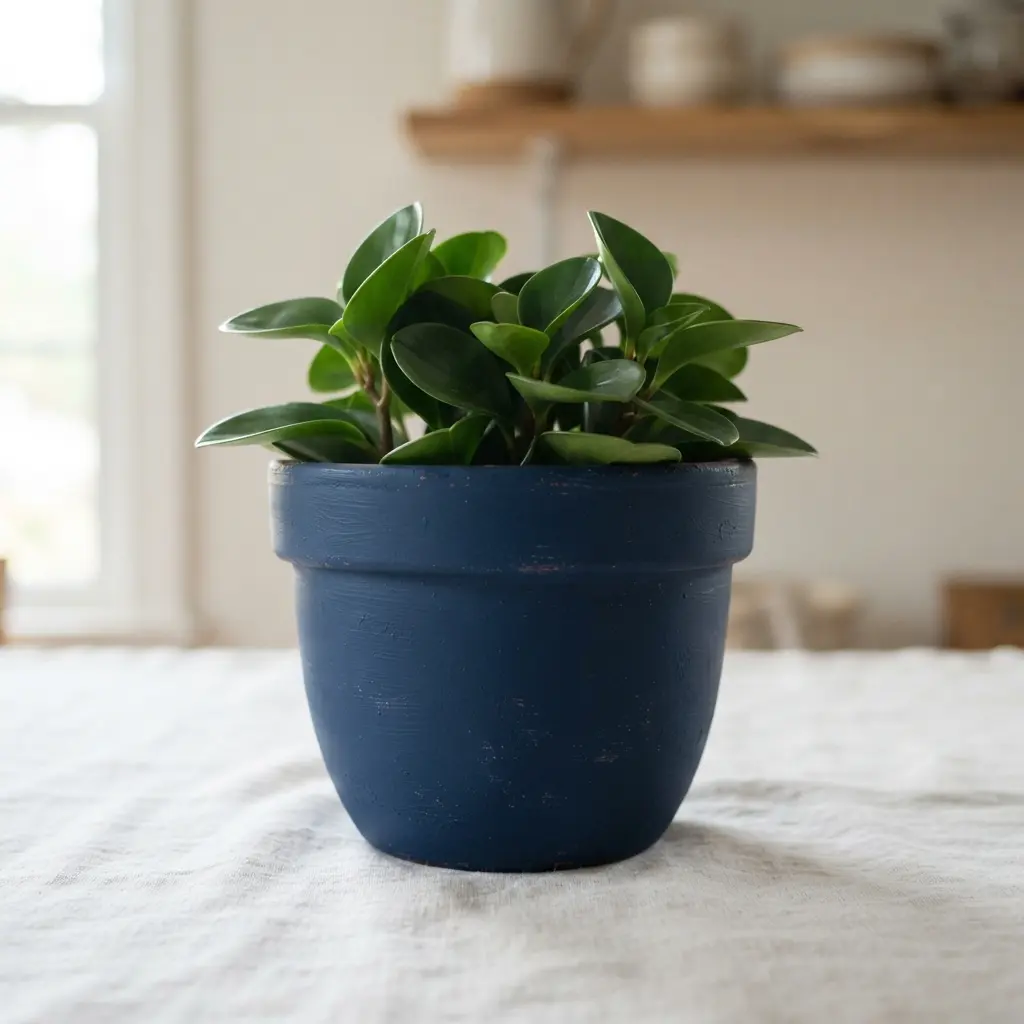
Want a pot with a rich, timeless look without much fuss? Start with a clean, dry surface, then brush on navy-blue chalk paint in smooth, even strokes. Let the painted surface settle until an understated texture appears, keeping the colour deep and the finish calm. Follow the paint label for preparation, coat, and drying guidance.
I love this style because navy feels grounded without taking over a room. The soft matte finish gives the pot a handmade appearance and suits modern, farmhouse, coastal, or traditional décor. Place it beside greenery, seasonal flowers, or a small ornament, and its rich colour will frame the display with quiet confidence.
Keep the surface low-sheen by avoiding glossy products. Trust me on this one, a simple shape often looks best when the paintwork stays neat and restrained.
14. Nested Vertical Herb Tower Pots for Small Spaces
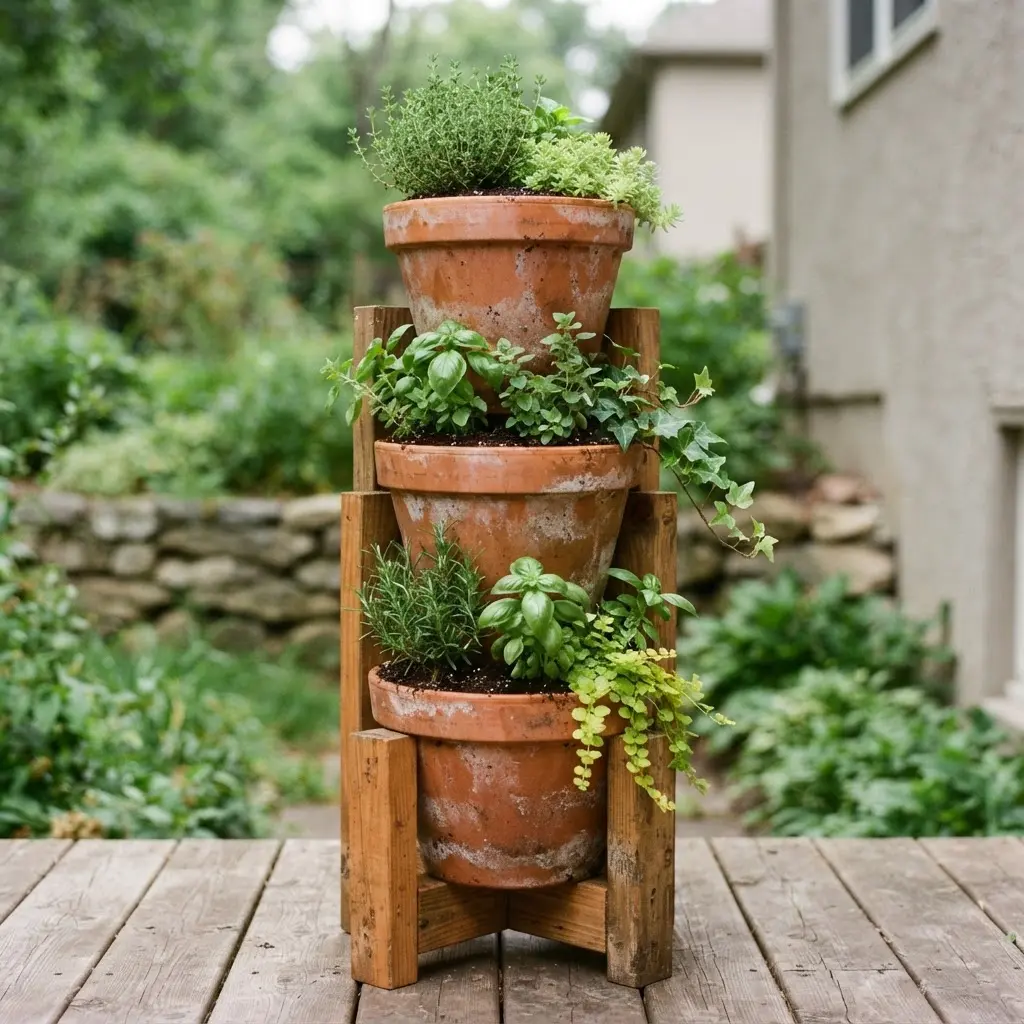
This compact herb setup gives a tiny balcony or porch several planting levels without crowding the floor. I love how stacked flower pots turn worn containers into a neat, useful display. Each tier holds basil, parsley, thyme, oregano, chives, rosemary, or sage, while mint stays in its own pot. Sound complicated? It is much easier than it looks.
Choose a sunny spot with at least six hours of light, then arrange each container around a central support or stack them securely. Fill every pot with lightweight, well-draining soil, and place drought-tolerant herbs near the top while moisture-loving varieties sit lower down. Use drainage holes in every container so water never collects beneath the roots.
Label each tier and rotate the tower from time to time for even light. Terracotta, ceramic, wood, and recycled containers give the arrangement a cheerful restored look. Trust me on this one, harvesting fresh herbs from a tidy little tower feels wonderfully satisfying.
15. Whitewashed Rough Sawn Wooden Planter with Farmhouse Character
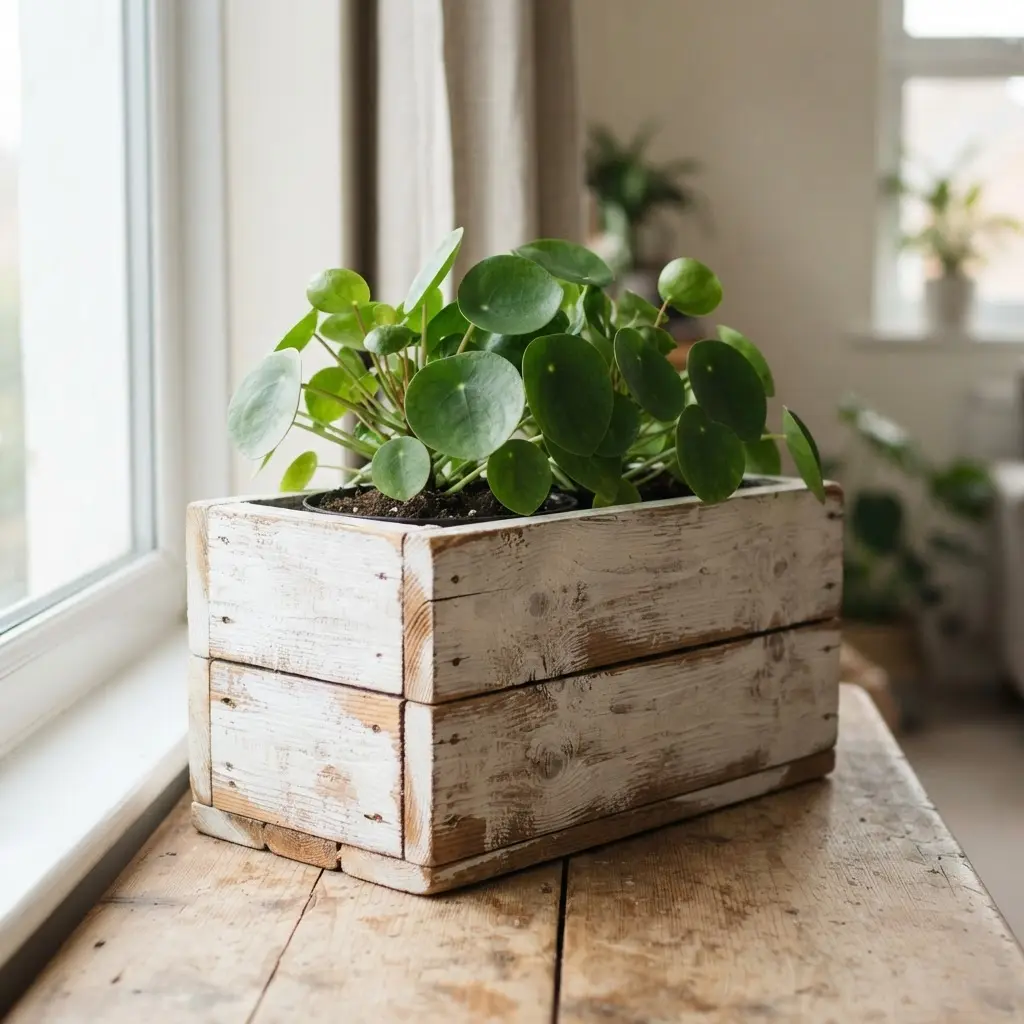
This one is my favorite because rough wood and a soft white finish give a tired planter instant farmhouse character. Start with a sturdy wooden planter, brushing away loose dirt and flakes before checking every corner for rot.
Apply a thin coat of whitewash paint, letting the grain show through instead of covering it with a solid block of color. Wipe the high spots with a dry cloth, then add a second light coat only where the wood still looks uneven.
Isn’t the worn texture satisfying? I love how the pale finish makes leafy plants stand out while the rough boards keep the piece relaxed and homespun. Seal the outside with exterior wood sealer, keeping drainage holes clear, and let the surface dry fully before planting.
16. Sea Glass Mosaic Embellished Pot with Coastal Detail
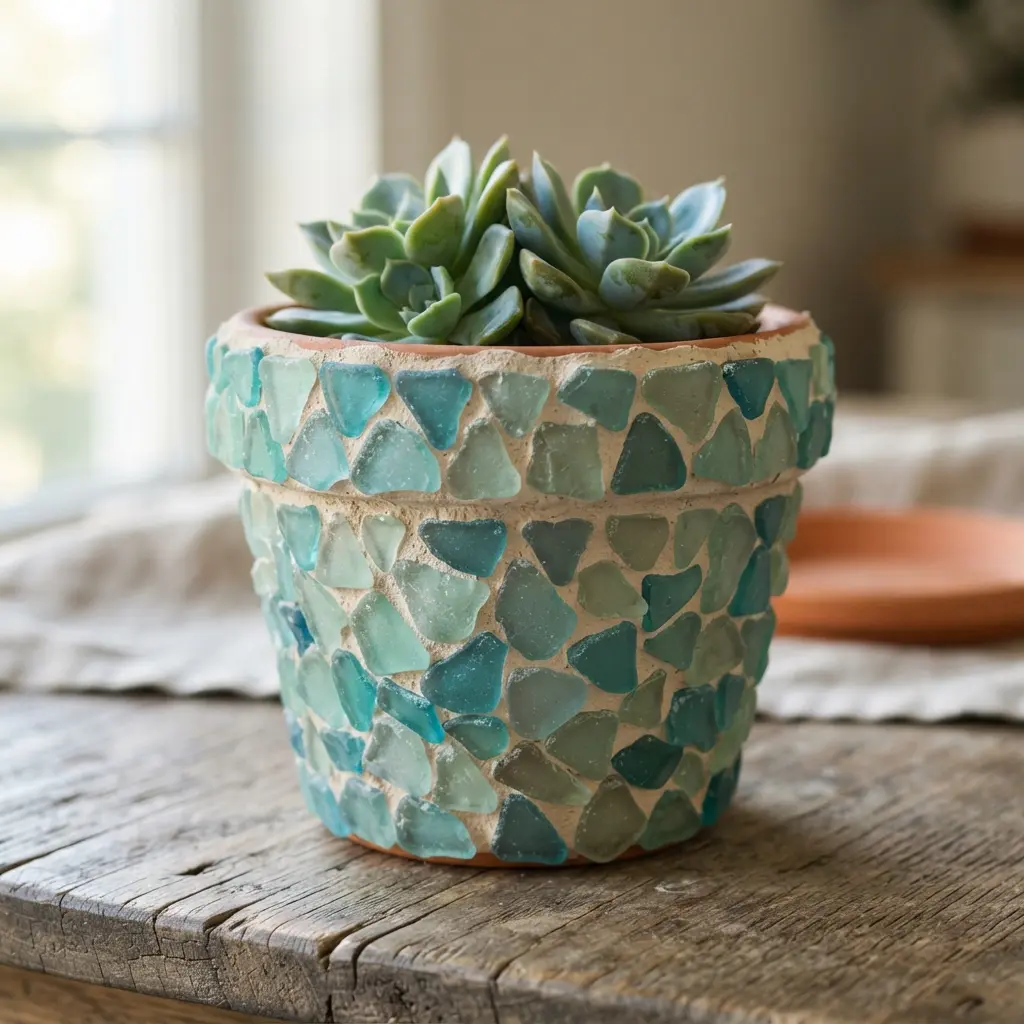
The finished pot catches light with frosted blue, green, and white sea glass pieces, while small coastal details add a relaxed seaside feel. The surface feels gently textured, making a plain planter suitable for succulents, herbs, flowers, or a small decorative display.
Begin with a clean flower pot. Arrange colorful sea glass pieces around it, leaving spaces balanced rather than crowded. Add shells, rope-inspired accents, or other coastal embellishments beside the mosaic, then review the layout before moving the pot. Why settle for a plain container when this finish brings beach-house character indoors? I love how the glass texture changes as sunlight moves across the surface. Plan the placement first with a dry arrangement, and keep decoration clear of the rim and drainage opening. Trust me, balanced spacing gives every piece room to show, so your restored planter feels cheerful, tidy, and ready for a sunroom, patio, or entryway.
17. Matte Charcoal Minimalist Planter Set for Modern Rooms
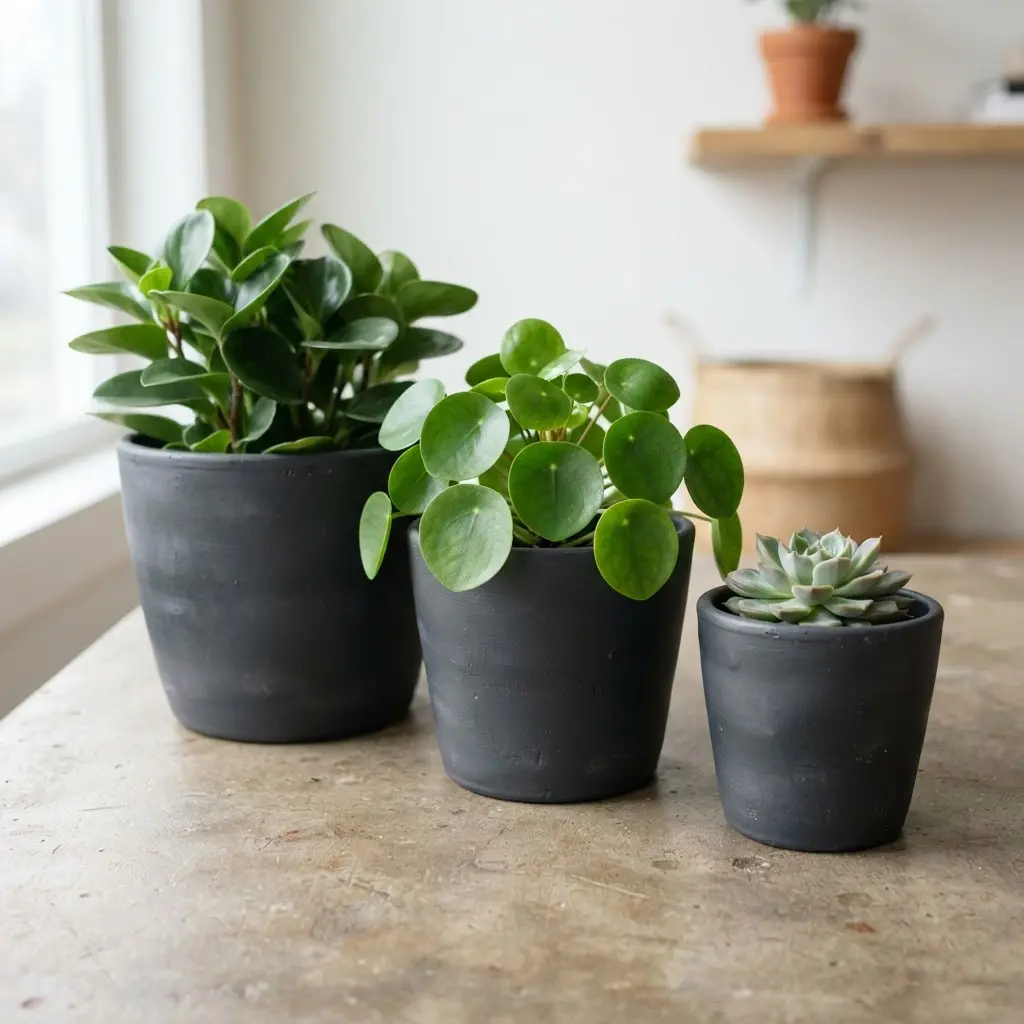
A common mistake is treating each pot as a separate accent. Keep the group together instead, using coordinated cylindrical planters to give the display a neat, connected look. The matte charcoal finish keeps the arrangement calm against neutral, industrial, or contemporary décor.
Place taller planters behind shorter ones on a shelf, tabletop, console, or windowsill. Fill them with succulents, herbs, small houseplants, or faux greenery, choosing compact shapes suited to each container. I love how a few varied heights add depth without making the room feel crowded.
Sound complicated? It is not. The matching forms make layered plant displays feel planned, while the dark neutral shade lets the greenery stand out. My go-to tip is to leave a little space around the set so its clean lines stay visible. The finished grouping feels fresh, tidy, and wonderfully modern.
18. Terracotta Pot Fairy Garden Scene with Tiny Details
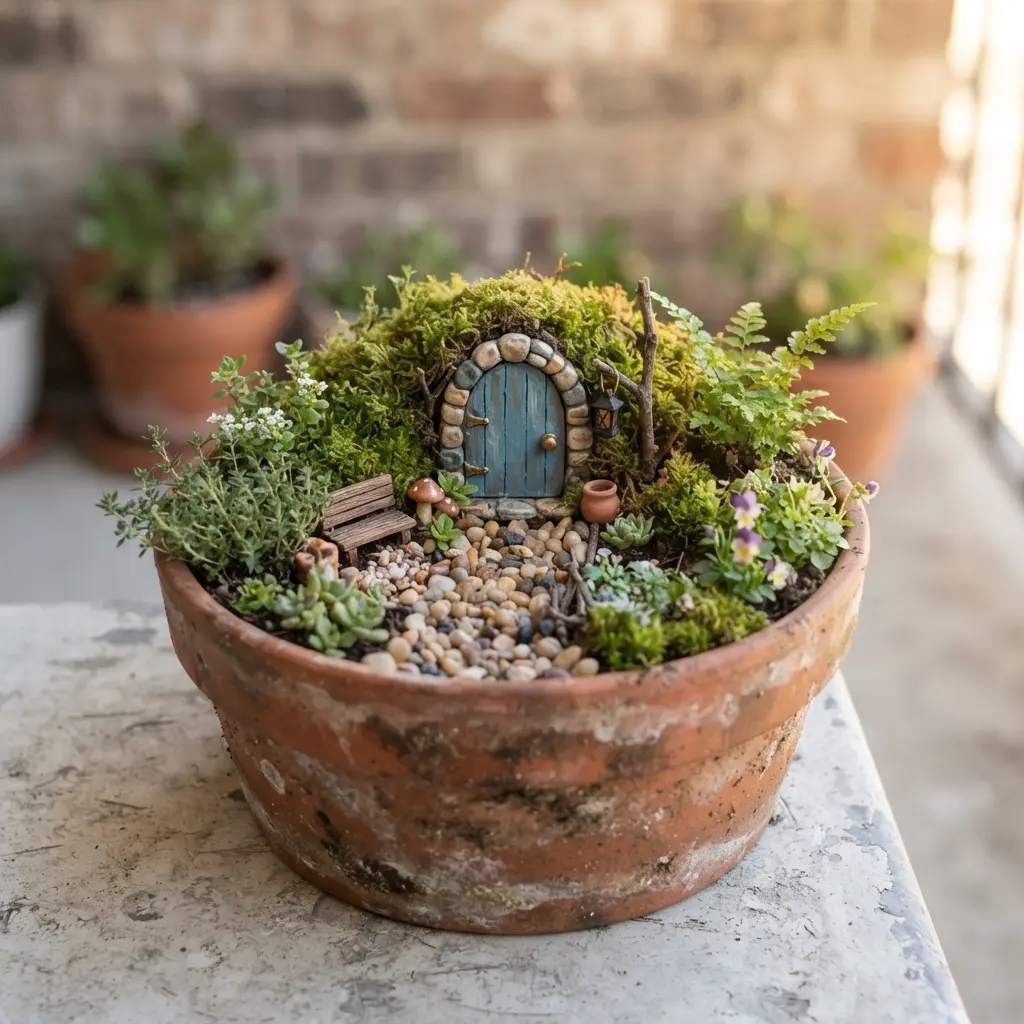
Start with a weathered terracotta pot, then set the moss-covered cottage toward the back so its round wooden door and windows stay visible. Add a pebble path from the doorway toward the rim, leaving open space around both sides. Sound complicated? It is not.
Layer moss around the cottage, then tuck in miniature mushrooms, wildflowers, and tiny ferns. Place the wooden bench beside the path, followed by the fairy figurine resting near a teacup. Hang the lanterns near the cottage for a soft glow. I love how each piece adds a little story without taking attention from the main structure.
Finish with gradual detail placement, adding the smallest accents last. Keep some terracotta showing, and vary the heights of plants, stones, and accessories for depth. Your scene will feel full yet easy to read, so enjoy the sweet woodland charm.
19. Hand Painted Lemon Motif Planter with Sunny Color
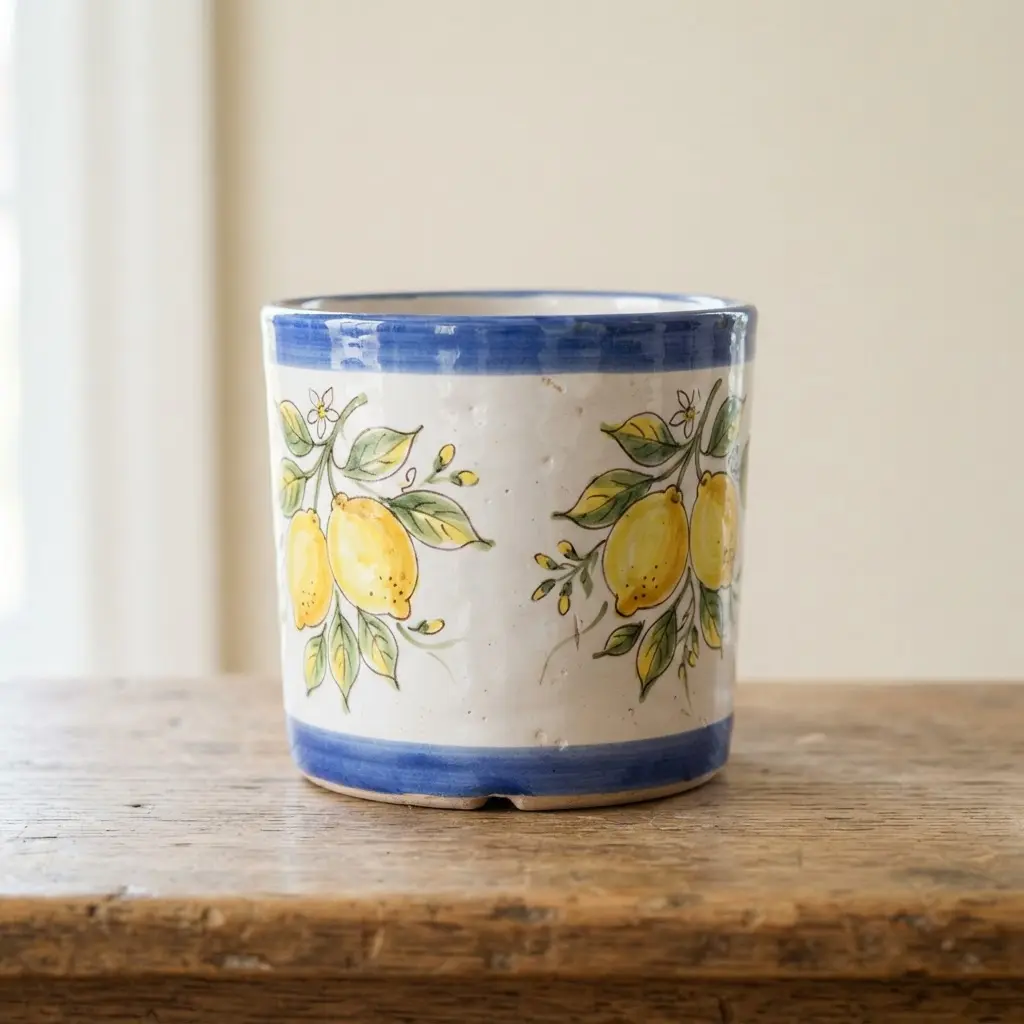
Want a cheerful kitchen accent with a personal touch? Start with a prepared flower pot, then sketch rounded lemons across the surface. Fill each fruit with sunny yellow paint, leaving room for simple leaves and warm accents. Keep the shapes loose rather than identical, since small differences give the piece its handmade character.
Add fresh green leaves or small green marks around the lemons, then let the decoration dry before planting herbs, succulents, or flowers. I love this idea for a windowsill because the yellow and green colors bring a fresh, welcoming feel without making the display fussy. Trust me on this tip: repeat a few lemon shapes around the rim for a finished look. Feel proud when your pot brightens the room.
20. Rustic Twine Tied Woven Basket Planter with Warm Fibers
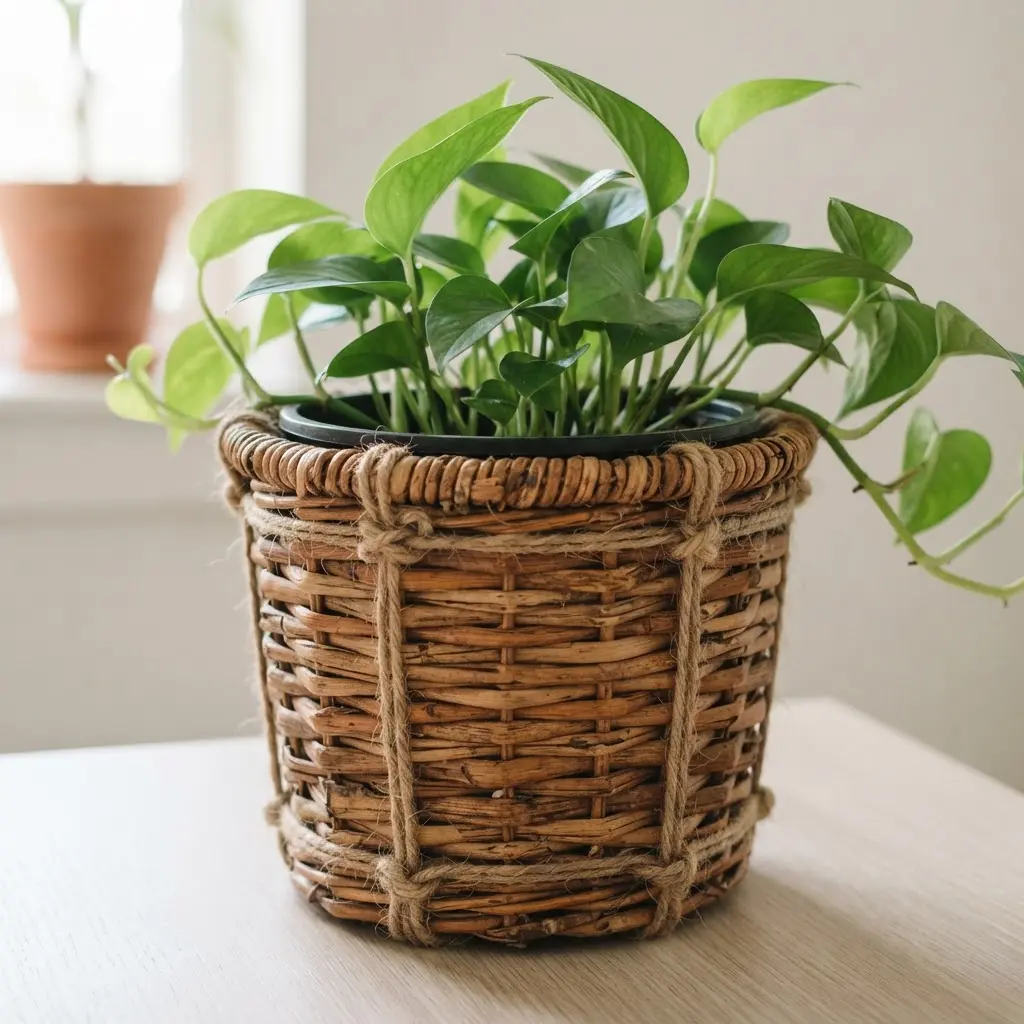
This basket planter brings warmth to a room without looking overworked. Start with a woven basket as the outer container, then arrange natural fibers around its sides while keeping the handmade texture visible. Wrap rustic twine around the basket in a few relaxed bands, tying small knots where the fibers meet. Leave a little unevenness so the piece feels personal and rustic.
Place a trailing plant, dried botanicals, or a seasonal arrangement inside, using greenery with gentle contrast against the soft neutral tones. Sound fussy? It isn’t. I love how the woven texture gives simple foliage more character while still fitting farmhouse, cottage, or bohemian decor. Pro tip: keep the contents slightly loose, so the warm fibers and twine details stay easy to see.
Outdoor Sealers And Seasonal Finish Maintenance
Choose a UV-resistant exterior acrylic sealer for painted terracotta, concrete, and stone kept outdoors, with a finish suited to the intended look. Matte coatings soften glare on textured surfaces, while satin finishes make bright painted details easier to wipe clean. Metal restorations need exterior enamel or a compatible clear coat over rust-free, primed areas, especially around rims and feet. Keep sealer away from drainage openings and avoid coating the inner cavity where roots and wet soil sit. Inspect the finish each spring for chalking, peeling, hairline cracks, or rust spots before those defects spread. Wash gently with mild soap rather than abrasive pads, then refresh worn sections after the pot dries. A thin UV-resistant acrylic sealer supports seasonal upkeep without hiding the surface texture beneath a heavy film. Routine care extends the lifespan of all Flower Pot Restoration Ideas.
Conclusion
So how was your creative session? A tired planter holds more personal value once you choose its colors, repair its flaws, and give it a place among your plants. Look at what you have made. That is real skill right there, especially when the finished pot still supports drainage and suits its setting. Flower Pot Restoration Ideas work best when you let the pot guide the result instead of forcing it into a style that feels unlike you. Before starting your next piece, wash the pot, inspect every crack, and choose an exterior-grade sealer for outdoor use. Give painted surfaces time to dry fully, then add soil and a plant suited to the container size. We have plenty of old pots waiting for a second chance, and I hope one of these ideas has you looking at yours differently. Pick your favorite, set out your supplies, and start your next restoration today.
FAQs
Q: How do I repair a cracked terracotta pot?
A: Brush away loose pieces, clean the crack, and let the pot dry. Apply exterior epoxy or concrete filler, smooth the repair, then seal it after curing.
Q: What paint works best for outdoor flower pots?
A: Exterior acrylic paint suits terracotta, concrete, and wood planters. Add an exterior-grade sealer after the paint dries for better resistance to moisture and sunlight.
Q: Should I seal a restored flower pot?
A: Seal painted or decoupage surfaces before placing the pot outdoors. Keep the drainage hole clear and avoid coating the inside where soil and roots sit.
Q: How do I prepare an old planter before painting?
A: Empty the pot, scrub away soil and residue, and let it dry fully. Sand rough areas, remove dust, and wipe the surface with a suitable degreaser.
Q: Are restored pots safe for edible herbs?
A: Choose lead-free paint and a food-safe finish for surfaces near edible plants. Keep decorative materials outside the soil area and retain open drainage.