

Measuring Head Size For Consistent Frame Fit
The fastest way to guarantee a comfortable fit is to measure the distance from temple to temple over the nose and add one inch for the ear pieces. You want the arms to hook securely behind the ears without pulling the frame too tight, which is a common beginner pitfall. Use a soft measuring tape to get this number, or simply wrap a piece of string around the head and mark it.
Trust me on this, starting a diy paper glasses craft requires a frame that fits perfectly from the start so all the creative decoration shines without constant readjustment. This simple step gives you a reliable template for every pair you make, ensuring the structural integrity of the design stays intact on a wiggly kid.
Selecting Durable Cardstock And Recycled Materials
Your frame needs 65lb weight cardstock or thicker to provide the necessary tension across the bridge of the nose without folding. That specific weight creates a sturdy base that handles playful movement and holds its shape. The good news is you can also upcycle cereal box cardboard, which offers fantastic rigidity and serves as a fun material for kids to personalize.
Gathering the right base for any diy paper glasses craft means layering a sheet of embossed scrapbooking paper over your plain base before cutting your template. This technique adds texture and depth while keeping the frame strong, and it works beautifully with high-contrast materials like metallic markers on a dark background.
1. Make Vibrant Neon Star Burst Frames
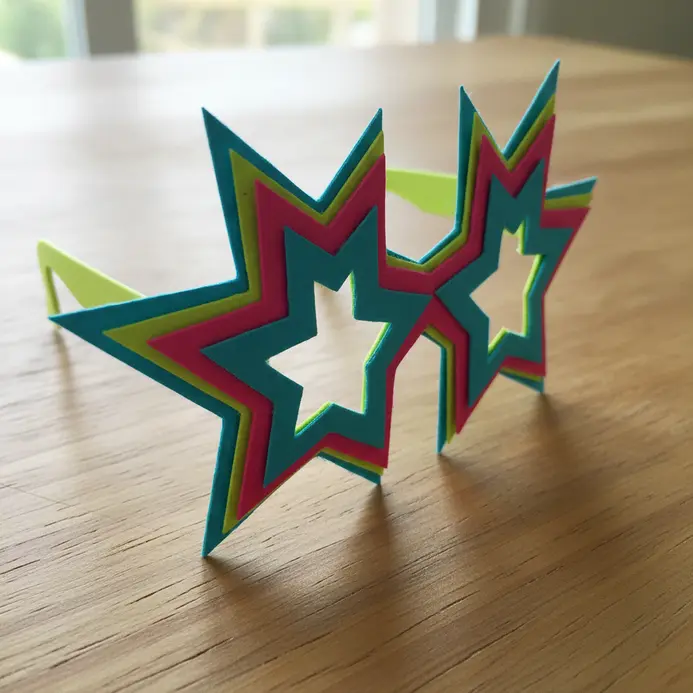
Ever wondered how to make your paper glasses pop with an electric glow? This effect looks complex, but trust me, you can nail it in no time. The secret to this diy paper glasses craft is all about contrast and layering. Start by drawing your star burst rays from a central point onto a dark colored paper background. Then, use your brightest neon markers to color them in, making sure those colors are super saturated.
To get that authentic neon look, add a second, lighter layer of color right at the center of each ray. This creates the inner glow that makes it seem lit from within. Finally, a slightly diffused outer line around each shape in a matching neon hue completes the luminous effect. It is incredibly satisfying to see your flat drawing start to look like a real light source. For more fun ways to light up a project, try these fun crafts to do at home.
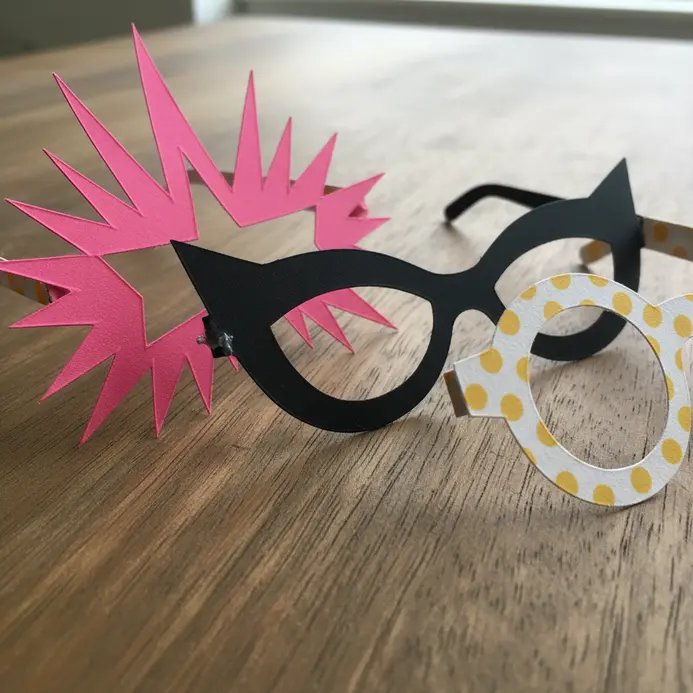
2. Classic Black Cat-Eye Glasses: A Timeless Silhouette
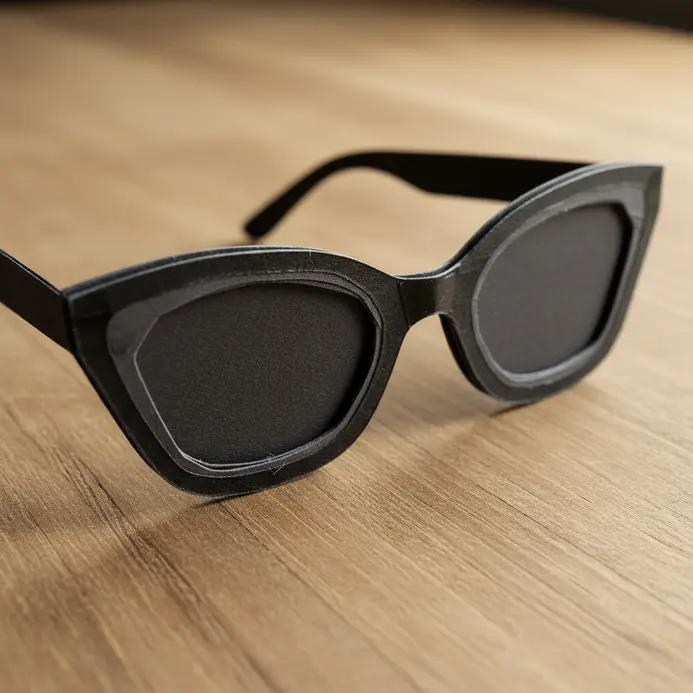
This diy paper glasses craft captures iconic retro glamour through its dramatic upswept corners that lift and define your face. You will trace a reliable template onto black cardstock, then carefully cut out the shape. Pay extra attention to those sharp outer angles.
I love this one because it instantly adds a sophisticated, confident vibe to any look. Use a slightly thicker paper for better structure, and feel that timeless elegance come together.
3. Create Sparkling Glitter Heart Shaped Frames
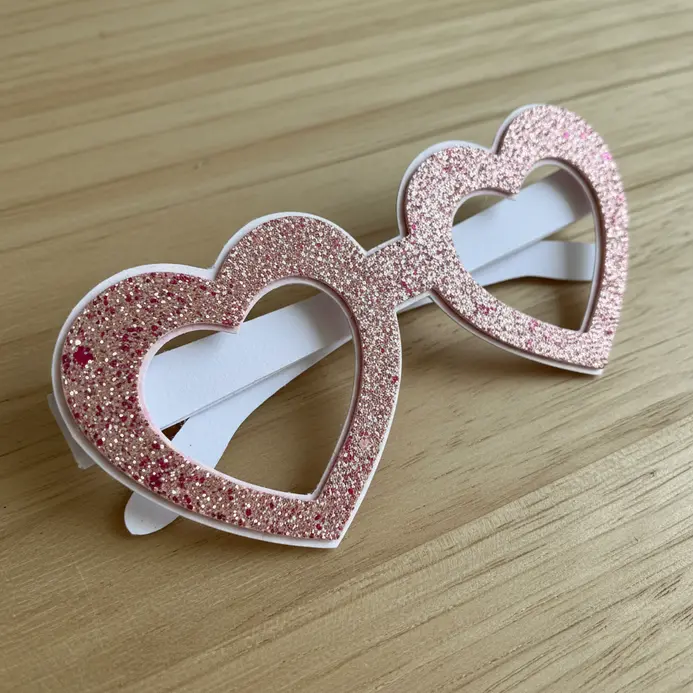
Mastering this diy paper glasses craft means focusing on a simple frame that gains instant charm from layered glitter. Work in small sections, applying a thin layer of Mod Podge with a brush, then immediately pour on your glitter. Tap off the excess and let it dry completely before sealing it with a clear spray to lock in the sparkle. It works because the glitter catches the light from every angle, creating a joyful, personalized piece.
For a fun follow-up project, check out these more kids’ craft ideas.
4. Retro Round Wire Style Glasses: A Vintage Vibe
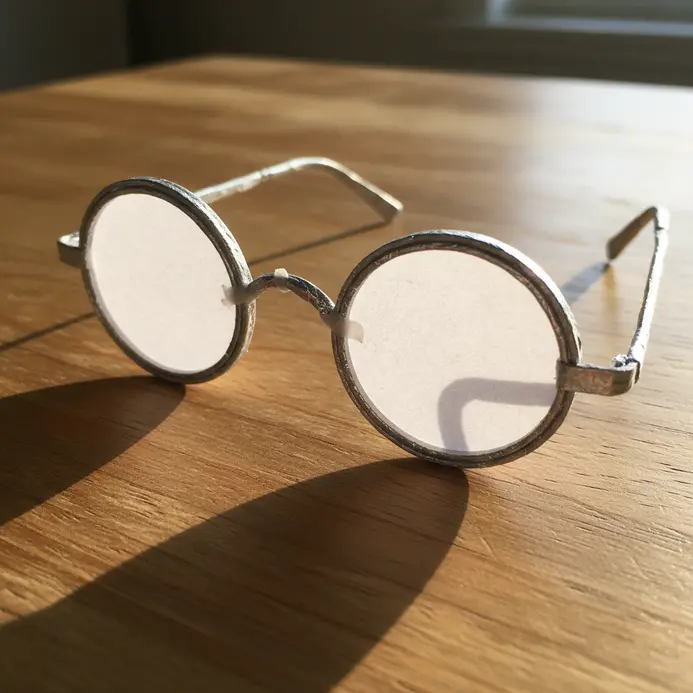
Ever thought round glasses were just for a certain face shape? I love how these retro frames often surprise people with their versatility. The secret behind this diy paper glasses craft is the thin metal wire frame, which creates a delicate, airy look that does not overpower your features. You will shape two perfect circles for the lenses and connect them with a simple bridge.
This style works because its classic, minimalist elegance adds a touch of intellectual charm to any look. It is a fantastic project if you enjoy creating something with a timeless feel. For a fun follow-up activity, you could make some other crafts for children using the same colorful papers. Does that not sound like a satisfying creative day?
5. Build Bold Superhero Mask Style Glasses
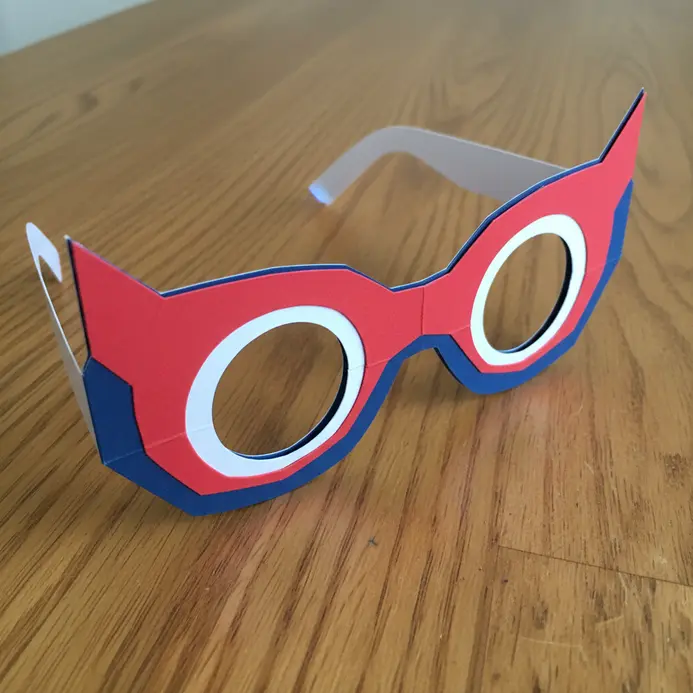
Ever wanted to create a wearable piece of power? This one is all about channeling that iconic superhero energy. Building a diy paper glasses craft starts with a sketch of a bold, single visor or connected lenses, then transferring it to a sturdy material like 5mm EVA foam. Cut the shape, carefully sand the edges for a smooth finish, and add a tinted plastic sheet for the lenses.
Attach them securely with an adjustable elastic band so they stay put during your adventures. The real magic happens with the final details. A few coats of metallic spray paint or some hand-painted details transform your accessory into a signature piece. Feel that creative power surge when you put them on.
6. Craft a Tropical Floral Rimmed Pair

Who would have thought plain rims could become a vibrant accessory? This design transforms a functional item into wearable art with some careful painting. The trick to any diy paper glasses craft is using thin layers of acrylic paint and letting each one dry before adding the next. This prevents clumping and gives you a smooth, professional finish.
Start by cleaning the frames thoroughly with rubbing alcohol for the best adhesion. Then, use your finest brush to paint bright hibiscus flowers or lush monstera leaves. I love how this technique lets you create a completely unique, personalized piece. It is perfect for adding a playful pop of color to your outfit. If you enjoy this kind of creative transformation, you might also like these spooky Halloween crafts for kids.
Trust me, the final step of sealing your design with a clear varnish is crucial. It protects all your hard work and makes the glasses durable for daily wear. Feel proud when you put on your one-of-a-kind creation.
7. Minimalist Pastel Square Frames for Clean Style
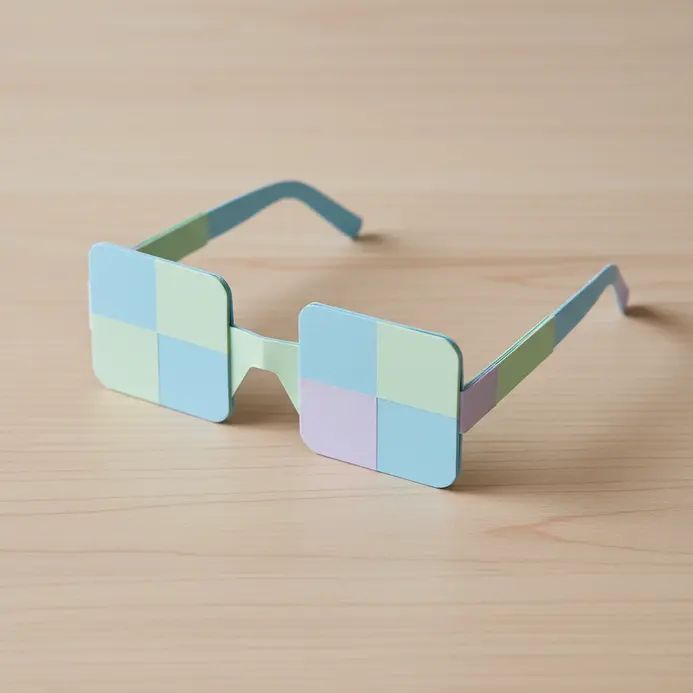
Ever feel like some craft projects are just too busy? This style is the perfect antidote. I love the calm it brings to a room. You will start with a simple square frame shape cut from sturdy cardstock. Choose a soft, muted color like blush pink or mint green for a truly serene look.
Keep the frame profile thin and smooth, with no distracting textures. A matte finish is key for any diy paper glasses craft to achieve that clean, modern feel. Isn’t it nice when your project looks so polished, like these festive Christmas crafts for kids? Trust me, the simplicity is what makes this design so sophisticated. Your finished frames will look effortlessly elegant. Feel that sense of calm order.
8. Assemble Whimsical Butterfly Wing Glasses
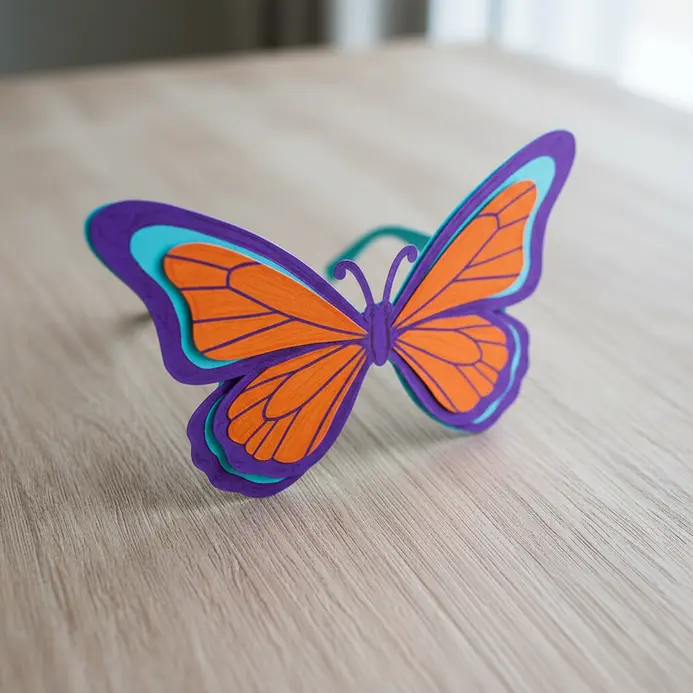
This is the part where every diy paper glasses craft comes together, and it is so satisfying. You have two main paths. The easiest is to use an old pair of novelty glasses. Just clean them well so your wings stick. For a custom fit, you can shape your own frame from craft wire. Bend it to match your face and wrap the joints securely.
Why does this work so well? The wire frame gives you total control over the shape. I love how this method lets you create something that is perfectly you. Attach your butterfly wings to the temples and feel the magic.
9. Make Metallic Foil Finished Robot Goggles
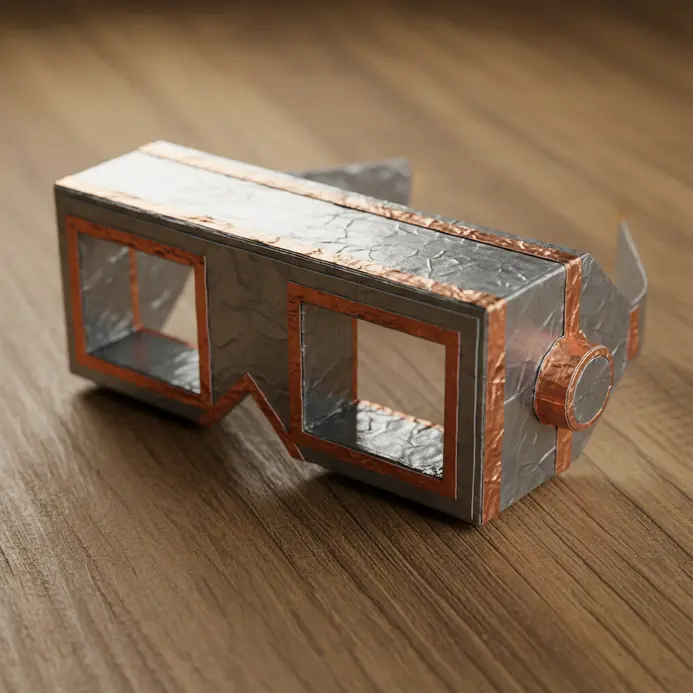
Who knew a few basic supplies could create such a convincingly futuristic accessory? I love the dramatic shift that happens when you apply the metallic craft foil to your cardboard goggle frames. Cut two circles for the lenses and a connecting bridge from your cardboard, then glue them together and attach your plastic ‘lenses’ from a bottle inside. The real magic is smoothing the foil over every surface, pushing out any air bubbles with a cotton swab for that perfect, shiny robotic skin.
Applying foil to a diy paper glasses craft gives an authentic metallic sheen that paint simply cannot replicate, making your goggles look like real found machinery. For a fantastic weathered look, crinkle the foil slightly before you stick it down, then seal it with a coat of Mod Podge. You can find more inspiration for your next family day craft activities to keep the creative fun going.
10. Patterned Polka Dot Frames: Playful and Bright
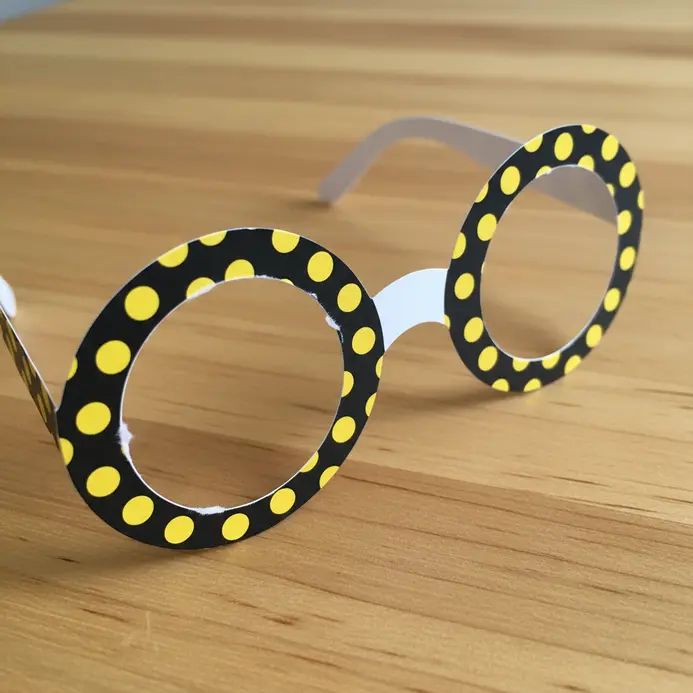
Ever wondered how to make a frame look so cheerful? This one is pure fun. You start by cutting your frame shape from colorful cardstock. Then, grab a paint pen or the back of a brush to add your dots. I love mixing dot sizes for a dynamic, playful look. The pattern creates instant visual interest and feels so optimistic.
For a kid-friendly version of this diy paper glasses craft, try using washable paint and big dotting tools. You will adore the bright, happy result. If you are looking for fun crafts to do at home, this pattern is a great starting point.
11. Layer Colorful Rainbow Striped Glasses
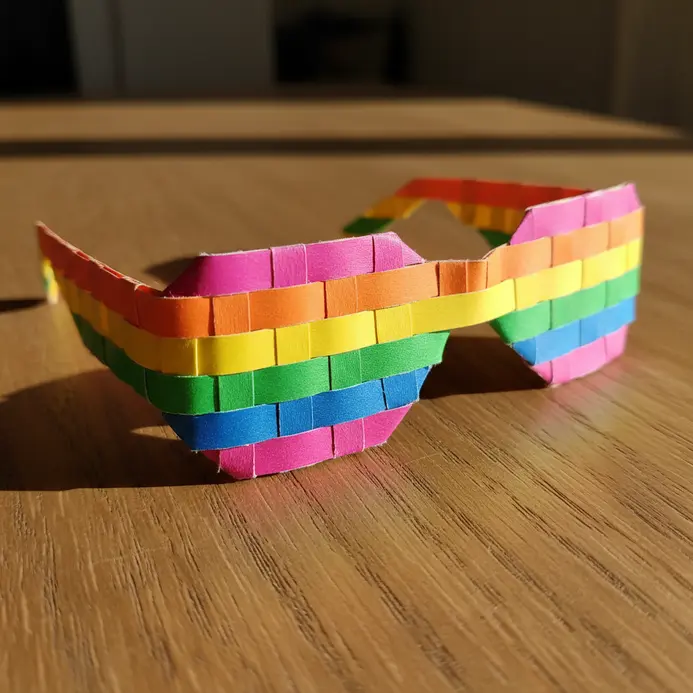
This project looks so complex but is honestly one of the easiest ways to get a stunning result. Start by cutting your basic frame shape from sturdy cardstock. Then, cut long, thin strips of paper in rainbow order and glue them across the front, layering each color edge-to-edge. The key is to press each strip down firmly and let the glue dry completely before moving on.
Mastering this technique for any diy paper glasses craft adds wonderful dimension and a playful feel. The layered stripes create a vibrant, wearable accessory that always brings a smile. Trust me, you will feel so proud putting these on.
12. Gothic Spider Web Glasses: A Spooky Silhouette
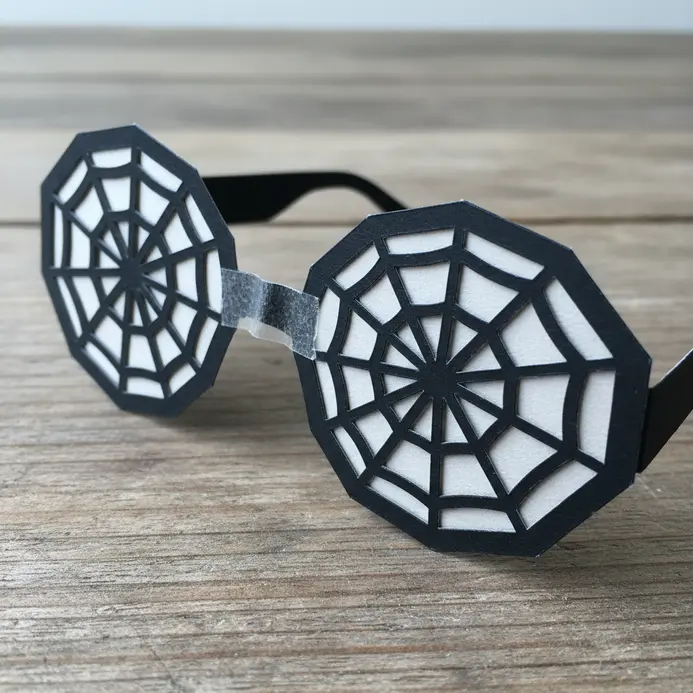
Ever wanted to make a pair of glasses that look like they belong in a haunted manor? Planning this diy paper glasses craft creates a fantastic spooky silhouette that frames your eyes perfectly. You will cut an intricate spider web pattern from black cardstock and attach it to your paper frame. The result is a wonderfully macabre accessory that is surprisingly simple to assemble.
My favorite part is how the web design creates that dramatic outline against your face. Trust me, using a sharp craft knife for those delicate cuts makes all the difference, much like exploring other inventive paper craft ideas. Feel that gothic pride when you put them on!
13. Create an Ocean Theme Sea Creature Pair
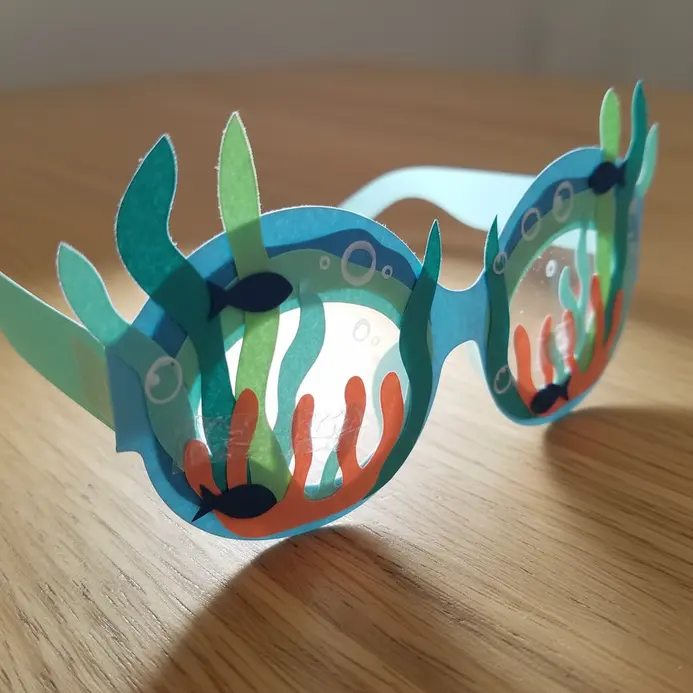
Ever wondered how to make a marine biology lesson feel like a play date? This pair project lets you explore a symbiotic relationship you can wear. I love starting with a classic clownfish and anemone. Cut your main shapes from sturdy orange and purple cardstock, then layer on the white stripes and flowing tentacles with smaller paper pieces. The real magic is in the pairing, showing how these creatures live together. Explore diverse paper art techniques to expand this theme.
Reinforcing the joints of this diy paper glasses craft requires extra glue so your glasses stay on during underwater adventures. Seeing a child’s face light up when they put on their finished creature pair is the best payoff. Does that not feel wonderfully creative?
14. Modern Geometric Hexagon Frames for Sharp Angles
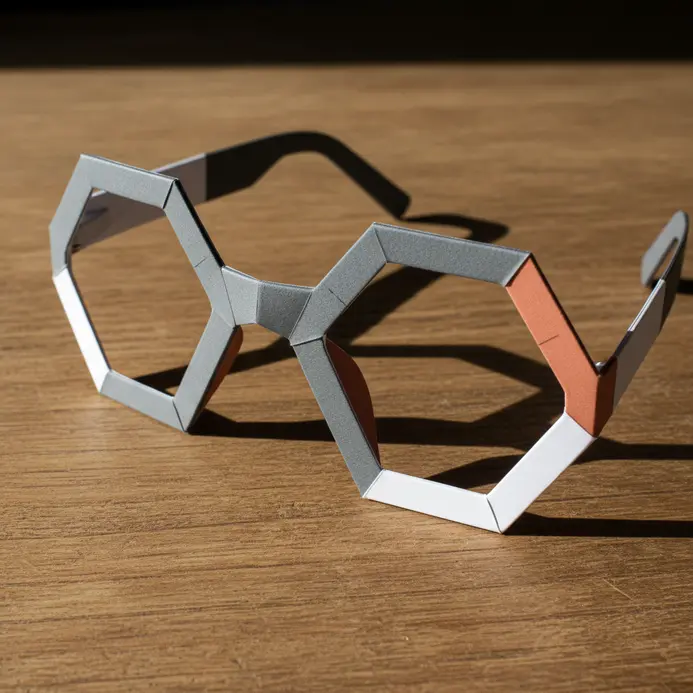
Who would have thought six sides could look so sharp and stylish? I love how this project transforms simple cardstock into a bold, architectural statement. Building any diy paper glasses craft with sharp angles starts by carefully scoring precise fold lines with a ruler and dull knife to get those clean lines. Then, cut out the shape and assemble it, focusing on crisp, symmetrical edges.
It works so well because the geometric form feels modern and intentional, a real step up from basic shapes. Trust me, the satisfaction when your frame holds its perfect shape is unbeatable.
15. Build Festive Birthday Cake Frames

Ever wanted a photo prop that feels like the star of the party? This one is a total blast. Grab a large sheet of corrugated cardboard and sketch out a multi-tiered cake shape with a big opening in the middle for faces. Cut it out carefully with a utility knife. After a base coat of spray paint, the real fun begins with acrylics and puff paint for sprinkles and candles. Isn’t that a delightful way to personalize a celebration?
I love how a hot glue gun makes attaching pom-poms and pipe cleaners so quick and sturdy. This creates a memorable centerpiece everyone will gather around. For more inspiration on further paper art creations, check out that link. Feel the joy of building something uniquely festive.
16. Vintage Oversized Aviator Glasses: A Bold Look
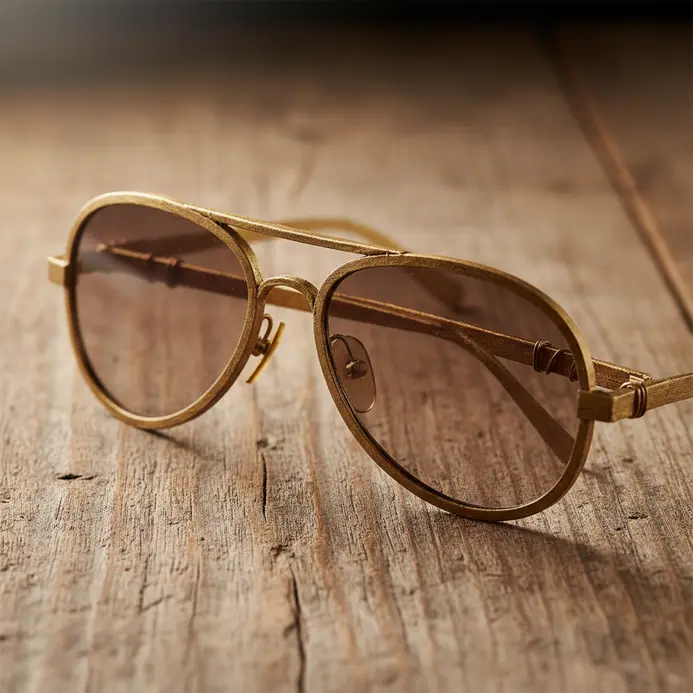
Who would have thought that a style made for pilots could become such a powerful fashion statement? The magic of vintage oversized aviator glasses lies in their specific, dramatic design. You are working with a thin metal frame, typically with a distinctive double bridge, and those large, convex lenses that sweep down your cheekbones. This creates an instantly retro look that draws all the right kind of attention.
I love how these glasses frame the face and add instant confidence. Their bold nature means they work best when you let them be the star, pairing them with simpler outfits. Want to see how other creative types use eyewear for character? Check out these male characters who wear glasses for some playful inspiration. Try this style and feel that boost of cool.
17. Make Fun Creature Eye Glasses
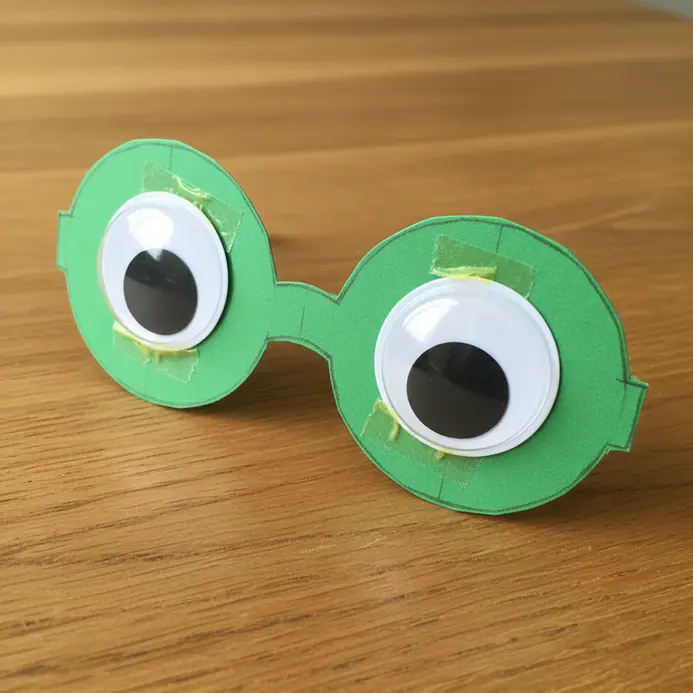
Who would have thought you could turn old sunglasses into a playful costume piece? This is all about transforming a simple frame with cut-out foam or felt shapes to look like a cute monster or animal. Start by sketching your creature’s features, like pointy ears or silly antennae, then cut them from your chosen material. I love using a hot glue gun for this because it gives a strong, quick bond to the frame.
Attach your main pieces first, then add personality with googly eyes and colorful pipe cleaners. The key is keeping your design light so the glasses stay comfortable to wear. Isn’t it fun to see a plain pair become a character? Feel proud when you put on your new creation.
18. Paper Emoji Expression Glasses: Wear Your Mood
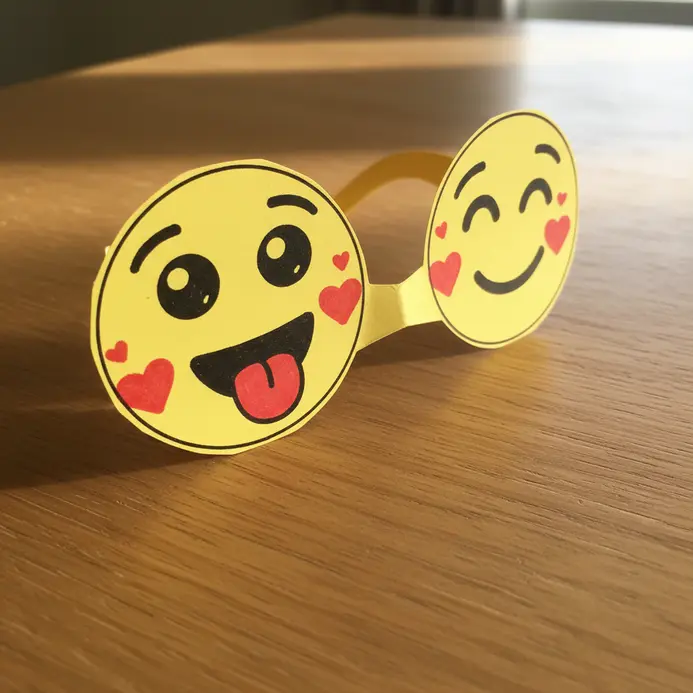
Ever feel like words just can not capture your mood? This craft lets you wear it instead. You will create a classic paper glasses frame, but the real magic is the set of interchangeable emoji lenses. Draw your favorite expressions on yellow circles and attach them with Velcro dots so you can swap from happy to surprised in a second.
I love how this turns feelings into a playful, visual game. The key is making your emoji bases slightly larger than the frame’s eyeholes for easy attachment. Studying the designs of various male characters who wear glasses offers great visual inspiration. Isn’t that a fun way to communicate?
19. Fancy Masquerade Style Glasses: Elegant and Ornate
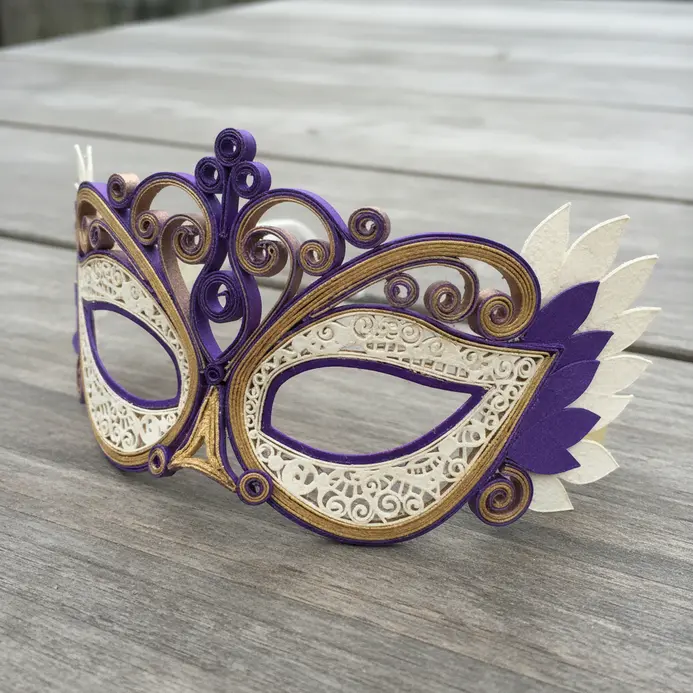
Ever wanted to create an accessory that whispers mystery and drama? These ornate glasses are pure magic for a themed party. Start with a plain paper frame base and give it a rich metallic paint finish. Once dry, the real fun begins with strategic embellishing. I love layering on rhinestones, delicate feathers, and tiny pearls using a strong craft adhesive.
It works because the transformation is so complete, turning simple materials into a statement piece. For a perfect finishing touch, consider exploring creative female characters who wear glasses for design inspiration. Feel the elegance come together.
20. Comic Book Pop Art Glasses: Bold and Graphic
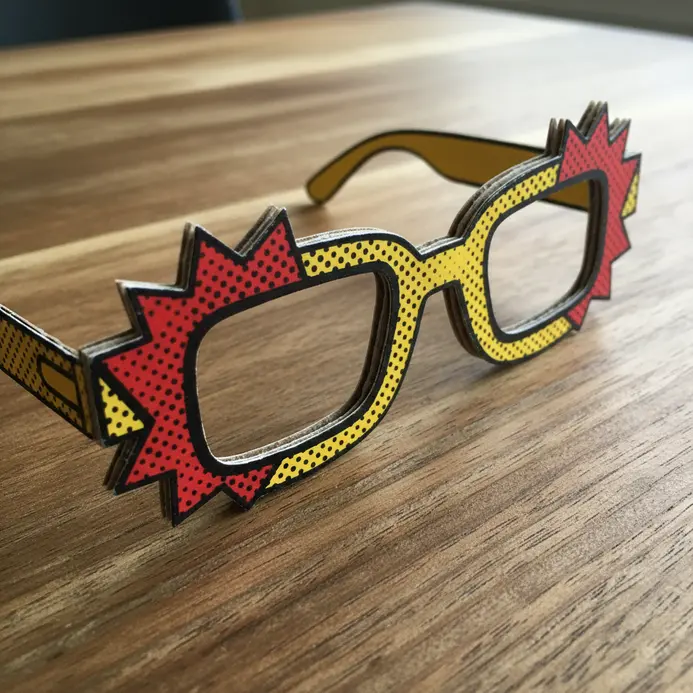
Ever wanted your glasses to shout ‘POW!’ instead of just sitting there? This style is all about turning a simple accessory into a piece of wearable pop art. I love how it uses thick, dark outlines and saturated colors to mimic classic comic book panels. The key is that high-contrast look, which makes your creation pop right off your face. It is a playful, expressive statement that feels nostalgic and fresh all at once.
Choosing vibrant acetate sheets in primary colors helps capture that graphic feel immediately. Cut your frame shapes with sharp, geometric angles to match the comic aesthetic. You can even add tiny Ben-Day dots for that authentic Roy Lichtenstein texture. Trust me, keeping the rest of your outfit simple lets these bold glasses be the undeniable star. Feel the fun when you put them on.
Reinforcing Frame Joints For Extended Imaginative Play
A tiny reinforcement tab on the inner side of the frame is your secret weapon for keeping the arms attached. This is the primary tension point, so you apply your strong adhesive here, sandwiching the ear piece between the tab and the main frame. Let this joint dry completely flat under a book before anyone tries the glasses on. A solid bond at this spot means the glasses survive being put on and taken off repeatedly during imaginative play. You will notice this extra step makes the whole pair feel more professional and durable, ready for whatever adventure comes next.
Conclusion
The best part of any diy paper glasses craft is watching a simple idea become a source of so much joy. It is a reminder that creativity does not need to be complicated to be meaningful. My advice is to keep a stack of colorful cardstock ready; when you need a quick activity, pick a template and let the decorating begin. The goal is not perfection, but that wonderful moment of play. I hope this list gives you a great starting point for your next creative session.
FAQs
Q: What is the best paper to use for sturdy glasses?
A: Use 65lb cardstock for the best balance of durability and ease of cutting. It holds its shape well for the arms and bridge. Construction paper works for quicker, lighter versions.
Q: How do I stop the arms from falling off?
A: Ensure the arms are cut as a single continuous piece with the front frame for strength. You can also reinforce the hinge point where the arm bends with a small piece of clear tape on the inside.
Q: Can I make these glasses fit different head sizes?
A: Yes. Before cutting your final design, test the template by holding the paper around the head. Lengthen or shorten the arms on the paper template to get a comfortable fit.
Q: What is the trickiest part to cut out?
A: The bridge between the two lenses requires the most precision. Use sharp scissors and cut slowly. A precise bridge ensures the glasses sit symmetrically on the face.
Q: Are these safe for very young children?
A: These are intended as dress-up props, not for actual vision correction. Always supervise young children. For toddlers, consider making the frames without the side arms to avoid any poking.


