


Fundamental Design Principles for Functional Paperweight Art
Before you dive into pouring resin or painting stones, let’s talk about what separates a good paperweight from a great one. The best diy paper weight art pieces master three core principles: stability, balance, and visual interest. A successful paperweight needs a low center of gravity and a solid, flat base to prevent tipping, which is why materials like concrete, thick glass, and heavy river rocks are so popular. Visually, consider the rule of thirds for placing focal points and ensure your design is captivating from all angles, not only the top. This foundational thinking elevates your work from a simple decorated object to a functional art piece.
1. Encapsulated Botanical Resin Paperweight Craft

Picture a perfect, preserved flower or leaf frozen in a gleaming, glass-like block on your desk. That’s the magic of an encapsulated botanical resin paperweight. We take a fully dried botanical, like a pressed fern or a sprig of lavender, and suspend it inside clear resin poured into a silicone mold. The result is a gorgeous, durable object that feels like a tiny piece of captured nature. People adore these because they turn a simple desk accessory into a personalized, artistic conversation piece full of natural beauty and a touch of luxury with the use of scrapbook paper. Let’s get into the fun part: making one. The key is in the preparation, and diy paper weight art pieces like this look best when botanicals are completely dry and sealed so they do not discolor the resin. I like to use a two-part epoxy resin for its clarity and ease of use. After mixing the resin slowly to minimize bubbles, you pour a base layer, arrange your design, and then carefully add the rest. A small, practical tip: use a heat gun or torch lightly over the surface after pouring to pop any pesky air bubbles for a crystal-clear finish.
2. Geometric Concrete Modern Paperweight Styles

Have you ever wanted a desk accessory that doubles as modern art? Geometric concrete paperweights deliver that with their fusion of raw material and clean lines. We adore how the heavy, tactile concrete is molded into precise shapes like cubes or sliced spheres, creating a brutalist minimalist aesthetic. This style works because it transforms a simple diy paper weight art pieces concept into a sculptural anchor for your desk. For a personalized touch, experiment with polished finishes or add integral pigments to match your decor. Incorporate negative space designs, like a cube with a hole, to play with light and shadow. It’s all about that satisfying heft and visual order, which can be enhanced with a heavy piece of glass.
3. Pressed Flower and Fern Resin Paperweight Ideas

Picture this: a tiny, perfect slice of spring or a magical forest floor, forever preserved on your desk. That’s the enchanting magic of pressed flower and fern resin paperweights. We’re not only making a heavy object for your papers; we’re creating a personal, miniature world. You can center a single, elegant fern frond for a scientific look or build a layered scene with moss and tiny petals to capture an enchanted forest vibe. These diy paper weight art pieces stay captivating because they let you hold onto fleeting natural beauty in a form that sparks conversation every single day. My top tip: use a clear domed mold to get that gorgeous magnifying effect on your botanical details.
4. Ocean and Beach Scene Paperweight Craft

Who doesn’t love having a little piece of the beach on their desk? We’re creating a gorgeous little world under glass with diy paper weight art pieces that layer colored resin for the ocean, add a sandy beach, and tuck in tiny shells or a starfish. This project captures a perfect moment and makes a truly personal gift. You’ll need a dome-shaped silicone mold, clear casting resin, and some alcohol inks in blues and greens. For the beach, mix fine sand right into your first resin layer or use crushed cookie crumbs for a creative texture. The magic happens with multiple pours, letting each layer set a bit before adding the next to keep your shells suspended. Here’s a fun tip: use a toothpick to swirl a tiny bit of white mica powder into your top ocean layer, and seal it with a layer of mod podge to keep the design intact. It creates realistic sea foam and wave effects. If you enjoy working with resin, you might get inspired by other clear-medium projects like these stunning glass painting designs.
5. Millefiori-Inspired Polymer Clay Paperweight Styles
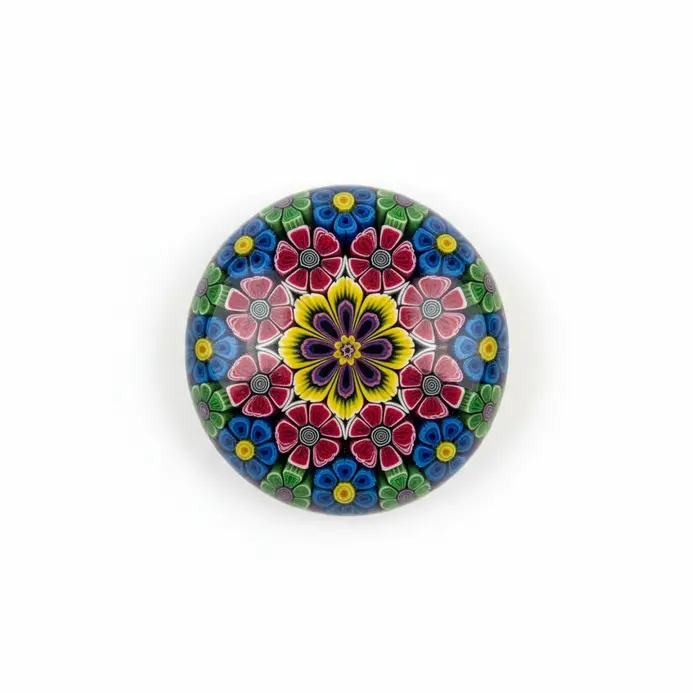
Have you ever wanted a desk accessory that’s both functional and a conversation starter? Millefiori-inspired polymer clay paperweights are exactly that. We take the thousand flowers technique from Italian glassmaking and adapt it to clay. You’ll build colorful canes, logs of clay with a design running through, then slice them to reveal intricate patterns. These slices become the decorative top of your paperweight. This approach is popular because diy paper weight art pieces in polymer clay let you create precise, repeatable art that feels handmade and special. My favorite trick is using a pasta machine to condition your clay evenly for flawless patterns.
6. Alcohol Ink Marbled Abstract Paperweight Examples

Are you ready to see how these glass dome blanks transform into tiny, frozen galaxies? This is a favorite style of diy paper weight art pieces because the results look stunning and different every single time. We drop vibrant alcohol inks onto a slick surface, use a little isopropyl alcohol to make them bloom and marble, and then seal that wild, abstract design under glass forever. People adore this project because it’s less about precise control and more about joyful experimentation. You get to play with bold color palettes and watch the inks create their own beautiful patterns. The magic happens when you tilt the tile or gently blow on the inks with a straw, creating nebula-like wisps or soft, oceanic blends. My best tip is to start with a dark base color for galactic styles. A navy or black background makes those metallic pops and bright accent colors stand out with contrast.
7. Wire-Wrapped Natural Stone Paperweight Craft

Imagine a beautiful, one-of-a-kind paperweight for your workspace with a natural touch. We’re wrapping a special stone with wire to create a secure and artistic hold. First, select a flat-bottomed stone, agate slices or river rocks work well, then cut some 18-gauge copper wire for the structure. Use chain-nose pliers to twist the wires into a sunburst base and gently bend them around the stone. Secure everything with tight figure-8 wraps for a durable finish. This project is a hit because DIY paperweight art pieces in natural stone feel personalized, useful, and eye-catching, especially when you add a layer of mod podge for a professional finish. For a polished finish, add felt pads to the bottom to protect your surfaces.
8. Decoupage Vintage Map Paperweight Examples

Picture a gorgeous, glossy paperweight holding a piece of your travel history right on your desk. Decoupage vintage map paperweights are a fun way to turn old maps into durable, personalized decor. We take a meaningful map fragment and seal it under layers of a decoupage medium like Mod Podge onto a heavy base. The result is a tactile, storytelling object with a beautiful protective finish. The Classic Globe-Trotter uses a clear glass cube with a single city map suspended inside, while the Collaged Journey layers pieces from different locations onto a wooden block, tracing your personal story. This style works well because it transforms fragile, sentimental paper into diy paper weight art pieces with lasting presence. Here’s a quick tip: start with a simple smooth river stone as your base. It’s an easy, forgiving surface for your first attempt. Grab a topographic map of your local area for a thematic match and seal it with a matte varnish to keep that organic feel against the human-made cartography.
9. Layered Dimensional Resin Paperweight Styles

Have you ever seen a paperweight with stunning depth that looks like a tiny 3D scene? That’s what layered dimensional resin styles achieve. This technique involves sequential pouring, letting each layer partially cure before adding the next. You strategically place elements like flowers, shells, or glitter at different heights to build a 3D effect. Popular themes include botanical gardens, ocean scenes, and cosmic galaxies, each relying on careful placement. We love these diy paper weight art pieces because the convex final layer magnifies everything and creates an illusion of space. For galaxy effects, use alcohol inks and let each color layer set slightly to prevent muddiness.
10. Geode and Crystal Effect Paperweight Craft

Get ready to make something that looks like you cracked open a tiny, magical rock, complete with a layer of mod podge that adds a unique shine. This geode paperweight is a stunning little piece of desk decor that gives you all the sparkle of a crystal shop without the price tag, especially when you add a layer of mod podge for a glossy finish. We’re using resin to create those gorgeous, colorful formations inside a textured rock-like base, and we can add a layer of mod podge to the back for extra durability. First, you need a solid base. Use a smooth river rock for an authentic feel, or grab a wood slice and seal it with varnish, then finish it with a layer of mod podge for a polished look. When diy paper weight art pieces use mica powder pigments in clear casting epoxy resin, the layers blend from dark to light and mimic real crystal growth. A heat gun helps pop bubbles, and once the center cures, attach it to the base and paint the exterior with texture paste and acrylics. A quick tip: line your mold with aluminum foil tape before pouring the resin to create a reflective backing that makes your crystals glow.
11. Memory and Keepsake Encasement Paperweight Ideas

Let’s transform your most fragile, precious memories into a solid, beautiful object you can hold every single day. We’re talking about encasing tiny treasures in clear resin or glass to create a permanent, touchable paperweight. This turns a fleeting moment into a desktop heirloom, giving your memories literal weight and presence on your desk or shelf. Think about sand from your favorite beach, a pressed flower from a wedding bouquet, or even a snippet of a baby’s first outfit. You can layer these items to tell a story or let one perfect object float serenely in the center. Diy paper weight art pieces in this style feel deeply personal and spark joy every time you see them. Always laminate paper items like handwritten notes or photos before sealing them in resin to prevent blurring over time.
12. Terrarium and Miniature Garden Paperweight Examples

Have you ever wanted a pocket-sized paradise that never fades? Terrarium and miniature garden paperweights are enchanting, self-contained decorative objects that blend artistry with everyday function. They range from simple geometric domes magnifying a perfect plant to intricate sealed globes with their own miniature ecosystems. Think desertscapes with tiny cacti or fairy gardens with wee cottages. These diy paper weight art pieces bring a personal touch of nature and fantasy to any desk, and people love them for their charm and minimal upkeep. Layer different materials like sand, stones, and preserved moss in a clear glass cube for a stunning scene that looks professionally made.
13. Glass Fusion Dichroic Paperweight Styles

Are you ready for some magic that feels straight out of a sci-fi movie? Let’s talk about dichroic glass fusion styles. This is where we take those incredible color-shifting glass sheets and fuse them into solid, gorgeous DIY paperweight art pieces, making crafts for adults truly enjoyable. The core idea is stacking and firing layers in a kiln to create permanent, jewel-like objects. You get to choose a visual style, from sharp geometric patterns to wild, organic flows, each locked in glass forever. People love these because the dichroic effect shifts with the light and turns a simple functional object into a dynamic sculpture. My top tip for starting out is to begin with a simple strip-stacking design. Cut a few parallel strips of dichroic and clear glass, layer them, and fire for a manageable first project with a modern result.
14. Mosaic Tile and Ceramic Paperweight Craft
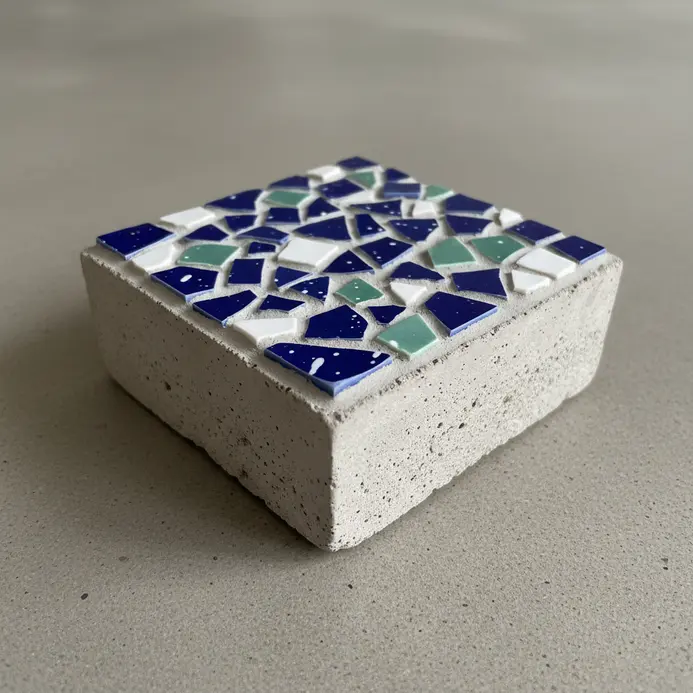
Let’s transform a simple, heavy base into a personalized desk accessory with a mosaic of colorful tiles. We’re talking about creating a gorgeous diy paper weight art pieces design that holds your papers and your memories. You’ll start with a ceramic bisque or a smooth stone, then adhere broken tiles, glass, or even sea glass in your favorite pattern. The magic happens when you press the grout into all the gaps, wipe it clean, and reveal your sparkling design. This works well because the process feels tactile and the finished product feels both artistic and substantial. Grab your safety glasses and tile nippers first, and if you want a variation, try using shards from a vintage plate for a broken china look.
15. Seasonal and Holiday Theme Paperweight Ideas

Have you ever wanted a little piece of holiday magic right on your desk? Seasonal diy paper weight art pieces are perfect for that. You can encase pressed cherry blossoms in resin for spring or layer sand and shells for a summer vibe. Consider a frosted pine branch for winter or a pumpkin-shaped stone for autumn, each one telling a story, and finish it off with a layer of mod podge for a cohesive look. The beauty is in how these weights personalize your space with memories and color. Start with a clear dome and add miniature elements like a tiny umbrella for a rainy day theme if you want something whimsical and easy.
16. Abstract Color Field Resin Paperweight Examples

Who says your desk needs to be boring? Let’s bring some gallery vibes to your workspace with these abstract resin paperweights. We’re talking about capturing the big, beautiful color fields of artists inside a glossy, durable resin dome. You get the emotional pull of minimalist art in a three-dimensional object you can touch and turn in the light. It’s a fantastic way to make diy paper weight art pieces that feel like tiny, personal sculptures. Try pouring layers of color for a serene gradient or using sharp lines for a bold geometric piece, then move pigments gently with a heat gun for soft blends, and don’t forget to brush on a layer of mod podge for a finished touch.
17. Found Object and Assemblage Paperweight Styles

Have you ever held onto a tiny seashell or a beautiful rusty gear and wished you could keep it forever? That’s the magic of found object and assemblage diy paper weight art pieces. We’re turning everyday treasures into tiny, preserved worlds under glass or resin. A found object paperweight spotlights one amazing thing, like a fossil or vintage key, while an assemblage combines multiple objects like watch parts, sea glass, and old buttons to build a miniature scene. This style works well because it lets you create art that’s deeply personal and full of memory and meaning. Raid your junk drawer or head out on a nature walk, and your first piece might be waiting there.
18. Metallic Leaf and Gilded Paperweight Craft

Have you ever wanted to add a touch of luxury to your workspace with a heavy piece of glass that doubles as a stunning paperweight? Let’s look at how to create these gorgeous diy paper weight art pieces. This project involves applying delicate metal leaf to a blank, like a glass cabochon or smooth stone, using a special adhesive called size. You can choose composition leaf for affordability or genuine gold for an heirloom piece. The adhesive needs to be tacky, not wet or fully dry, so timing matters. Start with a dark base coat, like black or navy, to make any gaps in the leaf look intentional and add depth.
19. Minimalist Monochrome Paperweight Ideas

Let’s talk about the ultimate desk upgrade for anyone who craves a little quiet sophistication. We’re moving beyond clutter and color to focus on pure, intentional form. Minimalist monochrome paperweight ideas are all about clean shapes in black, white, and gray, where the material’s natural texture becomes the decoration. This style grounds your space without shouting for attention, creating a calm focal point that feels modern and timeless. Diy paper weight art pieces in this style work best when you focus on one incredible material, such as black and white agate, basalt, or driftwood with a perfect shape. A generous coat of clear sealant is often enough to protect and highlight its natural beauty.
20. Textured and Tactile Surface Paperweight Examples

Have you ever caught yourself absentmindedly running your fingers over a cool, smooth stone on your desk? That’s the appeal of textured paperweights. These aren’t only functional items; they’re made to engage your sense of touch. We see striking examples in glass, like feather paperweights with raised threads you can trace, or in stone, with polished jasper slices that contrast smooth tops with gritty sides, making them great for crafts for adults. They work because they transform a mundane object into a source of sensory pleasure. For your own diy paper weight art pieces, try pressing leaves or lace into clay before baking to imprint a texture, then seal it for durability.
21. Combination Technique Mixed Media Paperweight Styles

Ever wondered how to make a diy paper weight art piece that truly stands out? Combination techniques do that by mixing materials like clear resin with pressed botanicals or faceted glass with copper wire. It’s all about building up textures and colors for a rich, tactile experience. We love this style because it turns a simple object into a personalized showcase of creativity. Diy paper weight art pieces in mixed media invite you to experiment with layers, mica powders, and tiny charms for a personal touch. Try sealing delicate items like feathers with a clear coat before embedding them to prevent discoloration over time.
Troubleshooting Common Resin Paperweight Defects and Imperfections
Even with careful planning, issues like sticky surfaces, bubbles, or cloudiness can emerge. If your resin hasn’t cured properly, it’s often due to incorrect mixing ratios or a cool, humid environment, so measure precisely and work in a warm, dry space. To combat bubbles, gently warm your mixed resin with a heat gun or torch before pouring. For a cloudy finish, sand the surface with progressively finer grits up to 3000 and then polish with a resin-specific compound. Treat these as lessons in mastering the material on your way to cleaner diy paper weight art pieces.
Advanced Surface Finishing Techniques for Professional Quality
The final finish is what makes your homemade paperweight look store-bought or gallery-worthy. For resin pieces, wet-sand any imperfections starting with 400-grit sandpaper and moving up to a high-grit buffing pad. A final coat of high-gloss spray sealant adds depth and protection. For concrete or plaster, consider burnishing the surface with a smooth stone while it’s still slightly damp to create a polished look, or apply a thin layer of matte varnish to enhance texture. Adhering a piece of felt to the base protects surfaces and adds a silent, professional touch that completes diy paper weight art pieces with a polished finish.
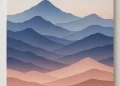
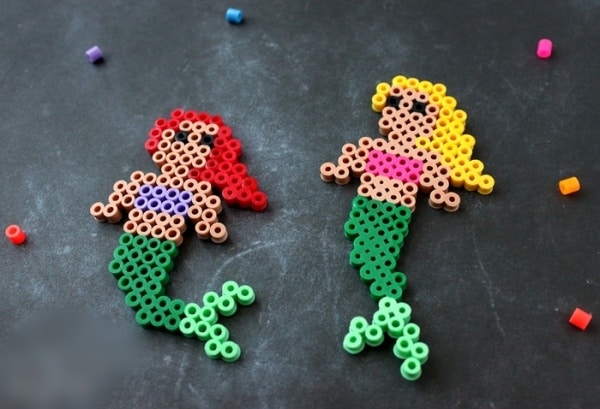
More DIY Paper Weight Art Pieces Gallery for Inspiration


Conclusion
We told you the world of desk art was more than painted rocks, and these styles prove it. From the serene beauty of encapsulated botanicals to the bold statement of mixed media, there’s a project here for every skill level and aesthetic. These diy paper weight art pieces show that functional items belong in the same conversation as decorative art. Pick your favorite, gather your supplies, and start creating your own diy paper weight art pieces for a workspace upgrade or a thoughtful gift.
FAQs
Q: Can I make a paperweight that is round or in different shapes?
A: Yes — you can make a paperweight in a round form or choose different shapes like square, oval, or heart using molds or DIY forms. Silicone molds sold on Amazon or repurposed household items work well; for custom shapes, create a sturdy cardboard or clay mold and press your mixture in, then allow it to harden and dry completely before removing.
Q: Is this an easy to make craft project for beginners?
A: Absolutely — many DIY paper weight art pieces are designed as an easy to make, perfect project for beginners. With a basic glue-and-filler mixture, a few decorative elements like beads or jewelry charms, and about 10 minutes of hands-on setup (not including drying time), you can assemble a playful design that will dry completely into a firm paperweight.
Q: What supplies can I get at the dollar store to make a paperweight?
A: You can find many useful items at the dollar store for craft projects: clear ornaments or small bowls for molds, decorative beads, faux gems, glitter, and basic glue. If you need specialty resins or silicone molds, check Amazon for a larger selection, but dollar store finds let you customize affordably.
Q: How do I use glue and beads safely so decorations stay firmly in place?
A: Use a strong adhesive recommended for your chosen base (epoxy or clear-drying craft glue) and press beads or jewelry pieces gently into the mixture while it is still tacky. Squeeze out excess glue and wipe away spills quickly; allow the piece to dry completely and harden according to product instructions so embellishments remain firmly attached.
Q: How do I avoid excess materials and ensure the mixture sets evenly?
A: Measure components carefully, especially for two-part epoxy mixtures — follow the manufacturer’s ratio to prevent a tacky finish. Pour a generous amount into the mold but avoid overfilling; tap or lightly flip the mold to release air bubbles and let the piece sit undisturbed to harden. If you notice excess around the edge, trim or sand it after it cures.


